


非必须,但如果配置了需补充相应的依赖,否则会出错
#type: redis
redis:
过期时间5秒,默认单位:毫秒,等同于设置成 5s、5S
time-to-live: 5000
key-prefix: cn.mariojd.cache.
cache-null-values: false
- 添加实体,实现 Serializable 接口
@Data
@Entity
@Builder
@NoArgsConstructor
@AllArgsConstructor
public class User implements Serializable {
@Id
@GeneratedValue(strategy = GenerationType.IDENTITY)
private Integer id;
private String name;
}
定义 Repository 接口:
public interface UserRepository extends JpaRepository<User, Integer> {
}
- 编写 Service,进行缓存规则配置,核心注解有:@CacheConfig、@Cacheable(缓存新增)、@CachePut(缓存更新)、@CacheEvict(缓存删除)
@Slf4j
@Service
@CacheConfig(cacheNames = “user”)
public class UserService {
@Resource
private UserRepository userRepository;
/**
* Key name: key-prefix.classSimpleName.methodName?pn=xxx&ps=xxx&sort=xxx
*/
@Cacheable(key = “#root.targetClass.simpleName+‘.’+#root.methodName+‘?pn=’+#pageable.pageNumber+‘&ps=’+#pageable.pageSize+‘&sort=’+#pageable.sort.toString()”)
public Page page(Pageable pageable) {
return userRepository.findAll(pageable);
}
@Cacheable(key = “‘user.’+#userId”, unless = “#result == null”)
public Optional get(int userId) {
return userRepository.findById(userId);
}
@Transactional
public User add(String name) {
User user = User.builder().name(name).build();
return userRepository.save(user);
}
@CachePut(key = “‘user.’+#userId”, unless = “#result == null”)
@Transactional
public Optional update(int userId, String name) {
Optional userOptional = userRepository.findById(userId);
userOptional.ifPresent(user -> {
user.setName(name);
userRepository.save(user);
});
return userOptional;
}
@CacheEvict(key = “‘user.’+#userId”)
@Transactional
public void delete(int userId) {
userRepository.findById(userId).ifPresent(user -> userRepository.delete(user));
}
}
- 缓存测试,为启动类添加:@EnableCaching
@Slf4j
@EnableCaching
@SpringBootApplication
public class SpringBootCacheApplication implements ApplicationRunner {
public static void main(String[] args) {
new SpringApplicationBuilder()
.sources(SpringBootCacheApplication.class)
.bannerMode(Banner.Mode.OFF)
.web(WebApplicationType.NONE)
.run(args);
log.info(“\n”);
}
@Resource
private UserRepository userRepository;
@PostConstruct
public void init() {
// 初始化数据
for (int i = 0; i < 10; i++) {
User user = User.builder().name(“ZS” + i).build();
userRepository.save(user);
}
}
@Resource
private UserService userService;
@Resource
private Environment environment;
@Override
public void run(ApplicationArguments args) throws InterruptedException {
// 测试缓存,观察是否有SQL输出
PageRequest pageable = PageRequest.of(0, 5);
userService.page(pageable);
for (int i = 0; i < 5; i++) {
userService.page(pageable);
log.info(“Reading page cache…”);
}
// 由于配置是5秒中后缓存失效,这里休眠后重新读取
TimeUnit.MILLISECONDS.sleep(Integer.parseInt(environment.getProperty(“spring.cache.redis.time-to-live”, “5000”)));
log.warn("Page Cache expired : " + userService.page(pageable).getT
otalElements());
log.info(“\n”);
// Test CRUD Cache
User user = userService.add(“李四”);
int userId = user.getId();
userService.get(userId);
log.info(“Reading user cache…” + userService.get(userId));
userService.update(userId, “王五”);
log.info(“Reading new user cache…” + userService.get(userId));
userService.delete(userId);
log.warn("User Cache delete : " + userService.get(userId));
}
}
从图中的红框部分输出可以看到,这些查询走了缓存,如果需要在 redis 中查看缓存内容,可以将配置中的 TTL 时间调大:
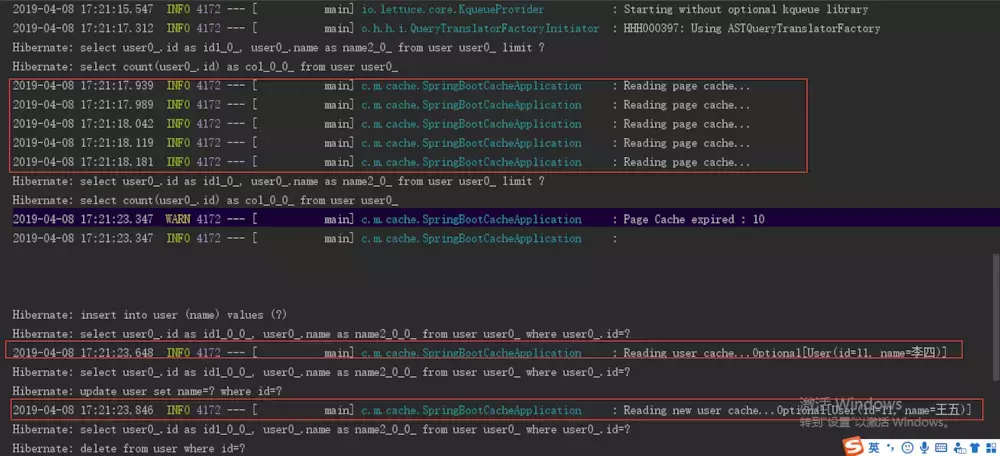
测试输出
扩展操作
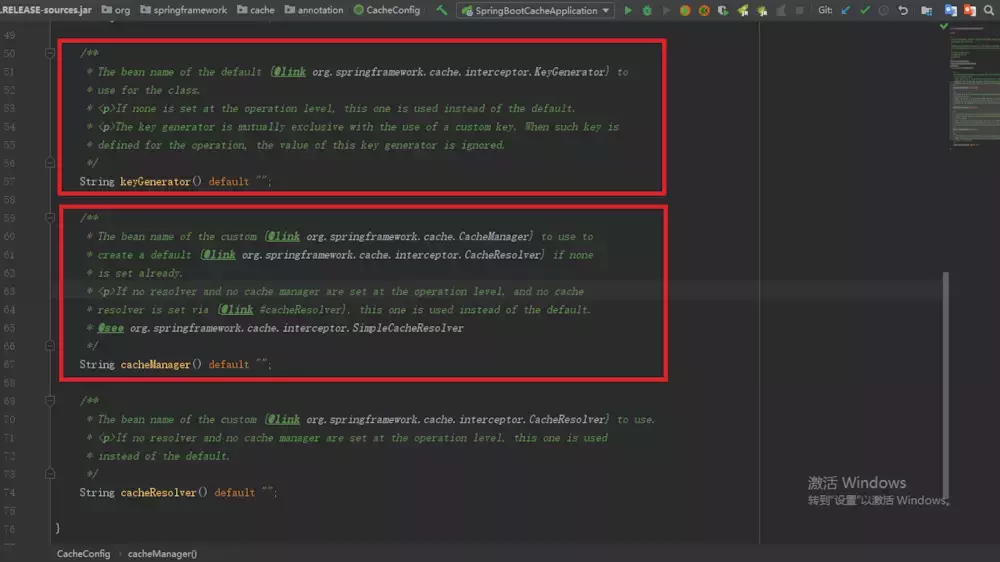
Spring 允许开发者们通过自定义 KeyGenerator 来覆盖繁琐的 Key 定义(非必须),同时也允许我们配置自定义的 CacheManager,下面来看看如何编写 KeyGenerator:
@CacheConfig
@Slf4j
public class CustomKeyGenerator implements KeyGenerator {
@Override
public Object generate(Object target, Method method, Object… params) {
// 类名.方法名.参数值
String keySuffix = target.getClass().getSimpleName() + “.” + method.getName() + “.” + Arrays.toString(params);
log.info(“Cache key suffix : {}”, keySuffix);
return keySuffix;
}
}
接着配置注册为 Bean:
@Configuration
public class CustomConfig {
@Bean
public CustomKeyGenerator customKeyGenerator() {
return new CustomKeyGenerator();
}
}
编写 Service 用于测试,具体的测试代码这里就不再贴出来了,有兴趣的可以自行尝试。
@Slf4j
@Service
@CacheConfig(cacheNames = “user”)
public class UserSupportService {
@Resource


 703
703

 被折叠的 条评论
为什么被折叠?
被折叠的 条评论
为什么被折叠?
 到【灌水乐园】发言


