


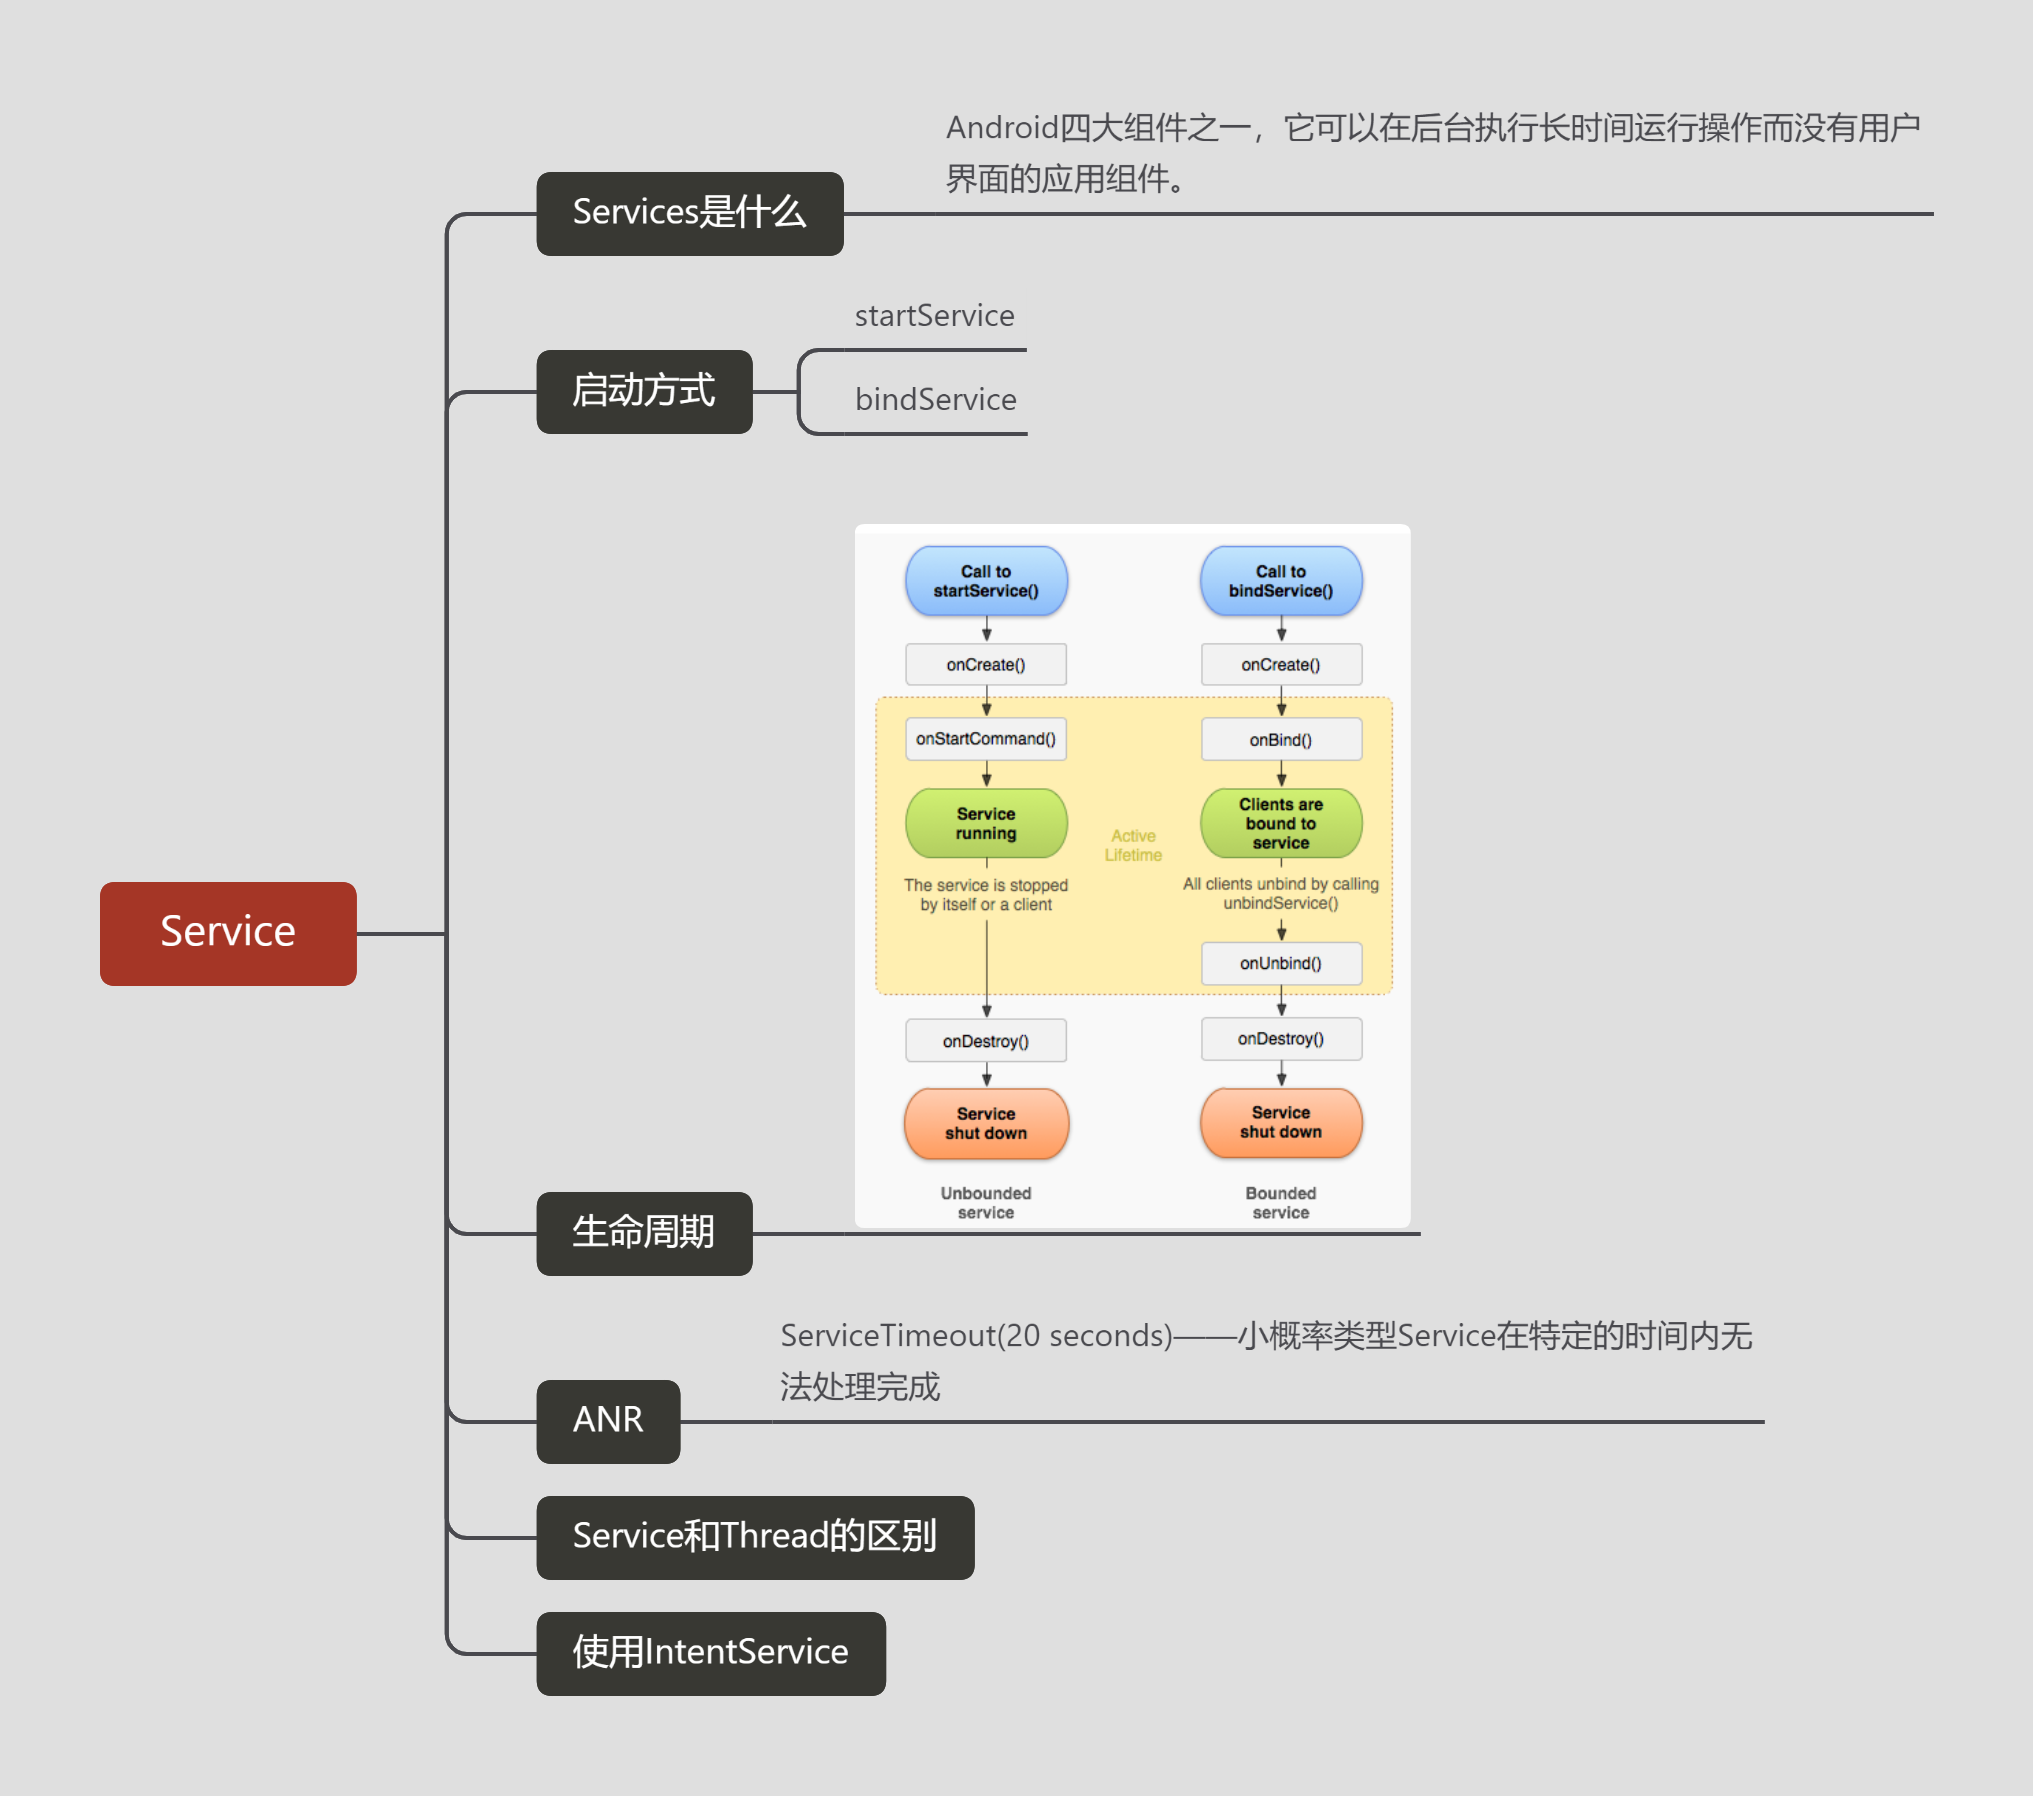
一、Service是什么
Service是Android四大组件之一,它可以在后台执行长时间运行操作而没有用户界面的应用组件。
Service的启动方式有两种:startService启动和bindService启动。
注意:服务与其他应用程序对象一样,在其托管进程的主线程中运行。这意味着,如果你的服务要执行任何CPU密集型(例如 MP3 播放)或阻塞(例如网络)操作,它应该在Service中再创建一个子线程,然后在这里去处理耗时操作就没问题了。
二、Service启动方式
startService
- 1.启动Service
显式启动通过类名称来启动,需要在Intent中指明Service所在的类,并调用startService (lntent)启动service,显式启动代码如下:
final Intent intentStart = new Intent(ServiceActivity.this, StartService.class);
startService(intentStart);
在上面的代码中,Intent指明了启动的Service所在类为StartService。
「通过该方式启动Service,访问者与Service之间没有关联,即使访问者退出了,Service也仍然运行。」
- 2.停止service
显式启动停止Service,需要将启动Service的Intent传递给stopService (Intent)函数,代码如下:
stopService(intentStart);
「因Android5.0开始,Google要求必须使用显示Intent启动Service,所以隐式启动咱就不介绍了。」
bindService
- 1.使用bindService()方法启动Service
绑定模式使用bindService()方法启动Service,其格式如下:
bindService(Intent service,ServiceConnection conn,int flags);
其中的参数说明如下:
-
service:该参数通过Intent指定需要启动的service。
-
conn:该参数是ServiceConnnection对象,当绑定成功后,系统将调用serviceConnnection的onServiceConnected ()方法,当绑定意外断开后,系统将调用ServiceConnnection中的onServiceDisconnected方法。
-
flags:该参数指定绑定时是否自动创建Service。如果指定为BIND_AUTO_CREATE,则自动创建,指定为0,则不自动创建。
绑定方式中,当调用者通过bindService()函数绑定Service时,onCreate()函数和onBinde ( )函数将被先后调用。
「通过该方式启动Service,访问者与Service绑定在一起,访问者一旦退出了,Service也就终止了。」
- 2.使用unbindService()方法取消绑定
取消绑定仅需要使用unbindService()方法,并将ServiceConnnection传递给unbindService()方法。
但需要注意的是,unbindService()方法成功后,系统并不会调用onServiceConnected(),因为onServiceConnected()仅在意外断开绑定时才被调用。
当调用者通过unbindService()函数取消绑定Service时,onUnbind()函数将被调用。如果onUnbind()函数返回true,则表示重新绑定服务时,onRebind ()函数将被调用。
startService样例
- 1.创建StartService.java继承自Service类,重写onCreate()方法、onStartCommand()方法、onBind()方法、onDestroy()方法,其代码如下:
public class StartService extends Service {
@Override
public void onCreate() {
super.onCreate();
MLog.e(getClass().getName(), “onCreate”);
}
@Override
public int onStartCommand(Intent intent, int flags, int startId) {
MLog.e(getClass().getName(), “onStartCommand”);
return super.onStartCommand(intent, flags, startId);
}
@Override
public void onDestroy() {
MLog.e(getClass().getName(), “onDestroy”);
super.onDestroy();
}
@Nullable
@Override
public IBinder onBind(Intent intent) {
return null;
}
}
- 2.创建ServiceActivity.java和配套的activity_service.xml文件,其代码如下:
public class ServiceActivity extends ActivityBase {
@Override
protected void onCreate(Bundle savedInstanceState) {
super.onCreate(savedInstanceState);
setContentView(R.layout.activity_service);
Intent intentStart = new Intent(ServiceActivity.this, StartService.class);
findViewById(R.id.btn_start).setOnClickListener(new View.OnClickListener() {
@Override
public void onClick(View v) {
startService(intentStart);
}
});
findViewById(R.id.btn_stop).setOnClickListener(new View.OnClickListener() {
@Override
public void onClick(View v) {
stopService(intentStart);
}
});
}
}
- 配套的activity_service.xml文件
<LinearLayout xmlns:android=“http://schemas.android.com/apk/res/android”
android:id=“@+id/ll_bg”
android:layout_width=“match_parent”
android:layout_height=“match_parent”
android:orientation=“vertical”
android:background=“@color/color_666666”>
<Button
android:id=“@+id/btn_start”
android:layout_width=“wrap_content”
android:layout_height=“wrap_content”
android:text=“start启动服务”/>
<Button
android:id=“@+id/btn_stop”
android:layout_width=“wrap_content”
android:layout_height=“wrap_content”
android:text=“start停止服务”/>
- 3.添加Service组件声明,在AndroidManifest.xml文件中声明一个Service组件,其代码如下:
<manifest xmlns:android=“http://schemas.android.com/apk/res/android”
package=“com.scc.demo”>
<application
…>
<activity
…>
…
- 运行结果
07-07 16:41:11.474 E/-SCC-: com.scc.demo.actvitiy.ServiceActivityonCreate
07-07 16:41:11.481 E/-SCC-: com.scc.demo.actvitiy.ServiceActivityonStart
07-07 16:41:11.482 E/-SCC-: com.scc.demo.actvitiy.ServiceActivityonResume
07-07 16:41:13.313 E/-SCC-com.scc.demo.service.StartService: onCreate
07-07 16:41:13.334 E/-SCC-com.scc.demo.service.StartService: onStartCommand
07-07 16:41:16.705 E/-SCC-com.scc.demo.service.StartService: onDestroy
bindService样例
- 1.创建BindService.java继承自Service类,重写onCreate()方法、onBind()方法、onUnbind()方法、onDestroy()方法,实现本地通知栏显示,其代码如下:
public class BindService extends Service {
//声明IBinder接口的一个接口变量mBinder
public final IBinder mBinder = new LocalBinder();
private NotificationManager mNM;
private int NOTIFICATION = R.string.local_service_started;
//LocalBinder是继承Binder的一个内部类
public class LocalBinder extends Binder {
public BindService getService() {
return BindService.this;
}
}
@Override
public void onCreate() {
mNM = (NotificationManager)getSystemService(NOTIFICATION_SERVICE);
MLog.e(getClass().getName(), “onCreate”);
showNotification();
}
@Override
public void onDestroy() {
MLog.e(getClass().getName(), “onDestroy”);
mNM.cancel(NOTIFICATION);
Toast.makeText(this, R.string.local_service_stopped, Toast.LENGTH_SHORT).show();
}
@Override
public IBinder onBind(Intent intent) {
MLog.e(getClass().getName(), “onBind”);
return mBinder;
}
@Override
public boolean onUnbind(Intent intent) {
MLog.e(getClass().getName(), “onUnbind”);
return super.onUnbind(intent);
}
private void showNotification() {
CharSequence text = getText(R.string.local_service_started);
PendingIntent contentIntent = PendingIntent.getActivity(this, 0,
new Intent(this, ServiceActivity.class), 0);
Notification notification = new Notification.
Builder(this)
.setSmallIcon(R.mipmap.ic_launcher)
.setTicker(text)
.setWhen(System.currentTimeMillis())
.setContentTitle(getText(R.string.local_service_label))
.setContentText(text)
.setContentIntent(contentIntent)
.build();
mNM.notify(NOTIFICATION, notification);
MLog.e(getClass().getName(), “通知栏已出”);
}
}
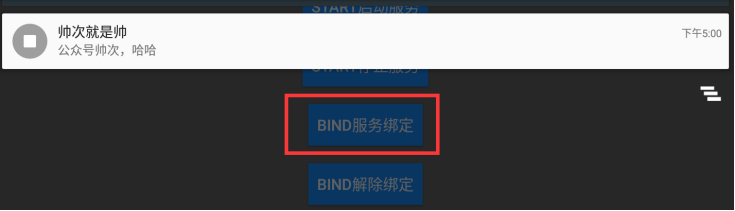
- 2.创建ServiceActivity.java和配套的activity_service.xml文件,其代码如下:
public class ServiceActivity extends ActivityBase {
private BindService bindService;
private boolean isBind = false;
@Override
protected void onCreate(Bundle savedInstanceState) {
super.onCreate(savedInstanceState);
setContentView(R.layout.activity_service);
findViewById(R.id.btn_bind).setOnClickListener(new View.OnClickListener() {
@Override
public void onClick(View v) {
if (!isBind) {
Intent intentBind = new Intent(ServiceActivity.this, BindService.class);
bindService(intentBind, serviceConnection, Context.BIND_AUTO_CREATE);
isBind = true;
}
}
});
findViewById(R.id.btn_unbing).setOnClickListener(new View.OnClickListener() {
@Override
public void onClick(View v) {
if (isBind) {
isBind = false;
unbindService(serviceConnection);
bindService = null;
}
}
});
}
private ServiceConnection serviceConnection = new ServiceConnection() {
@Override
public void onServiceConnected(ComponentName name, IBinder service) {
MLog.e(getClass().getName(), “onServiceConnected”);
bindService = ((BindService.LocalBinder) service).getService();
}
@Override
public void onServiceDisconnected(ComponentName name) {
MLog.e(getClass().getName(), “onServiceDisconnected”);
bindService = null;
}
};
}
- 配套的activity_service.xml文件
<LinearLayout xmlns:android=“http://schemas.android.com/apk/res/android”
android:id=“@+id/ll_bg”
android:layout_width=“match_parent”
android:layout_height=“match_parent”
android:orientation=“vertical”
android:background=“@color/color_666666”>
<Button
android:id=“@+id/btn_bind”
android:layout_width=“wrap_content”
android:layout_height=“wrap_content”
android:text=“bind服务绑定”/>
<Button
android:id=“@+id/btn_unbing”
android:layout_width=“wrap_content”
android:layout_height=“wrap_content”
android:text=“bind解除绑定”/>
- 3.添加Service组件声明,在AndroidManifest.xml文件中声明一个Service组件,其代码如下:
<manifest xmlns:android=“http://schemas.android.com/apk/res/android”
package=“com.scc.demo”>
<application
…>
<activity
…>
…
- 4运行结果
07-07 17:00:04.309 E/-SCC-: com.scc.demo.actvitiy.ServiceActivityonCreate
07-07 17:00:04.350 E/-SCC-: com.scc.demo.actvitiy.ServiceActivityonStart
07-07 17:00:04.350 E/-SCC-: com.scc.demo.actvitiy.ServiceActivityonResume
07-07 17:00:10.088 E/-SCC-com.scc.demo.service.BindService: onCreate
07-07 17:00:10.120 E/-SCC-com.scc.demo.service.BindService: 通知栏已出
07-07 17:00:10.145 E/-SCC-com.scc.demo.service.BindService: onBind
07-07 17:00:10.164 E/-SCC-com.scc.demo.actvitiy.ServiceActivity$5: onServiceConnected
07-07 17:00:39.111 E/-SCC-com.scc.demo.service.BindService: onUnbind
07-07 17:00:39.134 E/-SCC-com.scc.demo.service.BindService: onDestroy
三、Service生命周期
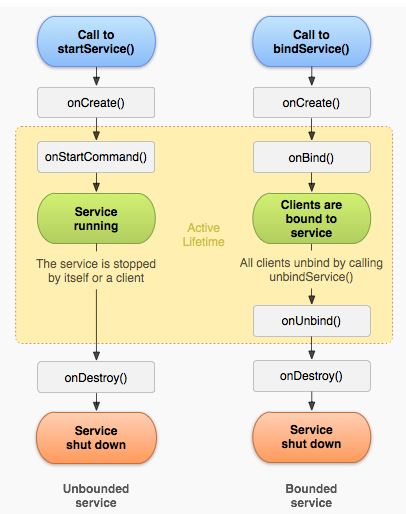
「onBind()」 是Service必须实现的方法,返回的IBinder对象相当于Service组件的代理对象,Service允许其他程序组件通过IBinder对象来访问Service内部数据,这样即可实现其他程序组件与Service之间的通信。
最后
小编这些年深知大多数初中级Android工程师,想要提升自己,往往是自己摸索成长,自己不成体系的自学效果低效漫长且无助。
因此我收集整理了一份《2024年Android移动开发全套学习资料》,初衷也很简单,就是希望能够帮助到想自学提升又不知道该从何学起的朋友。
一个人可以走的很快,但一群人才能走的更远!不论你是正从事IT行业的老鸟或是对IT行业感兴趣的新人
都欢迎加入我们的的圈子(技术交流、学习资源、职场吐槽、大厂内推、面试辅导),让我们一起学习成长!
资料⬅专栏获取
E/-SCC-com.scc.demo.service.BindService: onDestroy
三、Service生命周期
「onBind()」 是Service必须实现的方法,返回的IBinder对象相当于Service组件的代理对象,Service允许其他程序组件通过IBinder对象来访问Service内部数据,这样即可实现其他程序组件与Service之间的通信。
最后
小编这些年深知大多数初中级Android工程师,想要提升自己,往往是自己摸索成长,自己不成体系的自学效果低效漫长且无助。
因此我收集整理了一份《2024年Android移动开发全套学习资料》,初衷也很简单,就是希望能够帮助到想自学提升又不知道该从何学起的朋友。
[外链图片转存中…(img-Xn5ank9p-1718826253552)]
一个人可以走的很快,但一群人才能走的更远!不论你是正从事IT行业的老鸟或是对IT行业感兴趣的新人
都欢迎加入我们的的圈子(技术交流、学习资源、职场吐槽、大厂内推、面试辅导),让我们一起学习成长!
资料⬅专栏获取


 293
293


 被折叠的 条评论
为什么被折叠?
被折叠的 条评论
为什么被折叠?
 到【灌水乐园】发言


