


private void run() {
try {
 	.....
 	//创建消息looper
    Looper.prepareMainLooper();
    Looper.getMainLooper().setSlowLogThresholdMs(
            SLOW_DISPATCH_THRESHOLD_MS, SLOW_DELIVERY_THRESHOLD_MS);

    SystemServiceRegistry.sEnableServiceNotFoundWtf = true;

    // Initialize native services.------------------------1. 加载动态库libAndroid_servers.so
    System.loadLibrary("android_servers");

    // Allow heap / perf profiling.
    initZygoteChildHeapProfiling();

    // Debug builds - spawn a thread to monitor for fd leaks.
    if (Build.IS_DEBUGGABLE) {
        spawnFdLeakCheckThread();
    }

    // Check whether we failed to shut down last time we tried.
    // This call may not return.
    performPendingShutdown();

    // Initialize the system context.----------------------------2. 创建系统的context
    createSystemContext();

    // Call per-process mainline module initialization.
    ActivityThread.initializeMainlineModules();

    // Sets the dumper service
    ServiceManager.addService("system_server_dumper", mDumper);
    mDumper.addDumpable(this);

    // Create the system service manager.-----------------------------------3.  对系统服务进行创建、启动、生命周期管理
    mSystemServiceManager = new SystemServiceManager(mSystemContext);
    mSystemServiceManager.setStartInfo(mRuntimeRestart,
            mRuntimeStartElapsedTime, mRuntimeStartUptime);
    mDumper.addDumpable(mSystemServiceManager);

    LocalServices.addService(SystemServiceManager.class, mSystemServiceManager);
    // Prepare the thread pool for init tasks that can be parallelized
    SystemServerInitThreadPool tp = SystemServerInitThreadPool.start();
    mDumper.addDumpable(tp);

    // Load preinstalled system fonts for system server, so that WindowManagerService, etc
    // can start using Typeface. Note that fonts are required not only for text rendering,
    // but also for some text operations (e.g. TextUtils.makeSafeForPresentation()).
    if (Typeface.ENABLE_LAZY_TYPEFACE_INITIALIZATION) {
        Typeface.loadPreinstalledSystemFontMap();
    }

    // Attach JVMTI agent if this is a debuggable build and the system property is set.
    if (Build.IS_DEBUGGABLE) {
        // Property is of the form "library_path=parameters".
        String jvmtiAgent = SystemProperties.get("persist.sys.dalvik.jvmtiagent");
        if (!jvmtiAgent.isEmpty()) {
            int equalIndex = jvmtiAgent.indexOf('=');
            String libraryPath = jvmtiAgent.substring(0, equalIndex);
            String parameterList =
                    jvmtiAgent.substring(equalIndex + 1, jvmtiAgent.length());
            // Attach the agent.
            try {
                Debug.attachJvmtiAgent(libraryPath, parameterList, null);
            } catch (Exception e) {
                Slog.e("System", "*************************************************");
                Slog.e("System", "********** Failed to load jvmti plugin: " + jvmtiAgent);
            }
        }
    }
} finally {
    t.traceEnd();  // InitBeforeStartServices
}

// Setup the default WTF handler
RuntimeInit.setDefaultApplicationWtfHandler(SystemServer::handleEarlySystemWtf);

// Start services.
try {
    t.traceBegin("StartServices");
    //---------------------------------------------------4. 引导服务: 对创建的系统服务ActivityManagerService,pms,powermanagerservice等服务进行 创建,启动、生命周期管理等
    startBootstrapServices(t);
    //--------------------------------------------------- 5.核心服务:启动SystemConfigService,BatteryService等
    startCoreServices(t);
   //--------------------------------------------------- 6.其他服务:启动DynamicSystemService,NetworkManagementService,DropBoxManagerService

    startOtherServices(t);
} catch (Throwable ex) {
    Slog.e("System", "******************************************");
    Slog.e("System", "************ Failure starting system services", ex);
    throw ex;
} finally {
    t.traceEnd(); // StartServices
}

StrictMode.initVmDefaults(null);

if (!mRuntimeRestart && !isFirstBootOrUpgrade()) {
    final long uptimeMillis = SystemClock.elapsedRealtime();
    FrameworkStatsLog.write(FrameworkStatsLog.BOOT_TIME_EVENT_ELAPSED_TIME_REPORTED,
            FrameworkStatsLog.BOOT_TIME_EVENT_ELAPSED_TIME__EVENT__SYSTEM_SERVER_READY,
            uptimeMillis);
    final long maxUptimeMillis = 60 * 1000;
    if (uptimeMillis > maxUptimeMillis) {
        Slog.wtf(SYSTEM_SERVER_TIMING_TAG,
                "SystemServer init took too long. uptimeMillis=" + uptimeMillis);
    }
}

// Loop forever.-------loop循环取消息,ActivityThread的loop不允许quit()方法调用 退出
Looper.loop();
throw new RuntimeException("Main thread loop unexpectedly exited");
}
下图列出一些服务的含义
##### 3.1.1、引导服务:图3.0
在他里面刚开始就是我们常说的**Watchdog**
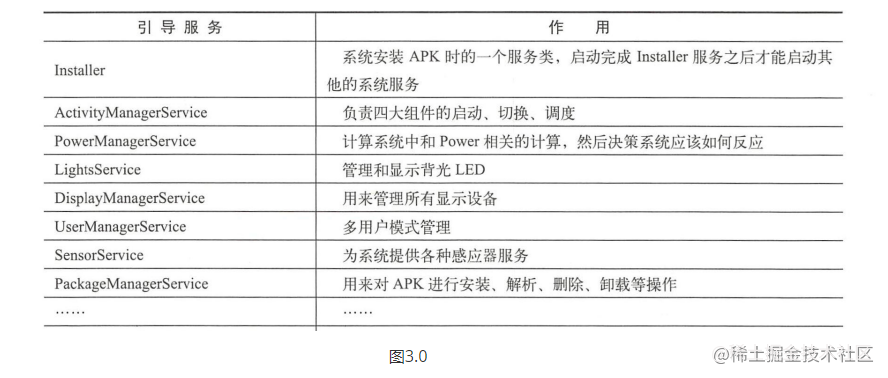 图3.0
##### 3.1.2、核心服务:图3.1

图3.1
##### 3.1.3、其他服务:图3.2
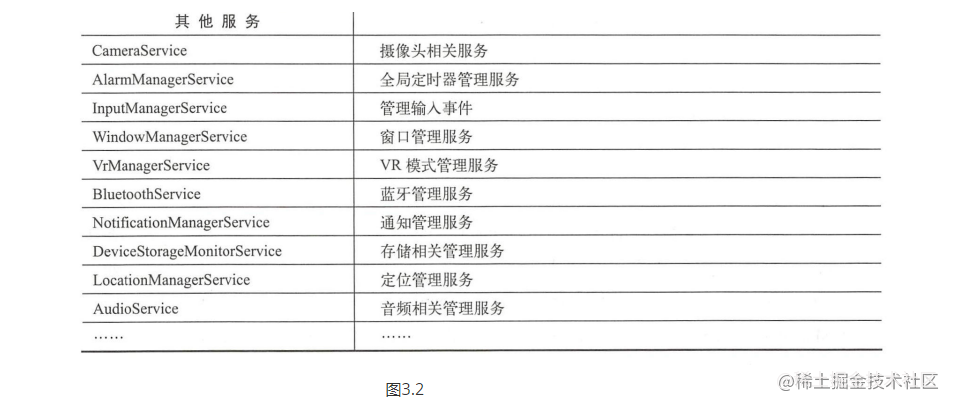
图3.2
##### 3.1.4、SystemServer的流程总结
1. 启动binder线程池,这样可以与其他进程进行通信
2. 创建SystemServiceManager,其用于对系统服务进行 创建,启动、生命周期管理等
3. 启动各种系统服务
#### 3.2、launcher启动过程
##### 3.2.1、Android 12.0启动流程图如下
// We now tell the activity manager it is okay to run third party
// code. It will call back into us once it has gotten to the state
// where third party code can really run (but before it has actually
// started launching the initial applications), for us to complete our
// initialization.
mActivityManagerService.systemReady(() -> {
}, t);
流程图:


##### 3.2.2、**[ActivityTaskManagerService.java] startHomeOnAllDisplays()**


\*\*说明:\*\*ActivityTaskManagerInternal是 ActivityManagerService的一个抽象类,正在的实现是在ActivityTaskManagerService的LocalService,所以mAtmInternal.startHomeOnAllDisplays()最终调用的是ActivityTaskManagerService的startHomeOnAllDisplays()方法
@Override
public boolean startHomeOnAllDisplays(int userId, String reason) {
synchronized (mGlobalLock) {
return mRootWindowContainer.startHomeOnAllDisplays(userId, reason);
}
}
##### **3.2.3、 [RootWindowContainer.java] startHomeOnAllDisplays()-》startHomeOnDisplay**


\*\*说明:\*\*在[4.1]中,获取的displayId为DEFAULT\_DISPLAY, 首先通过getHomeIntent 来构建一个category为CATEGORY\_HOME的Intent,表明是Home Activity;然后通过resolveHomeActivity()从系统所用已安装的引用中,找到一个符合HomeItent的Activity,最终调用startHomeActivity()来启动Activity
boolean startHomeOnDisplay(int userId, String reason, int displayId, boolean allowInstrumenting,
boolean fromHomeKey) {
// Fallback to top focused display or default display if the displayId is invalid.
if (displayId == INVALID_DISPLAY) {
final Task rootTask = getTopDisplayFocusedRootTask();
displayId = rootTask != null ? rootTask.getDisplayId() : DEFAULT_DISPLAY;
}
final DisplayContent display = getDisplayContent(displayId);
return display.reduceOnAllTaskDisplayAreas((taskDisplayArea, result) ->
                result | startHomeOnTaskDisplayArea(userId, reason, taskDisplayArea,
                        allowInstrumenting, fromHomeKey),
        false /* initValue */);
}
\*\*说明:\*\*承接startHomeOnDisplay方法
boolean startHomeOnTaskDisplayArea(int userId, String reason, TaskDisplayArea taskDisplayArea,
boolean allowInstrumenting, boolean fromHomeKey) {
// Fallback to top focused display area if the provided one is invalid.
if (taskDisplayArea == null) {
final Task rootTask = getTopDisplayFocusedRootTask();
taskDisplayArea = rootTask != null ? rootTask.getDisplayArea()
: getDefaultTaskDisplayArea();
}
Intent homeIntent = null;
ActivityInfo aInfo = null;

// --------------------------------------------------------------1. 构建一个category为CATEGORY_HOME的Intent
if (taskDisplayArea == getDefaultTaskDisplayArea()) {
    homeIntent = mService.getHomeIntent();
    //----------------------------------------------------------2.通过PKMS从系统所用已安装的引用中,找到一个符合HomeItent的Activity
    aInfo = resolveHomeActivity(userId, homeIntent);
} else if (shouldPlaceSecondaryHomeOnDisplayArea(taskDisplayArea)) {
    Pair<ActivityInfo, Intent> info = resolveSecondaryHomeActivity(userId, taskDisplayArea);
    aInfo = info.first;
    homeIntent = info.second;
}
if (aInfo == null || homeIntent == null) {
    return false;
}

//检查主activity是否能够被显示
if (!canStartHomeOnDisplayArea(aInfo, taskDisplayArea, allowInstrumenting)) {
    return false;
}

// Updates the home component of the intent.
homeIntent.setComponent(new ComponentName(aInfo.applicationInfo.packageName, aInfo.name));
homeIntent.setFlags(homeIntent.getFlags() | FLAG_ACTIVITY_NEW_TASK);
// Updates the extra information of the intent.
if (fromHomeKey) {
    homeIntent.putExtra(WindowManagerPolicy.EXTRA_FROM_HOME_KEY, true);
    if (mWindowManager.getRecentsAnimationController() != null) {
        mWindowManager.getRecentsAnimationController().cancelAnimationForHomeStart();
    }
}
homeIntent.putExtra(WindowManagerPolicy.EXTRA_START_REASON, reason);

// Update the reason for ANR debugging to verify if the user activity is the one that
// actually launched.
final String myReason = reason + ":" + userId + ":" + UserHandle.getUserId(
        aInfo.applicationInfo.uid) + ":" + taskDisplayArea.getDisplayId();

         //----------------------------------------------------------3..startHomeActivity 传递
mService.getActivityStartController().startHomeActivity(homeIntent, aInfo, myReason,
        taskDisplayArea);
return true;
**下面代码 承接startHomeOnTaskDisplayArea 方法 代码标记1处:**


\*\*说明:\*\*构建一个category为CATEGORY\_HOME的Intent,表明是Home Activity。


Intent.CATEGORY\_HOME = “android.intent.category.HOME”


这个category会在Launcher3的 AndroidManifest.xml中配置,表明是Home Acivity
Intent getHomeIntent() {
Intent intent = new Intent(mTopAction, mTopData != null ? Uri.parse(mTopData) : null);
intent.setComponent(mTopComponent);
intent.addFlags(Intent.FLAG_DEBUG_TRIAGED_MISSING);
if (mFactoryTest != FactoryTest.FACTORY_TEST_LOW_LEVEL) {
intent.addCategory(Intent.CATEGORY_HOME);
}
return intent;
}
**下面代码承接startHomeOnTaskDisplayArea 方法 代码标记2处: resolveHomeActivity**


\*\*说明:\*\*通过Binder跨进程通知PackageManagerService从系统所用已安装的引用中,找到一个符合HomeItent的Activity
@VisibleForTesting
ActivityInfo resolveHomeActivity(int userId, Intent homeIntent) {
final int flags = ActivityManagerService.STOCK_PM_FLAGS;
final ComponentName comp = homeIntent.getComponent();
ActivityInfo aInfo = null;
try {
if (comp != null) {
// Factory test.
aInfo = AppGlobals.getPackageManager().getActivityInfo(comp, flags, userId);
} else {
//--------------------------------------- //系统正常启动时,走该流程
final String resolvedType =
homeIntent.resolveTypeIfNeeded(mService.mContext.getContentResolver());
//-----------------------------------------------------------------
//-------------------resolveIntent做了两件事:1.通过queryIntentActivities来查找符合HomeIntent需求Activities
//------------------------------------------ 2.通过chooseBestActivity找到最符合Intent需求的Activity信息
final ResolveInfo info = AppGlobals.getPackageManager()
.resolveIntent(homeIntent, resolvedType, flags, userId);
if (info != null) {
aInfo = info.activityInfo;
}
}
} catch (RemoteException e) {
// ignore
}
if (aInfo == null) {
    Slog.wtf(TAG, "No home screen found for " + homeIntent, new Throwable());
    return null;
}

aInfo = new ActivityInfo(aInfo);
aInfo.applicationInfo = mService.getAppInfoForUser(aInfo.applicationInfo, userId);
return aInfo;
}
##### 3.2.4、ActivityStartController类


**下面代码 承接3.2.3中的startHomeOnTaskDisplayArea 方法 代码标记3处:**
void startHomeActivity(Intent intent, ActivityInfo aInfo, String reason,
TaskDisplayArea taskDisplayArea) {
…
//返回一个 ActivityStarter 对象,它负责 Activity 的启动
//一系列 setXXX() 方法传入启动所需的各种参数,最后的 execute() 是真正的启动逻辑
//最后执行 ActivityStarter的execute方法
mLastHomeActivityStartResult = obtainStarter(intent, "startHomeActivity: " + reason)
        .setOutActivity(tmpOutRecord)
        .setCallingUid(0)
        .setActivityInfo(aInfo)
        .setActivityOptions(options.toBundle())
        .execute();//--------------------------------------------看3.2.5段落
mLastHomeActivityStartRecord = tmpOutRecord[0];
if (rootHomeTask.mInResumeTopActivity) {
    // If we are in resume section already, home activity will be initialized, but not
    // resumed (to avoid recursive resume) and will stay that way until something pokes it
    // again. We need to schedule another resume.

      //如果home activity 处于顶层的resume activity中,则Home Activity 将被初始化,但不会被恢复(以避免递归恢复),
    //并将保持这种状态,直到有东西再次触发它。我们需要进行另一次恢复
    mSupervisor.scheduleResumeTopActivities();
}
}
##### **3.2.5、 [ActivityStarter.java] execute()**
int execute() {
…
///
执行活动启动请求并开始启动活动的过程。在这里首先进行几次初步检查。通常情况下,活动启动流程将通过
res = executeRequest(mRequest);
…
}
private int executeRequest(Request request) {
   ...
   在大多数初步检查已完成且来电者已确认拥有执行此操作所需的权限时启动活动。这里还可以确保在启动失败时删除启动活动。
   /调用 startActivityUnchecked ,一路调用到resumeFocusedStacksTopActivities(),

	 mLastStartActivityResult = startActivityUnchecked(r, sourceRecord, voiceSession,
            request.voiceInteractor, startFlags, true /* doResume */, checkedOptions, inTask,
            restrictedBgActivity, intentGrants);
...
}
ActivityStarter:下的
private int startActivityUnchecked(final ActivityRecord r, ActivityRecord sourceRecord,
IVoiceInteractionSession voiceSession, IVoiceInteractor voiceInteractor,
int startFlags, boolean doResume, ActivityOptions options, Task inTask,
boolean restrictedBgActivity, NeededUriGrants intentGrants) {
…
try {
mService.deferWindowLayout();
Trace.traceBegin(Trace.TRACE_TAG_WINDOW_MANAGER, “startActivityInner”);
result = startActivityInner(r, sourceRecord, voiceSession, voiceInteractor,
startFlags, doResume, options, inTask, restrictedBgActivity, intentGrants);
} finally {
}
…
}
ActivityStarter:下的
startActivityInner(final ActivityRecord r, ActivityRecord sourceRecord,
IVoiceInteractionSession voiceSession, IVoiceInteractor voiceInteractor,
int startFlags, boolean doResume, ActivityOptions options, Task inTask,
boolean restrictedBgActivity, NeededUriGrants intentGrants) {
…
if (targetTaskTop != null) {
// 循环此启动的目标任务。
startResult = recycleTask(targetTask, targetTaskTop, reusedTask, intentGrants);
if (startResult != START_SUCCESS) {
return startResult;
}
} else {
mAddingToTask = true;
}
…
}
ActivityStarter:下的
int recycleTask(Task targetTask, ActivityRecord targetTaskTop, Task reusedTask,
NeededUriGrants intentGrants) {
…
// We didn’t do anything… but it was needed (a.k.a., client don’t use that intent!)
// And for paranoia, make sure we have correctly resumed the top activity.
resumeTargetRootTaskIfNeeded();
…
}
ActivityStarter:下的
private void resumeTargetRootTaskIfNeeded() {
if (mDoResume) {
final ActivityRecord next = mTargetRootTask.topRunningActivity(
true /* focusableOnly */);
if (next != null) {
next.setCurrentLaunchCanTurnScreenOn(true);
}
if (mTargetRootTask.isFocusable()) {------------------------------------------------RootWindowContainer 中去了见下面
mRootWindowContainer.resumeFocusedTasksTopActivities(mTargetRootTask, null,
mOptions, mTransientLaunch);
} else {
mRootWindowContainer.ensureActivitiesVisible(null, 0, !PRESERVE_WINDOWS);
}
} else {
ActivityOptions.abort(mOptions);
}
mRootWindowContainer.updateUserRootTask(mStartActivity.mUserId, mTargetRootTask);
}
##### 3.2.6 、RootWindowContainer
boolean resumeFocusedTasksTopActivities(
Task targetRootTask, ActivityRecord target, ActivityOptions targetOptions,
boolean deferPause) {
if (!mTaskSupervisor.readyToResume()) {
return false;
}
boolean result = false;
//--------------------------------------------------------------------------1.如果秒表栈就是栈顶Activity,启动resumeTopActivityUncheckedLocked()方法

if (targetRootTask != null && (targetRootTask.isTopRootTaskInDisplayArea()
        || getTopDisplayFocusedRootTask() == targetRootTask)) {
    result = targetRootTask.resumeTopActivityUncheckedLocked(target, targetOptions,
            deferPause);
}

for (int displayNdx = getChildCount() - 1; displayNdx >= 0; --displayNdx) {
    final DisplayContent display = getChildAt(displayNdx);
    final boolean curResult = result;
    boolean[] resumedOnDisplay = new boolean[1];
    display.forAllRootTasks(rootTask -> {
        final ActivityRecord topRunningActivity = rootTask.topRunningActivity();
        if (!rootTask.isFocusableAndVisible() || topRunningActivity == null) {
            return;
        }
        if (rootTask == targetRootTask) {
            // Simply update the result for targetRootTask because the targetRootTask
            // had already resumed in above. We don't want to resume it again,
            // especially in some cases, it would cause a second launch failure
            // if app process was dead.
            resumedOnDisplay[0] |= curResult;
            return;
        }
        if (rootTask.getDisplayArea().isTopRootTask(rootTask)
                && topRunningActivity.isState(RESUMED)) {
            // Kick off any lingering app transitions form the MoveTaskToFront
            // operation, but only consider the top task and root-task on that
            // display.
            rootTask.executeAppTransition(targetOptions);
        } else {
            resumedOnDisplay[0] |= topRunningActivity.makeActiveIfNeeded(target);
        }
    });
    result |= resumedOnDisplay[0];
    if (!resumedOnDisplay[0]) {
        // In cases when there are no valid activities (e.g. device just booted or launcher
        // crashed) it's possible that nothing was resumed on a display. Requesting resume
        // of top activity in focused root task explicitly will make sure that at least home
        // activity is started and resumed, and no recursion occurs.
        //-----------------------------------------------------------------2.  // 获取  栈顶的 ActivityRecord
        //翻译:在没有有效活动的情况下(例如,设备刚刚启动或启动//崩溃),有可能什么都没有恢复显示。明确地请求集中的根任务中的top activity的resume //将确保至少home // activity被启动和恢复,并且不会发生递归

        final Task focusedRoot = display.getFocusedRootTask();
        if (focusedRoot != null) {
        	//----------------------------------------------------------------------//3.最终调用startSpecificActivityLocked()

            result |= focusedRoot.resumeTopActivityUncheckedLocked(target, targetOptions);
        } else if (targetRootTask == null) {
            result |= resumeHomeActivity(null /* prev */, "no-focusable-task",
                    display.getDefaultTaskDisplayArea());
        }
    }
}

return result;
}
##### 3.2.7、 com.android.server.wm.Task下的resumeTopActivityInnerLocked


\*\*解释:\*\*点击launcher 首次启动的时候–startSpecificActivity
private boolean resumeTopActivityInnerLocked(ActivityRecord prev, ActivityOptions options,
boolean deferPause) {
…
// Find the next top-most activity to resume in this root task that is not finishing and is
// focusable. If it is not focusable, we will fall into the case below to resume the
// top activity in the next focusable task.
//翻译:在根任务中找到要继续的下一个最顶端的活动,该活动没有完成并且已经完成
focusable。如果它是不可调焦的,我们将陷入下面的情况,在下一个可调焦的任务中恢复顶部的活动。
ActivityRecord next = topRunningActivity(true /* focusableOnly /);
…
if (next.attachedToProcess()) {
…
} else {
// Whoops, need to restart this activity!
if (!next.hasBeenLaunched) {
next.hasBeenLaunched = true;
} else {
if (SHOW_APP_STARTING_PREVIEW) {
next.showStartingWindow(false / taskSwich */);
}
if (DEBUG_SWITCH) Slog.v(TAG_SWITCH, "Restarting: " + next);
}
ProtoLog.d(WM_DEBUG_STATES, “resumeTopActivityLocked: Restarting %s”, next);
mTaskSupervisor.startSpecificActivity(next, true, true);
}
}
##### 3.2.8、看ActivityTaskSupervisor的startSpecificActivity方法(1)


解释:下一步看:startProcessAsync
void startSpecificActivity(ActivityRecord r, boolean andResume, boolean checkConfig) {
// Is this activity’s application already running?
final WindowProcessController wpc =
mService.getProcessController(r.processName, r.info.applicationInfo.uid);
    boolean knownToBeDead = false;
    if (wpc != null && wpc.hasThread()) {
        try {
            realStartActivityLocked(r, wpc, andResume, checkConfig);
            return;
        } catch (RemoteException e) {
            Slog.w(TAG, "Exception when starting activity "
                    + r.intent.getComponent().flattenToShortString(), e);
        }

        // If a dead object exception was thrown -- fall through to
        // restart the application.
        knownToBeDead = true;
    }

    r.notifyUnknownVisibilityLaunchedForKeyguardTransition();

    final boolean isTop = andResume && r.isTopRunningActivity();
    mService.startProcessAsync(r, knownToBeDead, isTop, isTop ? "top-activity" : "activity");
}
##### 3.2.8、看ActivityTaskManagerService的startProcessAsync方法(2)


解释:下一步看:startProcessAsync


\*\**最终调用到AMS的startProcess()*看下面:3.2.9**
void startProcessAsync(ActivityRecord activity, boolean knownToBeDead, boolean isTop,
String hostingType) {
try {
if (Trace.isTagEnabled(TRACE_TAG_WINDOW_MANAGER)) {
Trace.traceBegin(TRACE_TAG_WINDOW_MANAGER, “dispatchingStartProcess:”
+ activity.processName);
}
// Post message to start process to avoid possible deadlock of calling into AMS with the
// ATMS lock held.
//-----------------------1.发送消息启动进程,以避免调用AMS时可能出现的死锁 ATMS锁定。
final Message m = PooledLambda.obtainMessage(ActivityManagerInternal::startProcess,
mAmInternal, activity.processName, activity.info.applicationInfo, knownToBeDead,
isTop, hostingType, activity.intent.getComponent());
mH.sendMessage(m);
} finally {
Trace.traceEnd(TRACE_TAG_WINDOW_MANAGER);
}
}
##### 3.2.9、发布消息以启动进程,以避免在ATM锁保持的情况下调用AMS时可能出现死锁ActivityManagerService的startProcess方法


\*\*说明:\**调用startProcessLocked,然后到 Process的start,最终到ZygoteProcess的attemptUsapSendArgsAndGetResult()*
@Override
public void startProcess(String processName, ApplicationInfo info, boolean knownToBeDead,
boolean isTop, String hostingType, ComponentName hostingName) {
try {
if (Trace.isTagEnabled(Trace.TRACE_TAG_ACTIVITY_MANAGER)) {
Trace.traceBegin(Trace.TRACE_TAG_ACTIVITY_MANAGER, “startProcess:”
+ processName);
}
1.------------同步操作,避免死锁
synchronized (ActivityManagerService.this) {
// If the process is known as top app, set a hint so when the process is
// started, the top priority can be applied immediately to avoid cpu being
// preempted by other processes before attaching the process of top app.
startProcessLocked(processName, info, knownToBeDead, 0 /* intentFlags /,
new HostingRecord(hostingType, hostingName, isTop),
ZYGOTE_POLICY_FLAG_LATENCY_SENSITIVE, false / allowWhileBooting /,
false / isolated */);
}
} finally {
Trace.traceEnd(Trace.TRACE_TAG_ACTIVITY_MANAGER);
}
}
@GuardedBy(“this”)
final ProcessRecord startProcessLocked(String processName,
ApplicationInfo info, boolean knownToBeDead, int intentFlags,
HostingRecord hostingRecord, int zygotePolicyFlags, boolean allowWhileBooting,
boolean isolated) {
//----------------------2.用来fork一个新的Launcher的进程,
    return mProcessList.startProcessLocked(processName, info, knownToBeDead, intentFlags,
            hostingRecord, zygotePolicyFlags, allowWhileBooting, isolated, 0 /* isolatedUid */,
            null /* ABI override */, null /* entryPoint */,
            null /* entryPointArgs */, null /* crashHandler */);
}
##### 3.2.10、ZygoteProcess的startViaZygote方法(通过zygote机制开始一个新的过程。)
解释1:创建argsForZygote字符列表,将应用进程的的启动参数保存在其中,最后调用zygoteSendArgsAndGetResult方法
注意的是它的第一个参数为openZygoteSocketIfNeeded(abi)方法
解释2:Sends an argument list to the zygote process, which starts a new child and returns the child’s pid. Please note: the present implementation replaces newlines in the argument list with spaces.
翻译:将参数列表发送给受精卵进程,受精卵进程启动一个新的子进程并返回子进程的pid。请注意:目前的实现用空格替换了参数列表中的换行符
解释3:Tries to open a session socket to a Zygote process with a compatible ABI if one is not already open. If a compatible session socket is already open that session socket is returned. This function may block and may have to try connecting to multiple Zygotes to find the appropriate one.
翻译:如果一个Zygote进程还没有打开,则尝试用一个兼容的ABI打开一个socket。如果兼容的socket已经打开,则返回该socket。这个功能可能会阻塞,可能需要连接多个Zygote来找到合适的一个。
译文:将参数列表发送给受精卵进程,受精卵进程启动一个新的子进程并返回子进程的pid。请注意:目前的实现用空格替换了参数列表中的换行符。
private Process.ProcessStartResult startViaZygote(…)
throws ZygoteStartFailedEx {
ArrayList argsForZygote = new ArrayList<>();
    // --runtime-args, --setuid=, --setgid=,
    // and --setgroups= must go first
    argsForZygote.add("--runtime-args");
    argsForZygote.add("--setuid=" + uid);
    argsForZygote.add("--setgid=" + gid);
    argsForZygote.add("--runtime-flags=" + runtimeFlags);
    if (mountExternal == Zygote.MOUNT_EXTERNAL_DEFAULT) {
        argsForZygote.add("--mount-external-default");
    } else if (mountExternal == Zygote.MOUNT_EXTERNAL_INSTALLER) {
        argsForZygote.add("--mount-external-installer");
    } else if (mountExternal == Zygote.MOUNT_EXTERNAL_PASS_THROUGH) {
        argsForZygote.add("--mount-external-pass-through");
    } else if (mountExternal == Zygote.MOUNT_EXTERNAL_ANDROID_WRITABLE) {
        argsForZygote.add("--mount-external-android-writable");
    }

    argsForZygote.add("--target-sdk-version=" + targetSdkVersion);
	...
    synchronized(mLock) {
        // The USAP pool can not be used if the application will not use the systems graphics
        // driver.  If that driver is requested use the Zygote application start path.
        return zygoteSendArgsAndGetResult(openZygoteSocketIfNeeded(abi),
                                          zygotePolicyFlags,
                                          argsForZygote);
    }
}
**openZygoteSocketIfNeeded方法**
private ZygoteState openZygoteSocketIfNeeded(String abi) throws ZygoteStartFailedEx {
try {
attemptConnectionToPrimaryZygote();
    if (primaryZygoteState.matches(abi)) {
        return primaryZygoteState;
    }

    if (mZygoteSecondarySocketAddress != null) {
        // The primary zygote didn't match. Try the secondary.
        attemptConnectionToSecondaryZygote();

        if (secondaryZygoteState.matches(abi)) {
            return secondaryZygoteState;
        }
    }
} catch (IOException ioe) {
    throw new ZygoteStartFailedEx("Error connecting to zygote", ioe);
}

throw new ZygoteStartFailedEx("Unsupported zygote ABI: " + abi);
}
##### 3.2.11、ZygoteProcess的attemptZygoteSendArgsAndGetResult方法
private Process.ProcessStartResult attemptZygoteSendArgsAndGetResult(
ZygoteState zygoteState, String msgStr) throws ZygoteStartFailedEx {
try {
//传入的zygoteState为openZygoteSocketIfNeeded(),里面会通过abi来检查是第一个zygote还是第二个
final BufferedWriter zygoteWriter = zygoteState.mZygoteOutputWriter;
final DataInputStream zygoteInputStream = zygoteState.mZygoteInputStream;
    zygoteWriter.write(msgStr);  //把应用进程的一些参数写给前面连接的zygote进程,包括前面的processClass ="android.app.ActivityThread"
    zygoteWriter.flush(); //进入Zygote进程,处于阻塞状态, 参考[4.4]

     //从socket中得到zygote创建的应用pid,赋值给 ProcessStartResult的对象
    Process.ProcessStartResult result = new Process.ProcessStartResult();
    result.pid = zygoteInputStream.readInt();
    result.usingWrapper = zygoteInputStream.readBoolean();

    if (result.pid < 0) {
        throw new ZygoteStartFailedEx("fork() failed");
    }

    return result;
} catch (IOException ex) {
    zygoteState.close();
    Log.e(LOG_TAG, "IO Exception while communicating with Zygote - "
            + ex.toString());
    throw new ZygoteStartFailedEx(ex);
}
}
##### 3.2.12、**Zygote fork一个Launcher进程的阶段**


\*\*说明:\*\*Zygote的启动过程我们前面有讲到过。SystemServer的AMS服务向启动Home Activity发起一个fork请求,Zygote进程通过Linux的fork函数,孵化出一个新的进程。


由于Zygote进程在启动时会创建Java虚拟机,因此通过fork而创建的Launcher程序进程可以在内部获取一个Java虚拟机的实例拷贝。fork采用copy-on-write机制,有些类如果不做改变,甚至都不用复制,子进程可以和父进程共享这部分数据,从而省去不少内存的占用。


Zygote类中的main方法
public static void main(String argv[]) {
// 1.创建ZygoteServer
ZygoteServer zygoteServer = null;
    // 调用native函数,确保当前没有其它线程在运行
    ZygoteHooks.startZygoteNoThreadCreation();

    //设置pid为0,Zygote进入自己的进程组
    Os.setpgid(0, 0);
    ......
    Runnable caller;
    try {
        ......
        //得到systrace的监控TAG
        String bootTimeTag = Process.is64Bit() ? "Zygote64Timing" : "Zygote32Timing";
        TimingsTraceLog bootTimingsTraceLog = new TimingsTraceLog(bootTimeTag,
                Trace.TRACE_TAG_DALVIK);
        //通过systradce来追踪 函数ZygoteInit, 可以通过systrace工具来进行分析
        //traceBegin 和 traceEnd 要成对出现,而且需要使用同一个tag
        bootTimingsTraceLog.traceBegin("ZygoteInit");

        //开启DDMS(Dalvik Debug Monitor Service)功能
        //注册所有已知的Java VM的处理块的监听器。线程监听、内存监听、native 堆内存监听、debug模式监听等等
        RuntimeInit.enableDdms();

        boolean startSystemServer = false;
        String zygoteSocketName = "zygote";
        String abiList = null;
        boolean enableLazyPreload = false;

        //2. 解析app_main.cpp - start()传入的参数
        for (int i = 1; i < argv.length; i++) {
            if ("start-system-server".equals(argv[i])) {
                startSystemServer = true; //启动zygote时,才会传入参数:start-system-server
            } else if ("--enable-lazy-preload".equals(argv[i])) {
                enableLazyPreload = true; //启动zygote_secondary时,才会传入参数:enable-lazy-preload
            } else if (argv[i].startsWith(ABI_LIST_ARG)) { //通过属性ro.product.cpu.abilist64\ro.product.cpu.abilist32 从C空间传来的值
                abiList = argv[i].substring(ABI_LIST_ARG.length());
            } else if (argv[i].startsWith(SOCKET_NAME_ARG)) {
                zygoteSocketName = argv[i].substring(SOCKET_NAME_ARG.length()); //会有两种值:zygote和zygote_secondary
            } else {
                throw new RuntimeException("Unknown command line argument: " + argv[i]);
            }
        }

        // 根据传入socket name来决定是创建socket还是zygote_secondary
        final boolean isPrimaryZygote = zygoteSocketName.equals(Zygote.PRIMARY_SOCKET_NAME);

        // 在第一次zygote启动时,enableLazyPreload为false,执行preload
        if (!enableLazyPreload) {
            //systrace 追踪 ZygotePreload
            bootTimingsTraceLog.traceBegin("ZygotePreload");
            EventLog.writeEvent(LOG_BOOT_PROGRESS_PRELOAD_START,
                    SystemClock.uptimeMillis());
            // 3.加载进程的资源和类,参考[4.2.2]
            preload(bootTimingsTraceLog);
            EventLog.writeEvent(LOG_BOOT_PROGRESS_PRELOAD_END,
                    SystemClock.uptimeMillis());
            //systrae结束 ZygotePreload的追踪
            bootTimingsTraceLog.traceEnd(); // ZygotePreload
        } else {
            // 延迟预加载, 变更Zygote进程优先级为NORMAL级别,第一次fork时才会preload
            Zygote.resetNicePriority();
        }

        //结束ZygoteInit的systrace追踪
        bootTimingsTraceLog.traceEnd(); // ZygoteInit
        //禁用systrace追踪,以便fork的进程不会从zygote继承过时的跟踪标记
        Trace.setTracingEnabled(false, 0);

        // 4.调用ZygoteServer 构造函数,创建socket,会根据传入的参数,
        // 创建两个socket:/dev/socket/zygote 和 /dev/socket/zygote_secondary
        zygoteServer = new ZygoteServer(isPrimaryZygote);

        if (startSystemServer) {
            //5. fork出system server,
            Runnable r = forkSystemServer(abiList, zygoteSocketName, zygoteServer);

            // 启动SystemServer
            if (r != null) {
                r.run();
                return;
            }
        }

        // 6.  zygote进程进入无限循环,循环等待AMS请求fork出其他的应用进程,比如Launche ,最终通过调用processOneCommand()来进行进程的处理
        caller = zygoteServer.runSelectLoop(abiList);
    } catch (Throwable ex) {
        Log.e(TAG, "System zygote died with exception", ex);
        throw ex;
    } finally {
        if (zygoteServer != null) {
            zygoteServer.closeServerSocket();
        }
    }

    // 7.在子进程中退出了选择循环。继续执行命令
    if (caller != null) {
        caller.run();
    }
}
上面注释说明:在注释2处预加载类和资源。在注释5处启动SystcmServer进程,这样系统的服 务也会由SystemServer进程启动起来。在注释6处调用ZygoteServer的runSelectLoop方法 来等待AMS请求创建新的应用程序进程。下面来查看ZygoteServer的runSelectLoop方法:


\*\*上面注释4处:\*\*创建socket–用Zygote服务器套接字、USAP池服务器套接字和USAP池事件FD初始化Zygote服务器


##### 3.2.13、ZygoteServer的runSelectLoop


\*\*说明:\*\*运行受精卵过程的选择循环。当新连接发生时,接受它们,并从连接中读取一次一个刷出请求值的命
Runnable runSelectLoop(String abiList) {
ArrayList socketFDs = new ArrayList<>();
ArrayList peers = new ArrayList<>();
//-------------------------------------1. 首先将server socket加入到fds
socketFDs.add(mZygoteSocket.getFileDescriptor());
peers.add(null);
    mUsapPoolRefillTriggerTimestamp = INVALID_TIMESTAMP;

    while (true) {
        fetchUsapPoolPolicyPropsWithMinInterval();
        mUsapPoolRefillAction = UsapPoolRefillAction.NONE;

        int[] usapPipeFDs = null;
        StructPollfd[] pollFDs;
		//-----------------------------------2.每次循环,都重新创建需要监听的pollFds
        // Allocate enough space for the poll structs, taking into account
        // the state of the USAP pool for this Zygote (could be a
        // regular Zygote, a WebView Zygote, or an AppZygote).
        if (mUsapPoolEnabled) {
            usapPipeFDs = Zygote.getUsapPipeFDs();
            pollFDs = new StructPollfd[socketFDs.size() + 1 + usapPipeFDs.length];
        } else {
            pollFDs = new StructPollfd[socketFDs.size()];
        }

        /*
         * For reasons of correctness the USAP pool pipe and event FDs
         * must be processed before the session and server sockets.  This
         * is to ensure that the USAP pool accounting information is
         * accurate when handling other requests like API deny list
         * exemptions.
         */

       	....


        if (pollReturnValue == 0) {
            // The poll returned zero results either when the timeout value has been exceeded
            // or when a non-blocking poll is issued and no FDs are ready.  In either case it
            // is time to refill the pool.  This will result in a duplicate assignment when
            // the non-blocking poll returns zero results, but it avoids an additional
            // conditional in the else branch.
            mUsapPoolRefillTriggerTimestamp = INVALID_TIMESTAMP;
            mUsapPoolRefillAction = UsapPoolRefillAction.DELAYED;

        } else {
            boolean usapPoolFDRead = false;
				 //3.倒序处理,即优先处理已建立链接的信息,后处理新建链接的请求
            while (--pollIndex >= 0) {
                if ((pollFDs[pollIndex].revents & POLLIN) == 0) {
                    continue;
                }
				//4.server socket最先加入fds, 因此这里是server socket收到数据
                if (pollIndex == 0) {
                    // Zygote server socket
                    ZygoteConnection newPeer = acceptCommandPeer(abiList);
                    peers.add(newPeer);
                    socketFDs.add(newPeer.getFileDescriptor());
                } else if (pollIndex < usapPoolEventFDIndex) {
                    // Session socket accepted from the Zygote server socket
					//说明接收到AMS发送过来创建应用程序的请求,来创建新的应用程序进程
                    try {
                    //有socket连接,创建ZygoteConnection对象,并添加到fds
                        ZygoteConnection connection = peers.get(pollIndex);
                        boolean multipleForksOK = !isUsapPoolEnabled()
                                && ZygoteHooks.isIndefiniteThreadSuspensionSafe();

                       //5.处理连接
                        final Runnable command =
                                connection.processCommand(this, multipleForksOK);

                        // TODO (chriswailes): Is this extra check necessary?
                        if (mIsForkChild) {
                            // We're in the child. We should always have a command to run at
                            // this stage if processCommand hasn't called "exec".
                            if (command == null) {
                                throw new IllegalStateException("command == null");
                            }

                            return command;
                        } else {
                            // We're in the server - we should never have any commands to run.
                            if (command != null) {
                                throw new IllegalStateException("command != null");
                            }

                            // We don't know whether the remote side of the socket was closed or
                            // not until we attempt to read from it from processCommand. This
                            // shows up as a regular POLLIN event in our regular processing
                            // loop.
                            if (connection.isClosedByPeer()) {
                                connection.closeSocket();
                                peers.remove(pollIndex);
                                socketFDs.remove(pollIndex);
                            }
总结
其实要轻松掌握很简单,要点就两个:
- 找到一套好的视频资料,紧跟大牛梳理好的知识框架进行学习。
- 多练。 (视频优势是互动感强,容易集中注意力)
你不需要是天才,也不需要具备强悍的天赋,只要做到这两点,短期内成功的概率是非常高的。
对于很多初中级Android工程师而言,想要提升技能,往往是自己摸索成长,不成体系的学习效果低效漫长且无助。下面资料部分截图是我花费几个月时间整理的,诚意满满:特别适合有3-5年开发经验的Android程序员们学习。

           if (command != null) {
                                throw new IllegalStateException("command != null");
                            }

                            // We don't know whether the remote side of the socket was closed or
                            // not until we attempt to read from it from processCommand. This
                            // shows up as a regular POLLIN event in our regular processing
                            // loop.
                            if (connection.isClosedByPeer()) {
                                connection.closeSocket();
                                peers.remove(pollIndex);
                                socketFDs.remove(pollIndex);
                            }
总结
其实要轻松掌握很简单,要点就两个:
- 找到一套好的视频资料,紧跟大牛梳理好的知识框架进行学习。
- 多练。 (视频优势是互动感强,容易集中注意力)
你不需要是天才,也不需要具备强悍的天赋,只要做到这两点,短期内成功的概率是非常高的。
对于很多初中级Android工程师而言,想要提升技能,往往是自己摸索成长,不成体系的学习效果低效漫长且无助。下面资料部分截图是我花费几个月时间整理的,诚意满满:特别适合有3-5年开发经验的Android程序员们学习。
[外链图片转存中…(img-ACx9RzEF-1723532817632)]


 5069
5069

 被折叠的 条评论
为什么被折叠?
被折叠的 条评论
为什么被折叠?
 到【灌水乐园】发言


