


微信小程序调用系统摄像头完成拍照功能,通过以下三个步骤就可以完美实现
1.授权功能:调用uni.authorize提示用户摄像头授权
调用uni.authorize方法,scope:'scope.camera',来让用户授权,
1.1 如果用户没授权就会弹出下面这样的弹窗让用户授权:授权后就可以直接使用拍照功能啦

(因为涉及到隐私,我对弹窗中的内容做了马赛克处理hhhhhh)
1.2 如果用户已经授权过就不会弹出上面的弹窗,调用uni.authorize会直接返回成功,直接使用拍照功能就行,
1.3 如果用户点击‘拒绝’,拒绝授权或者是之前就拒绝过授权,就会到fail里,我们需要额外处理(这个放到最后再处理)
下面是以上三种情况的具体代码:
uni.authorize({
	scope: 'scope.camera',
	success: (res => {
            //用户点击授权后或用户之前已经授权过摄像头权限,就会到success里,下一步我们就可以拍照了
			that.addImg()
	}),
	fail:(res=> {
            // 用户选择拒绝授权或者之前用户拒绝过授权都会到fail里,最后会处理这块
			that.showModal()
	}),
})
2.拍照功能:使用uni.chooseMedia拍照或从相册中选择图片
用户同意授权摄像头权限后,我们就可以直接调用uni.chooseMedia方法进行拍照了
以下是这个步骤的代码:
uni.chooseMedia({
	count: 1 //选择文件的数量
	sizeType: ['compressed'],//是否压缩,仅对 mediaType 为 image 时有效
	mediaType:['image'],//文件类型
	sourceType:['camera'],//选择拍摄
	success: (res) => {
        //拍摄成功,把图片路径存在items数组里,用来展示
		console.log(res,'res图片的值')
		for(let i = 0; i < res.tempFiles.length; i++){
		    that.items.push({url:res.tempFiles[i].tempFilePath})
		}
	},
	fail: function (res) {
	    console.log('拍摄图片失败',res)
	}
});
3.最后处理用户拒绝授权的解决方法
用户拒绝授权后会到uni.authorize方法的fail回调函数中,我们这时就需要通过uni.showModal给用户一个提示,引导用户去设置中打开摄像头权限:我这里给的引导提示是这样的:
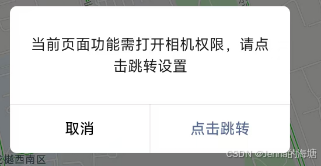
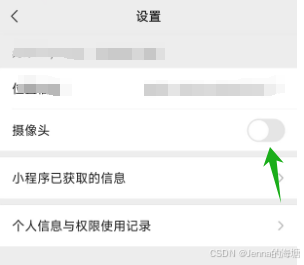
用户点击跳转时调用uni.openSetting跳转到到设置中打开摄像头开关就好啦
以下是详细的代码:
//用户拒绝授权处理方法:
showModal() {
    let that = this
    //弹出弹窗让用户点击"点击跳转"按钮到设置页面
    uni.showModal({
	    content: "当前页面功能需打开相机权限,请点击跳转设置",
		showCancel: true,
		confirmText: "点击跳转",
		success: (res => {
			    if (res.confirm) {
                    //用户点击"点击跳转"调用goAuth函数
					that.goAuth()
				}
		}),
	})
},
goAuth() {
		let that = this
        //用户点击"点击跳转"之后,调用uni.openSetting方法跳到设置页面
		uni.openSetting({
		    success: (res => {
                //跳到设置页面回来判断用户是否把摄像头开关打开了,如果打开即用户同意授权,直接调用addImg进行下一步拍照功能就行,如果没打开代表拒绝授权,重新调用that.showModal()方法继续提示,直到用户授权为止
				if (res.authSetting["scope.camera"]) {
					that.addImg()
				} else {
					that.showModal()
				}
		    })
		})
},
综上:下面是所有完整的代码:
//点击拍照按钮
    //授权
authCamera() {
	let that = this
	uni.authorize({
		scope: 'scope.camera',
		success: (res => {
            //同意授权摄像头,去拍照
			that.addImg()
		}),
		fail:(res=> {
            //拒绝授权,这是弹窗引导用户去设置中打开摄像头
			that.showModal()
	    }),
	})
},
showModal() {
	let that = this
	uni.showModal({
		content: "当前页面功能需打开相机权限,请点击跳转设置",
		showCancel: true,
		confirmText: "点击跳转",
		success: (res => {
			if (res.confirm) {
				that.goAuth()
			}
		}),
	})
},
goAuth() {
	let that = this
	uni.openSetting({
		success: (res => {
			if (res.authSetting["scope.camera"]) {
				that.addImg()
			} else {
				that.showModal()
			}
		})
	})
},
//拍照功能
addImg() {
	let that = this
	uni.chooseMedia({
		count: 1,
		sizeType: ['compressed'],
		mediaType:['image'],
		sourceType:['camera'],
		success: (res) => {
			  for(let i = 0; i < res.tempFiles.length; i++){
			  	 that.items.push({url:res.tempFiles[i].tempFilePath})
			  }
		},
		fail: function (res) {
			console.log('拍摄图片失败',res)
		}
	});
},
html中通过image遍历items就可以啦:
		  <view  v-for="(item,index) in items" :key="index">
		    <image :src="item.url" :data-imgurl="item.url" class="grace-add-list-img" :mode="imgMode"></image>
		  </view>
希望Jenna的帖子能帮助到努力的你,笔芯!


 2299
2299

 被折叠的 条评论
为什么被折叠?
被折叠的 条评论
为什么被折叠?
 到【灌水乐园】发言


