


<androidx.appcompat.widget.Toolbar
xmlns:app=“http://schemas.android.com/apk/res-auto”
android:id=“@+id/toolbar”
android:layout_width=“match_parent”
android:layout_height=“?attr/actionBarSize”
android:background=“@color/white”
android:elevation=“@dimen/dp_2”
app:contentInsetLeft=“0dp”
app:contentInsetStart=“0dp”
app:contentInsetStartWithNavigation=“0dp”
app:layout_constraintEnd_toEndOf=“parent”
app:layout_constraintLeft_toLeftOf=“parent”
app:layout_constraintTop_toTopOf=“parent”
app:navigationIcon=“@mipmap/icon_return”
app:popupTheme=“@style/AppTheme.PopupOverlay”>
<LinearLayout
android:layout_width=“match_parent”
android:layout_height=“@dimen/dp_30”
android:layout_marginRight=“@dimen/dp_12”
android:layout_weight=“1”
android:background=“@drawable/shape_gray_bg_14”
android:gravity=“center_vertical”
android:paddingLeft=“@dimen/dp_12”
android:paddingRight=“@dimen/dp_12”>
<ImageView
android:layout_width=“@dimen/dp_16”
android:layout_height=“@dimen/dp_16”
android:src=“@mipmap/icon_search” />
<EditText
android:id=“@+id/edit_query”
android:layout_width=“match_parent”
android:layout_height=“wrap_content”
android:layout_weight=“1”
android:background=“@null”
android:hint=“添加城市”
android:imeOptions=“actionSearch”
android:paddingLeft=“@dimen/dp_8”
android:paddingRight=“@dimen/dp_4”
android:singleLine=“true”
android:textColor=“@color/black”
android:textCursorDrawable=“@drawable/cursor_style”
android:textSize=“@dimen/sp_14” />
<ImageView
android:id=“@+id/iv_clear_search”
android:layout_width=“@dimen/dp_16”
android:layout_height=“@dimen/dp_16”
android:src=“@mipmap/icon_delete”
android:visibility=“gone” />
</androidx.appcompat.widget.Toolbar>
<LinearLayout
android:visibility=“gone”
android:id=“@+id/lay_normal”
android:gravity=“center”
android:orientation=“vertical”
android:layout_width=“match_parent”
android:layout_height=“match_parent”>
<ImageView
android:layout_width=“@dimen/dp_160”
android:layout_height=“@dimen/dp_160”
android:src=“@mipmap/icon_normal”/>
<TextView
android:textSize=“@dimen/sp_16”
android:text=“空空如也~”
android:textColor=“@color/dark_gray”
android:layout_marginTop=“@dimen/dp_12”
android:layout_width=“wrap_content”
android:layout_height=“wrap_content”/>
<androidx.recyclerview.widget.RecyclerView
android:id=“@+id/rv_commonly_used”
android:layout_width=“match_parent”
android:layout_height=“match_parent”
android:scrollbars=“none” />
<androidx.recyclerview.widget.RecyclerView
android:id=“@+id/rv_search”
android:visibility=“gone”
android:layout_width=“match_parent”
android:layout_height=“match_parent”
android:scrollbars=“none” />
可以看到这里布局和搜索城市的布局有些类似,但不一样,这里的搜索出来的结果不会产生搜索记录,当点击搜索出来的城市时,就去查询这个城市的天气,同时这个城市也会放入常用城市列表里面,这里可以用缓存来做处理,也可以通过数据库来处理。
② Android SQLite
相信很多从事Android开发的程序员都了解过SQLite,但是用过的人并不多,这是为什么呢?因为一旦数据量很多的情况下我们不会用SQLite,而是通过服务器的数据库返回数据,而数据量少的时候用缓存就可以解决问题,所以这也是SQLite尴尬的地方,这是我个人看法,不过这个SQLite还是很重要的,不然我还是会用缓存的,如果是使用原生的SQLite代码就会比较的繁琐,所以这里我们可以用第三方库来快速实现功能,这里使用郭霖大神的LitePal框架
首先是在mvplibrary下的build.gradle中添加依赖
//Android SQLite操作框架
api ‘org.litepal.guolindev:core:3.1.1’
//列表item侧滑删除
api ‘com.github.mcxtzhang:SwipeDelMenuLayout:V1.3.0’

应该是一目了然吧,记得Sync哦~
然后配置litepal.xml,将项目预览模式切换为Project,然后打开mvplibrary,创建一个assets文件夹,再创建一个litepal.xml文件
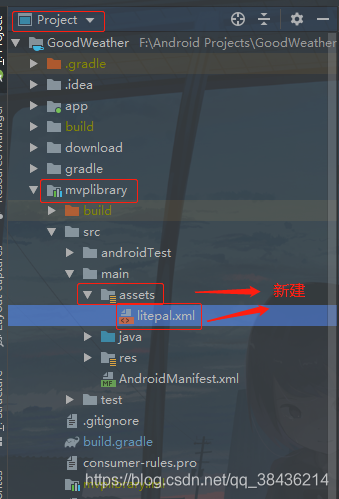
文件中的代码如下
<?xml version="1.0" encoding="utf-8"?>比较的简单
然后要在app下的WeatherApplication中进行初始化

现在你可以创建数据实体了,然后在mvplibrary下创建一个数据实体bean

代码如下:
package com.llw.mvplibrary.bean;
import org.litepal.crud.LitePalSupport;
public class ResidentCity extends LitePalSupport {
private int id;//编号
private String location;//地区/城市名称
private String parent_city;//该地区/城市的上级城市
private String admin_area;//该地区/城市所属行政区域
private String cnty;//该地区/城市所属国家名称
public int getId() {
return id;
}
public void setId(int id) {
this.id = id;
}
public String getLocation() {
return location;
}
public void setLocation(String location) {
this.location = location;
}
public String getParent_city() {
return parent_city;
}
public void setParent_city(String parent_city) {
this.parent_city = parent_city;
}
public String getAdmin_area() {
return admin_area;
}
public void setAdmin_area(String admin_area) {
this.admin_area = admin_area;
}
public String getCnty() {
return cnty;
}
public void setCnty(String cnty) {
this.cnty = cnty;
}
}
然后在litepal.xml中增加一个mapping

最后在WeatherApplication中的onCreate方法中初始化,初始化的时候,你的数据库就创建好了,数据库名称是GoodWeather,表名是ResidentCity

那么这一块的内容就写完了,只需要在实际应用中结合业务逻辑使用就可以了,当然你也可以去自己尝试一下,感兴趣的可以看Android LitePal的简单使用这篇文章。
③ 布局item
通过最上面的效果图可以看到是两个列表,其中一个是已经添加的城市列表,另一个是搜索出来的城市列表,既然两个列表就要有两个item,当然你也可以用一个item来写,只不过用的时候要多写一些代码,首先当然是从布局开始着手了。

在app中res下的layout中创建两个布局文件
item_commonly_city_list.xml
<?xml version="1.0" encoding="utf-8"?><LinearLayout android:orientation=“vertical”
xmlns:android=“http://schemas.android.com/apk/res/android”
android:layout_width=“match_parent”
android:layout_height=“wrap_content”>
<com.mcxtzhang.swipemenulib.SwipeMenuLayout
xmlns:android=“http://schemas.android.com/apk/res/android”
android:layout_width=“match_parent”
android:layout_height=“@dimen/dp_50”
android:clickable=“true”
android:paddingBottom=“1dp”>
<TextView
android:id=“@+id/tv_city_name”
android:gravity=“center_vertical”
android:paddingLeft=“@dimen/dp_16”
android:layout_width=“match_parent”
android:layout_height=“match_parent”
android:textColor=“@color/shallow_black”
android:background=“?android:attr/selectableItemBackground”
android:text=“城市”/>
<Button
android:id=“@+id/btn_delete”
android:layout_width=“@dimen/dp_100”
android:layout_height=“match_parent”
android:background=“@color/red”
android:text=“删除”
android:textColor=“@android:color/white”/>
</com.mcxtzhang.swipemenulib.SwipeMenuLayout>
<View
android:background=“@color/line_gray”
android:layout_width=“match_parent”
android:layout_height=“@dimen/dp_1”/>
item_commonly_city_add_list.xml
<?xml version="1.0" encoding="utf-8"?><LinearLayout xmlns:android=“http://schemas.android.com/apk/res/android”
xmlns:app=“http://schemas.android.com/apk/res-auto”
android:layout_width=“match_parent”
android:id=“@+id/item_add_city”
android:background=“?android:attr/selectableItemBackground”
android:layout_height=“wrap_content”
android:orientation=“vertical”>
<TextView
android:id=“@+id/tv_location”
android:gravity=“center_vertical”
android:layout_width=“match_parent”
android:textSize=“@dimen/sp_16”
android:paddingLeft=“@dimen/dp_16”
android:layout_height=“@dimen/dp_50”
android:textColor=“@color/shallow_black” />
<View
android:layout_width=“match_parent”
android:layout_height=“@dimen/dp_1”
android:background=“@color/line_gray” />
④ 列表适配器
然后创建适配器

CommonlyCityAdapter.java
package com.llw.goodweather.adapter;
import androidx.annotation.Nullable;
import com.chad.library.adapter.base.BaseQuickAdapter;
import com.chad.library.adapter.base.BaseViewHolder;
import com.llw.goodweather.R;
import com.llw.mvplibrary.bean.ResidentCity;
import java.util.List;
/**
- 常用城市列表适配器
*/
public class CommonlyCityAdapter extends BaseQuickAdapter<ResidentCity, BaseViewHolder> {
public CommonlyCityAdapter(int layoutResId, @Nullable List data) {
super(layoutResId, data);
}
@Override
protected void convert(BaseViewHolder helper, ResidentCity item) {
helper.setText(R.id.tv_city_name, item.getLocation());
//添加点击事件
helper.addOnClickListener(R.id.tv_city_name)
.addOnClickListener(R.id.btn_delete);
}
}
CommonlyCityAddAdapter.java
package com.llw.goodweather.adapter;
import android.text.SpannableStringBuilder;
import android.text.style.ForegroundColorSpan;
import android.widget.TextView;
import androidx.annotation.Nullable;
import com.chad.library.adapter.base.BaseQuickAdapter;
import com.chad.library.adapter.base.BaseViewHolder;
import com.llw.goodweather.R;
import com.llw.goodweather.bean.SearchCityResponse;
import java.util.List;
import static android.text.Spanned.SPAN_EXCLUSIVE_EXCLUSIVE;
/**
- 添加城市时搜索返回结果列表适配器
*/
public class CommonlyCityAddAdapter extends BaseQuickAdapter<SearchCityResponse.HeWeather6Bean.BasicBean, BaseViewHolder> {
private String edStr;//关键字
public CommonlyCityAddAdapter(int layoutResId, @Nullable List<SearchCityResponse.HeWeather6Bean.BasicBean> data) {
super(layoutResId, data);
}
@Override
protected void convert(BaseViewHolder helper, SearchCityResponse.HeWeather6Bean.BasicBean item) {
TextView textView = helper.getView(R.id.tv_location);
String result = item.getLocation() + " , " + item.getParent_city() + " , " + item.getAdmin_area() + " , " + item.getCnty();
if (edStr != null && edStr.length() > 0) {
textView.setText(matcherSearchText(mContext.getResources().getColor(R.color.shallow_yellow),result,edStr));
} else {
textView.setText(item.getLocation() + " , " +
item.getParent_city() + " , " +
item.getAdmin_area() + " , " +
item.getCnty());
}
helper.addOnClickListener(R.id.item_add_city);
}
/**
-
改变颜色
-
@param str 输入的文本
*/
public void changTxColor(String str) {
edStr = str;
notifyDataSetChanged();
}
/**
-
改变一段文本中第一个关键字的文字颜色
-
@param color 要改变文字的颜色
-
@param string 文本字符串
-
@param keyWord 关键字
-
@return
*/
public static CharSequence matcherSearchText(int color, String string, String keyWord) {
SpannableStringBuilder builder = new SpannableStringBuilder(string);
int indexOf = string.indexOf(keyWord);
if (indexOf != -1) {
builder.setSpan(new ForegroundColorSpan(color), indexOf, indexOf + keyWord.length(), SPAN_EXCLUSIVE_EXCLUSIVE);
}
return builder;
}
}
适配器的代码都是比较简单的,其中matcherSearchText方法是根据传入的关键字找到它在一段字符串中的第一次出现的位置,并修改字体颜色。
⑤ 代码整合
打开CommonlyUsedCityActivity.java

然后会出现五个构造方法,分别是
//数据初始化
@Override
public void initData(Bundle savedInstanceState) {
}
@Override
public int getLayoutId() {
return R.layout.activity_commonly_used_city;
}
@Override
protected SearchCityContract.SearchCityPresenter createPresent() {
return new SearchCityContract.SearchCityPresenter();
}
/**
-
请求数据返回处理
-
@param response
*/
@Override
public void getSearchCityResult(Response response) {
}
/**
- 网络异常返回处理
*/
@Override
public void getDataFailed() {
dismissLoadingDialog();//关闭弹窗
ToastUtils.showShortToast(context, “网络异常”);//这里的context是框架中封装好的,等同于this
}
现在你可以把onCreate方法删掉了。
首先初始化控件
@BindView(R.id.edit_query)
EditText editQuery;//输入框
@BindView(R.id.iv_clear_search)
ImageView ivClearSearch;//清除输入框内容的图标
@BindView(R.id.toolbar)
Toolbar toolbar;//标题控件
@BindView(R.id.rv_commonly_used)
RecyclerView rvCommonlyUsed;//常用城市列表
@BindView(R.id.rv_search)
RecyclerView rvSearch;//搜索城市列表
@BindView(R.id.lay_normal)
LinearLayout layNormal;//常用城市为空时展示的布局
CommonlyCityAdapter mAdapter;//常用城市列表适配器
List<SearchCityResponse.HeWeather6Bean.BasicBean> mList = new ArrayList<>();//数据源
CommonlyCityAddAdapter mAdapterAdd;//搜索城市列表适配器
List cityList;//常用城市列表
根据常用城市数据来进行页面控件显示/隐藏
/**
- 根据常用城市数据来进行页面控件显示/隐藏
*/
private void initHideOrShow() {
ivClearSearch.setVisibility(View.GONE);//隐藏清除输入框内容的图标
rvSearch.setVisibility(View.GONE);//隐藏搜索结果列表
if (cityList != null && cityList.size() > 0) {//有数据
rvCommonlyUsed.setVisibility(View.VISIBLE);//显示常用城市列表
layNormal.setVisibility(View.GONE);//隐藏没有数据时的布局
} else {//没数据
rvCommonlyUsed.setVisibility(View.GONE);//隐藏常用城市列表
layNormal.setVisibility(View.VISIBLE);//显示没有数据时的布局
}
}
初始化常用城市列表数据
这个方法主要是查询表中的所有数据,有数据就渲染出来,没有数据就更换为相应的表示布局,其中对item中的点击事件做了处理,分别item的点击和侧滑菜单的点击。
/**
- 初始化常用城市列表数据
*/
private void initCityList() {
//查询ResidentCity表中所有数据
cityList = LitePal.findAll(ResidentCity.class);
if (cityList.size() > 0 && cityList != null) {
mAdapter = new CommonlyCityAdapter(R.layout.item_commonly_city_list, cityList);
rvCommonlyUsed.setLayoutManager(new LinearLayoutManager(context));


 1499
1499

 被折叠的 条评论
为什么被折叠?
被折叠的 条评论
为什么被折叠?
 到【灌水乐园】发言


