


使用语义分割框架 PyTorch 和 MMSegmentation训练处理无人机视角下的语义分割数据集 并识别检测无人机视角语义分割任务
文章目录
以下文字及代码仅供参考。
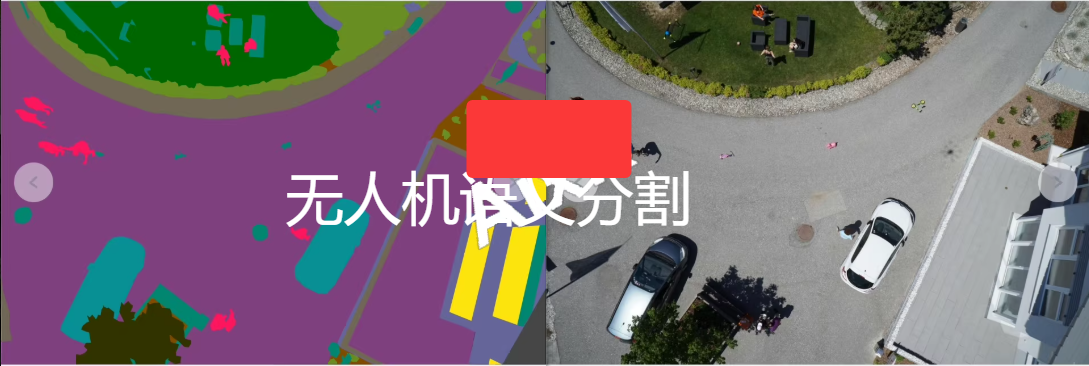
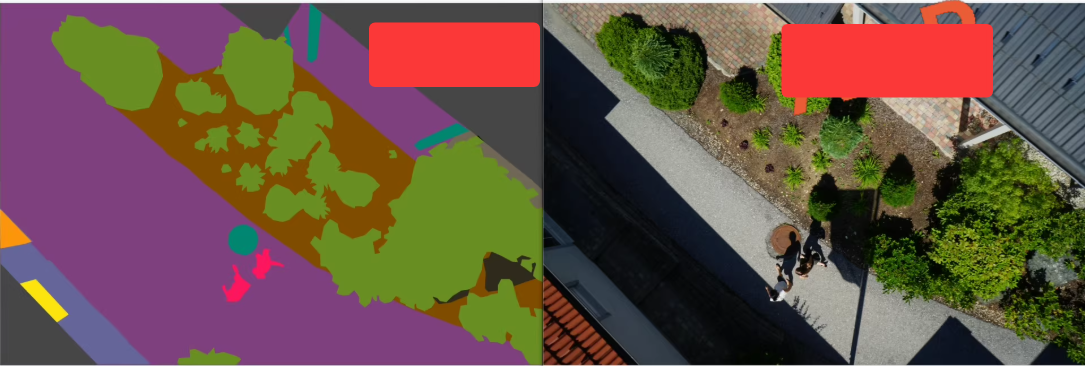
无人机视角下语义分割数据集
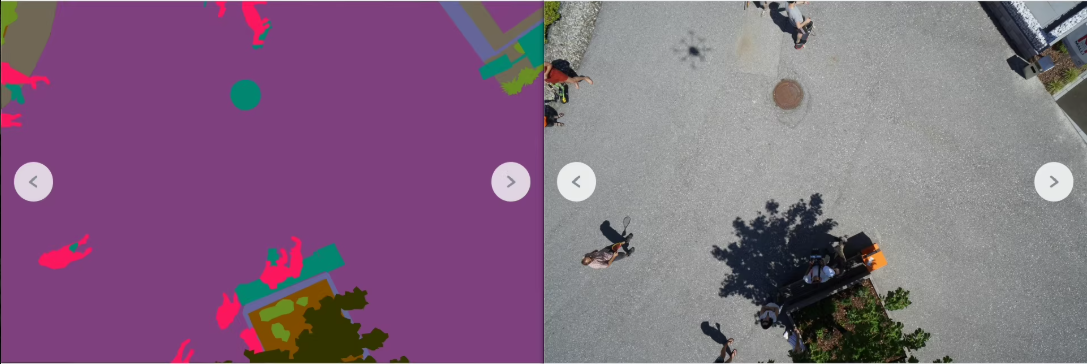
无人机:DJI mini3
数据类型:原始图片,已分类,语义分割标签
总内存大小:(1200张图片)
图片分辨率:6000*4000
采集高度:20~45m
类别:tree, gras, other vegetation, dirt, gravel, rocks, water, paved area, pool, person, dog, car, bicycle, roof, wall, fence, fence-pole, window, door, obstacle
1
1

映射给

数据准备到模型推理和性能评估的详细步骤。
使用语义分割框架 PyTorch 和 MMSegmentation 来处理无人机视角下的语义分割任务。
1. 环境搭建
安装依赖
# 创建虚拟环境(可选)
conda create -n drone_seg python=3.8
conda activate drone_seg

# 安装 PyTorch 和 torchvision
pip install torch torchvision

# 安装 MMSegmentation
pip install mmcv-full -f https://download.openmmlab.com/mmcv/dist/index.html
pip install mmsegmentation

# 其他依赖
pip install numpy pillow tqdm opencv-python
2. 数据准备
数据格式转换
假设原始图片和标签文件分别存储在 images/ 和 labels/ 文件夹中,且标签文件是像素级标注的 PNG 图像。
我们需要将数据转换为 MMSegmentation 支持的格式(COCO 或自定义格式)。
import os
from PIL import Image

def convert_labels_to_indexed(label_path, output_path):
    # 将彩色标签图转换为索引图
    label = Image.open(label_path)
    label_array = np.array(label)

    # 假设每个颜色对应一个类别
    color_to_class = {
        (0, 0, 0): 0,       # background
        (255, 0, 0): 1,     # tree
        (0, 255, 0): 2,     # grass
        (0, 0, 255): 3,     # other vegetation
        # 添加其他类别的 RGB 映射
    }

    indexed_label = np.zeros(label_array.shape[:2], dtype=np.uint8)
    for color, class_id in color_to_class.items():
        mask = np.all(label_array == color, axis=-1)
        indexed_label[mask] = class_id

    indexed_label_image = Image.fromarray(indexed_label)
    indexed_label_image.save(output_path)

# 遍历所有标签文件并转换
label_dir = "dataset/labels"
output_dir = "dataset/converted_labels"
os.makedirs(output_dir, exist_ok=True)

for label_file in os.listdir(label_dir):
    label_path = os.path.join(label_dir, label_file)
    output_path = os.path.join(output_dir, label_file)
    convert_labels_to_indexed(label_path, output_path)
3. 数据划分
将数据划分为训练集、验证集和测试集:
import os
import random
import shutil

def split_dataset(image_dir, label_dir, output_dir, train_ratio=0.7, val_ratio=0.2):
    images = os.listdir(image_dir)
    random.shuffle(images)

    train_size = int(len(images) * train_ratio)
    val_size = int(len(images) * val_ratio)

    splits = {
        "train": images[:train_size],
        "val": images[train_size:train_size + val_size],
        "test": images[train_size + val_size:]
    }

    for split, files in splits.items():
        split_dir = os.path.join(output_dir, split)
        os.makedirs(os.path.join(split_dir, "images"), exist_ok=True)
        os.makedirs(os.path.join(split_dir, "labels"), exist_ok=True)

        for file in files:
            src_image = os.path.join(image_dir, file)
            src_label = os.path.join(label_dir, file.replace(".jpg", ".png"))

            dst_image = os.path.join(split_dir, "images", file)
            dst_label = os.path.join(split_dir, "labels", file.replace(".jpg", ".png"))

            shutil.copy(src_image, dst_image)
            shutil.copy(src_label, dst_label)

split_dataset("dataset/images", "dataset/converted_labels", "dataset/split")
4. 数据配置
创建 dataset_config.py 文件,定义数据集路径和类别信息:
# dataset_config.py
data_root = 'dataset/split'

img_norm_cfg = dict(
    mean=[123.675, 116.28, 103.53], std=[58.395, 57.12, 57.375], to_rgb=True)

train_pipeline = [
    dict(type='LoadImageFromFile'),
    dict(type='LoadAnnotations'),
    dict(type='Resize', img_scale=(6000, 4000), ratio_range=(0.5, 2.0)),
    dict(type='RandomCrop', crop_size=(512, 512), cat_max_ratio=0.75),
    dict(type='RandomFlip', prob=0.5),
    dict(type='Normalize', **img_norm_cfg),
    dict(type='Pad', size=(512, 512), pad_val=0, seg_pad_val=255),
    dict(type='DefaultFormatBundle'),
    dict(type='Collect', keys=['img', 'gt_semantic_seg']),
]

test_pipeline = [
    dict(type='LoadImageFromFile'),
    dict(
        type='MultiScaleFlipAug',
        img_scale=(6000, 4000),
        flip=False,
        transforms=[
            dict(type='Resize', keep_ratio=True),
            dict(type='RandomFlip'),
            dict(type='Normalize', **img_norm_cfg),
            dict(type='ImageToTensor', keys=['img']),
            dict(type='Collect', keys=['img']),
        ])
]

data = dict(
    samples_per_gpu=4,
    workers_per_gpu=4,
    train=dict(
        type='CustomDataset',
        data_root=data_root,
        img_dir='train/images',
        ann_dir='train/labels',
        pipeline=train_pipeline),
    val=dict(
        type='CustomDataset',
        data_root=data_root,
        img_dir='val/images',
        ann_dir='val/labels',
        pipeline=test_pipeline),
    test=dict(
        type='CustomDataset',
        data_root=data_root,
        img_dir='test/images',
        ann_dir='test/labels',
        pipeline=test_pipeline))
5. 模型训练
选择适合的模型(如 DeepLabV3+),并进行训练。
from mmseg.apis import train_segmentor
from mmseg.datasets import build_dataset
from mmseg.models import build_segmentor
from mmcv import Config

# 加载配置文件
cfg = Config.fromfile('configs/deeplabv3plus/deeplabv3plus_r50-d8_512x512_40k_voc12aug.py')

# 修改配置
cfg.data.train.type = 'CustomDataset'
cfg.data.val.type = 'CustomDataset'
cfg.data.test.type = 'CustomDataset'

cfg.data.train.img_dir = 'train/images'
cfg.data.train.ann_dir = 'train/labels'
cfg.data.val.img_dir = 'val/images'
cfg.data.val.ann_dir = 'val/labels'
cfg.data.test.img_dir = 'test/images'
cfg.data.test.ann_dir = 'test/labels'

cfg.model.decode_head.num_classes = 21  # 类别数
cfg.model.auxiliary_head.num_classes = 21

# 构建数据集和模型
datasets = [build_dataset(cfg.data.train)]
model = build_segmentor(cfg.model)

# 开始训练
train_segmentor(model, datasets, cfg, distributed=False, validate=True)
6. 模型推理
编写推理代码,对单张图像或批量图像进行预测。
from mmseg.apis import inference_segmentor, init_segmentor
import cv2

# 初始化模型
config_file = 'configs/deeplabv3plus/deeplabv3plus_r50-d8_512x512_40k_voc12aug.py'
checkpoint_file = 'work_dirs/deeplabv3plus/latest.pth'
model = init_segmentor(config_file, checkpoint_file, device='cuda:0')

# 推理单张图像
img_path = 'dataset/test/images/image_001.jpg'
result = inference_segmentor(model, img_path)

# 可视化结果
pred_mask = result[0].astype(np.uint8)
overlay = cv2.addWeighted(cv2.imread(img_path), 0.5, pred_mask, 0.5, 0)
cv2.imshow('Result', overlay)
cv2.waitKey(0)
cv2.destroyAllWindows()
7. 性能评估
使用 MMSegmentation 提供的工具评估模型性能:
from mmseg.apis import multi_gpu_test, single_gpu_test
from mmseg.datasets import build_dataloader, build_dataset

# 构建验证数据集
val_dataset = build_dataset(cfg.data.val)

# 构建数据加载器
data_loader = build_dataloader(
    val_dataset,
    samples_per_gpu=1,
    workers_per_gpu=4,
    dist=False,
    shuffle=False)

# 评估模型
results = single_gpu_test(model, data_loader)

# 打印评估结果
metrics = val_dataset.evaluate(results, metric='mIoU')
print(metrics)
总结
从数据准备到模型推理和性能评估的完整流程。通过 MMSegmentation 和 PyTorch 的强大功能,可以高效地完成无人机视角下的语义分割任务。
仅供参考,。


 被折叠的 条评论
为什么被折叠?
被折叠的 条评论
为什么被折叠?
 到【灌水乐园】发言


