


构建基于YOLOv10的玉米叶片病变检测系统
文章目录
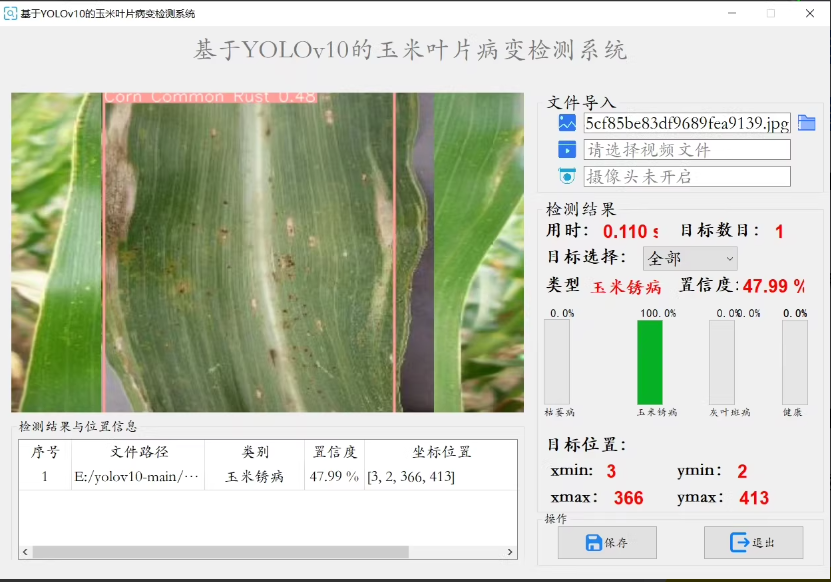
基于YOLOv10的玉米叶片病变检测系统
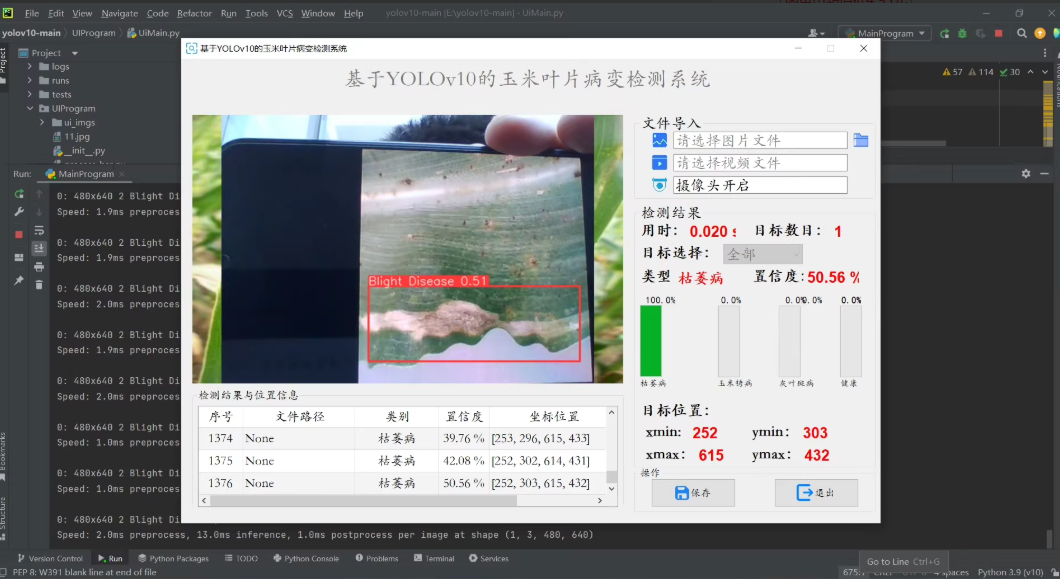
检测类别 [枯萎病、玉米锈病、灰叶斑病、健康] 四种情况
通过PYQT构建UI界面,可通过图片检测/视频检测/摄像头实时检测。
构建基于YOLOv10的玉米叶片病变检测系统涉及到多个步骤,包括环境搭建、数据准备、模型训练、推理以及性能评估等。
代码示例。仅供参考。
环境搭建
首先,确保安装了必要的库和工具:
pip install torch torchvision torchaudio
pip install opencv-python-headless numpy matplotlib
git clone https://github.com/ultralytics/yolov5  # 克隆YOLOv5仓库,假设YOLOv10类似
cd yolov5
pip install -r requirements.txt
数据准备
格式转换与数据划分
假设同学你已经有了标注好的数据集(包含图像及其对应的标签文件),需要将其转换为YOLO格式,并划分为训练集和验证集。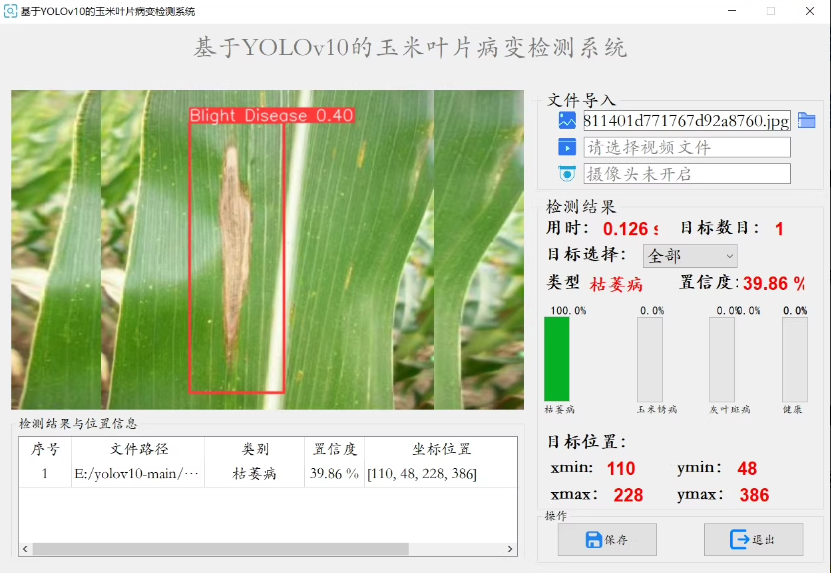
- 转换标签格式:YOLO要求标签文件是文本文件,每行代表一个对象,格式为
<class_index> <x_center> <y_center> <width> <height>(归一化坐标)。 - 数据划分:将数据集随机分成训练集和验证集(如8:2比例)。
以下是一个简单的Python脚本示例,用于执行上述任务:
import os
import random
import shutil

def convert_labels(input_dir, output_dir):
    # 假设已经有一个函数convert_to_yolo_format来处理单个文件的转换
    for file in os.listdir(input_dir):
        if file.endswith('.xml'):  # 假设原始标签是Pascal VOC格式
            convert_to_yolo_format(os.path.join(input_dir, file), output_dir)

def split_dataset(images_dir, labels_dir, train_dir, val_dir, ratio=0.8):
    files = [f.split('.')[0] for f in os.listdir(images_dir)]
    random.shuffle(files)
    split_point = int(len(files) * ratio)
    train_files, val_files = files[:split_point], files[split_point:]

    for phase, file_list in [('train', train_files), ('val', val_files)]:
        dest_image_dir = os.path.join(train_dir if phase == 'train' else val_dir, 'images')
        dest_label_dir = os.path.join(train_dir if phase == 'train' else val_dir, 'labels')
        os.makedirs(dest_image_dir, exist_ok=True)
        os.makedirs(dest_label_dir, exist_ok=True)

        for f in file_list:
            shutil.copy(os.path.join(images_dir, f + '.jpg'), dest_image_dir)
            shutil.copy(os.path.join(labels_dir, f + '.txt'), dest_label_dir)
数据配置
创建一个.yaml文件来定义你的数据集路径和类别信息:
train: ./data/train/images
val: ./data/val/images
nc: 4  # 类别数量
names: ['枯萎病', '玉米锈病', '灰叶斑病', '健康']
模型训练
使用YOLOv5的训练脚本来训练模型。假设你已经在yolov5目录下:
python train.py --img 640 --batch 16 --epochs 50 --data corn_leaf_disease.yaml --weights yolov5s.pt
--img:输入图像尺寸。--batch:批次大小。--epochs:训练周期数。--data:数据配置文件路径。--weights:预训练权重路径(可以使用YOLOv5的预训练模型作为起点)。
配置超参数
根据实验结果调整学习率、批次大小、训练轮次等超参数以优化模型性能。
模型推理
训练完成后,你可以使用如下命令进行推理:
python detect.py --source ./data/images/test.jpg --weights runs/train/exp/weights/best.pt --conf 0.25
推理代码
为了批量处理图像并保存结果,可以修改detect.py脚本或编写新的Python脚本:
from pathlib import Path
from models.experimental import attempt_load
from utils.general import non_max_suppression, scale_coords
from utils.torch_utils import select_device
import cv2

# 加载模型
device = select_device('')
model = attempt_load('runs/train/exp/weights/best.pt', map_location=device)

# 处理图像
def process_image(image_path):
    img = cv2.imread(image_path)
    # 图像预处理...
    pred = model(img, augment=False)[0]
    pred = non_max_suppression(pred, 0.25, 0.45, classes=None, agnostic=False)
    # 后处理预测结果...
    return results

# 批量处理
image_paths = list(Path('./data/images').glob('*.jpg'))
for image_path in image_paths:
    results = process_image(str(image_path))
    # 保存或显示结果...
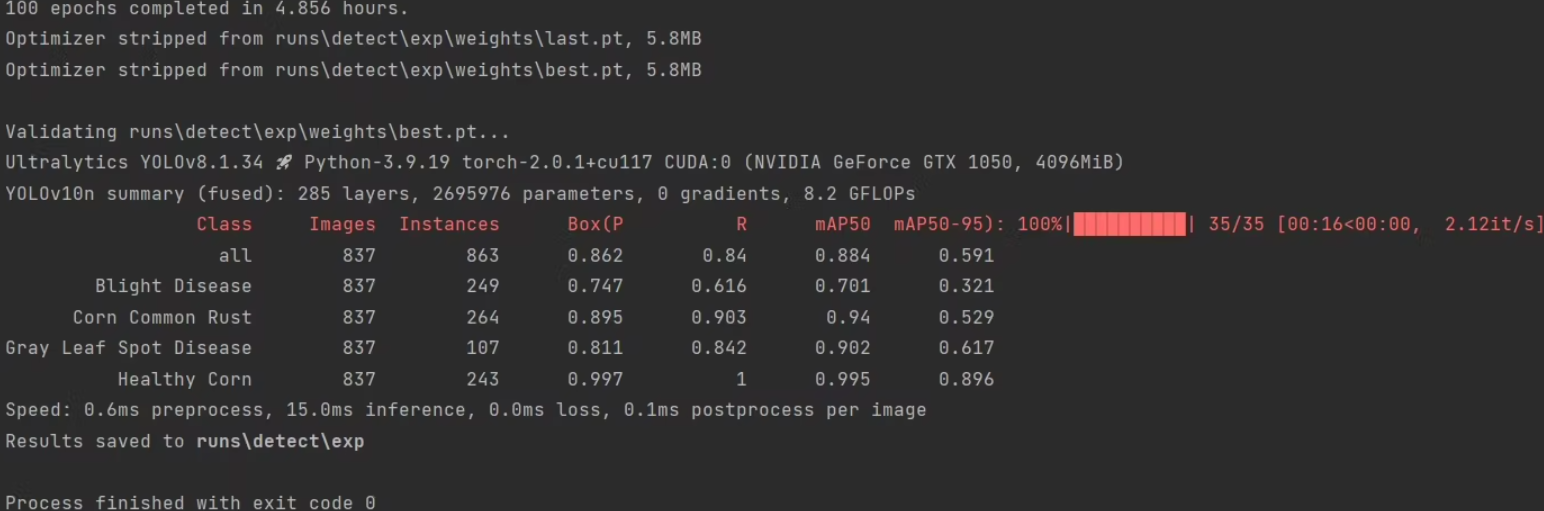
性能评估
使用mAP(mean Average Precision)等指标评估模型性能。YOLOv5自带的val.py脚本可以帮助完成这项工作:
python val.py --data corn_leaf_disease.yaml --weights runs/train/exp/weights/best.pt --img 640
输出模型在验证集上的表现,包括mAP和其他详细指标。
1. 环境准备
确保安装了必要的库:
pip install PyQt5 opencv-python-headless numpy torch torchvision
2. YOLOv10模型配置
假设你已经有了训练好的YOLOv10模型权重文件(.pt格式),并且已经定义好了相应的配置文件(.yaml)。
3. 创建PyQt5 UI
首先,设计UI布局。你可以使用Qt Designer来设计UI,并将其转换为Python代码。
ui_main.py (由Qt Designer生成)
from PyQt5 import QtCore, QtGui, QtWidgets

class Ui_MainWindow(object):
    def setupUi(self, MainWindow):
        MainWindow.setObjectName("MainWindow")
        MainWindow.resize(800, 600)
        self.centralwidget = QtWidgets.QWidget(MainWindow)
        self.centralwidget.setObjectName("centralwidget")

        # 添加你的控件和布局代码

        MainWindow.setCentralWidget(self.centralwidget)
        self.retranslateUi(MainWindow)
        QtCore.QMetaObject.connectSlotsByName(MainWindow)

    def retranslateUi(self, MainWindow):
        _translate = QtCore.QCoreApplication.translate
        MainWindow.setWindowTitle(_translate("MainWindow", "基于YOLOv10的玉米叶片病变检测系统"))
4. 主程序逻辑
在主程序中,我们将集成YOLOv10模型和PyQt5 UI。
main_program.py
import sys
import os
import cv2
import numpy as np
from PyQt5.QtWidgets import QApplication, QMainWindow, QFileDialog, QTableWidgetItem
from PyQt5.QtGui import QImage, QPixmap
from ui_main import Ui_MainWindow
import torch
from yolov5.models.experimental import attempt_load
from yolov5.utils.general import non_max_suppression, scale_coords
from yolov5.utils.torch_utils import select_device

class MainWindow(QMainWindow, Ui_MainWindow):
    def __init__(self):
        super().__init__()
        self.setupUi(self)
        self.device = select_device('')
        self.model = attempt_load('best.pt', map_location=self.device)  # 加载YOLOv10模型
        self.init_slots()

    def init_slots(self):
        self.pushButton_select_image.clicked.connect(self.select_image)
        self.pushButton_select_video.clicked.connect(self.select_video)
        self.pushButton_camera.clicked.connect(self.open_camera)

    def select_image(self):
        file_name, _ = QFileDialog.getOpenFileName(self, '选择图片文件', '', 'Images (*.png *.xpm *.jpg)')
        if file_name:
            self.detect_image(file_name)

    def detect_image(self, file_name):
        img = cv2.imread(file_name)
        img = letterbox(img, new_shape=640)[0]
        img = img[:, :, ::-1].transpose(2, 0, 1)  # BGR to RGB, to 3x416x416
        img = np.ascontiguousarray(img)
        img = torch.from_numpy(img).to(self.device)
        img = img.float() / 255.0  # 0 - 255 to 0.0 - 1.0
        if img.ndimension() == 3:
            img = img.unsqueeze(0)

        pred = self.model(img, augment=False)[0]
        pred = non_max_suppression(pred, 0.25, 0.45, classes=None, agnostic=False)

        for i, det in enumerate(pred):  # detections per image
            if len(det):
                det[:, :4] = scale_coords(img.shape[2:], det[:, :4], img.shape).round()
                for *xyxy, conf, cls in reversed(det):
                    label = f'{self.model.names[int(cls)]} {conf:.2f}'
                    plot_one_box(xyxy, img, label=label, color=(0, 255, 0), line_thickness=3)

        qimg = QImage(img.data, img.shape[1], img.shape[0], QImage.Format_RGB888)
        pixmap = QPixmap.fromImage(qimg)
        self.label_result.setPixmap(pixmap)

    def select_video(self):
        pass  # 实现视频检测逻辑

    def open_camera(self):
        pass  # 实现摄像头实时检测逻辑

def letterbox(img, new_shape=(640, 640), color=(114, 114, 114), auto=True, scaleFill=False, scaleup=True):
    shape = img.shape[:2]  # current shape [height, width]
    if isinstance(new_shape, int):
        new_shape = (new_shape, new_shape)

    r = min(new_shape[0] / shape[0], new_shape[1] / shape[1])
    if not scaleup:  # only scale down, do not scale up (for better test mAP)
        r = min(r, 1.0)

    ratio = r, r  # width, height ratios
    new_unpad = int(round(shape[1] * r)), int(round(shape[0] * r))
    dw, dh = new_shape[1] - new_unpad[0], new_shape[0] - new_unpad[1]  # wh padding

    dw /= 2  # divide padding into 2 sides
    dh /= 2

    if shape[::-1] != new_unpad:  # resize
        img = cv2.resize(img, new_unpad, interpolation=cv2.INTER_LINEAR)
    top, bottom = int(round(dh - 0.1)), int(round(dh + 0.1))
    left, right = int(round(dw - 0.1)), int(round(dw + 0.1))
    img = cv2.copyMakeBorder(img, top, bottom, left, right, cv2.BORDER_CONSTANT, value=color)  # add border
    return img, ratio, (dw, dh)

def plot_one_box(x, img, color=None, label=None, line_thickness=None):
    tl = line_thickness or round(0.002 * (img.shape[0] + img.shape[1]) / 2) + 1  # line thickness
    c1, c2 = (int(x[0]), int(x[1])), (int(x[2]), int(x[3]))
    cv2.rectangle(img, c1, c2, color, thickness=tl, lineType=cv2.LINE_AA)
    if label:
        tf = max(tl - 1, 1)  # font thickness
        t_size = cv2.getTextSize(label, 0, fontScale=tl / 3, thickness=tf)[0]
        c2 = c1[0] + t_size[0], c1[1] - t_size[1] - 3
        cv2.rectangle(img, c1, c2, color, -1, cv2.LINE_AA)  # filled
        cv2.putText(img, label, (c1[0], c1[1] - 2), 0, tl / 3, [225, 255, 255], thickness=tf, lineType=cv2.LINE_AA)

if __name__ == '__main__':
    app = QApplication(sys.argv)
    window = MainWindow()
    window.show()
    sys.exit(app.exec_())
注意事项
- YOLOv10模型:你需要根据你的需求选择合适的YOLOv10模型权重文件。
- UI设计:使用Qt Designer设计更复杂的UI,并将生成的代码整合到
ui_main.py中。 - 视频和摄像头检测:需要实现对应的逻辑来处理视频流和摄像头输入。
- 性能优化:在实际应用中,可能需要对代码进行进一步的优化,以提高处理速度和准确性。
这个示例代码提供了一个基本框架,同学可以在此基础上进行扩展和优化,以满足具体的应用需求。
以上代码及文字仅供参考,


 被折叠的 条评论
为什么被折叠?
被折叠的 条评论
为什么被折叠?
 到【灌水乐园】发言


