


如何实现
深度学习目标检测中 对火灾数据集进行训练后_实现基于YOLOV5的火灾检测系统
基于YOLOV5的火灾检测系统

软件:Pycharm+Anaconda
环境:python=3.8 opencv_python PyQt5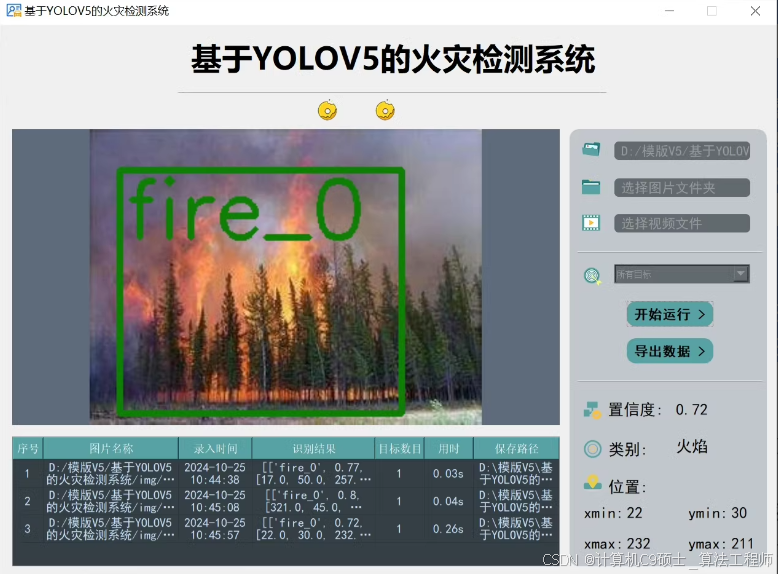
①选择图片识别火灾
②选择视频识别火灾
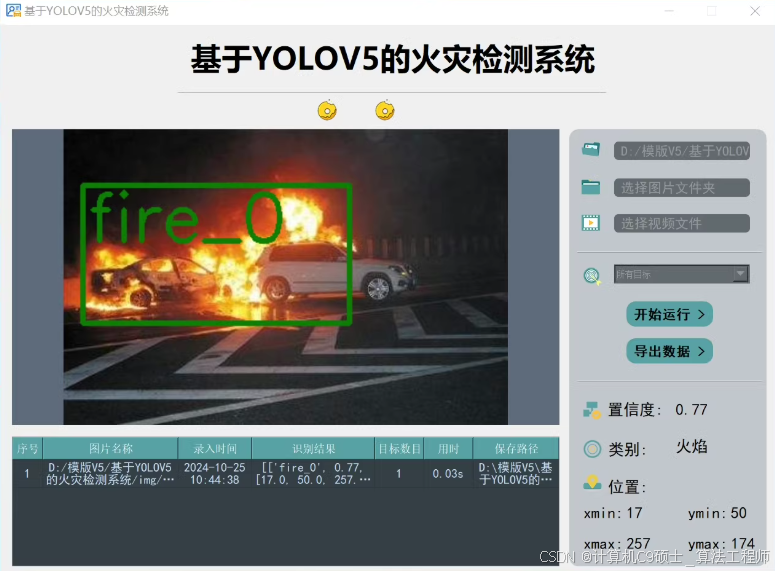
实现一个基于YOLOv5的火灾检测系统,包括UI界面设计、训练模型、数据集处理及评估等几个方面。
1. 环境配置
首先,确保你的开发环境已经配置好:
- 安装Anaconda,并创建一个新的Python 3.8环境。
- 在PyCharm中设置此环境为项目解释器。
- 使用pip安装必要的库:
pip install torch torchvision torchaudio opencv-python PyQt5
接着克隆YOLOv5仓库并安装其依赖:
git clone https://github.com/ultralytics/yolov5
cd yolov5
pip install -r requirements.txt
2. 数据集准备与预训练
假设你已经有了一个标记好的火灾图像数据集,格式符合YOLO的要求(即每个图像有一个对应的txt文件,包含边界框信息)。如果没有,你需要先标注数据集,可以使用LabelImg等工具。
创建data.yaml文件来描述你的数据集路径和类别信息:
train: ./path/to/train/images
val: ./path/to/val/images

nc: 1  # 假设只有一个类别:火灾
names: ['fire']
对于预训练,你可以直接使用YOLOv5s模型作为起点:
python train.py --img 640 --batch 16 --epochs 100 --data path/to/data.yaml --weights yolov5s.pt
3. 创建UI界面
使用Qt Designer设计UI界面,主要包括选择图片或视频进行检测的功能按钮。保存为.ui文件后,转换为Python文件:
pyuic5 -x your_ui_file.ui -o your_ui_file.py
然后,在PyCharm中创建主程序文件(如main.py),导入生成的UI文件并添加逻辑:
from PyQt5.QtWidgets import QApplication, QMainWindow, QFileDialog
from your_ui_file import Ui_MainWindow
import cv2
import sys
from pathlib import Path
import torch

class FireDetectionApp(QMainWindow, Ui_MainWindow):
    def __init__(self):
        super(FireDetectionApp, self).__init__()
        self.setupUi(self)
        self.initUI()

    def initUI(self):
        self.actionOpen_Image.triggered.connect(self.open_image)
        self.actionOpen_Video.triggered.connect(self.open_video)

    def open_image(self):
        fileName, _ = QFileDialog.getOpenFileName(self, "Open Image", "", "Image Files (*.png *.jpg *.jpeg)")
        if fileName:
            img = cv2.imread(fileName)
            self.detect_fire(img)

    def open_video(self):
        fileName, _ = QFileDialog.getOpenFileName(self, "Open Video", "", "Video Files (*.mp4 *.avi)")
        if fileName:
            cap = cv2.VideoCapture(fileName)
            while(cap.isOpened()):
                ret, frame = cap.read()
                if not ret:
                    break
                self.detect_fire(frame)
                if cv2.waitKey(1) & 0xFF == ord('q'):
                    break
            cap.release()

    def detect_fire(self, img):
        model = torch.hub.load('ultralytics/yolov5', 'custom', path='runs/train/exp/weights/best.pt')
        results = model(img)
        for i, (im, pred) in enumerate(zip(results.imgs, results.pred)):
            im = cv2.cvtColor(im, cv2.COLOR_RGB2BGR)
            if pred is not None and len(pred):
                for *box, conf, cls in pred:  # xyxy, confidence, class
                    label = f'{results.names[int(cls)]} {conf:.2f}'
                    plot_one_box(box, im, label=label, color=[0, 255, 0])
            cv2.imshow("Fire Detection", im)
        cv2.waitKey(0)
        cv2.destroyAllWindows()

def plot_one_box(x, img, color=None, label=None, line_thickness=None):
    tl = line_thickness or round(0.002 * (img.shape[0] + img.shape[1]) / 2) + 1  # line/font thickness
    color = color or [random.randint(0, 255) for _ in range(3)]
    c1, c2 = (int(x[0]), int(x[1])), (int(x[2]), int(x[3]))
    cv2.rectangle(img, c1, c2, color, thickness=tl, lineType=cv2.LINE_AA)
    if label:
        tf = max(tl - 1, 1)  # font thickness
        t_size = cv2.getTextSize(label, 0, fontScale=tl / 3, thickness=tf)[0]
        c2 = c1[0] + t_size[0], c1[1] - t_size[1] - 3
        cv2.rectangle(img, c1, c2, color, -1, cv2.LINE_AA)  # filled
        cv2.putText(img, label, (c1[0], c1[1] - 2), 0, tl / 3, [225, 255, 255], thickness=tf, lineType=cv2.LINE_AA)

if __name__ == '__main__':
    app = QApplication(sys.argv)
    mainWindow = FireDetectionApp()
    mainWindow.show()
    sys.exit(app.exec_())
4. 测试与评估
在完成模型训练后,可以通过val.py脚本对验证集进行评估:
python val.py --weights runs/train/exp/weights/best.pt --data path/to/data.yaml --img 640 --task val
这将输出包括mAP在内的多项指标,以评估模型性能。
tongx ,通过上述步骤,构建一个基本的基于YOLOv5的火灾检测系统,支持从图像或视频中实时检测火灾。请根据实际需要调整代码中的细节,比如路径、参数等。
以下是构建基于YOLOv5的火灾检测系统的关键代码示例,包括UI界面设计、模型加载与预测以及可视化结果。这些代码片段可以帮助你快速启动项目。
UI界面设计
首先,使用PyQt5创建一个简单的UI界面,包含选择图片和视频进行火灾检测的功能。
from PyQt5.QtWidgets import QApplication, QMainWindow, QFileDialog
from PyQt5.QtGui import QImage, QPixmap
from your_ui_file import Ui_MainWindow  # 假设已经通过pyuic5生成了这个文件

class FireDetectionApp(QMainWindow, Ui_MainWindow):
    def __init__(self):
        super(FireDetectionApp, self).__init__()
        self.setupUi(self)
        self.initUI()

    def initUI(self):
        self.actionOpen_Image.triggered.connect(self.open_image)
        self.actionOpen_Video.triggered.connect(self.open_video)

    def open_image(self):
        fileName, _ = QFileDialog.getOpenFileName(self, "Open Image", "", "Image Files (*.png *.jpg *.jpeg)")
        if fileName:
            self.detect_fire(fileName)

    def open_video(self):
        fileName, _ = QFileDialog.getOpenFileName(self, "Open Video", "", "Video Files (*.mp4 *.avi)")
        if fileName:
            self.detect_fire(fileName, is_video=True)
模型加载与预测
接下来是核心部分:加载训练好的YOLOv5模型,并对输入的图像或视频进行预测。
import cv2
import torch
from pathlib import Path

def detect_fire(file_path, is_video=False):
    model = torch.hub.load('ultralytics/yolov5', 'custom', path='runs/train/exp/weights/best.pt')  # 根据实际情况修改路径
    if is_video:
        cap = cv2.VideoCapture(file_path)
        while(cap.isOpened()):
            ret, frame = cap.read()
            if not ret:
                break
            results = model(frame)
            visualize_results(results)
            if cv2.waitKey(1) & 0xFF == ord('q'):
                break
        cap.release()
        cv2.destroyAllWindows()
    else:
        img = cv2.imread(file_path)
        results = model(img)
        visualize_results(results)

def visualize_results(results):
    for i, (im, pred) in enumerate(zip(results.imgs, results.pred)):
        im = cv2.cvtColor(im, cv2.COLOR_RGB2BGR)
        if pred is not None and len(pred):
            for *box, conf, cls in pred:  # xyxy, confidence, class
                label = f'{results.names[int(cls)]} {conf:.2f}'
                plot_one_box(box, im, label=label, color=[0, 255, 0])
        cv2.imshow("Fire Detection", im)
        cv2.waitKey(0)
    cv2.destroyAllWindows()

def plot_one_box(x, img, color=None, label=None, line_thickness=None):
    tl = line_thickness or round(0.002 * (img.shape[0] + img.shape[1]) / 2) + 1  # line/font thickness
    color = color or [random.randint(0, 255) for _ in range(3)]
    c1, c2 = (int(x[0]), int(x[1])), (int(x[2]), int(x[3]))
    cv2.rectangle(img, c1, c2, color, thickness=tl, lineType=cv2.LINE_AA)
    if label:
        tf = max(tl - 1, 1)  # font thickness
        t_size = cv2.getTextSize(label, 0, fontScale=tl / 3, thickness=tf)[0]
        c2 = c1[0] + t_size[0], c1[1] - t_size[1] - 3
        cv2.rectangle(img, c1, c2, color, -1, cv2.LINE_AA)  # filled
        cv2.putText(img, label, (c1[0], c1[1] - 2), 0, tl / 3, [225, 255, 255], thickness=tf, lineType=cv2.LINE_AA)
主函数入口
最后,在主程序中初始化应用并运行:
if __name__ == '__main__':
    app = QApplication(sys.argv)
    mainWindow = FireDetectionApp()
    mainWindow.show()
    sys.exit(app.exec_())
以上代码提供了构建基于YOLOv5的火灾检测系统的基本框架.


 被折叠的 条评论
为什么被折叠?
被折叠的 条评论
为什么被折叠?
 到【灌水乐园】发言


