


基于YOLOv8的脑肿瘤检测识别系统
以下文字及代码仅供参考。
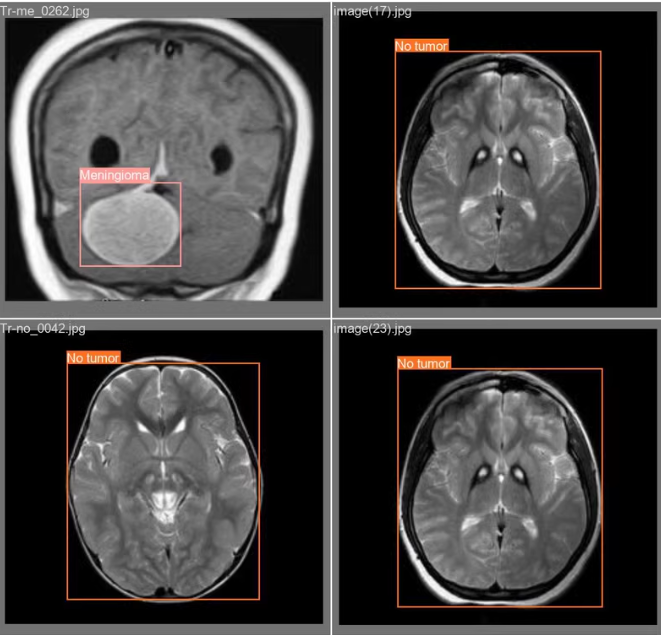
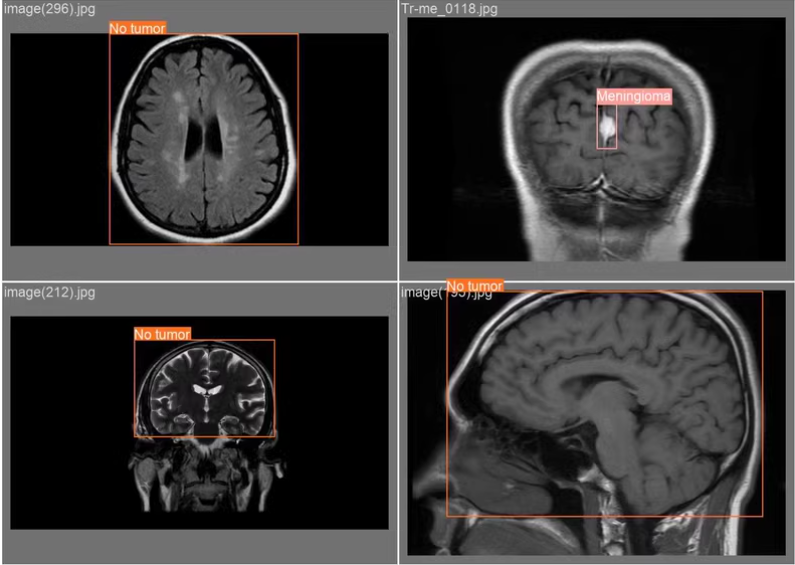
、四种脑肿瘤类别(:胶质瘤、脑膜瘤、垂体瘤和听神经瘤)的检测与分类,我们将从以下几个方面来构建这个
1. 安装依赖
首先确保安装了必要的库:
pip install ultralytics opencv-python pyqt5 pandas torch torchvision
2. 数据集准备
假设你的数据集结构如下:
dataset/
├── images/
│   ├── train/
│   │   ├── img1.jpg
│   │   └── ...
│   └── val/
│       ├── img1.jpg
│       └── ...
└── labels/
    ├── train/
    │   ├── img1.txt
    │   └── ...
    └── val/
        ├── img1.txt
        └── ...
每个标签文件是.txt格式,每一行表示一个目标,格式为:
<class_id> <x_center> <y_center> <width> <height>
3. 配置YOLOv8
创建一个data.yaml文件用于定义数据集路径和类别名称:
train: ./dataset/images/train
val: ./dataset/images/val

nc: 4  # 类别数量
names: ['glioma', 'meningioma', 'pituitary', 'acoustic']  # 类别名称
4. 训练模型
编写训练代码,使用YOLOv8进行训练:
from ultralytics import YOLO

def train_model():
    model = YOLO('yolov8n.pt')  # 使用YOLOv8 Nano预训练模型
    model.train(
        data='data.yaml',
        epochs=100,
        imgsz=640,
        batch=16,
        device='cuda',
        workers=8,
        project='runs/train',
        name='exp'
    )

if __name__ == "__main__":
    train_model()
5. GUI设计与推理逻辑
使用PyQt5设计GUI,并集成YOLOv8进行推理:
from PyQt5.QtWidgets import QApplication, QMainWindow, QPushButton, QLabel, QVBoxLayout, QWidget, QFileDialog, QMessageBox, QComboBox
from PyQt5.QtGui import QImage, QPixmap
from PyQt5.QtCore import QTimer
from ultralytics import YOLO
import cv2
import pandas as pd
import os
class BrainTumorDetector(QMainWindow):
def __init__(self):
super().__init__()
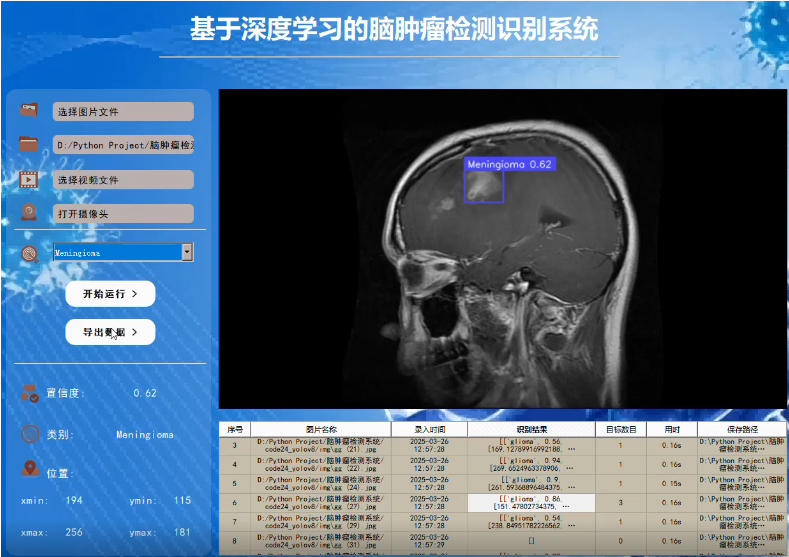
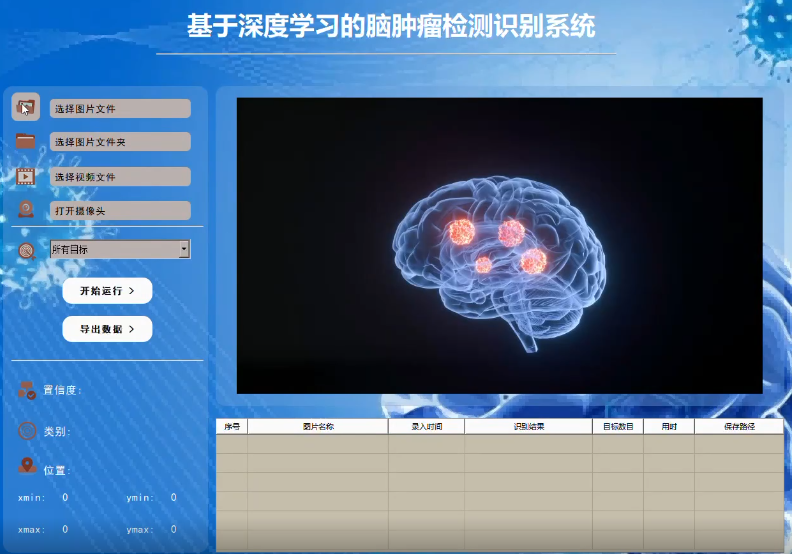
self.setWindowTitle("脑肿瘤检测识别系统")
self.setGeometry(100, 100, 800, 600)
self.model = YOLO("runs/train/exp/weights/best.pt") # 加载训练好的模型
self.class_names = ['glioma', 'meningioma', 'pituitary', 'acoustic']
self.current_class = None
self.label = QLabel(self)
self.label.setGeometry(50, 50, 700, 400)
self.btn_image = QPushButton("选择图片", self)
self.btn_video = QPushButton("选择视频", self)
self.btn_camera = QPushButton("打开摄像头", self)
self.btn_export = QPushButton("导出结果", self)
self.combo_classes = QComboBox(self)
self.btn_image.setGeometry(50, 500, 150, 40)
self.btn_video.setGeometry(220, 500, 150, 40)
self.btn_camera.setGeometry(390, 500, 150, 40)
self.btn_export.setGeometry(560, 500, 150, 40)
self.combo_classes.setGeometry(320, 550, 150, 40)
self.btn_image.clicked.connect(self.detect_single_image)
self.btn_video.clicked.connect(self.detect_video)
self.btn_camera.clicked.connect(self.open_camera)
self.btn_export.clicked.connect(self.export_results)
self.combo_classes.addItems(["All"] + self.class_names)
self.combo_classes.currentTextChanged.connect(self.switch_class)
self.cap = None
self.timer = QTimer()
self.timer.timeout.connect(self.update_frame)
self.results_data = []
def detect_single_image(self):
file_path, _ = QFileDialog.getOpenFileName(self, "选择图片", "", "Images (*.jpg *.png)")
if file_path:
self.process_image(file_path)
def detect_video(self):
file_path, _ = QFileDialog.getOpenFileName(self, "选择视频", "", "Videos (*.mp4 *.avi)")
if file_path:
self.cap = cv2.VideoCapture(file_path)
self.timer.start(30)
def open_camera(self):
self.cap = cv2.VideoCapture(0)
self.timer.start(30)
def update_frame(self):
ret, frame = self.cap.read()
if ret:
self.process_image(frame=frame, is_video=True)
def process_image(self, file_path=None, frame=None, is_video=False):
if not is_video:
frame = cv2.imread(file_path)
results = self.model(frame)
counts = {cls: 0 for cls in self.class_names}
for result in results:
boxes = result.boxes.xyxy.cpu().numpy()
classes = result.boxes.cls.cpu().numpy()
confidences = result.boxes.conf.cpu().numpy()
for box, cls, conf in zip(boxes, classes, confidences):
class_name = self.model.names[int(cls)]
counts[class_name] += 1
if self.current_class == "All" or class_name == self.current_class:
x1, y1, x2, y2 = map(int, box)
label = f"{class_name} {conf:.2f}"
cv2.rectangle(frame, (x1, y1), (x2, y2), (0, 255, 0), 2)
cv2.putText(frame, label, (x1, y1 - 10), cv2.FONT_HERSHEY_SIMPLEX, 0.9, (0, 255, 0), 2)
if not is_video:
self.results_data.append({
"file": file_path,
**counts,
"detection_time": pd.Timestamp.now()
})
if is_video:
self.display_frame(frame)
else:
self.display_image(frame)
def display_image(self, frame):
frame = cv2.cvtColor(frame, cv2.COLOR_BGR2RGB)
height, width, channel = frame.shape
bytes_per_line = 3 * width
q_img = QImage(frame.data, width, height, bytes_per_line, QImage.Format_RGB888)
self.label.setPixmap(QPixmap.fromImage(q_img))
def display_frame(self, frame):
frame = cv2.cvtColor(frame, cv2.COLOR_BGR2RGB)
height, width, channel = frame.shape
bytes_per_line = 3 * width
q_img = QImage(frame.data, width, height, bytes_per_line, QImage.Format_RGB888)
self.label.setPixmap(QPixmap.fromImage(q_img))
def switch_class(self, class_name):
self.current_class = class_name if class_name != "All" else None
def export_results(self):
if not self.results_data:
QMessageBox.warning(self, "警告", "没有检测结果可导出!")
return
file_path, _ = QFileDialog.getSaveFileName(self, "保存结果", "", "Excel Files (*.xlsx);;CSV Files (*.csv)")
if file_path:
df = pd.DataFrame(self.results_data)
if file_path.endswith(".xlsx"):
df.to_excel(file_path, index=False)
elif file_path.endswith(".csv"):
df.to_csv(file_path, index=False)
QMessageBox.information(self, "成功", "结果已导出!")
if __name__ == "__main__":
app = QApplication([])
window = BrainTumorDetector()
window.show()
app.exec_()
6. SE注意力机制
同学,如果你想添加SE(Squeeze-and-Excitation)注意力机制到主干网络中,你需要在训练之前修改YOLOv8的架构。涉及到自定义YOLOv8模型或使用一些第三方扩展包。对于简单的示例,这里不深入讨论如何具体实现,但你可以参考相关论文或开源项目来学习如何将SE模块集成到卷积层之间。
7. 结论
以上代码提供了一个完整的框架,用于构建基于YOLOv8的脑肿瘤检测系统,包括数据处理、模型训练、GUI设计等。根据实际需求,同学;需要调整一些细节,如优化模型参数、增强数据预处理步骤等。
仅供参考,我的同学们。


 被折叠的 条评论
为什么被折叠?
被折叠的 条评论
为什么被折叠?
 到【灌水乐园】发言


