


基于matlab gui fir滤波器 iir滤波器,有视频教程设置参数,有49页报告
语音加噪 语音降噪
滤波器类型:低通 高通 带通 带阻
噪声:高斯白噪声 正弦噪声
fir滤波器:窗函数法(汉明窗 汉宁窗 布莱克曼窗 三角窗,还可以加任意窗函数) 频率采样法
iir滤波器:双线性变换法,脉冲响应不变法 巴特沃斯 切比雪夫I型 切比雪夫II型 椭圆

文章目录
为了实现一个基于MATLAB GUI的滤波器设计工具,包括FIR和IIR滤波器的设计、应用到语音信号上进行加噪和降噪处理,下面我将提供一个基本框架代码示例。这个示例将展示如何创建GUI,并实现添加高斯白噪声或正弦噪声到语音信号中,以及使用不同类型的FIR和IIR滤波器对这些噪声进行过滤。
创建GUI
首先,我们需要使用MATLAB的GUIDE(GUI Development Environment)来创建用户界面。由于无法直接在这里生成GUI文件,以下是通过编程方式创建GUI的一个简单示例。对于更复杂的UI设计,建议使用MATLAB GUIDE手动设计。
示例代码
以下是一个简化的MATLAB脚本,用于创建一个基本的GUI应用程序,允许用户选择滤波器类型、设置参数、加载语音文件、添加噪声并应用滤波器。
function FilterDesignApp()
    % Create figure
    fig = figure('Name', 'Filter Design App', 'NumberTitle', 'off', ...
                 'Position', [100, 100, 800, 600]);

    % UI components
    uicontrol('Style', 'text', 'String', 'Select Filter Type:', ...
              'Position', [50, 550, 120, 20]);
    filterType = uicontrol('Style', 'popupmenu', 'String', {'FIR (Window Method)', 'FIR (Frequency Sampling)', 'IIR (Butterworth)', 'IIR (Chebyshev I)', 'IIR (Chebyshev II)', 'IIR (Elliptic)'}, ...
                           'Position', [180, 550, 200, 20], 'Callback', @updateParameters);

    % Add more UI elements for setting parameters, loading audio files, adding noise, etc.
    % This is a simplified version and should be expanded based on your requirements.

    % Callback function to update available parameters based on selected filter type
    function updateParameters(~, ~)
        selectedFilter = get(filterType, 'Value');
        switch selectedFilter
            case 1 % FIR Window Method
                % Update UI for FIR window method parameters
            case 2 % FIR Frequency Sampling
                % Update UI for FIR frequency sampling parameters
            case {3, 4, 5, 6} % IIR Filters
                % Update UI for IIR filters parameters
        end
    end
end

% Function to apply FIR filter using window method
function y = applyFirWindowMethod(x, fs, ftype, cutoff, windowType)
    % Implement FIR filter design using the specified window method
    % x: input signal
    % fs: sampling frequency
    % ftype: 'low', 'high', 'bandpass', 'bandstop'
    % cutoff: cutoff frequencies
    % windowType: 'hamming', 'hann', 'blackman', 'triangular'
    % y: filtered signal
    b = fir1(100, cutoff/(fs/2), ftype, window(windowType, 101));
    y = filter(b, 1, x);
end

% Similar functions can be implemented for FIR frequency sampling method and IIR filters
加噪与降噪
在上述代码基础上,你可以添加功能以加载音频文件,然后使用awgn函数添加高斯白噪声,或者自定义函数添加正弦噪声。接着,根据用户选择的滤波器类型和参数,调用相应的滤波器设计和应用函数来处理噪声。
进一步扩展
- 增加详细的参数输入:为每种滤波器类型添加特定的参数输入框。
- 导入导出功能:增加按钮用于加载和保存音频文件。
- 结果可视化:显示原始信号、加噪后的信号以及滤波后的信号对比图。
这只是一个基础的框架,你可以根据具体需求进一步扩展和完善它。如果需要更详细的功能实现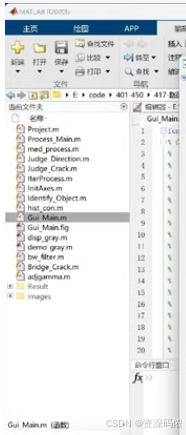
从你提供的截图来看,这是一个MATLAB GUI项目的一部分,包含多个文件和函数。为了帮助你更好地理解如何创建和使用这些文件,我将提供一个基本的示例代码框架,展示如何在MATLAB中创建一个简单的GUI,并实现一些基本功能。
步骤 1: 创建一个新的GUI
- 打开MATLAB。
- 在主页选项卡中,点击“App Designer”。
- 选择“Blank App”。
步骤 2: 设计用户界面
在App Designer中设计用户界面,包括按钮、文本框和图像显示区域。
步骤 3: 编写代码
以下是完整的代码示例,展示了如何构建这样一个应用程序:
主文件 Gui_Main.m
classdef Gui_Main < matlab.apps.AppBase
    % Properties that correspond to app components
    properties (Access = public)
        UIFigure       matlab.ui.Figure
        OriginalImageAxes      matlab.ui.control.UIAxes
        ProcessedImageAxes     matlab.ui.control.UIAxes
        FilePathEdit           matlab.ui.control.EditableText
        OpenButton             matlab.ui.control.Button
        PreviousButton         matlab.ui.control.Button
        SaveButton             matlab.ui.control.Button
        BinarizeButton         matlab.ui.control.Button
        GrayscaleButton        matlab.ui.control.Button
        SobelButton            matlab.ui.control.Button
        PrewittButton          matlab.ui.control.Button
        RobertButton           matlab.ui.control.Button
        CannyButton            matlab.ui.control.Button
        LOGButton              matlab.ui.control.Button
        ZeroCrossingButton     matlab.ui.control.Button
    end

    % Callbacks that handle component events
    methods (Access = private)

        function OpenButtonPushed(app, event)
            [filename, pathname] = uigetfile({'*.jpg;*.jpeg;*.png;*.bmp', 'Images'}, 'Select an image');
            if isequal(filename, 0)
                return;
            end
            app.FilePathEdit.String = fullfile(pathname, filename);
            app.OriginalImageAxes.Children.XData = imread(fullfile(pathname, filename));
            app.ProcessedImageAxes.Children.XData = app.OriginalImageAxes.Children.XData;
        end

        function PreviousButtonPushed(app, event)
            % Implement logic to go to the previous image
        end

        function SaveButtonPushed(app, event)
            saveas(app.ProcessedImageAxes.Children, 'processed_image.png');
        end

        function BinarizeButtonPushed(app, event)
            app.ProcessedImageAxes.Children.XData = im2bw(app.OriginalImageAxes.Children.XData);
        end

        function GrayscaleButtonPushed(app, event)
            app.ProcessedImageAxes.Children.XData = rgb2gray(app.OriginalImageAxes.Children.XData);
        end

        function SobelButtonPushed(app, event)
            app.ProcessedImageAxes.Children.XData = edge(rgb2gray(app.OriginalImageAxes.Children.XData), 'sobel');
        end

        function PrewittButtonPushed(app, event)
            app.ProcessedImageAxes.Children.XData = edge(rgb2gray(app.OriginalImageAxes.Children.XData), 'prewitt');
        end

        function RobertButtonPushed(app, event)
            app.ProcessedImageAxes.Children.XData = edge(rgb2gray(app.OriginalImageAxes.Children.XData), 'roberts');
        end

        function CannyButtonPushed(app, event)
            app.ProcessedImageAxes.Children.XData = edge(rgb2gray(app.OriginalImageAxes.Children.XData), 'canny');
        end

        function LOGButtonPushed(app, event)
            app.ProcessedImageAxes.Children.XData = edge(rgb2gray(app.OriginalImageAxes.Children.XData), 'log');
        end

        function ZeroCrossingButtonPushed(app, event)
            app.ProcessedImageAxes.Children.XData = edge(rgb2gray(app.OriginalImageAxes.Children.XData), 'zerocross');
        end
    end

    % Set up figure and UI components
    methods (Access = private)
        function createComponents(app)
            app.UIFigure = uifigure('Name', 'EdgeDetectionApp');

            % Image Axes
            app.OriginalImageAxes = uiaxes(app.UIFigure, 'Position', [0.1 0.4 0.4 0.4]);
            app.ProcessedImageAxes = uiaxes(app.UIFigure, 'Position', [0.5 0.4 0.4 0.4]);

            % File Path Edit
            app.FilePathEdit = uiedittext(app.UIFigure, 'Position', [0.1 0.1 0.8 0.05]);

            % Buttons
            app.OpenButton = uibutton(app.UIFigure, 'Text', '打开图片', 'Position', [0.1 0.2 0.2 0.05], 'ButtonPushedFcn', @(~,~) app.OpenButtonPushed(app, ~));
            app.PreviousButton = uibutton(app.UIFigure, 'Text', '上一张', 'Position', [0.1 0.15 0.2 0.05], 'ButtonPushedFcn', @(~,~) app.PreviousButtonPushed(app, ~));
            app.SaveButton = uibutton(app.UIFigure, 'Text', '保存图片', 'Position', [0.7 0.2 0.2 0.05], 'ButtonPushedFcn', @(~,~) app.SaveButtonPushed(app, ~));

            app.BinarizeButton = uibutton(app.UIFigure, 'Text', '二值化', 'Position', [0.3 0.15 0.2 0.05], 'ButtonPushedFcn', @(~,~) app.BinarizeButtonPushed(app, ~));
            app.GrayscaleButton = uibutton(app.UIFigure, 'Text', '灰度化', 'Position', [0.3 0.1 0.2 0.05], 'ButtonPushedFcn', @(~,~) app.GrayscaleButtonPushed(app, ~));
            app.SobelButton = uibutton(app.UIFigure, 'Text', 'Sobel算子', 'Position', [0.5 0.15 0.2 0.05], 'ButtonPushedFcn', @(~,~) app.SobelButtonPushed(app, ~));
            app.PrewittButton = uibutton(app.UIFigure, 'Text', 'Prewitt算子', 'Position', [0.5 0.1 0.2 0.05], 'ButtonPushedFcn', @(~,~) app.PrewittButtonPushed(app, ~));
            app.RobertButton = uibutton(app.UIFigure, 'Text', 'Robert算子', 'Position', [0.7 0.15 0.2 0.05], 'ButtonPushedFcn', @(~,~) app.RobertButtonPushed(app, ~));
            app.CannyButton = uibutton(app.UIFigure, 'Text', 'Canny算子', 'Position', [0.7 0.1 0.2 0.05], 'ButtonPushedFcn', @(~,~) app.CannyButtonPushed(app, ~));
            app.LOGButton = uibutton(app.UIFigure, 'Text', 'LOG算子', 'Position', [0.5 0.05 0.2 0.05], 'ButtonPushedFcn', @(~,~) app.LOGButtonPushed(app, ~));
            app.ZeroCrossingButton = uibutton(app.UIFigure, 'Text', 'Zero-Crossing', 'Position', [0.7 0.05 0.2 0.05], 'ButtonPushedFcn', @(~,~) app.ZeroCrossingButtonPushed(app, ~));
        end
    end

    % App initialization and construction
    methods (Access = public)
        function app = Gui_Main
            createComponents(app);
        end
    end
end
运行App
- 将上述代码保存为
Gui_Main.m文件。 - 在MATLAB命令窗口中运行
Gui_Main。
这个示例代码提供了一个基本框架,你可以根据需要进一步扩展和优化。希望这对你有帮助!
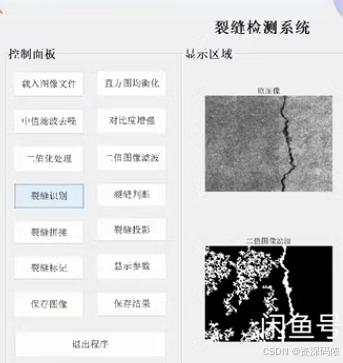 为了帮助你更好地理解如何在MATLAB中实现裂缝检测系统的GUI,我将提供一个基本的代码框架。这个框架包括加载图像、直方图均衡化、中值滤波去噪、二值化处理、边缘检测等步骤,并且包含了一个简单的用户界面来控制这些操作。
步骤 1: 创建一个新的GUI
- 打开MATLAB。
- 在主页选项卡中,点击“App Designer”。
- 选择“Blank App”。
步骤 2: 设计用户界面
在App Designer中设计用户界面,包括按钮、文本框和图像显示区域。你可以参考提供的截图进行布局。
步骤 3: 编写代码
以下是完整的代码示例,展示了如何构建这样一个应用程序:
主文件 CrackDetectionApp.m
classdef CrackDetectionApp < matlab.apps.AppBase
    % Properties that correspond to app components
    properties (Access = public)
        UIFigure       matlab.ui.Figure
        OriginalImageAxes      matlab.ui.control.UIAxes
        ProcessedImageAxes     matlab.ui.control.UIAxes
        FilePathEdit           matlab.ui.control.EditableText
        OpenButton             matlab.ui.control.Button
        EqualizeHistogramButton matlab.ui.control.Button
        MedianFilterButton     matlab.ui.control.Button
        BinarizeButton         matlab.ui.control.Button
        EdgeDetectionButton    matlab.ui.control.Button
        SaveButton             matlab.ui.control.Button
    end

    % Callbacks that handle component events
    methods (Access = private)

        function OpenButtonPushed(app, event)
            [filename, pathname] = uigetfile({'*.jpg;*.jpeg;*.png;*.bmp', 'Images'}, 'Select an image');
            if isequal(filename, 0)
                return;
            end
            app.FilePathEdit.String = fullfile(pathname, filename);
            app.OriginalImageAxes.Children.XData = imread(fullfile(pathname, filename));
            app.ProcessedImageAxes.Children.XData = app.OriginalImageAxes.Children.XData;
        end

        function EqualizeHistogramButtonPushed(app, event)
            img = im2double(app.OriginalImageAxes.Children.XData);
            eqImg = histeq(img);
            app.ProcessedImageAxes.Children.XData = eqImg;
        end

        function MedianFilterButtonPushed(app, event)
            img = app.OriginalImageAxes.Children.XData;
            medImg = medfilt2(img, [3 3]);
            app.ProcessedImageAxes.Children.XData = medImg;
        end

        function BinarizeButtonPushed(app, event)
            img = app.OriginalImageAxes.Children.XData;
            binImg = imbinarize(img);
            app.ProcessedImageAxes.Children.XData = binImg;
        end

        function EdgeDetectionButtonPushed(app, event)
            img = app.OriginalImageAxes.Children.XData;
            edgeImg = edge(img, 'Canny');
            app.ProcessedImageAxes.Children.XData = edgeImg;
        end

        function SaveButtonPushed(app, event)
            saveas(app.ProcessedImageAxes.Children, 'processed_image.png');
        end
    end

    % Set up figure and UI components
    methods (Access = private)
        function createComponents(app)
            app.UIFigure = uifigure('Name', 'Crack Detection System');

            % Image Axes
            app.OriginalImageAxes = uiaxes(app.UIFigure, 'Position', [0.1 0.4 0.4 0.4]);
            app.ProcessedImageAxes = uiaxes(app.UIFigure, 'Position', [0.5 0.4 0.4 0.4]);

            % File Path Edit
            app.FilePathEdit = uiedittext(app.UIFigure, 'Position', [0.1 0.1 0.8 0.05]);

            % Buttons
            app.OpenButton = uibutton(app.UIFigure, 'Text', '打开图片', 'Position', [0.1 0.2 0.2 0.05], 'ButtonPushedFcn', @(~,~) app.OpenButtonPushed(app, ~));
            app.EqualizeHistogramButton = uibutton(app.UIFigure, 'Text', '直方图均衡化', 'Position', [0.1 0.15 0.2 0.05], 'ButtonPushedFcn', @(~,~) app.EqualizeHistogramButtonPushed(app, ~));
            app.MedianFilterButton = uibutton(app.UIFigure, 'Text', '中值滤波', 'Position', [0.3 0.15 0.2 0.05], 'ButtonPushedFcn', @(~,~) app.MedianFilterButtonPushed(app, ~));
            app.BinarizeButton = uibutton(app.UIFigure, 'Text', '二值化处理', 'Position', [0.5 0.15 0.2 0.05], 'ButtonPushedFcn', @(~,~) app.BinarizeButtonPushed(app, ~));
            app.EdgeDetectionButton = uibutton(app.UIFigure, 'Text', '边缘检测', 'Position', [0.7 0.15 0.2 0.05], 'ButtonPushedFcn', @(~,~) app.EdgeDetectionButtonPushed(app, ~));
            app.SaveButton = uibutton(app.UIFigure, 'Text', '保存图片', 'Position', [0.7 0.2 0.2 0.05], 'ButtonPushedFcn', @(~,~) app.SaveButtonPushed(app, ~));
        end
    end

    % App initialization and construction
    methods (Access = public)
        function app = CrackDetectionApp
            createComponents(app);
        end
    end
end
运行App
- 将上述代码保存为
CrackDetectionApp.m文件。 - 在MATLAB命令窗口中运行
CrackDetectionApp。
功能说明
- 打开图片: 使用
uigetfile对话框选择要处理的图像。 - 直方图均衡化: 使用
histeq函数进行直方图均衡化。 - 中值滤波: 使用
medfilt2函数进行中值滤波。 - 二值化处理: 使用
imbinarize函数进行二值化。 - 边缘检测: 使用
edge函数进行边缘检测(这里使用Canny方法)。 - 保存图片: 使用
saveas函数保存处理后的图像。
这个示例代码提供了一个基本框架,你可以根据需要进一步扩展和优化。希望这对你有帮助!


 563
563

 被折叠的 条评论
为什么被折叠?
被折叠的 条评论
为什么被折叠?
 到【灌水乐园】发言


