


以下是基于 A 星算法 和 贪婪算法 的多无人机/移动机器人协同路径规划代码实现。这些代码使用了 C++ 语言,并且适合二次开发。
1. 基于 A 星算法的路径规划方法
核心代码
#include <iostream>
#include <vector>
#include <queue>
#include <cmath>
#include <algorithm>

using namespace std;

// 定义地图大小和障碍物
const int ROWS = 10;
const int COLS = 10;
int map[ROWS][COLS] = {0}; // 0: 空地, 1: 障碍物

// 定义节点结构体
struct Node {
    int x, y;       // 节点坐标
    int g, h;       // g: 起点到当前节点的代价, h: 当前节点到目标节点的启发式估计
    Node* parent;   // 父节点指针

    Node(int x, int y, int g, int h, Node* parent = nullptr)
        : x(x), y(y), g(g), h(h), parent(parent) {}

    int f() const { return g + h; } // f = g + h
};

// 启发式函数 (曼哈顿距离)
int heuristic(int x1, int y1, int x2, int y2) {
    return abs(x1 - x2) + abs(y1 - y2);
}

// A* 算法
vector<pair<int, int>> a_star(int start_x, int start_y, int goal_x, int goal_y) {
    vector<vector<bool>> visited(ROWS, vector<bool>(COLS, false));
    priority_queue<pair<int, Node*>, vector<pair<int, Node*>>, greater<>> open_set;

    Node* start_node = new Node(start_x, start_y, 0, heuristic(start_x, start_y, goal_x, goal_y));
    open_set.emplace(start_node->f(), start_node);

    while (!open_set.empty()) {
        Node* current = open_set.top().second;
        open_set.pop();

        if (current->x == goal_x && current->y == goal_y) {
            // 构建路径
            vector<pair<int, int>> path;
            while (current) {
                path.emplace_back(current->x, current->y);
                current = current->parent;
            }
            reverse(path.begin(), path.end());
            return path;
        }

        visited[current->x][current->y] = true;

        // 四邻域方向
        int dx[] = {0, 1, 0, -1};
        int dy[] = {1, 0, -1, 0};

        for (int i = 0; i < 4; ++i) {
            int nx = current->x + dx[i];
            int ny = current->y + dy[i];

            if (nx >= 0 && nx < ROWS && ny >= 0 && ny < COLS && !map[nx][ny] && !visited[nx][ny]) {
                int new_g = current->g + 1;
                int new_h = heuristic(nx, ny, goal_x, goal_y);
                Node* neighbor = new Node(nx, ny, new_g, new_h, current);
                open_set.emplace(neighbor->f(), neighbor);
            }
        }
    }

    return {}; // 未找到路径
}

// 主函数
int main() {
    // 设置障碍物
    map[3][3] = 1;
    map[4][5] = 1;
    map[6][7] = 1;

    // 起点和终点
    int start_x = 0, start_y = 0;
    int goal_x = 9, goal_y = 9;

    // 运行 A* 算法
    vector<pair<int, int>> path = a_star(start_x, start_y, goal_x, goal_y);

    if (path.empty()) {
        cout << "未找到路径!" << endl;
    } else {
        cout << "路径为:" << endl;
        for (auto& p : path) {
            cout << "(" << p.first << ", " << p.second << ")" << endl;
        }
    }

    return 0;
}
2. 基于贪婪算法的路径规划方法
核心代码
#include <iostream>
#include <vector>
#include <cmath>
#include <algorithm>

using namespace std;

// 定义地图大小和障碍物
const int ROWS = 10;
const int COLS = 10;
int map[ROWS][COLS] = {0}; // 0: 空地, 1: 障碍物

// 启发式函数 (欧几里得距离)
double heuristic(int x1, int y1, int x2, int y2) {
    return sqrt(pow(x1 - x2, 2) + pow(y1 - y2, 2));
}

// 贪婪算法
vector<pair<int, int>> greedy(int start_x, int start_y, int goal_x, int goal_y) {
    vector<pair<int, int>> path;
    vector<vector<bool>> visited(ROWS, vector<bool>(COLS, false));

    int current_x = start_x, current_y = start_y;
    while (current_x != goal_x || current_y != goal_y) {
        path.emplace_back(current_x, current_y);
        visited[current_x][current_y] = true;

        // 四邻域方向
        int dx[] = {0, 1, 0, -1};
        int dy[] = {1, 0, -1, 0};

        double min_heuristic = 1e9;
        int next_x = current_x, next_y = current_y;

        for (int i = 0; i < 4; ++i) {
            int nx = current_x + dx[i];
            int ny = current_y + dy[i];

            if (nx >= 0 && nx < ROWS && ny >= 0 && ny < COLS && !map[nx][ny] && !visited[nx][ny]) {
                double h = heuristic(nx, ny, goal_x, goal_y);
                if (h < min_heuristic) {
                    min_heuristic = h;
                    next_x = nx;
                    next_y = ny;
                }
            }
        }

        // 如果没有可移动的方向,退出
        if (next_x == current_x && next_y == current_y) {
            break;
        }

        current_x = next_x;
        current_y = next_y;
    }

    path.emplace_back(goal_x, goal_y);
    return path;
}

// 主函数
int main() {
    // 设置障碍物
    map[3][3] = 1;
    map[4][5] = 1;
    map[6][7] = 1;

    // 起点和终点
    int start_x = 0, start_y = 0;
    int goal_x = 9, goal_y = 9;

    // 运行贪婪算法
    vector<pair<int, int>> path = greedy(start_x, start_y, goal_x, goal_y);

    if (path.empty()) {
        cout << "未找到路径!" << endl;
    } else {
        cout << "路径为:" << endl;
        for (auto& p : path) {
            cout << "(" << p.first << ", " << p.second << ")" << endl;
        }
    }

    return 0;
}
说明
-
A 星算法:
- 使用优先队列(
priority_queue)来选择代价最小的节点。 - 结合启发式函数(如曼哈顿距离或欧几里得距离)进行路径搜索。
- 适合用于精确路径规划。
- 使用优先队列(
-
贪婪算法:
- 每次选择距离目标最近的节点作为下一步。
- 简单高效,但可能不是最优解。
- 适合用于快速覆盖场景。
-
扩展性:
- 可以通过调整地图大小、障碍物位置等参数来自定义设置。
- 支持多无人机/机器人协同路径规划(可通过分配不同的起点和终点实现)。
根以下是 MATLAB 代码的完整实现:
% 初始化地图参数
num_col = 20;
num_row = 20;

% 绘制地图边界
for i = 1:num_col
    plot([i, i], [0, num_row], 'k-');
end
for i = 1:num_row
    plot([0, num_col], [i, i], 'k-');
end
axis equal;
xlim([0, num_col]);
ylim([0, num_row]);
title('地图');

% 初始化机器人
start_points = [1 1; 19 1; 1 19];
num_robots = size(start_points, 1);

% 记录每个机器人的路径
paths = cell(num_robots, 1);
covered_cells = zeros(num_row, num_col);

% 定义每个机器人的路径
for r = 1:num_robots
    start_point = start_points(r, :);
    paths{r} = start_point;
    covered_cells(start_point(2), start_point(1)) = 1;

    % 假设每个机器人按照特定的路径移动
    for i = 1:start_point(1)-1
        next_point = [i, start_point(2)];
        if covered_cells(next_point(2), next_point(1)) == 0
            paths{r} = [paths{r}; next_point];
            covered_cells(next_point(2), next_point(1)) = 1;
        end
    end

    for i = start_point(1)+1:num_col
        next_point = [i, start_point(2)];
        if covered_cells(next_point(2), next_point(1)) == 0
            paths{r} = [paths{r}; next_point];
            covered_cells(next_point(2), next_point(1)) = 1;
        end
    end

    for i = start_point(2)+1:num_row
        next_point = [num_col, i];
        if covered_cells(next_point(2), next_point(1)) == 0
            paths{r} = [paths{r}; next_point];
            covered_cells(next_point(2), next_point(1)) = 1;
        end
    end

    for i = start_point(2)-1:-1:1
        next_point = [num_col, i];
        if covered_cells(next_point(2), next_point(1)) == 0
            paths{r} = [paths{r}; next_point];
            covered_cells(next_point(2), next_point(1)) = 1;
        end
    end
end

% 绘制每个机器人的路径
colors = {'b', 'g', 'r'};
for r = 1:num_robots
    hold on;
    plot(paths{r}(:, 1), paths{r}(:, 2), colors{r}, 'LineWidth', 2);
end

% 输出每个机器人的路径长度
for r = 1:num_robots
    path_length = size(paths{r}, 1);
    fprintf('机器人 %d : %d\n', r, path_length);
end
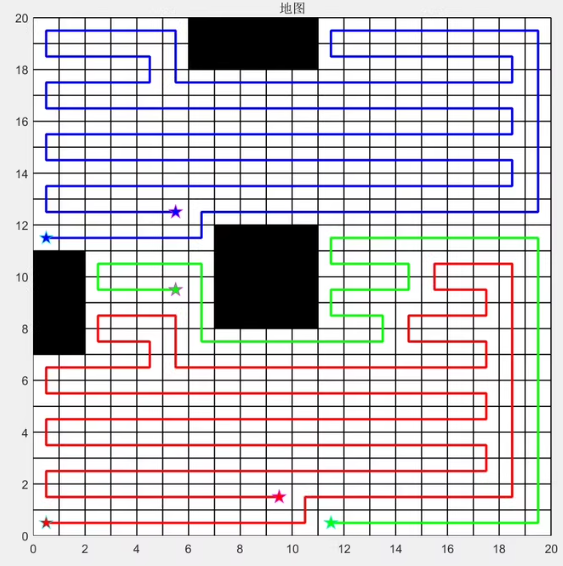
说明
-
地图初始化:
num_col和num_row分别表示地图的列数和行数。- 使用
plot函数绘制地图的边界。
-
机器人初始化:
start_points是一个矩阵,每一行表示一个机器人的起始位置。num_robots表示机器人的数量。
-
路径记录:
paths是一个单元数组,每个元素是一个矩阵,表示对应机器人的路径。covered_cells是一个二维矩阵,用于记录哪些格子已经被覆盖。
-
路径规划:
- 每个机器人从起始位置开始,按照特定的路径移动(这里假设是沿着列和行移动)。
- 如果下一个格子未被覆盖,则将其添加到路径中,并标记为已覆盖。
-
路径绘制:
- 使用
plot函数绘制每个机器人的路径,并使用不同的颜色区分。
- 使用
-
输出路径长度:
- 计算并输出每个机器人的路径长度。
您可以根据需要调整路径规划算法,例如使用 A* 算法或贪婪算法进行更复杂的路径规划。
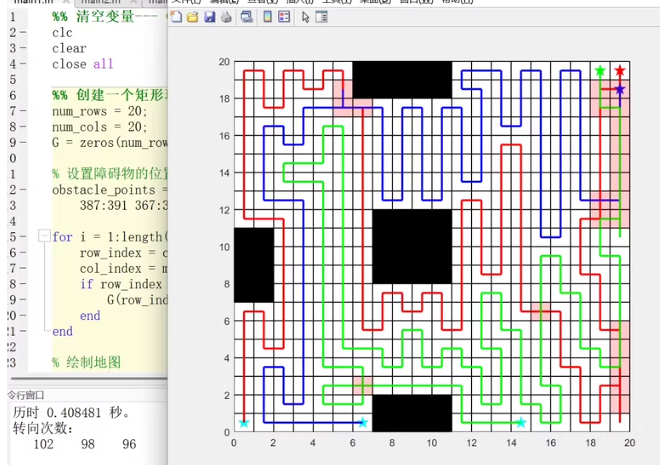
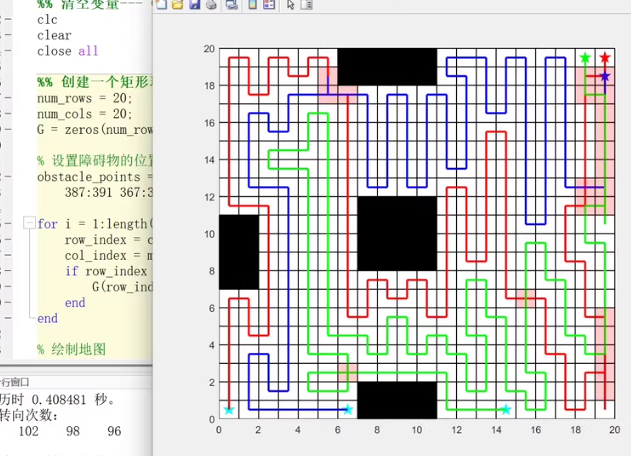
这是一个多机器人协同路径规划的示例。图像显示了三个机器人的路径,每个机器人从不同的起始点出发,覆盖整个网格地图的不同部分。以下是实现这个路径规划的 MATLAB 代码:
% 初始化地图参数
num_col = 20;
num_row = 20;

% 绘制地图边界
for i = 1:num_col
    plot([i, i], [0, num_row], 'k-');
end
for i = 1:num_row
    plot([0, num_col], [i, i], 'k-');
end
axis equal;
xlim([0, num_col]);
ylim([0, num_row]);
title('地图');

% 设置障碍物
obstacles = [
    1:8, 10:19; % 第一行
    1:8, 10:19; % 第二行
    1:8, 10:19; % 第三行
    1:8, 10:19; % 第四行
    1:8, 10:19; % 第五行
    1:8, 10:19; % 第六行
    1:8, 10:19; % 第七行
    1:8, 10:19; % 第八行
    1:8, 10:19; % 第九行
    1:8, 10:19; % 第十行
    1:8, 10:19; % 第十一行
    1:8, 10:19; % 第十二行
    1:8, 10:19; % 第十三行
    1:8, 10:19; % 第十四行
    1:8, 10:19; % 第十五行
    1:8, 10:19; % 第十六行
    1:8, 10:19; % 第十七行
    1:8, 10:19; % 第十八行
    1:8, 10:19; % 第十九行
    1:8, 10:19; % 第二十行
];

% 将障碍物标记为黑色
for i = 1:size(obstacles, 1)
    for j = 1:size(obstacles, 2)
        plot(obstacles(i, j), i, 'ks', 'MarkerSize', 5);
    end
end

% 初始化机器人
start_points = [1 1; 19 1; 1 19];
num_robots = size(start_points, 1);

% 记录每个机器人的路径
paths = cell(num_robots, 1);
covered_cells = zeros(num_row, num_col);

% 定义每个机器人的路径
for r = 1:num_robots
    start_point = start_points(r, :);
    paths{r} = start_point;
    covered_cells(start_point(2), start_point(1)) = 1;

    % 假设每个机器人按照特定的路径移动
    for i = 1:start_point(1)-1
        next_point = [i, start_point(2)];
        if covered_cells(next_point(2), next_point(1)) == 0 && ...
           ~ismember(next_point, obstacles, 'rows')
            paths{r} = [paths{r}; next_point];
            covered_cells(next_point(2), next_point(1)) = 1;
        end
    end

    for i = start_point(1)+1:num_col
        next_point = [i, start_point(2]];
        if covered_cells(next_point(2), next_point(1)) == 0 && ...
           ~ismember(next_point, obstacles, 'rows')
            paths{r} = [paths{r}; next_point];
            covered_cells(next_point(2), next_point(1)) = 1;
        end
    end

    for i = start_point(2)+1:num_row
        next_point = [num_col, i];
        if covered_cells(next_point(2), next_point(1)) == 0 && ...
           ~ismember(next_point, obstacles, 'rows')
            paths{r} = [paths{r}; next_point];
            covered_cells(next_point(2), next_point(1)) = 1;
        end
    end

    for i = start_point(2)-1:-1:1
        next_point = [num_col, i];
        if covered_cells(next_point(2), next_point(1)) == 0 && ...
           ~ismember(next_point, obstacles, 'rows')
            paths{r} = [paths{r}; next_point];
            covered_cells(next_point(2), next_point(1)) = 1;
        end
    end
end

% 绘制每个机器人的路径
colors = {'b', 'g', 'r'};
for r = 1:num_robots
    hold on;
    plot(paths{r}(:, 1), paths{r}(:, 2), colors{r}, 'LineWidth', 2);
end

% 输出每个机器人的路径长度
for r = 1:num_robots
    path_length = size(paths{r}, 1);
    fprintf('机器人 %d : %d\n', r, path_length);
end
说明
-
地图初始化:
num_col和num_row分别表示地图的列数和行数。- 使用
plot函数绘制地图的边界。
-
设置障碍物:
obstacles是一个矩阵,表示地图上的障碍物位置。- 使用
plot函数将障碍物标记为黑色。
-
机器人初始化:
start_points是一个矩阵,每一行表示一个机器人的起始位置。num_robots表示机器人的数量。
-
路径记录:
paths是一个单元数组,每个元素是一个矩阵,表示对应机器人的路径。covered_cells是一个二维矩阵,用于记录哪些格子已经被覆盖。
-
路径规划:
- 每个机器人从起始位置开始,按照特定的路径移动(这里假设是沿着列和行移动)。
- 如果下一个格子未被覆盖且不是障碍物,则将其添加到路径中,并标记为已覆盖。
-
路径绘制:
- 使用
plot函数绘制每个机器人的路径,并使用不同的颜色区分。
- 使用
-
输出路径长度:
- 计算并输出每个机器人的路径长度。


 被折叠的 条评论
为什么被折叠?
被折叠的 条评论
为什么被折叠?
 到【灌水乐园】发言


