


一、WORD
1、写内容
2、参考GPT改:内容、逻辑结构、语句
3、查标题及其标号
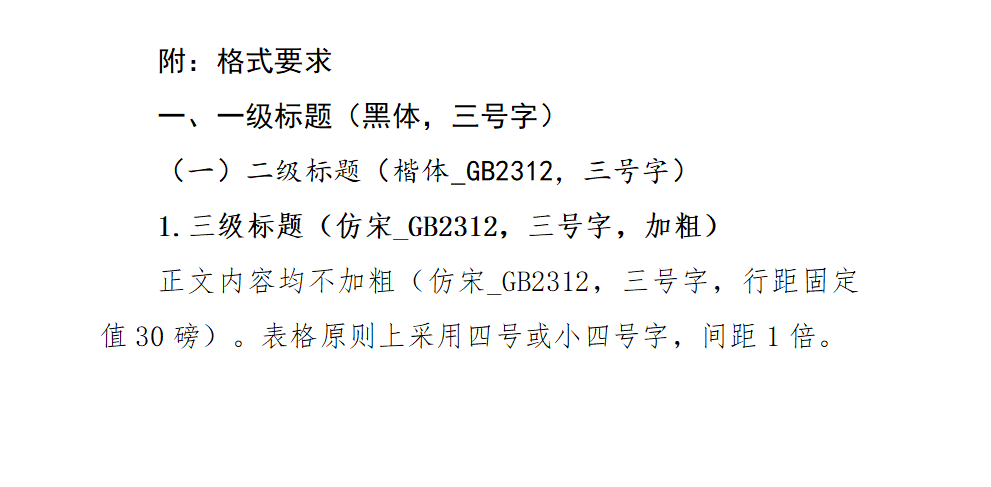
4、修改格式
要求一:
VBA代码
Sub ModifyCurrentDocument()
    Dim wdDoc As Object
    Dim wdRange As Object
    Dim para As Paragraph

    ' 获取当前活动文档
    Set wdDoc = ActiveDocument

    ' 设置文档的基本属性
    With wdDoc.PageSetup
        .TopMargin = 72 ' 上边距,单位为磅
        .BottomMargin = 72 ' 下边距,单位为磅
        .LeftMargin = 90 ' 左边距,单位为磅
        .RightMargin = 90 ' 右边距,单位为磅
    End With

    ' 遍历文档中的每个段落
    For Each para In wdDoc.Paragraphs
        Set wdRange = para.Range

        ' 检查段落样式并应用新的格式
        Select Case para.Style
            Case wdStyleHeading1 ' 一级标题
                With wdRange.Font
                    .Name = "黑体"
                    .Size = 16 ' 三号字对应16磅
                    .Bold = False
                End With

            Case wdStyleHeading2 ' 二级标题
                With wdRange.Font
                    .Name = "楷体_GB2312"
                    .Size = 16 ' 三号字对应16磅
                    .Bold = False
                End With

            Case wdStyleHeading3 ' 三级标题
                With wdRange.Font
                    .Name = "仿宋_GB2312"
                    .Size = 16 ' 三号字对应16磅
                    .Bold = True
                End With

            Case Else ' 正文内容
                With wdRange.Font
                    .Name = "仿宋_GB2312"
                    .Size = 16 ' 三号字对应16磅
                    .Bold = False
                End With
                wdRange.ParagraphFormat.LineSpacingRule = wdLineSpaceExactly
                wdRange.ParagraphFormat.LineSpacing = 30 ' 行距固定值 30磅
        End Select
    Next para

    ' 提升修改完成提示
    MsgBox "修改完成,请注意标题,如果原始文档标题等级未设置则按正文修改", vbInformation

    ' 清理对象变量
    Set wdRange = Nothing
    Set wdDoc = Nothing
End Sub
要求二:字体仿宋 、日期是楷体、正文统一为小三,标题三号,1.5倍行距,加页码。
采用VBA代码自动修改,不知为何标题无法修改字体
Sub 插入页码_及设置格式()

    Dim rng As Range
    Dim par As Paragraph

    ' 设置正文格式
    Set rng = ActiveDocument.Range
    With rng
        .Font.Name = "仿宋" ' 设置字体为仿宋
        .Font.Size = 15 ' 设置字号为小三(这里以15磅为例,具体大小依Word的字体设置为准)
        .ParagraphFormat.LineSpacingRule = wdLineSpace150Percent ' 设置1.5倍行距
    End With

    ' 设置标题格式并居中
    For Each par In ActiveDocument.Paragraphs
        If par.Range.Style.NameLocal = "Heading 1" Then ' 假设一级标题使用样式 "Heading 1"
            With par.Range.Font
                .Size = 30 ' 设置字号为三号(Word中默认三号为16磅)
                .Name = "仿宋" ' 设置字体为仿宋
            End With
            par.Range.ParagraphFormat.Alignment = wdAlignParagraphCenter ' 设置标题居中
        End If
    Next par

    ' 添加页码
    ActiveDocument.PageSetup.OddAndEvenPagesHeaderFooter = False '关闭奇偶页相同(防止上回启用奇偶页不同后没有关闭此项设置)

    With ActiveWindow.ActivePane.View

        .SeekView = wdSeekCurrentPageFooter

        With Selection

            .Expand wdStory

            .Font.Size = 9 '字号(小五)
            .Font.Name = "仿宋" '字体

            .ParagraphFormat.Alignment = wdAlignParagraphCenter

            .TypeText "第 "
            .Font.Name = "Times New Roman" '字体
            .Fields.Add .Range, wdFieldPage
            .Font.Name = "仿宋" '字体
            .TypeText " 页" ' 在数字和“页”之间增加空格

        End With

        .SeekView = wdSeekMainDocument '退出页码的编辑(即关闭页眉和页脚工具栏)

    End With

End Sub
VBA 自动雅黑
Sub ChangeFontInAllSlides()
    Dim oSlide As Slide
    Dim oShape As Shape
    Dim oTable As Table
    Dim oRow As Row
    Dim oCell As Cell
    Dim oTxtRange As TextRange
    Dim oGroup As Shapes
    Dim oChildShape As Shape

    ' 遍历演示文稿中的所有幻灯片
    For Each oSlide In ActivePresentation.Slides
        ' 遍历幻灯片中的所有形状
        For Each oShape In oSlide.Shapes

            ' 如果形状包含文本框
            If oShape.HasTextFrame Then
                Set oTxtRange = oShape.TextFrame.TextRange
                ' 设置文本框中文本的字体属性
                With oTxtRange.Font
                    .Name = "微软雅黑"

                    '.Size = 14
                    '.Color.RGB = RGB(255, 0, 0)
                    '.Bold = True
                    .Italic = False
                    .Underline = False
                End With
                ' 行距1.5
                  oTxtRange.ParagraphFormat.SpaceWithin = 1.5
            End If

            ' 如果形状是组合图形

            If oShape.Type = msoGroup Then
                ' 直接遍历组合图形内的子形状
                For i = 1 To oShape.GroupItems.Count
                    Set oChildShape = oShape.GroupItems.Item(i)
                    ' 如果子形状包含文本框
                    If oChildShape.HasTextFrame Then
                        Set oTxtRange = oChildShape.TextFrame.TextRange
                        ' 设置文本框中文本的字体属性
                        With oTxtRange.Font
                            .Name = "微软雅黑"

                            '.Size = 14
                            '.Color.RGB = RGB(255, 0, 0)
                            '.Bold = True
                            .Italic = False
                            .Underline = False
                        End With
                        ' 行距1.5
                        oTxtRange.ParagraphFormat.SpaceWithin = 1.5
                    End If
                Next i
            End If


            ' 如果形状包含表格
            If oShape.HasTable Then
                Set oTable = oShape.Table
                ' 遍历表格中的所有行和单元格
                For Each oRow In oTable.Rows
                    For Each oCell In oRow.Cells
                        If oCell.Shape.HasTextFrame Then
                            Set oTxtRange = oCell.Shape.TextFrame.TextRange
                            ' 设置表格单元格中文本的字体属性
                            With oTxtRange.Font
                                .Name = "微软雅黑"
                                 '.Size = 20
                                 '.Color.RGB = RGB(255, 0, 0)
                                 '.Bold = True
                                .Italic = False
                                .Underline = False
                            End With
                        End If
                    Next oCell
                Next oRow
            End If
        Next oShape
    Next oSlide
End Sub
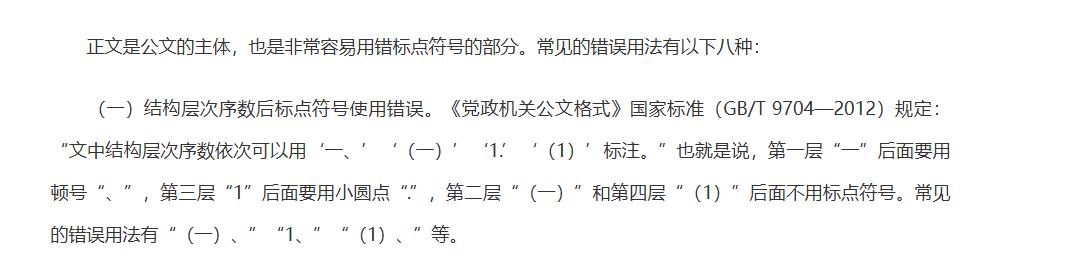
公文序号
第一层通常使用“一、”或“二、”等汉字数字加顿号。
第二层使用“(一)”或“(二)”等汉字数字置于括号内。
第三层使用“1.”或“2.”等阿拉伯数字加脚点。
第四层使用“(1)”或“(2)”等阿拉伯数字置于括号内。
第五层可以使用带右小括号的阿拉伯数字,1)”。
段落起始位置对齐
1、调出标尺
视图 — 标尺

上标尺调整整个页面
下标尺调整选中的段落
使用Python—docx库
1、修改中文
设置中文字体不能用run.font.name = '仿宋_GB2312’而是用style._element.rPr.rFonts.set(qn(‘w:eastAsia’), ‘仿宋_GB2312’) 设置中文字体。
2、修改表格样式
使用table_style可以做一些常用修改,使用OxmlElement可以调用底层xml,修改更丰富的内容。
from docx import Document
from docx.oxml import OxmlElement
from docx.oxml.ns import qn
from docx.table import _Cell


def set_cell_border(cell: _Cell, **kwargs):
    """
    Set cell`s border.
    """
    tc = cell._tc
    tcPr = tc.get_or_add_tcPr()

    # Check for tag existence, if none found, then create one
    tcBorders = tcPr.first_child_found_in("w:tcBorders")
    if tcBorders is None:
        tcBorders = OxmlElement('w:tcBorders')
        tcPr.append(tcBorders)

    # List over all available tags
    for edge in ('start', 'top', 'end', 'bottom', 'insideH', 'insideV'):
        edge_data = kwargs.get(edge)
        if edge_data:
            tag = 'w:{}'.format(edge)

            # Check for tag existence, if none found, then create one
            element = tcBorders.find(qn(tag))
            if element is None:
                element = OxmlElement(tag)
                tcBorders.append(element)

            # Looks like order of attributes is important
            for key in ["sz", "val", "color", "space", "shadow"]:
                if key in edge_data:
                    element.set(qn('w:{}'.format(key)), str(edge_data[key]))


def clear_cell_shading(cell: _Cell):
    """
    Clear cell shading (background color).
    """
    tcPr = cell._tc.get_or_add_tcPr()
    # Remove all old w:shd elements
    for shd in tcPr.xpath('w:shd'):
        tcPr.remove(shd)
    # Add new no-fill attribute
    new_shading = OxmlElement('w:shd')
    new_shading.set(qn('w:fill'), 'auto')  # Set to auto (no fill)
    tcPr.append(new_shading)


def process_word_document(input_path, output_path):
    doc = Document(input_path)

    for table in doc.tables:
        for row in table.rows:
            for cell in row.cells:
                # Clear cell shading
                clear_cell_shading(cell)

                # Set cell borders to blue
                set_cell_border(
                    cell,
                    top={"sz": 4, "val": "single", "color": "0000FF"},
                    bottom={"sz": 4, "val": "single", "color": "0000FF"},
                    start={"sz": 4, "val": "single", "color": "0000FF"},
                    end={"sz": 4, "val": "single", "color": "0000FF"}
                )

    doc.save(output_path)


# 使用示例
input_file = r"xx"
output_file = r"xx"
process_word_document(input_file, output_file)
公文标号设置


 被折叠的 条评论
为什么被折叠?
被折叠的 条评论
为什么被折叠?
 到【灌水乐园】发言


