


每个UI开发人员都应该了解ModelView编程,本教程的目标是为大家提供一个简单易懂的介绍。
Qt 是目前最先进、最完整的跨平台C++开发工具。它不仅完全实现了一次编写,所有平台无差别运行,更提供了几乎所有开发过程中需要用到的工具。如今,Qt已被运用于超过70个行业、数千家企业,支持数百万设备及应用。
在上文中,我们主要为大家介绍了如何创建一个简单的Model/View(模型/视图)的应用(点击这里回顾>>),本文将继续为大家介绍如何实现中间主题。
点击获取Qt Widget组件下载(Q技术交流:166830288)
3. 中间主题
3.1 TreeView
开发人员可以将上面的示例转换为具有树视图的应用程序,简单地将QTableView 替换为QTreeView,这将产生一个读/写树。不必对模型进行任何更改,树不会有任何层次结构,因为模型本身没有任何层次结构。
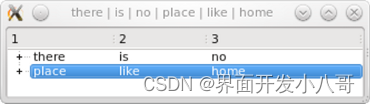
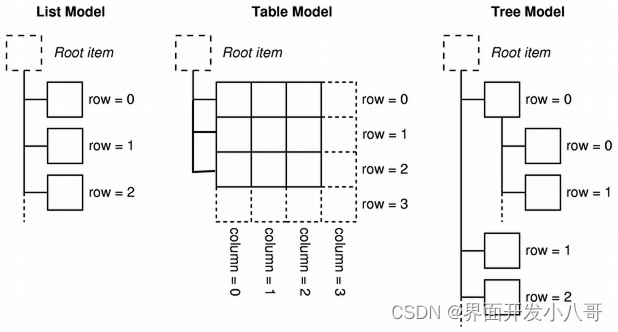
QListView、QTableView和QTreeView都使用一个模型抽象,它是一个合并的列表、表和树,这使得从同一个模型中使用几种不同类型的视图类成为可能。
这是我们的示例模型到目前为止的样子:
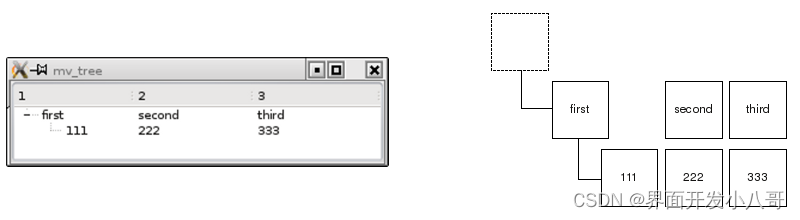
为了建立一个模型,我们把数据封装在上面的示例中。这次使用QStandardItemModel,它是一个层次数据的容器,也实现了QAbstractItemModel。要显示树,QStandardItemModel必须用QStandardItems填充,QStandardItems能够容纳项目的所有标准属性,如文本、字体、复选框或笔刷。
(文件来源:examples/widgets/tutorials/modelview/6_treeview/mainwindow.cpp)
// modelview.cpp
#include "mainwindow.h"

#include <QTreeView>
#include <QStandardItemModel>
#include <QStandardItem>

MainWindow::MainWindow(QWidget *parent)
: QMainWindow(parent)
, treeView(new QTreeView(this))
, standardModel(new QStandardItemModel(this))
{
setCentralWidget(treeView);

QList<QStandardItem *> preparedRow = prepareRow("first", "second", "third");
QStandardItem *item = standardModel->invisibleRootItem();
// adding a row to the invisible root item produces a root element
item->appendRow(preparedRow);

QList<QStandardItem *> secondRow = prepareRow("111", "222", "333");
// adding a row to an item starts a subtree
preparedRow.first()->appendRow(secondRow);

treeView->setModel(standardModel);
treeView->expandAll();
}

QList<QStandardItem *> MainWindow::prepareRow(const QString &first,
const QString &second,
const QString &third) const
{
return {new QStandardItem(first),
new QStandardItem(second),
new QStandardItem(third)};
}我们简单地实例化一个QStandardItemModel,并向构造函数添加两个QStandardItems,然后可以创建一个层次数据结构,因为一个QStandardItem 可以容纳其他QStandardItems,节点在视图中折叠和展开。
3.2 使用选择
我们希望访问选定项的内容,以便将其与层次结构级别一起输出到窗口标题中。
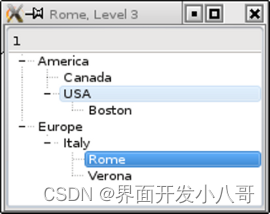
所以创建两个项目:
(文件来源:examples/widgets/tutorials/modelview/7_selections/mainwindow.cpp)
#include "mainwindow.h"

#include <QTreeView>
#include <QStandardItemModel>
#include <QItemSelectionModel>

MainWindow::MainWindow(QWidget *parent)
: QMainWindow(parent)
, treeView(new QTreeView(this))
, standardModel(new QStandardItemModel(this))
{
setCentralWidget(treeView);
auto *rootNode = standardModel->invisibleRootItem();

// defining a couple of items
auto *americaItem = new QStandardItem("America");
auto *mexicoItem = new QStandardItem("Canada");
auto *usaItem = new QStandardItem("USA");
auto *bostonItem = new QStandardItem("Boston");
auto *europeItem = new QStandardItem("Europe");
auto *italyItem = new QStandardItem("Italy");
auto *romeItem = new QStandardItem("Rome");
auto *veronaItem = new QStandardItem("Verona");

// building up the hierarchy
rootNode-> appendRow(americaItem);
rootNode-> appendRow(europeItem);
americaItem-> appendRow(mexicoItem);
americaItem-> appendRow(usaItem);
usaItem-> appendRow(bostonItem);
europeItem-> appendRow(italyItem);
italyItem-> appendRow(romeItem);
italyItem-> appendRow(veronaItem);

// register the model
treeView->setModel(standardModel);
treeView->expandAll();

// selection changes shall trigger a slot
QItemSelectionModel *selectionModel = treeView->selectionModel();
connect(selectionModel, &QItemSelectionModel::selectionChanged,
this, &MainWindow::selectionChangedSlot);
}视图在单独的选择模型中管理选择,可以使用selectionModel() 方法检索,检索选择模型是为了将一个槽连接到它的selectionChanged() 信号。
(文件来源:examples/widgets/tutorials/modelview/7_selections/mainwindow.cpp)
void MainWindow::selectionChangedSlot(const QItemSelection & /*newSelection*/, const QItemSelection & /*oldSelection*/)
{
// get the text of the selected item
const QModelIndex index = treeView->selectionModel()->currentIndex();
QString selectedText = index.data(Qt::DisplayRole).toString();
// find out the hierarchy level of the selected item
int hierarchyLevel = 1;
QModelIndex seekRoot = index;
while (seekRoot.parent().isValid()) {
seekRoot = seekRoot.parent();
hierarchyLevel++;
}
QString showString = QString("%1, Level %2").arg(selectedText)
.arg(hierarchyLevel);
setWindowTitle(showString);
}通过调用treeView->selectionModel()->currentIndex()来获得与选择相对应的模型索引,并通过使用模型索引来获得字段的字符串,然后只需计算该项的hierarchyLevel。顶级项没有父项,parent()方法将返回一个默认构造的QModelIndex(),这就是为什么使用parent()方法迭代到顶层,同时计算迭代期间执行的步骤。
选择模型(如上所示)可以检索,但也可以使用QAbstractItemView::setSelectionModel进行设置。这就是为什么有3个视图类具有同步选择,因为只使用了选择模型的一个实例。要在3个视图之间共享选择模型,请使用selectionModel() 并使用setSelectionModel()将结果分配给第二个和第三个视图类。
3.3 预定义模型
使用模型/视图的典型方法是封装特定的数据,使其可用于视图类。但是Qt也为公共底层数据结构提供了预定义的模型,如果其中一种可用的数据结构适合您的应用程序,那么预定义模型可能是一个不错的选择。
QStringListModel:存储字符串列表
QStandardItemModel:存储任意层次项
QFileSystemModel:封装本地文件系统
QSqlQueryModel:封装SQL结果集
QSqlTableModel:封装SQL表
QSqlRelationalTableModel:用外键封装SQL表
QSortFilterProxyModel:对另一个模型进行排序和/或筛选
3.4 Delegates
在迄今为止的所有示例中,数据在单元格中以文本或复选框的形式呈现,并以文本或复选框的形式进行编辑,提供这些表示和编辑服务的组件称为delegate。一起来看一个名为Star Delegate的示例:
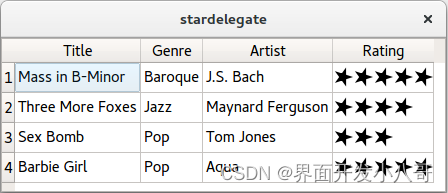
该视图有一个setItemDelegate()方法,用于替换默认delegate并安装自定义delegate。一个新的delegate可以通过创建一个继承自QStyledItemDelegate的类来编写,为了编写一个显示星号且没有输入功能的delegate并安装自定义delegate。一个新的delegate,我们只需要重写2个方法。
class StarDelegate : public QStyledItemDelegate
{
Q_OBJECT
public:
StarDelegate(QWidget *parent = nullptr);
void paint(QPainter *painter, const QStyleOptionViewItem &option,
const QModelIndex &index) const;
QSize sizeHint(const QStyleOptionViewItem &option,
const QModelIndex &index) const;
};
paint()根据底层数据的内容绘制星号,可以通过调用index.data()来查找数据。delegate的sizeHint()方法用于获取每个星星的尺寸,因此单元格将提供足够的高度和宽度来容纳这些星星。
如果您想在视图类的网格中使用自定义图形表示方式显示数据,那么编写自定义delegates是正确的选择。如果想要离开网格,不会使用自定义delegates,可以使用自定义视图类。
3.5 使用ModelTest进行调试
模型的被动特性为程序员提供了新的挑战,模型中的不一致可能导致应用程序崩溃。由于模型受到来自视图的大量调用的影响,因此很难找出哪个调用使应用程序崩溃,以及哪个操作引入了问题。
Qt Labs提供了一种名为ModelTest的软件,可以在程序运行时检查模型。每当模型被更改时,ModelTest都会扫描模型并使用断言报告错误。这对于树模型尤其重要,因为它们的层次性质为微妙的不一致留下了许多可能性。
与视图类不同,ModelTest使用超出范围的索引来测试模型。这意味着您的应用程序可能会在使用ModelTest时崩溃,即使没有它它也可以完美地运行。因此在使用ModelTest时,您还需要处理所有超出范围的索引。


 594
594

 被折叠的 条评论
为什么被折叠?
被折叠的 条评论
为什么被折叠?
 到【灌水乐园】发言


