


Qt 是目前最先进、最完整的跨平台C++开发工具。它不仅完全实现了一次编写,所有平台无差别运行,更提供了几乎所有开发过程中需要用到的工具。如今,Qt已被运用于超过70个行业、数千家企业,支持数百万设备及应用。
Line Edits(行编辑)示例演示了QLineEdit的多种使用方式,并显示了各种属性和验证器对用户提供的输入和输出的影响。
点击获取Qt Widget组件下载(Q技术交流:166830288)
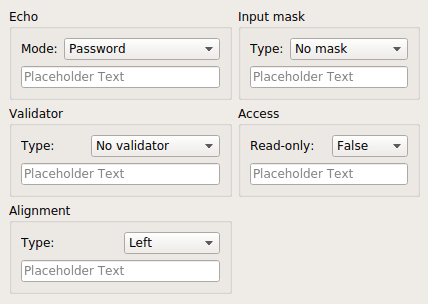
该示例由单个Window类组成,其中包含具有不同输入约束和显示属性的行编辑选择,这些属性可以通过从组合框中选择项来更改。将它们放在一起可以帮助开发人员选择合适的属性用于行编辑,并且可以很容易地比较每个验证器对用户输入的影响。
Window类定义
Window类继承了QWidget并包含一个构造函数和几个槽:
class Window : public QWidget
{
Q_OBJECT

public:
Window(QWidget *parent = nullptr);

public slots:
void echoChanged(int);
void validatorChanged(int);
void alignmentChanged(int);
void inputMaskChanged(int);
void accessChanged(int);

private:
QLineEdit *echoLineEdit;
QLineEdit *validatorLineEdit;
QLineEdit *alignmentLineEdit;
QLineEdit *inputMaskLineEdit;
QLineEdit *accessLineEdit;
};
当在关联的组合框中选择了新的验证器时,这些槽用于更新给定行编辑的验证器类型,行编辑保存在窗口中,以便在这些槽中使用。
Window类实现
Window构造函数用于设置行编辑器、验证器和组合框,将来自组合框的信号连接到Window类中的槽,并在布局中安排子部件。
我们首先构建一个组框来保存标签、组合框和行编辑器,这样就可以演示QLineEdit::echoMode属性:
Window::Window(QWidget *parent)
: QWidget(parent)
{
QGroupBox *echoGroup = new QGroupBox(tr("Echo"));

QLabel *echoLabel = new QLabel(tr("Mode:"));
QComboBox *echoComboBox = new QComboBox;
echoComboBox->addItem(tr("Normal"));
echoComboBox->addItem(tr("Password"));
echoComboBox->addItem(tr("PasswordEchoOnEdit"));
echoComboBox->addItem(tr("No Echo"));

echoLineEdit = new QLineEdit;
echoLineEdit->setPlaceholderText("Placeholder Text");
echoLineEdit->setFocus();
在这一点上,这些小部件都没有被安排在布局中。最后echoLabel、echoComboBox和echoLineEdit将被放置在echoGroup组框内的垂直布局中。
类似地,我们构造组框和小部件集合来显示QIntValidator 和QDoubleValidator对行编辑器内容的影响:
QGroupBox *validatorGroup = new QGroupBox(tr("Validator"));

QLabel *validatorLabel = new QLabel(tr("Type:"));
QComboBox *validatorComboBox = new QComboBox;
validatorComboBox->addItem(tr("No validator"));
validatorComboBox->addItem(tr("Integer validator"));
validatorComboBox->addItem(tr("Double validator"));

validatorLineEdit = new QLineEdit;
validatorLineEdit->setPlaceholderText("Placeholder Text");
文本对齐由另一组小部件演示:
QGroupBox *alignmentGroup = new QGroupBox(tr("Alignment"));

QLabel *alignmentLabel = new QLabel(tr("Type:"));
QComboBox *alignmentComboBox = new QComboBox;
alignmentComboBox->addItem(tr("Left"));
alignmentComboBox->addItem(tr("Centered"));
alignmentComboBox->addItem(tr("Right"));

alignmentLineEdit = new QLineEdit;
alignmentLineEdit->setPlaceholderText("Placeholder Text");
QLineEdit 支持使用输入掩码,它们只允许用户在行编辑中输入遵循简单规范的字符,我们构建了一组小部件来演示预定义掩码的选择:
QGroupBox *inputMaskGroup = new QGroupBox(tr("Input mask"));

QLabel *inputMaskLabel = new QLabel(tr("Type:"));
QComboBox *inputMaskComboBox = new QComboBox;
inputMaskComboBox->addItem(tr("No mask"));
inputMaskComboBox->addItem(tr("Phone number"));
inputMaskComboBox->addItem(tr("ISO date"));
inputMaskComboBox->addItem(tr("License key"));

inputMaskLineEdit = new QLineEdit;
inputMaskLineEdit->setPlaceholderText("Placeholder Text");
QLineEdit的另一个有用特性是使其内容只读的能力,此属性用于控制对以下小部件组中的行编辑访问:
QGroupBox *accessGroup = new QGroupBox(tr("Access"));

QLabel *accessLabel = new QLabel(tr("Read-only:"));
QComboBox *accessComboBox = new QComboBox;
accessComboBox->addItem(tr("False"));
accessComboBox->addItem(tr("True"));

accessLineEdit = new QLineEdit;
accessLineEdit->setPlaceholderText("Placeholder Text");
现在所有的子部件都已经构造好了,我们将来自组合框的信号连接到Window对象中的槽:
connect(echoComboBox, &QComboBox::activated,
this, &Window::echoChanged);
connect(validatorComboBox, &QComboBox::activated,
this, &Window::validatorChanged);
connect(alignmentComboBox, &QComboBox::activated,
this, &Window::alignmentChanged);
connect(inputMaskComboBox, &QComboBox::activated,
this, &Window::inputMaskChanged);
connect(accessComboBox, &QComboBox::activated,
this, &Window::accessChanged);这些连接中的每一个都使用QComboBox::activated()信号,该信号向插槽提供一个整数,这将用于有效地更改每个槽中的适当行编辑。
我们将每个组合框、行编辑和标签放置在每个组框的布局中,从echoGroup组框的布局开始:
QGridLayout *echoLayout = new QGridLayout;
echoLayout->addWidget(echoLabel, 0, 0);
echoLayout->addWidget(echoComboBox, 0, 1);
echoLayout->addWidget(echoLineEdit, 1, 0, 1, 2);
echoGroup->setLayout(echoLayout);
其他布局的构造方式相同:
QGridLayout *validatorLayout = new QGridLayout;
validatorLayout->addWidget(validatorLabel, 0, 0);
validatorLayout->addWidget(validatorComboBox, 0, 1);
validatorLayout->addWidget(validatorLineEdit, 1, 0, 1, 2);
validatorGroup->setLayout(validatorLayout);

QGridLayout *alignmentLayout = new QGridLayout;
alignmentLayout->addWidget(alignmentLabel, 0, 0);
alignmentLayout->addWidget(alignmentComboBox, 0, 1);
alignmentLayout->addWidget(alignmentLineEdit, 1, 0, 1, 2);
alignmentGroup-> setLayout(alignmentLayout);

QGridLayout *inputMaskLayout = new QGridLayout;
inputMaskLayout->addWidget(inputMaskLabel, 0, 0);
inputMaskLayout->addWidget(inputMaskComboBox, 0, 1);
inputMaskLayout->addWidget(inputMaskLineEdit, 1, 0, 1, 2);
inputMaskGroup->setLayout(inputMaskLayout);

QGridLayout *accessLayout = new QGridLayout;
accessLayout->addWidget(accessLabel, 0, 0);
accessLayout->addWidget(accessComboBox, 0, 1);
accessLayout->addWidget(accessLineEdit, 1, 0, 1, 2);
accessGroup->setLayout(accessLayout);
最后我们将每个组框放置在Window对象的网格布局中,并设置窗口标题:
QGridLayout *layout = new QGridLayout;
layout->addWidget(echoGroup, 0, 0);
layout->addWidget(validatorGroup, 1, 0);
layout->addWidget(alignmentGroup, 2, 0);
layout->addWidget(inputMaskGroup, 0, 1);
layout->addWidget(accessGroup, 1, 1);
setLayout(layout);

setWindowTitle(tr("Line Edits"));
}
槽响应用户更改组合框时发出的信号。
当Echo分组框的组合框被改变时,echoChanged()槽被调用:
void Window::echoChanged(int index)
{
switch (index) {
case 0:
echoLineEdit->setEchoMode(QLineEdit::Normal);
break;
case 1:
echoLineEdit->setEchoMode(QLineEdit::Password);
break;
case 2:
echoLineEdit->setEchoMode(QLineEdit::PasswordEchoOnEdit);
break;
case 3:
echoLineEdit->setEchoMode(QLineEdit::NoEcho);
break;
}
}
槽更新同一分组框中的行编辑,来使用与分组合框中描述的条目对应的回显模式。
当Validator分组框的组合框被改变时,validatorChanged()槽被调用:
void Window::validatorChanged(int index)
{
switch (index) {
case 0:
validatorLineEdit->setValidator(nullptr);
break;
case 1:
validatorLineEdit->setValidator(new QIntValidator(
validatorLineEdit));
break;
case 2:
validatorLineEdit->setValidator(new QDoubleValidator(-999.0,
999.0, 2, validatorLineEdit));
break;
}

validatorLineEdit->clear();
}槽或者为要使用的行编辑创建一个新的验证器,或者通过调用带有零指针的QLineEdit::setValidator()来删除正在使用的验证器。在本例中,我们清除了行编辑,以确保最初为新的验证器提供了有效的输入。
当对齐分组框的组合框被改变时,alignmentChanged()槽被调用:
void Window::alignmentChanged(int index)
{
switch (index) {
case 0:
alignmentLineEdit->setAlignment(Qt::AlignLeft);
break;
case 1:
alignmentLineEdit->setAlignment(Qt::AlignCenter);
break;
case 2:
alignmentLineEdit->setAlignment(Qt::AlignRight);
break;
}
}
这会改变文本在行编辑器中的显示方式,使其与组合框中选择的描述相对应。
inputMaskChanged()插槽处理输入掩码分组框中组合框的更改:
void Window::inputMaskChanged(int index)
{
switch (index) {
case 0:
inputMaskLineEdit->setInputMask("");
break;
case 1:
inputMaskLineEdit->setInputMask("+99 99 99 99 99;_");
break;
case 2:
inputMaskLineEdit->setInputMask("0000-00-00");
inputMaskLineEdit->setText("00000000");
inputMaskLineEdit->setCursorPosition(0);
break;
case 3:
inputMaskLineEdit->setInputMask(">AAAAA-AAAAA-AAAAA-AAAAA-AAAAA;#");
break;
}
}
相关组合框中的每个条目都与一个输入掩码相关联,我们通过使用合适的字符串调用QLineEdit::setInputMask()函数来设置一个新的掩码;如果使用空字符串,则禁用掩码。
accessChanged()槽处理Access分组框中组合框的更改:
void Window::accessChanged(int index)
{
switch (index) {
case 0:
accessLineEdit->setReadOnly(false);
break;
case 1:
accessLineEdit->setReadOnly(true);
break;
}
}
这里,我们简单地将分组合框中的False和True条目与传递给QLineEdit::setReadOnly()的False和True值关联起来,这允许用户启用和禁用对行编辑的输入。
Qt Widget组件推荐
- QtitanRibbon - Ribbon UI组件:是一款遵循Microsoft Ribbon UI Paradigm for Qt技术的Ribbon UI组件,QtitanRibbon致力于为Windows、Linux和Mac OS X提供功能完整的Ribbon组件。
- QtitanChart - Qt类图表组件:是一个C ++库,代表一组控件,这些控件使您可以快速地为应用程序提供漂亮而丰富的图表。
- QtitanDataGrid - Qt网格组件:提供了一套完整的标准 QTableView 函数和传统组件无法实现的独特功能。使您能够将不同来源的各类数据加载到一个快速、灵活且功能强大的可编辑网格中,支持排序、分组、报告、创建带状列、拖放按钮和许多其他方便的功能。
- QtitanDocking:允许您像 Visual Studio 一样为您的伟大应用程序配备可停靠面板和可停靠工具栏。黑色、白色、蓝色调色板完全支持 Visual Studio 2019 主题!


 3119
3119


 被折叠的 条评论
为什么被折叠?
被折叠的 条评论
为什么被折叠?
 到【灌水乐园】发言


