


 本文深入探讨MyBatis的执行流程,从SqlSessionFactory的构建到SqlSession的使用,再到Mapper代理模式的工作原理,以及核心组件如Executor、StatementHandler等的内部机制。此外,还详细分析了插件系统的实现原理。
[一步是咫尺,一步即天涯]
本文的内容将作为前面我们叙述的内容的内部原理篇的解释,希望各位读者能够仔细理解本篇的内容,下一篇,我们将详细的介绍如何实现一个生产环境下的分页查询,好了,马上开始我们的正文部分吧。【在此,先对开源世界的大神表示感谢】
准备工作:Mybatis 3.3.1版本源码。【其他版本,请读者自行对比即可】
--------------------------------------------------------------------------------------------------------------------------------------------------------
1.首先,请大家回想下面的代码:
public class SqlSessionFactoryUtil {
private static SqlSessionFactory sqlSessionFactory;
public static SqlSessionFactory getSqlSessionFactory(){
if(sqlSessionFactory==null){
InputStream inputStream=null;
try{
inputStream=Resources.getResourceAsStream("mybatis-config.xml");
sqlSessionFactory=new SqlSessionFactoryBuilder().build(inputStream);
}catch(Exception e){
e.printStackTrace();
}
}
return sqlSessionFactory;
}
public static SqlSession openSession(){
return getSqlSessionFactory().openSession();
}
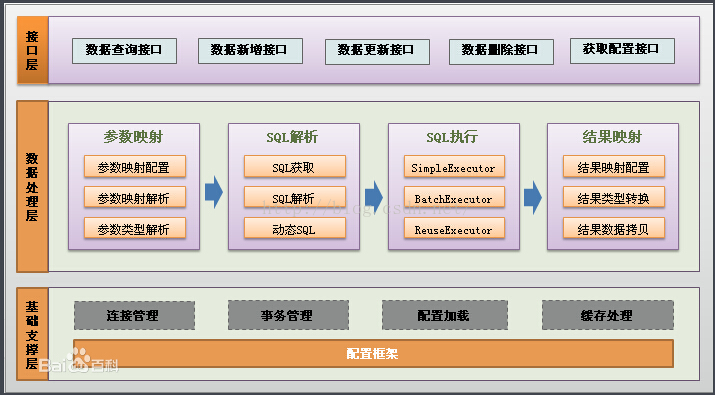
}2.Mybatis的整体架构图,如下:【摘自百科】
3.Mybatis执行流程图,如下:【摘自其他博文,详情见末尾】
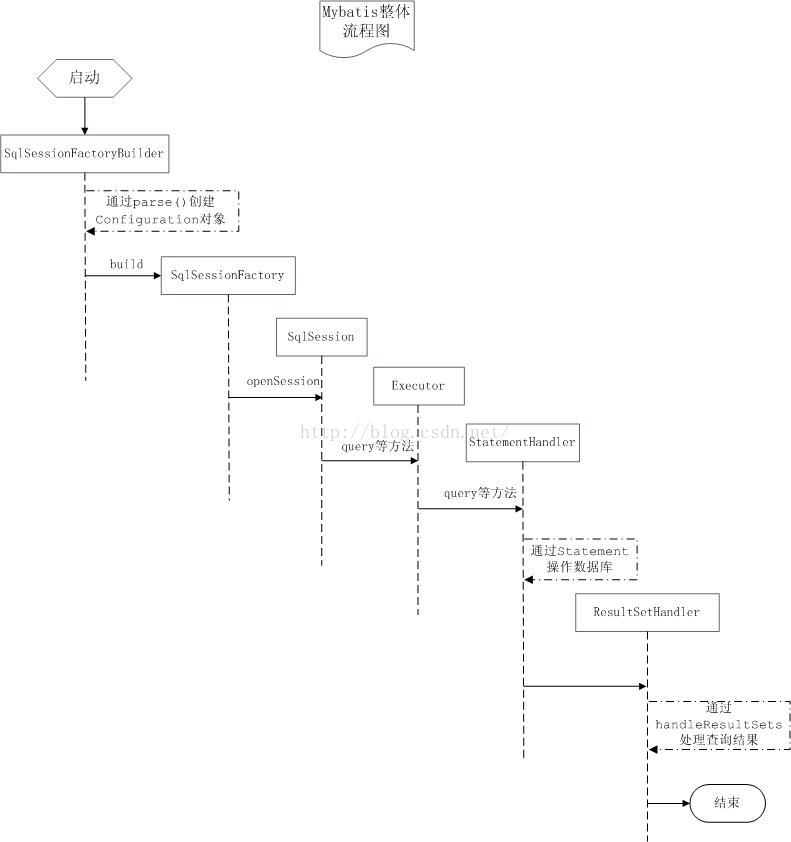
4.上图中各个组件的概念解释:
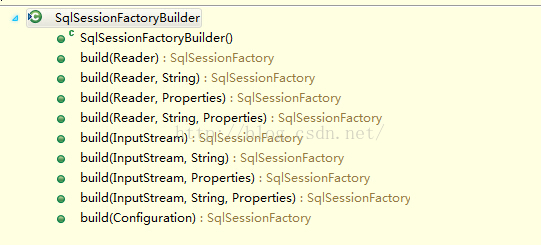
SqlSessionFactoryBuilder:每一个Mybatis的应用程序的入口是SqlSessionFactoryBuilder,它的作用是通过XML配置文件创建Configuration对象(当然也可以在程序中自行创建),然后通过build方法创建SqlSessionFactory对象。没有必要每次访问Mybatis就创建一次SqlSessionFactoryBuilder,通常的做法是创建一个全局的对象就可以了。正如我们在前文中演示的那样,专门有一个Util负责管理SqlSwssionFactoryBuilder。【下面的方法请参照上文程序对比学习】
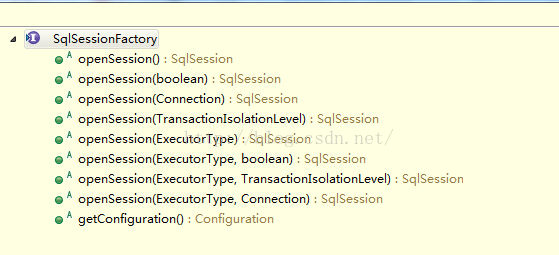
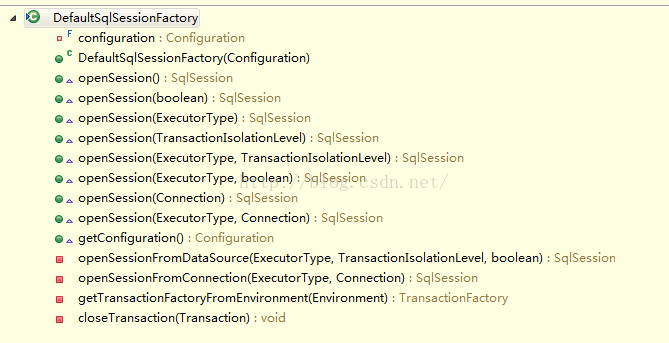
SqlSessionFactory:SqlSessionFactory对象由SqlSessionFactoryBuilder创建。它的主要功能是创建SqlSession对象,和SqlSessionFactoryBuilder对象一样,没有必要每次访问Mybatis就创建一次SqlSessionFactory,通常的做法是创建一个全局的对象就可以了。SqlSessionFactory对象一个必要的属性是Configuration对象,它是保存Mybatis全局配置的一个配置对象,通常由SqlSessionFactoryBuilder从XML配置文件创建。
【SqlSessionFactory为接口】
【DefaultSqlSessionFactory为默认实现】
SqlSession:SqlSession对象的主要功能是完成一次数据库的访问和结果的映射,它类似于数据库的session概念,由于不是线程安全的,所以SqlSession对象的作用域需限制在方法内。SqlSession的默认实现类是DefaultSqlSession,它有两个必须配置的属性:Configuration和Executor。【截图中省略部分内容】
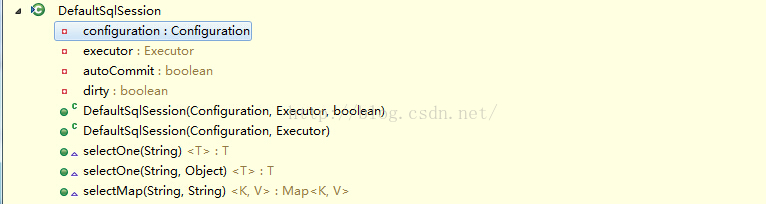
Configuration和Executor。Configuration即是我们的mybatis-config.xml文件,具体的配置请参考前文《Mybatis最入门---Mapper文件配置详解(上)》等内容。SqlSession对数据库的操作都是通过Executor来完成的,Executor的具体功能在下文描述。
到目前为止,我们看到的都是mybatis的流程,我们的应用程序在什么地方插入到这个流程中并获得我们想要的结果呢?就是SqlSession这里。SqlSession有一个重要的方法getMapper,顾名思义,这个方式是用来获取Mapper对象的。什么是Mapper对象?根据Mybatis的官方手册,应用程序除了要初始并启动Mybatis之外,还需要定义一些接口,接口里定义访问数据库的方法,存放接口的包路径下需要放置同名的XML配置文件。SqlSession的getMapper方法是联系应用程序和Mybatis纽带,应用程序访问getMapper时,Mybatis会根据传入的接口类型和对应的XML配置文件生成一个代理对象,这个代理对象就叫Mapper对象。应用程序获得Mapper对象后,就应该通过这个Mapper对象来访问Mybatis的SqlSession对象,这样就达到里插入到Mybatis流程的目的。示例代码如下:
UserInfoDao userInfo = sqlSession.getMapper(UserInfoDao.class);
Executor:Executor对象在创建Configuration对象的时候创建,并且缓存在Configuration对象里。Executor对象的主要功能是调用StatementHandler访问数据库,并将查询结果存入缓存中(如果配置了缓存的话)。
StatementHandler:是真正访问数据库的地方,并调用ResultSetHandler处理查询结果。
-------------------------------------------------------------------------------------------------------------------------------------
SqlSession详解:
1.现在我们的程序已经执行到了
public static SqlSession openSession(){
		return getSqlSessionFactory().openSession();
	}
public class DefaultSqlSessionFactory implements SqlSessionFactory {
  //.....
  @Override
  public SqlSession openSession() {
    return openSessionFromDataSource(configuration.getDefaultExecutorType(), null, false);
  }
  //.....
}
private SqlSession openSessionFromDataSource(ExecutorType execType, TransactionIsolationLevel level, boolean autoCommit) {
    Transaction tx = null;
    try {
      final Environment environment = configuration.getEnvironment();
      final TransactionFactory transactionFactory = getTransactionFactoryFromEnvironment(environment);
      tx = transactionFactory.newTransaction(environment.getDataSource(), level, autoCommit);
      final Executor executor = configuration.newExecutor(tx, execType);
      return new DefaultSqlSession(configuration, executor, autoCommit);
    } catch (Exception e) {
      closeTransaction(tx); // may have fetched a connection so lets call close()
      throw ExceptionFactory.wrapException("Error opening session.  Cause: " + e, e);
    } finally {
      ErrorContext.instance().reset();
    }
  }
1) 从配置中获取Environment;
2) 从Environment中取得TransactionFactory;
3) 从Environment中取得DataSource;
4) 创建事务对象Transaction;
5) 创建Executor对象(该对象非常重要,事实上sqlsession的所有操作都是通过它完成的);
6) 创建sqlsession对象。
Executor的创建:Executor与Sqlsession的关系就像市长与书记,Sqlsession只是个门面,真正干事的是Executor,Sqlsession对数据库的操作都是通过Executor来完成的。与Sqlsession一样,Executor也是动态创建的:
此时,程序执行到了上文中:
final Executor executor = configuration.newExecutor(tx, execType); public Executor newExecutor(Transaction transaction, ExecutorType executorType) {
executorType = executorType == null ? defaultExecutorType : executorType;
executorType = executorType == null ? ExecutorType.SIMPLE : executorType;
Executor executor;
if (ExecutorType.BATCH == executorType) {
executor = new BatchExecutor(this, transaction);
} else if (ExecutorType.REUSE == executorType) {
executor = new ReuseExecutor(this, transaction);
} else {
executor = new SimpleExecutor(this, transaction);
}
if (cacheEnabled) {
executor = new CachingExecutor(executor);
}
executor = (Executor) interceptorChain.pluginAll(executor);
return executor;
}可以看出,如果不开启cache的话,创建的Executor只是3中基础类型之一,BatchExecutor专门用于执行批量sql操作,ReuseExecutor会重用statement执行sql操作,SimpleExecutor只是简单执行sql没有什么特别的。【按照我们前文的设置,这里创建的就是SimpleExecutor】开启cache的话(默认是开启的并且没有任何理由去关闭它),就会创建CachingExecutor,它以前面创建的Executor作为唯一参数。CachingExecutor在查询数据库前先查找缓存,若没找到的话调用delegate(就是构造时传入的Executor对象)从数据库查询,并将查询结果存入缓存中。
Executor对象是可以被插件拦截的,如果定义了针对Executor类型的插件,最终生成的Executor对象是被各个插件插入后的代理对象。
至此,SqlSession对象已经成功创建。接下来就该执行getMapper(..)
-------------------------------------------------------------------------------------------------------------------------------------
1.我们首先来看看getMapper的实现,如下:【默认执行下面的方法】
public class DefaultSqlSession implements SqlSession {
  //...
@Override
  public <T> T getMapper(Class<T> type) {
    return configuration.<T>getMapper(type, this);
  }
  //...
}
public class Configuration {
//...
public <T> T getMapper(Class<T> type, SqlSession sqlSession) {
    return mapperRegistry.getMapper(type, sqlSession);
  }
//..
}
public class MapperRegistry {
//....
 @SuppressWarnings("unchecked")
  public <T> T getMapper(Class<T> type, SqlSession sqlSession) {
    final MapperProxyFactory<T> mapperProxyFactory = (MapperProxyFactory<T>) knownMappers.get(type);
    if (mapperProxyFactory == null) {
      throw new BindingException("Type " + type + " is not known to the MapperRegistry.");
    }
    try {
      return mapperProxyFactory.newInstance(sqlSession);
    } catch (Exception e) {
      throw new BindingException("Error getting mapper instance. Cause: " + e, e);
    }
  }
//...
}
public class MapperProxyFactory<T> {
  //...
@SuppressWarnings("unchecked")
  protected T newInstance(MapperProxy<T> mapperProxy) {
    return (T) Proxy.newProxyInstance(mapperInterface.getClassLoader(), new Class[] { mapperInterface }, mapperProxy);
  }

  public T newInstance(SqlSession sqlSession) {
    final MapperProxy<T> mapperProxy = new MapperProxy<T>(sqlSession, mapperInterface, methodCache);
    return newInstance(mapperProxy);
  }
//...
}---------------------------------------------------------------------------------------------------------------------------------------------------------------------------------
现在,准备工作已经基本结束,程序流即将执行到具体的接口中的CRUD方法,如:
int re = userInfo.insertUserInfo(ui);我们知道对被代理对象的方法的访问都会落实到代理者的invoke上来,MapperProxy的invoke如下:
public class MapperProxy<T> implements InvocationHandler, Serializable {
//....
  @Override
  public Object invoke(Object proxy, Method method, Object[] args) throws Throwable {
    if (Object.class.equals(method.getDeclaringClass())) {
      try {
        return method.invoke(this, args);
      } catch (Throwable t) {
        throw ExceptionUtil.unwrapThrowable(t);
      }
    }
    final MapperMethod mapperMethod = cachedMapperMethod(method);
    return mapperMethod.execute(sqlSession, args);
  }

  private MapperMethod cachedMapperMethod(Method method) {
    MapperMethod mapperMethod = methodCache.get(method);
    if (mapperMethod == null) {
      mapperMethod = new MapperMethod(mapperInterface, method, sqlSession.getConfiguration());
      methodCache.put(method, mapperMethod);
    }
    return mapperMethod;
  }
//....
}
public class MapperMethod {
//...
public Object execute(SqlSession sqlSession, Object[] args) {
    Object result;
    if (SqlCommandType.INSERT == command.getType()) {
      Object param = method.convertArgsToSqlCommandParam(args);
      result = rowCountResult(sqlSession.insert(command.getName(), param));
    } else if (SqlCommandType.UPDATE == command.getType()) {
      Object param = method.convertArgsToSqlCommandParam(args);
      result = rowCountResult(sqlSession.update(command.getName(), param));
    } else if (SqlCommandType.DELETE == command.getType()) {
      Object param = method.convertArgsToSqlCommandParam(args);
      result = rowCountResult(sqlSession.delete(command.getName(), param));
    } else if (SqlCommandType.SELECT == command.getType()) {
      if (method.returnsVoid() && method.hasResultHandler()) {
        executeWithResultHandler(sqlSession, args);
        result = null;
      } else if (method.returnsMany()) {
        result = executeForMany(sqlSession, args);
      } else if (method.returnsMap()) {
        result = executeForMap(sqlSession, args);
      } else {
        Object param = method.convertArgsToSqlCommandParam(args);
        result = sqlSession.selectOne(command.getName(), param);
      }
    } else if (SqlCommandType.FLUSH == command.getType()) {
        result = sqlSession.flushStatements();
    } else {
      throw new BindingException("Unknown execution method for: " + command.getName());
    }
    if (result == null && method.getReturnType().isPrimitive() && !method.returnsVoid()) {
      throw new BindingException("Mapper method '" + command.getName()
          + " attempted to return null from a method with a primitive return type (" + method.getReturnType() + ").");
    }
    return result;
  }
//...
}可以看到,MapperMethod就像是一个分发者,他根据参数和返回值类型选择不同的sqlsession方法来执行。这样mapper对象与sqlsession就真正的关联起来了。
-------------------------------------------------------------------------------------------------------------------------------------------------------------------------------
Executor
前面提到过,sqlsession只是一个门面,真正发挥作用的是executor,对sqlsession方法的访问最终都会落到executor的相应方法上去。int re = userInfo.insertUserInfo(ui);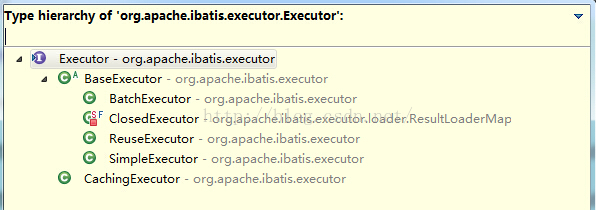
如上图,在Mybatis3.3.1版本中,BaseExcutor分为4类,BatchExecutor用于执行批量sql操作,ClosedExecutor用于关闭Executor,ReuseExecutor用于重用statement执行sql操作,SimpleExecutor用于简单的执行Sql语句,并不做特别处理。
【接下来,由于查询语句的执行流程包含插入语句的执行过程,借此以查询语句为例,说明后续程序执行流程。】
public class CachingExecutor implements Executor {
  private Executor delegate;
@Override
  public int update(MappedStatement ms, Object parameterObject) throws SQLException {
    flushCacheIfRequired(ms);
    return delegate.update(ms, parameterObject);
  }

  @Override
  public <E> List<E> query(MappedStatement ms, Object parameterObject, RowBounds rowBounds, ResultHandler resultHandler) throws SQLException {
    BoundSql boundSql = ms.getBoundSql(parameterObject);
    CacheKey key = createCacheKey(ms, parameterObject, rowBounds, boundSql);
    return query(ms, parameterObject, rowBounds, resultHandler, key, boundSql);
  }

  @Override
  public <E> List<E> query(MappedStatement ms, Object parameterObject, RowBounds rowBounds, ResultHandler resultHandler, CacheKey key, BoundSql boundSql)
      throws SQLException {
    Cache cache = ms.getCache();
    if (cache != null) {
      flushCacheIfRequired(ms);
      if (ms.isUseCache() && resultHandler == null) {
        ensureNoOutParams(ms, parameterObject, boundSql);
        @SuppressWarnings("unchecked")
        List<E> list = (List<E>) tcm.getObject(cache, key);
        if (list == null) {
          list = delegate.<E> query(ms, parameterObject, rowBounds, resultHandler, key, boundSql);
          tcm.putObject(cache, key, list); // issue #578 and #116
        }
        return list;
      }
    }
    return delegate.<E> query(ms, parameterObject, rowBounds, resultHandler, key, boundSql);
  }

} @Override
public int doUpdate(MappedStatement ms, Object parameter) throws SQLException {
Statement stmt = null;
try {
Configuration configuration = ms.getConfiguration();
StatementHandler handler = configuration.newStatementHandler(this, ms, parameter, RowBounds.DEFAULT, null, null);
stmt = prepareStatement(handler, ms.getStatementLog());
return handler.update(stmt);
} finally {
closeStatement(stmt);
}
} public StatementHandler newStatementHandler(Executor executor, MappedStatement mappedStatement, Object parameterObject, RowBounds rowBounds, ResultHandler resultHandler, BoundSql boundSql) {
StatementHandler statementHandler = new RoutingStatementHandler(executor, mappedStatement, parameterObject, rowBounds, resultHandler, boundSql);
statementHandler = (StatementHandler) interceptorChain.pluginAll(statementHandler);
return statementHandler;
}public class RoutingStatementHandler implements StatementHandler {
private final StatementHandler delegate;
public RoutingStatementHandler(Executor executor, MappedStatement ms, Object parameter, RowBounds rowBounds, ResultHandler resultHandler, BoundSql boundSql) {
switch (ms.getStatementType()) {
case STATEMENT:
delegate = new SimpleStatementHandler(executor, ms, parameter, rowBounds, resultHandler, boundSql);
break;
case PREPARED:
delegate = new PreparedStatementHandler(executor, ms, parameter, rowBounds, resultHandler, boundSql);
break;
case CALLABLE:
delegate = new CallableStatementHandler(executor, ms, parameter, rowBounds, resultHandler, boundSql);
break;
default:
throw new ExecutorException("Unknown statement type: " + ms.getStatementType());
}
}
//...
}public abstract class BaseStatementHandler implements StatementHandler {
//....
protected BaseStatementHandler(Executor executor, MappedStatement mappedStatement, Object parameterObject, RowBounds rowBounds, ResultHandler resultHandler, BoundSql boundSql) {
this.configuration = mappedStatement.getConfiguration();
this.executor = executor;
this.mappedStatement = mappedStatement;
this.rowBounds = rowBounds;
this.typeHandlerRegistry = configuration.getTypeHandlerRegistry();
this.objectFactory = configuration.getObjectFactory();
if (boundSql == null) { // issue #435, get the key before calculating the statement
generateKeys(parameterObject);
boundSql = mappedStatement.getBoundSql(parameterObject);
}
this.boundSql = boundSql;
this.parameterHandler = configuration.newParameterHandler(mappedStatement, parameterObject, boundSql);
this.resultSetHandler = configuration.newResultSetHandler(executor, mappedStatement, rowBounds, parameterHandler, resultHandler, boundSql);
}
//...
} public ParameterHandler newParameterHandler(MappedStatement mappedStatement, Object parameterObject, BoundSql boundSql) {
ParameterHandler parameterHandler = mappedStatement.getLang().createParameterHandler(mappedStatement, parameterObject, boundSql);
parameterHandler = (ParameterHandler) interceptorChain.pluginAll(parameterHandler);
return parameterHandler;
} public ResultSetHandler newResultSetHandler(Executor executor, MappedStatement mappedStatement, RowBounds rowBounds, ParameterHandler parameterHandler,
ResultHandler resultHandler, BoundSql boundSql) {
ResultSetHandler resultSetHandler = new DefaultResultSetHandler(executor, mappedStatement, parameterHandler, resultHandler, boundSql, rowBounds);
resultSetHandler = (ResultSetHandler) interceptorChain.pluginAll(resultSetHandler);
return resultSetHandler;
} private Statement prepareStatement(StatementHandler handler, Log statementLog) throws SQLException {
Statement stmt;
Connection connection = getConnection(statementLog);
stmt = handler.prepare(connection);
handler.parameterize(stmt);
return stmt;
}statement的开启和参数设置没什么特别之处,handler.parameterize倒是可以看看其内部细节。handler.parameterize通过调用ParameterHandler的setParameters完成参数的设置,ParameterHandler随着StatementHandler的创建而创建,默认的实现是DefaultParameterHandler:如下:
public class RoutingStatementHandler implements StatementHandler {
private final StatementHandler delegate;public class PreparedStatementHandler extends BaseStatementHandler {
//...
@Override
public void parameterize(Statement statement) throws SQLException {
parameterHandler.setParameters((PreparedStatement) statement);
}
//...
}public class DefaultParameterHandler implements ParameterHandler {
private final TypeHandlerRegistry typeHandlerRegistry;
private final MappedStatement mappedStatement;
private final Object parameterObject;
private BoundSql boundSql;
private Configuration configuration;
//...
@Override
public void setParameters(PreparedStatement ps) {
ErrorContext.instance().activity("setting parameters").object(mappedStatement.getParameterMap().getId());
List<ParameterMapping> parameterMappings = boundSql.getParameterMappings();
if (parameterMappings != null) {
for (int i = 0; i < parameterMappings.size(); i++) {
ParameterMapping parameterMapping = parameterMappings.get(i);
if (parameterMapping.getMode() != ParameterMode.OUT) {
Object value;
String propertyName = parameterMapping.getProperty();
if (boundSql.hasAdditionalParameter(propertyName)) { // issue #448 ask first for additional params
value = boundSql.getAdditionalParameter(propertyName);
} else if (parameterObject == null) {
value = null;
} else if (typeHandlerRegistry.hasTypeHandler(parameterObject.getClass())) {
value = parameterObject;
} else {
MetaObject metaObject = configuration.newMetaObject(parameterObject);
value = metaObject.getValue(propertyName);
}
TypeHandler typeHandler = parameterMapping.getTypeHandler();
JdbcType jdbcType = parameterMapping.getJdbcType();
if (value == null && jdbcType == null) {
jdbcType = configuration.getJdbcTypeForNull();
}
try {
typeHandler.setParameter(ps, i + 1, value, jdbcType);
} catch (TypeException e) {
throw new TypeException("Could not set parameters for mapping: " + parameterMapping + ". Cause: " + e, e);
} catch (SQLException e) {
throw new TypeException("Could not set parameters for mapping: " + parameterMapping + ". Cause: " + e, e);
}
}
}
}
}
//...
}这里面最重要的一句其实就是最后一句代码,它的作用是用合适的TypeHandler完成参数的设置。那么什么是合适的TypeHandler呢,它又是如何决断出来的呢?BaseStatementHandler的构造方法里有这么一句:
if (boundSql == null) { // issue #435, get the key before calculating the statement
generateKeys(parameterObject);
boundSql = mappedStatement.getBoundSql(parameterObject);
}它触发了sql 的解析,在解析sql的过程中,TypeHandler也被决断出来了,决断的原则就是根据参数的类型和参数对应的JDBC类型决定使用哪个TypeHandler。比如:参数类型是String的话就用StringTypeHandler,参数类型是整数的话就用IntegerTypeHandler等。
参数设置完毕后,执行数据库操作(update或query)。如果是query最后还有个查询结果的处理过程。
-------------------------------------------------------------------------------------------------------------------------------------查询结果的处理过程
  public ResultSetHandler newResultSetHandler(Executor executor, MappedStatement mappedStatement, RowBounds rowBounds, ParameterHandler parameterHandler,
      ResultHandler resultHandler, BoundSql boundSql) {
    ResultSetHandler resultSetHandler = new DefaultResultSetHandler(executor, mappedStatement, parameterHandler, resultHandler, boundSql, rowBounds);
    resultSetHandler = (ResultSetHandler) interceptorChain.pluginAll(resultSetHandler);
    return resultSetHandler;
}public class DefaultResultSetHandler implements ResultSetHandler {
//...
private Object getRowValue(ResultSetWrapper rsw, ResultMap resultMap) throws SQLException {
final ResultLoaderMap lazyLoader = new ResultLoaderMap();
Object resultObject = createResultObject(rsw, resultMap, lazyLoader, null);
if (resultObject != null && !typeHandlerRegistry.hasTypeHandler(resultMap.getType())) {
final MetaObject metaObject = configuration.newMetaObject(resultObject);
boolean foundValues = !resultMap.getConstructorResultMappings().isEmpty();
if (shouldApplyAutomaticMappings(resultMap, false)) {
foundValues = applyAutomaticMappings(rsw, resultMap, metaObject, null) || foundValues;
}
foundValues = applyPropertyMappings(rsw, resultMap, metaObject, lazyLoader, null) || foundValues;
foundValues = lazyLoader.size() > 0 || foundValues;
resultObject = foundValues ? resultObject : null;
return resultObject;
}
return resultObject;
}
//...
} private boolean applyAutomaticMappings(ResultSetWrapper rsw, ResultMap resultMap, MetaObject metaObject, String columnPrefix) throws SQLException {
List<UnMappedColumAutoMapping> autoMapping = createAutomaticMappings(rsw, resultMap, metaObject, columnPrefix);
boolean foundValues = false;
if (autoMapping.size() > 0) {
for (UnMappedColumAutoMapping mapping : autoMapping) {
final Object value = mapping.typeHandler.getResult(rsw.getResultSet(), mapping.column);
// issue #377, call setter on nulls
if (value != null || configuration.isCallSettersOnNulls()) {
if (value != null || !mapping.primitive) {
metaObject.setValue(mapping.property, value);
}
foundValues = true;
}
}
}
return foundValues;
} private List<UnMappedColumAutoMapping> createAutomaticMappings(ResultSetWrapper rsw, ResultMap resultMap, MetaObject metaObject, String columnPrefix) throws SQLException {
final String mapKey = resultMap.getId() + ":" + columnPrefix;
List<UnMappedColumAutoMapping> autoMapping = autoMappingsCache.get(mapKey);
if (autoMapping == null) {
autoMapping = new ArrayList<UnMappedColumAutoMapping>();
final List<String> unmappedColumnNames = rsw.getUnmappedColumnNames(resultMap, columnPrefix);
for (String columnName : unmappedColumnNames) {
String propertyName = columnName;
if (columnPrefix != null && !columnPrefix.isEmpty()) {
// When columnPrefix is specified,
// ignore columns without the prefix.
if (columnName.toUpperCase(Locale.ENGLISH).startsWith(columnPrefix)) {
propertyName = columnName.substring(columnPrefix.length());
} else {
continue;
}
}
final String property = metaObject.findProperty(propertyName, configuration.isMapUnderscoreToCamelCase());
if (property != null && metaObject.hasSetter(property)) {
final Class<?> propertyType = metaObject.getSetterType(property);
if (typeHandlerRegistry.hasTypeHandler(propertyType)) {
final TypeHandler<?> typeHandler = rsw.getTypeHandler(propertyType, columnName);
autoMapping.add(new UnMappedColumAutoMapping(columnName, property, typeHandler, propertyType.isPrimitive()));
}
}
}
autoMappingsCache.put(mapKey, autoMapping);
}
return autoMapping;
}学习了Mybatis整个Sql语句的执行细节之后,现在,我们开始看看插件的实现原理。
代理链的生成
Mybatis支持对Executor、StatementHandler、PameterHandler和ResultSetHandler进行拦截,也就是说会对这4种对象进行代理。下面以Executor为例。Mybatis在创建Executor对象时会执行下面一行代码:
executor =(Executor) interceptorChain.pluginAll(executor); public class InterceptorChain {
private final List<Interceptor> interceptors = new ArrayList<Interceptor>();
public Object pluginAll(Object target) {
for (Interceptor interceptor : interceptors) {
target = interceptor.plugin(target);
}
return target;
}
//...
}
@Intercepts({@Signature(type = Executor.class, method ="update", args = {MappedStatement.class, Object.class})})
public class ExamplePlugin implements Interceptor {
    @Override
    public Object intercept(Invocation invocation) throws Throwable {
        return invocation.proceed();
    }

    @Override
    public Object plugin(Object target) {
        return Plugin.wrap(target, this);
    }

    @Override
    public void setProperties(Properties properties) {
    }
}
每一个拦截器都必须实现上面的三个方法,其中:
1) Object intercept(Invocation invocation)是实现拦截逻辑的地方,内部要通过invocation.proceed()显式地推进责任链前进,也就是调用下一个拦截器拦截目标方法。
2) Object plugin(Object target) 就是用当前这个拦截器生成对目标target的代理,实际是通过Plugin.wrap(target,this) 来完成的,把目标target和拦截器this传给了包装函数。
3) setProperties(Properties properties)用于设置额外的参数,参数配置在拦截器的Properties节点里。
注解里描述的是指定拦截方法的签名 [type,method,args] (即对哪种对象的哪种方法进行拦截),它在拦截前用于决断。
Plugin.wrap方法
从前面可以看出,每个拦截器的plugin方法是通过调用Plugin.wrap方法来实现的。代码如下:
public staticObject wrap(Object target, Interceptor interceptor) {
   //从拦截器的注解中获取拦截的类名和方法信息
   Map<Class<?>, Set<Method>> signatureMap =getSignatureMap(interceptor);
   Class<?> type = target.getClass();
   //解析被拦截对象的所有接口(注意是接口)
   Class<?>[] interfaces = getAllInterfaces(type, signatureMap);
   if(interfaces.length > 0) {
        //生成代理对象, Plugin对象为该代理对象的InvocationHandler  (InvocationHandler属于java代理的一个重要概念,不熟悉的请参考相关概念)
        return Proxy.newProxyInstance(type.getClassLoader(), interfaces, new Plugin(target,interceptor,signatureMap));
    }
    returntarget;
} 这个Plugin类有三个属性:
private Object target;//被代理的目标类
private Interceptor interceptor;//对应的拦截器
private Map<Class<?>, Set<Method>> signatureMap;//拦截器拦截的方法缓存
我们再次结合(Executor)interceptorChain.pluginAll(executor)这个语句来看,这个语句内部对
executor执行了多次plugin,第一次plugin后通过Plugin.wrap方法生成了第一个代理类,姑且就叫executorProxy1,这个代理类的target属性是该executor对象。第二次plugin后通过Plugin.wrap方法生成了第二个代理类,姑且叫executorProxy2,这个代理类的target属性是executorProxy1...这样通过每个代理类的target属性就构成了一个代理链(从最后一个executorProxyN往前查找,通过target属性可以找到最原始的executor类)。
代理链上的拦截
代理链生成后,对原始目标的方法调用都转移到代理者的invoke方法上来了。Plugin作为InvocationHandler的实现类,它的invoke方法是怎么样的呢?
 @Override
  public Object invoke(Object proxy, Method method, Object[] args) throws Throwable {
    try {
      Set<Method> methods = signatureMap.get(method.getDeclaringClass());
      if (methods != null && methods.contains(method)) {
        //调用代理类所属拦截器的intercept方法,
        return interceptor.intercept(new Invocation(target, method, args));
      }
      return method.invoke(target, args);
    } catch (Exception e) {
      throw ExceptionUtil.unwrapThrowable(e);
    }
}在invoke里,如果方法签名和拦截中的签名一致,就调用拦截器的拦截方法。我们看到传递给拦截器的是一个Invocation对象,这个对象是什么样子的,他的功能又是什么呢?
package org.apache.ibatis.plugin;

import java.lang.reflect.InvocationTargetException;
import java.lang.reflect.Method;

/**
 * @author Clinton Begin
 */
public class Invocation {

  private Object target;
  private Method method;
  private Object[] args;

  public Invocation(Object target, Method method, Object[] args) {
    this.target = target;
    this.method = method;
    this.args = args;
  }

  public Object getTarget() {
    return target;
  }

  public Method getMethod() {
    return method;
  }

  public Object[] getArgs() {
    return args;
  }

  public Object proceed() throws InvocationTargetException, IllegalAccessException {
    return method.invoke(target, args);
  }

}
在每个拦截器的intercept方法内,最后一个语句一定是return invocation.proceed()(不这么做的话拦截器链就断了,你的mybatis基本上就不能正常工作了)。invocation.proceed()只是简单的调用了下target的对应方法,如果target还是个代理,就又回到了上面的Plugin.invoke方法了。这样就形成了拦截器的调用链推进。
public Object intercept(Invocation invocation) throws Throwable {

     //完成代理类本身的逻辑
     ...
     //通过invocation.proceed()方法完成调用链的推进
     return invocation.proceed();
} 我们假设在MyBatis配置了一个插件,在运行时会发生什么?
1) 所有可能被拦截的处理类都会生成一个代理
2) 处理类代理在执行对应方法时,判断要不要执行插件中的拦截方法
3) 执行插接中的拦截方法后,推进目标的执行
如果有N个插件,就有N个代理,每个代理都要执行上面的逻辑。这里面的层层代理要多次生成动态代理,是比较影响性能的。虽然能指定插件拦截的位置,但这个是在执行方法时动态判断,初始化的时候就是简单的把插件包装到了所有可以拦截的地方。
因此,在编写插件时需注意以下几个原则:
1) 不编写不必要的插件;
2) 实现plugin方法时判断一下目标类型,是本插件要拦截的对象才执行Plugin.wrap方法,否者直接返回目标本省,这样可以减少目标被代理的次数。
本文,我们就先介绍到这里,下一篇文章,我们将详细的介绍其原理及实现。
-------------------------------------------------------------------------------------------------------------------------------------
至此,Mybatis最入门---分页查询(内部原理篇)
备注:
本文内容请读者仔细理解,最好手动的跟踪代码的执行过程
参考资料:
百度百科
特别感谢:http://blog.csdn.net/hupanfeng/article/details/9247379


 634
634

 被折叠的 条评论
为什么被折叠?
被折叠的 条评论
为什么被折叠?
 到【灌水乐园】发言


