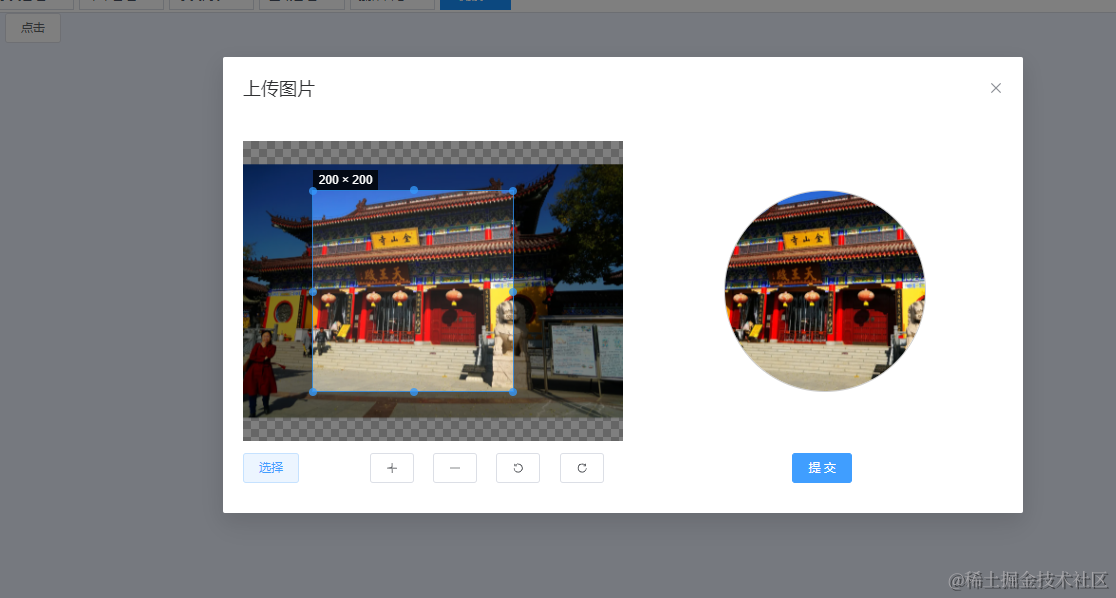
效果(CV即用)
1.安装引入vue-cropper(官网)官网地址
  npm install vue-cropper@next
  import 'vue-cropper/dist/index.css'
  import { VueCropper }  from "vue-cropper";
2. 全局引入
import VueCropper from 'vue-cropper';
import 'vue-cropper/dist/index.css'

const app = createApp(App)
app.use(VueCropper)
app.mount('#app')
3.组件完整代码
<template>
  <div class="avatar-container" @click="editImage()">
    <el-dialog
      :title="title"
      :model-value="dialogVisibleCorpper"
      width="800px"
      append-to-body
      @opened="openDialog"
      :before-close="beforeClose"
    >
      <el-row>
        <el-col :span="12" style="height: 300px">
          <vue-cropper
            ref="cropper"
            :img="options.img"
            :info="true"
            :autoCrop="options.autoCrop"
            :autoCropWidth="options.autoCropWidth"
            :autoCropHeight="options.autoCropHeight"
            :fixedBox="options.fixedBox"
            :outputType="options.outputType"
            @realTime="realTime"
            v-if="showCropper"
          />
        </el-col>
        <el-col :span="12" style="height: 300px">
          <div class="preview-box">
            <img v-if="previews.url" :src="previews.url" :style="previews.img" />
            <span v-else></span>
          </div>
        </el-col>
      </el-row>
      <el-row style="margin-top: 12px">
        <el-col :span="12">
          <el-row>
            <el-col :span="8">
              <el-upload
                action="#"
                :http-request="() => {}"
                :before-upload="beforeUpload"
                :show-file-list="false"
              >
                <el-button>选择</el-button>
              </el-upload>
            </el-col>
            <el-col :span="4">
              <el-button :icon="Plus" @click="changeScale(1)"></el-button>
            </el-col>
            <el-col :span="4">
              <el-button :icon="Minus" @click="changeScale(-1)"></el-button>
            </el-col>
            <el-col :span="4">
              <el-button :icon="RefreshLeft" @click="rotateLeft()"></el-button>
            </el-col>
            <el-col :span="4">
              <el-button :icon="RefreshRight" @click="rotateRight()"></el-button>
            </el-col>
          </el-row>
        </el-col>
        <el-col :span="4" :offset="8" style="margin-left: 22.3%">
          <el-button type="primary" @click="determine()">提 交</el-button>
        </el-col>
      </el-row>
    </el-dialog>
  </div>
</template>

<script setup lang="ts">
import { Plus, Minus, RefreshLeft, RefreshRight } from '@element-plus/icons-vue'
import { ElMessage } from 'element-plus'
import 'vue-cropper/dist/index.css'
import { VueCropper } from 'vue-cropper'
import { getCurrentInstance, ref, reactive, watch } from 'vue'

const { proxy } = getCurrentInstance()
const props = defineProps({
  dialogVisibleCorpper: {
    type: Boolean,
    default: false
  },
  title: {
    type: String,
    default: '上传图片'
  }
})
const showCropper = ref(false)
// cropper配置  更多配置可参考 https://www.npmjs.com/package/vue-cropper
const options = reactive({
  img: null, // 裁剪图片的地址
  autoCropWidth: 200, // 默认生成截图框宽度 默认容器的 80%
  autoCropHeight: 200, // 默认生成截图框高度 默认容器的 80%
  outputType: 'png', // 裁剪生成图片的格式 jpeg, png, webp
  autoCrop: true, // 是否默认生成截图框
  fixedBox: false // 固定截图框大小
})
const previews = ref({
  url: ''
})

// 打开裁剪弹窗
const openDialog = () => {
  showCropper.value = true
}
// 修改图片大小 正数为变大 负数变小
const changeScale = (num) => {
  num = num || 1
  proxy.$refs.cropper.changeScale(num)
}
// 向左边旋转90度
const rotateLeft = () => {
  proxy.$refs.cropper.rotateLeft()
}
// 向右边旋转90度
const rotateRight = () => {
  proxy.$refs.cropper.rotateRight()
}
// 上传图片处理
const beforeUpload = (rawFile) => {
  if (rawFile.type.indexOf('image/') == -1) {
    ElMessage.error('请上传图片类型文件!')
    return false
  }
  if (rawFile.size / 1024 / 1024 > 2) {
    ElMessage.error('文件大小不能超过2MB!')
    return false
  }
  const reader = new FileReader()
  reader.readAsDataURL(rawFile)
  reader.onload = () => {
    // 图片在这里
    options.img = reader.result
  }
}
// 实时预览事件
const realTime = (data) => {
  previews.value = data
}
const emit = defineEmits(['update:dialogVisibleCorpper', 'confirm'])

// 关闭弹窗
const beforeClose = () => {
  options.img = null
  previews.value.url = ''
  emit('update:dialogVisibleCorpper', false)
}
// 提交图片
const determine = () => {
  options.img = null
  previews.value.url = ''
  emit('confirm')
}
</script>

<style lang='scss' scoped>
.avatar-container {
  .img-box {
    border-radius: 50%;
    border: 1px solid #ccc;
    width: 10vw;
    height: 10vw;
  }
}
.preview-box {
  position: absolute;
  top: 50%;
  transform: translate(50%, -50%);
  width: 200px;
  height: 200px;
  border-radius: 50%;
  border: 1px solid #ccc;
  overflow: hidden;
}
</style>
4. 组件使用
<template>
  <div class="avatar-box">
    <el-button @click="btnClick">点击</el-button>
    <ImgCorpper v-model:dialogVisibleCorpper="dialogVisibleCorpper" @confirm="confirm" />
  </div>
</template>

<script setup lang="ts">
import { ref } from 'vue'

const dialogVisibleCorpper = ref(false)
// 组件点击事件
const btnClick = () => {
  dialogVisibleCorpper.value = true
}
// 组件提交事件
const confirm = () => {
  dialogVisibleCorpper.value = false
}
</script>
<style lang="scss" scoped>
.avatar-box {
  width: 300px;
  display: flex;
  justify-content: center;
}
</style>


 8694
8694

 被折叠的 条评论
为什么被折叠?
被折叠的 条评论
为什么被折叠?
 到【灌水乐园】发言


