


 本文详细介绍了如何在Gradle项目中使用ApiHug工具,涉及依赖管理的基础概念,如依赖的获取、仓库设置、依赖类型(如implementation和api)以及Spring框架的依赖管理。
🤗 ApiHug × {Postman|Swagger|Api...} = 快↑ 准√ 省↓
- GitHub - apihug/apihug.com: All abou the Apihug
- apihug.com: 有爱,有温度,有质量,有信任
- ApiHug - API design Copilot - IntelliJ IDEs Plugin | Marketplace
ApiHug 整个工具链基于 Gradle, 使用 ApiHug 准备工作最先需要学习的就是 gradle. 工欲善其事,必先利其器
依赖管理
通俗来讲,依赖管理由如下两部分组成。
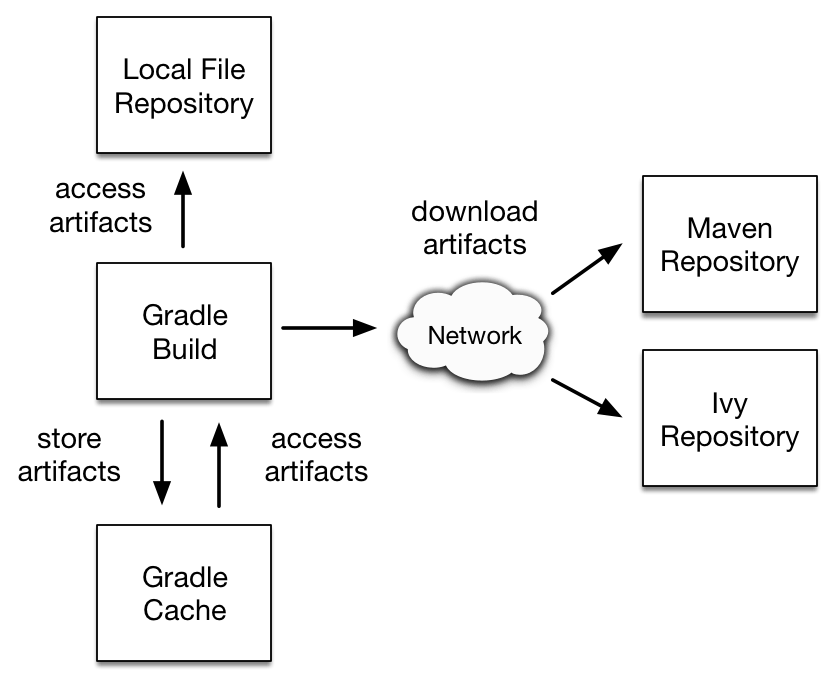
首先,Gradle 需要知道项目构建或运行所需要的一些文件,以便于找到这些需要的文件, 这些输入的文件为项目的依赖。
其次,你可能需要构建完成后自动上传到某个地方。这些输出为发布。
大部分工程都不太可能完全自给自足,一般你都会用到其他工程的文件。
比如我工程需要 Hibernate 就得把它的类库加进来,比如测试的时候可能需要某些额外 jar 包,例如 JDBC 驱动或 Ehcache 之类的 Jar 包。
这些文件就是工程的依赖。Gradle 需要你告诉它工程的依赖是什么,它们在哪,然后帮你加入构建中。依赖可能需要去远程库下载,比如 Maven 或者 Ivy 库。也可以是本地库,甚至可能是另一个工程。我们称这个过程叫依赖解决。
通常,依赖的自身也有依赖。例如,Hibernate 核心类库就依赖于一些其他的类库。所以,当 Gradle 构建你的工程时,会去找到这些依赖。我们称之为依赖传递。
大部分工程构建的主要目的是脱离工程使用。例如,生成 jar 包,包括源代码、文档等,然后发布出去。
这些输出的文件构成了项目的发布内容。Gralde 也会为你分担这些工作。
你声明了发布到到哪,Gradle 就会发布到哪。“发布”的意思就是你想做什么。比如,复制到某个目录,上传到 Maven 或 Ivy 仓库。或者在其它项目里使用,这些都可以称之为发行。
#简单例子
plugins {
    id 'java'
}

repositories {
    mavenCentral()
}

dependencies {
    implementation 'org.springframework.boot:spring-boot-starter:2.3.4.RELEASE'
    testImplementation 'org.springframework.boot:spring-boot-starter-test:2.3.4.RELEASE'
}
看这个最基础项目里面包含什么:
#插件
插件表面这个是个java 项目, java 项目都有哪些功能呢? java_pluginopen in new window, 当然最新的有 java_libraryopen in new window。
#仓库
Gradle 是在一个被称之为仓库的地方找寻所需的外部依赖。
仓库即是一个按 group,name 和 version 规则进行存储的一些文件。
Gradle 可以支持不同的仓库存储格式,如 Maven 和 Ivy,并且还提供多种与仓库进行通信的方式,如通过本地文件系统或 HTTP。
默认情况下,Gradle 没有定义任何仓库,你需要在使用外部依赖之前至少定义一个仓库,例如 Maven 中央仓库。
复杂如:
repositories {
        mavenLocal()
        maven { url "https://maven.aliyun.com/repository/public" }
        maven { url "https://maven.aliyun.com/repository/spring" }
        maven { url "https://maven.aliyun.com/repository/spring-plugin" }
        maven { url "https://repo.spring.io/release" }
        maven { url "https://repo.spring.io/milestone" }
        mavenCentral()
}
重头戏是依赖管理和声明Declaring dependenciesopen in new window
#依赖
#依赖配置
一个依赖配置包含 4 个部分:
- group – organization, company, project 标识
- name – 具体依赖的功能标识
- version – 版本
- classifier – 上面 group, name, version无法区分的, 比如不同OS分不同的包, 可以看netty的针对不同操作系统poll 实现包。
implementation 'org.springframework.boot:spring-boot-starter:2.3.4.RELEASE'
当然grovvy语法也如此操作:
implementation group:'org.springframework.boot', name: 'spring-boot-starter', version: '2.3.4.RELEASE'
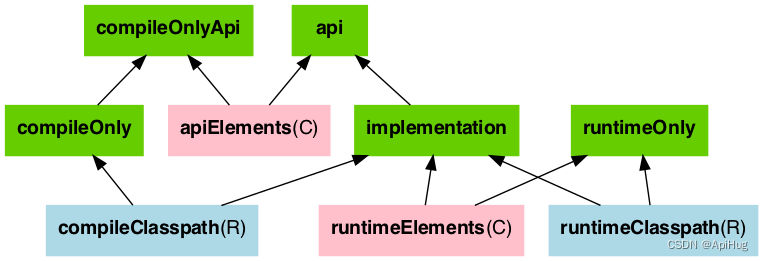
#依赖类型
除我们日常接触比较多的 implementation & testImplementation 其实 gradle 支持的更多。
| 名词 | 描述 |
|---|---|
| api | 显式的依赖声明, 运行时候classpath 依赖, 有接口在打包中依赖 |
| implementation | 内部引用需要, 打包不暴露到外界环境 |
| compileOnly | 编译时候需要, 比如JSR 标准协议,或者annotation 处理 |
| compileOnlyApi | 编译时候需要, 但是在运行时classpath 也需要 |
| runtimeOnly | 运行时候需要, 编译时候不需要 |
| testImplementation | 在编译测试时候需要 |
| testCompileOnly | test compile 时期需要 |
| testRuntimeOnly | test runtime 时期需要 |
重点参数下 api vs implementation 理解起来比较拗口, 举个例子:
dependencies {
    implementation group: 'com.fasterxml.jackson.core', name: 'jackson-databind', version: '2.10.2'
}
如下依赖, 如果我们通过 ./gradlew dependencies 可以查看:
compileClasspath 依赖如下:
compileClasspath - Compile classpath for source set 'main'.
\--- com.fasterxml.jackson.core:jackson-databind:2.10.2
     +--- com.fasterxml.jackson.core:jackson-annotations:2.10.2
     \--- com.fasterxml.jackson.core:jackson-core:2.10.2
runtimeClasspath 依赖如下:
runtimeClasspath  - Compile classpath for source set 'main'.
\--- com.fasterxml.jackson.core:jackson-databind:2.10.2
     +--- com.fasterxml.jackson.core:jackson-annotations:2.10.2
     \--- com.fasterxml.jackson.core:jackson-core:2.10.2
可以看到 编译 和 运行 时候的 path 一样, jackson-databind 将他的 dependencies 也声明为 compile 期的依赖; mvnrepository 下面已经标注open in new window。
如下一个项目依赖, 项目 依赖 Library A , A 依赖 Library B & Library C:
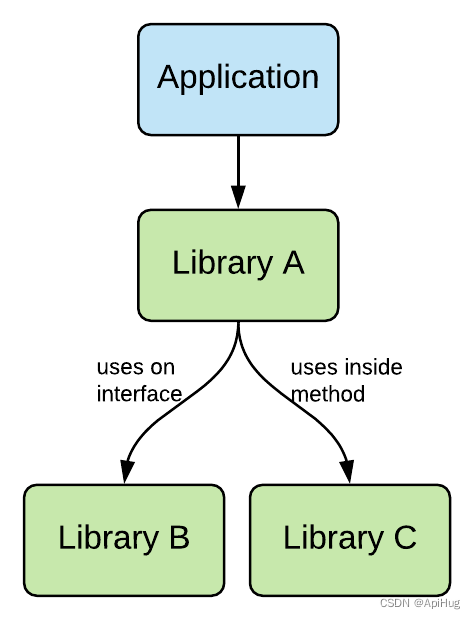
- 项目使用了
Library A里面的类 Library A使用了Library B和Library C里面的类。Library A暴露了Library B里面的接口 (比如某个接口里面使用Library B里面的类或者接口)Library C只在Library A内部使用 (比如内部方法)
背景知道了, 然后看看这个例子给我们的 jar 依赖管理带来什么样的挑战:
上面的 3&4 是分歧点, LBI (Library binary interface), ABI(Application binary interface) 之分。
ABI:
- public method 参数
- 返回类型
- 父类, 接口类
NO-ABI:
- 方法内的类型
- 私有方法内使用的类型
如此看来再编译时和运行时我们的lib 有什么不同。
| Lib | 编译compile | 运行runtime |
|---|---|---|
| A | 需要 | 需要 |
| B | 需要 | 需要 |
| C | 不需要 | 需要 |
这么多的铺垫其实就是为了和你解释 api 和 implementation 不一样地方。 如此分析上面的例子我们可以如此定义依赖关系:
dependencies {
    api 'library-b'
    implementation 'library-c'
}
官方文档: Recognizing API and implementation dependenciesopen in new window,再看一个官方例子:
// The following types can appear anywhere in the code
// but say nothing about API or implementation usage
import org.apache.commons.lang3.exception.ExceptionUtils;
import org.apache.http.HttpEntity;
import org.apache.http.HttpResponse;
import org.apache.http.HttpStatus;
import org.apache.http.client.HttpClient;
import org.apache.http.client.methods.HttpGet;

import java.io.ByteArrayOutputStream;
import java.io.IOException;
import java.io.UnsupportedEncodingException;

public class HttpClientWrapper {

    private final HttpClient client; // private member: implementation details

    // HttpClient is used as a parameter of a public method
    // so "leaks" into the public API of this component
    public HttpClientWrapper(HttpClient client) {
        this.client = client;
    }

    // public methods belongs to your API
    public byte[] doRawGet(String url) {
        HttpGet request = new HttpGet(url);
        try {
            HttpEntity entity = doGet(request);
            ByteArrayOutputStream baos = new ByteArrayOutputStream();
            entity.writeTo(baos);
            return baos.toByteArray();
        } catch (Exception e) {
            ExceptionUtils.rethrow(e); // this dependency is internal only
        } finally {
            request.releaseConnection();
        }
        return null;
    }

    // HttpGet and HttpEntity are used in a private method, so they don't belong to the API
    private HttpEntity doGet(HttpGet get) throws Exception {
        HttpResponse response = client.execute(get);
        if (response.getStatusLine().getStatusCode() != HttpStatus.SC_OK) {
            System.err.println("Method failed: " + response.getStatusLine());
        }
        return response.getEntity();
    }
}
可以看到 HttpClientWrapper 构造函数依赖 HttpClient, 同时对于 ExceptionUtils 的依赖只是内部方法。 所以 httpclient 是API 依赖, commons-lang 只是实现依赖。
dependencies {
    api 'org.apache.httpcomponents:httpclient:4.5.7'
    implementation 'org.apache.commons:commons-lang3:3.5'
}
#其他依赖关系
文件、项目:
implementation project(':shared')
runtimeOnly files('libs/sampleOne.jar', 'libs/sampleTwo.jar')
runtimeOnly fileTree("libs") { include "*.jar" }
#Spring
好像在java世界, 逃避不了 spring 操作方式: Dependency Management Pluginopen in new window & 源码open in new window & Example projectopen in new window。
io.spring.dependency-management 是可以独立使用的 spring 提供的依赖管理plugin。
plugins {
  id 'org.springframework.boot' version '2.7.1'
  id 'io.spring.dependency-management' version '1.0.11.RELEASE'
  id 'java'
}
dependency-management (dependencyManagement) 有两个功能:
- DSL 配置依赖管理
- 导入Maven POM
依赖管理:
dependencyManagement {
    dependencies {
        dependency 'org.springframework:spring-core:4.0.3.RELEASE'
    }
}
这个配置会导致所有依赖 spring-core(直接或者间接)的都固定到版本 4.0.3.RELEASE, 如果在依赖管理中声明了, 那么depedencies 中无需再制定版本:
dependencies {
    implementation 'org.springframework:spring-core'
}
引入BOM:
dependencies {
  implementation 'org.springframework.boot:spring-boot-starter-web'
  implementation 'org.springframework.cloud:spring-cloud-starter-config'  //不需要指定版本
  annotationProcessor 'org.springframework.boot:spring-boot-configuration-processor'
  testImplementation 'org.springframework.boot:spring-boot-starter-test'
  testImplementation 'org.testcontainers:junit-jupiter' //不需要指定版本
}

dependencyManagement {
  imports {
    mavenBom "org.testcontainers:testcontainers-bom:${testcontainersVersion}"
    mavenBom "org.springframework.cloud:spring-cloud-dependencies:${springCloudVersion}"
  }
}
dependencyManagement 也可以用来组织自己的 pom 是 java-platform 外一个解决方案。
java-platformopen in new window 方式:
description = "Spring Framework (Bill of Materials)"

apply plugin: 'java-platform'
apply from: "$rootDir/gradle/publications.gradle"

group = "org.springframework"

dependencies {
	constraints {
		parent.moduleProjects.findAll{ it.name != 'spring-core-graalvm' }.sort { "$it.name" }.each {
			api it
		}
	}
}

publishing {
	publications {
		mavenJava(MavenPublication) {
			artifactId = 'spring-framework-bom'
			from components.javaPlatform
		}
	}
}
dependencyManagement 方式:
dependencyManagement {
    imports {
        mavenBom 'io.spring.platform:platform-bom:1.1.1.RELEASE'
    }
    dependencies {
        dependency 'com.google.guava:guava:18.0'
    }
}
<dependencyManagement>
    <dependencies>
        <dependency>
            <groupId>io.spring.platform</groupId>
            <artifactId>platform-bom</artifactId>
            <version>1.1.1.RELEASE</version>
            <scope>import</scope>
            <type>pom</type>
        </dependency>
        <dependency>
            <groupId>com.google.guava</groupId>
            <artifactId>guava</artifactId>
            <version>18.0</version>
        </dependency>
    </dependencies>
</dependencyManagement>
#参考
- Gradle API and implementation separation open in new window
- Dependency Management in Gradleopen in new window
- Dependency management in Gradleopen in new window
- Dependency Management Pluginopen in new window
- The Java Platform Pluginopen in new window
- How to use Gradle api vs. implementation dependencies with the Java Library pluginopen in new window
- gradle-dependency-management github example


 1149
1149


 被折叠的 条评论
为什么被折叠?
被折叠的 条评论
为什么被折叠?
 到【灌水乐园】发言


