


目录
(下面BrowserRouter as Router 是给BrowserRouter起别名叫做Router)
3.5 使用Router组件配置路由规则和要展示的组件(路由出口)
5.7.4 求和案例_react-redux开发者工具的使用
1.React原理
1.1 setState
多次setState只会进行一次render,会把所有setState合并再进行render

推荐语法
用两个setState会不一样,会加2,而原来的语法则是只加1

setState的第二个参数

this.setState(
      (state, props) => {
        return {
          count: state.count + 1
        }
      },
      // 状态更新后并且重新渲染后,立即执行:
      () => {
        console.log('状态更新完成:', this.state.count) // 2
        console.log(document.getElementById('title').innerText)
        document.title = '更新后的count为:' + this.state.count
      }
    )
    console.log(this.state.count) // 1
1.2 JSX的转化原理

1.3 组件更新机制

1.4 组件性能优化
1.4.1减轻state

1.4.2 避免不必要的重新渲染

class App extends React.Component {
state = {
count: 0
}
handleClick = () => {
this.setState(state => {
return {
count: state.count + 1
}
})
}
// 钩子函数
shouldComponentUpdate(nextProps, nextState) {
// 返回false,阻止组件重新渲染
// return false
// 最新的状态:
console.log('最新的state:', nextState)
// 更新前的状态:
console.log('this.state:', this.state)
return true
}
render() {
console.log('组件更新了')
return (
<div>
<h1>计数器:{this.state.count}</h1>
<button onClick={this.handleClick}>+1</button>
</div>
)
}
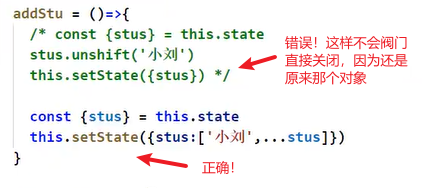
}1.5 纯组件

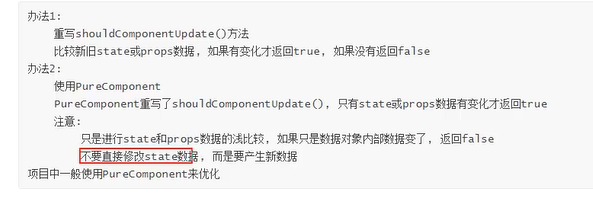
纯组件会先进行一次比较,如果两次对象都是同一个即使内部数据改变,则不会发生渲染


2.虚拟DOM和diff算法
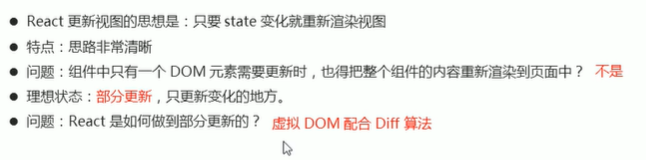
2.1 虚拟DOM


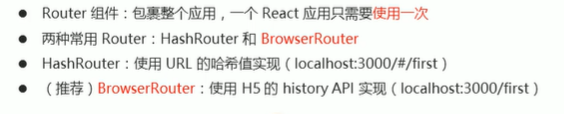
3.React路由

3.1 安装router
npm add react-router-dom3.2 导入三个核心组件Router,Route,Link
(下面BrowserRouter as Router 是给BrowserRouter起别名叫做Router)
import {BrowserRouter as Router,Route,Link} from 'react-router-dom';3.3 Router组件包裹整个应用
const App= ()=> {
  <Router>
    <div>
      <h1>React路由</h1>
    </div>
  </Router>
}
3.4 使用Link组件作为导航菜单(路由入口)
<Link to="/first">页面一</Link>3.4.1 NavLink组件
NavLink可以实现路由链接的高亮,通过activeClassName指定样式名
当点击该NavLink组件则该NavLink组件会追加一个类名active,可以通过activeClassName改为其他名称,如图中改为atguigu
<NavLink activeClassName="atguigu" className="list-group-item" to="/about">About</NavLink>
<NavLink activeClassName="atguigu" className="list-group-item" to="/home">Home</NavLink>
当我们NavLink都有同样的样式,都要写一个同样的类名,一个个这样写出来不简洁,于是我们便把NavLink封装起来
import React, { Component } from 'react'
import {NavLink} from 'react-router-dom'

export default class MyNavLink extends Component {
	render() {
		// console.log(this.props);
		return (
			<NavLink activeClassName="atguigu" className="list-group-item" {...this.props}/>
		)
	}
}
<MyNavLink to="/about">About</MyNavLink>
<MyNavLink to="/home">Home</MyNavLink>
3.5 使用Router组件配置路由规则和要展示的组件(路由出口)
const First =() => <p>页面一的内容</p>

const App= ()=> (
  <Router>
    <div>
      <h1>React路由</h1>
      <Link to="/first">页面一</Link>
      <Route path="/first" component={First}></Route>
    </div>
  </Router>
)
3.6 常用组件说明

3.7 路由执行过程

3.8 编程式导航

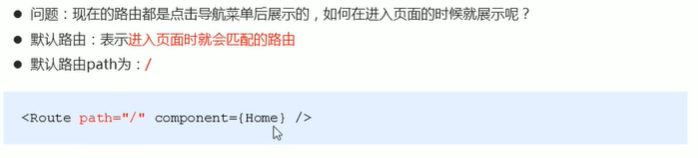
3.9 默认路由
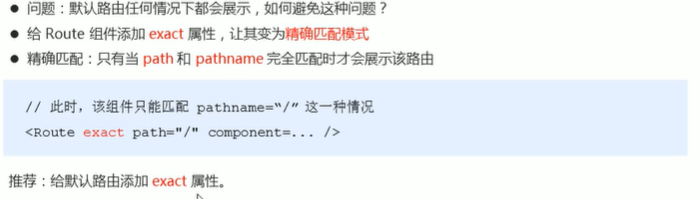
3.10 匹配模式
3.10.1 模糊匹配模式

3.10.2 精确匹配
3.11 Switch组件
1.通常情况下,path和component是一一对应的关系。
2.Switch可以提高路由匹配效率(单一匹配)。
3.当路由匹配成功便不会往下继续查找
将Route组件全部包裹进Switch组件中
<Switch>
<Route path="/about" component={About}/>
<Route path="/home" component={Home}/>
<Route path="/home" component={Test}/>
</Switch>
3.12 Redirect组件
一般写在所有路由注册的最下方,当所有路由都无法匹配时,跳转到Redirect指定的路由
<Switch>
<Route path="/about" component={About}/>
<Route path="/home" component={Home}/>
<Redirect to="/about"/>
</Switch>
3.13 向路由组件传递参数
3.13.1 params参数
路由链接(携带参数):<Link to='/demo/test/tom/18'}>详情</Link>
注册路由(声明接收):<Route path="/demo/test/:name/:age" component={Test}/>
接收参数:this.props.match.params
<Link to={`/home/message/detail/${msgObj.id}/${msgObj.title}`}>{msgObj.title}</Link><Route path="/home/message/detail/:id/:title" component={Detail}/>// 接收params参数
const {id,title} = this.props.match.params3.13.2 search参数
路由链接(携带参数):<Link to='/demo/test?name=tom&age=18'}>详情</Link>
注册路由(无需声明,正常注册即可):<Route path="/demo/test" component={Test}/>
接收参数:this.props.location.search
备注:获取到的search是urlencoded编码字符串,需要借助querystring解析
<Link to={`/home/message/detail/?id=${msgObj.id}&title=${msgObj.title}`}>{msgObj.title}</Link>{/* search参数无需声明接收,正常注册路由即可 */}
<Route path="/home/message/detail" component={Detail}/>//引入qs用于将接受的参数字符串转化为对象
import qs from 'querystring'
// 接收search参数
const {search} = this.props.location
//slice(1)是为了将字符串第一个字符‘?’去掉
const {id,title} = qs.parse(search.slice(1))
3.13. 3 state参数
路由链接(携带参数):<Link to={{pathname:'/demo/test',state:{name:'tom',age:18}}}>详情</Link>
注册路由(无需声明,正常注册即可):<Route path="/demo/test" component={Test}/>
接收参数:this.props.location.state
备注:刷新也可以保留住参数
<Link to={{pathname:'/home/message/detail',state:{id:msgObj.id,title:msgObj.title}}}>{msgObj.title}</Link>{/* state参数无需声明接收,正常注册路由即可 */}
<Route path="/home/message/detail" component={Detail}/>// 接收state参数
const {id,title} = this.props.location.state || {}
const findResult = DetailData.find((detailObj)=>{
return detailObj.id === id
}) || {}3.14 withRouter
withRouter可以加工一般组件,让一般组件具备路由组件所特有的API
withRouter的返回值是一个新组件
import React, { Component } from 'react'
import {withRouter} from 'react-router-dom'
class Header extends Component {
back = ()=>{
this.props.history.goBack()
}
forward = ()=>{
this.props.history.goForward()
}
go = ()=>{
this.props.history.go(-2)
}
render() {
console.log('Header组件收到的props是',this.props);
return (
<div className="page-header">
<h2>React Router Demo</h2>
<button onClick={this.back}>回退</button>
<button onClick={this.forward}>前进</button>
<button onClick={this.go}>go</button>
</div>
)
}
}
export default withRouter(Header)4 ref
组件内的标签可以定义ref属性来标识自己
字符串形式(过时的api)
class Demo extends React.Component{
//展示左侧输入框的数据
showData = ()=>{
const {input1} = this.refs
alert(input1.value)
}
//展示右侧输入框的数据
showData2 = ()=>{
const {input2} = this.refs
alert(input2.value)
}
render(){
return(
<div>
<input ref="input1" type="text" placeholder="点击按钮提示数据"/>
<button onClick={this.showData}>点我提示左侧的数据</button>
<input ref="input2" onBlur={this.showData2} type="text" placeholder="失去焦点提示数据"/>
</div>
)
}
}回调函数形式(react会自动帮你调用这个函数)
class Demo extends React.Component{
//展示左侧输入框的数据
showData = ()=>{
const {input1} = this
alert(input1.value)
}
//展示右侧输入框的数据
showData2 = ()=>{
const {input2} = this
alert(input2.value)
}
render(){
return(
<div>
<input ref={c => this.input1 = c } type="text" placeholder="点击按钮提示数据"/>
<button onClick={this.showData}>点我提示左侧的数据</button>
<input onBlur={this.showData2} ref={c => this.input2 = c } type="text" placeholder="失去焦点提示数据"/>
</div>
)
}
}但是上面的方式每一次刷新组件都会调用两次这个内联函数,下面代码则可以避免每次刷新都重新调用这个内联函数(其实以后要用依旧可以用内联函数,这两次调用无关紧要)
		class Demo extends React.Component{

			state = {isHot:false}

			showInfo = ()=>{
				const {input1} = this
				alert(input1.value)
			}

			changeWeather = ()=>{
				//获取原来的状态
				const {isHot} = this.state
				//更新状态
				this.setState({isHot:!isHot})
			}

			saveInput = (c)=>{
				this.input1 = c;
				console.log('@',c);
			}

			render(){
				const {isHot} = this.state
				return(
					<div>
						<h2>今天天气很{isHot ? '炎热':'凉爽'}</h2>
						{/*<input ref={(c)=>{this.input1 = c;console.log('@',c);}} type="text"/><br/><br/>*/}
						<input ref={this.saveInput} type="text"/><br/><br/>
						<button onClick={this.showInfo}>点我提示输入的数据</button>
						<button onClick={this.changeWeather}>点我切换天气</button>
					</div>
				)
			}
		}
createRef形式
React.createRef调用后可以返回一个容器,该容器可以存储被ref所标识的节点,该容器是“专人专用”的(即一个节点只能用一个容器)
class Demo extends React.Component{
/*
React.createRef调用后可以返回一个容器,该容器可以存储被ref所标识的节点,该容器是“专人专用”的
*/
myRef = React.createRef()
myRef2 = React.createRef()
//展示左侧输入框的数据
showData = ()=>{
alert(this.myRef.current.value);
}
//展示右侧输入框的数据
showData2 = ()=>{
alert(this.myRef2.current.value);
}
render(){
return(
<div>
<input ref={this.myRef} type="text" placeholder="点击按钮提示数据"/>
<button onClick={this.showData}>点我提示左侧的数据</button>
<input onBlur={this.showData2} ref={this.myRef2} type="text" placeholder="失去焦点提示数据"/>
</div>
)
}
}5 redux
中文文档: http://www.redux.org.cn/
英文文档: https://redux.js.org/
5.1 redux是什么?
- redux是一个专门用于做状态管理的JS库(不是react插件库)。
- 它可以用在react, angular, vue等项目中, 但基本与react配合使用。
- 作用: 集中式管理react应用中多个组件共享的状态。
5.2 什么情况下需要使用redux
- 某个组件的状态,需要让其他组件可以随时拿到(共享)。
- 一个组件需要改变另一个组件的状态(通信)。
- 总体原则:能不用就不用, 如果不用比较吃力才考虑使用。

5.3 redux的三个核心概念
5.3.1 action
- 动作的对象
- 包含2个属性
- type:标识属性, 值为字符串, 唯一, 必要属性
- data:数据属性, 值类型任意, 可选属性
- 例子:{ type: 'ADD_STUDENT',data:{name: 'tom',age:18} }
5.3.2 reducer
- 用于初始化状态、加工状态。
- 加工时,根据旧的state和action, 产生新的state的纯函数。
5.3.3 store
1. 将state、action、reducer联系在一起的对象
2. 如何得到此对象?
(1)import {createStore} from 'redux'
(2)import reducer from './reducers'
(3)const store = createStore(reducer)
3. 此对象的功能?
(1) getState(): 得到state
(2) dispatch(action): 分发action, 触发reducer调用, 产生新的state
(3) subscribe(listener): 注册监听, 当产生了新的state时, 自动调用
5.4 redux 核心API
5.4.1 createstore()
作用:创建包含指定reducer的store对象
5.4.2. store对象

5.4.3 applyMiddleware()
作用:应用上基于redux的中间件(插件库)
5.4.4 combineReducers()
作用:合并多个reducer函数
5.5 redux异步编程
5.5.1理解:
- redux默认是不能进行异步处理的,
- 某些时候应用中需要在redux中执行异步任务(ajax, 定时器)
5.5.2. 使用异步中间件
npm install --save redux-thunk5.6 使用步骤
安装redux
yarn add redux生成随机id
npm add nanoid1.求和案例_redux精简版
(1).去除Count组件自身的状态
(2).src下建立:
-redux
-store.js
-count_reducer.js
(3).store.js:
1).引入redux中的createStore函数,创建一个store
2).createStore调用时要传入一个为其服务的reducer
3).记得暴露store对象
(4).count_reducer.js:
1).reducer的本质是一个函数,接收:preState,action,返回加工后的状态
2).reducer有两个作用:初始化状态,加工状态
3).reducer被第一次调用时,是store自动触发的,
传递的preState是undefined,
传递的action是:{type:'@@REDUX/INIT_a.2.b.4}
(5).在index.js中监测store中状态的改变,一旦发生改变重新渲染<App/>
备注:redux只负责管理状态,至于状态的改变驱动着页面的展示,要靠我们自己写。
2.求和案例_redux完整版
新增文件:
1.count_action.js 专门用于创建action对象
2.constant.js 放置容易写错的type值
3.求和案例_redux异步action版
(1).明确:延迟的动作不想交给组件自身,想交给action
(2).何时需要异步action:想要对状态进行操作,但是具体的数据靠异步任务返回。
(3).具体编码:
1).yarn add redux-thunk,并配置在store中
2).创建action的函数不再返回一般对象,而是一个函数,该函数中写异步任务。
3).异步任务有结果后,分发一个同步的action去真正操作数据。
(4).备注:异步action不是必须要写的,完全可以自己等待异步任务的结果了再去分发同步action。
5.7 react-redux

5.7.1 求和案例_react-redux基本使用
(1).明确两个概念:
1).UI组件:不能使用任何redux的api,只负责页面的呈现、交互等。
2).容器组件:负责和redux通信,将结果交给UI组件。
(2).如何创建一个容器组件————靠react-redux 的 connect函数
connect(mapStateToProps,mapDispatchToProps)(UI组件)
-mapStateToProps:映射状态,返回值是一个对象
-mapDispatchToProps:映射操作状态的方法,返回值是一个对象
(3).备注1:容器组件中的store是靠props传进去的,而不是在容器组件中直接引入
(4).备注2:mapDispatchToProps,也可以是一个对象
5.7.2 求和案例_react-redux优化
(1).容器组件和UI组件整合一个文件
(2).无需自己给容器组件传递store,给<App/>包裹一个<Provider store={store}>即可。
(3).使用了react-redux后也不用再自己检测redux中状态的改变了,容器组件可以自动完成这个工作。
(4).mapDispatchToProps也可以简单的写成一个对象
(5).一个组件要和redux“打交道”要经过哪几步?
(1).定义好UI组件---不暴露
(2).引入connect生成一个容器组件,并暴露,写法如下:
connect(
state => ({key:value}), //映射状态
{key:xxxxxAction} //映射操作状态的方法
)(UI组件)
(4).在UI组件中通过this.props.xxxxxxx读取和操作状态
5.7.3 求和案例_react-redux数据共享版
(1).定义一个Pserson组件,和Count组件通过redux共享数据。
(2).为Person组件编写:reducer、action,配置constant常量。
(3).重点:Person的reducer和Count的Reducer要使用combineReducers进行合并,
合并后的总状态是一个对象!!!
(4).交给store的是总reducer,最后注意在组件中取出状态的时候,记得“取到位”。
5.7.4 求和案例_react-redux开发者工具的使用
(1).yarn add redux-devtools-extension
(2).store中进行配置
import {composeWithDevTools} from 'redux-devtools-extension'
const store = createStore(allReducer,composeWithDevTools(applyMiddleware(thunk)))
5.7.5 求和案例_react-redux最终版
(1).所有变量名字要规范,尽量触发对象的简写形式。
(2).reducers文件夹中,编写index.js专门用于汇总并暴露所有的reducer
6.拓展
6.1 lazyload
路由懒加载
用这种方法引入路由组件
import React, { Component,lazy,Suspense} from 'react
import Loading from './Loading'
const Home = lazy(()=> import('./Home') )
const About = lazy(()=> import('./About'))
注册路由(当网速慢加载不出来就显示Loading组件)
<Suspense fallback={<Loading/>}>
	{/* 注册路由 */}
<Route path="/about" component={About}/>
<Route path="/home" component={Home}/>
</Suspense>
6.2 Hooks
6.2.1 React Hook/Hooks是什么?
(1). Hook是React 16.8.0版本增加的新特性/新语法
(2). 可以让你在函数组件中使用 state 以及其他的 React 特性
6.2.2 State Hook
State Hook 里面就两个参数,第一个是存放数值,第二个是更新数值的方法(数组解构可以通过位置来解构,不用同一名称)
const [count,setCount] = React.useState(0)useState()说明:
参数: 第一次初始化指定的值在内部作缓存
返回值: 包含2个元素的数组, 第1个为内部当前状态值, 第2个为更新状态值的函数
setCount(count+1) //第一种写法
setCount(count => count+1 )
6.2.3 Effect Hook
Effect Hook 可以让你在函数组件中执行副作用操作(用于模拟类组件中的生命周期钩子)
当useEffect第二个参数为空数组时,只相当于 componentDidMount(),当没有第二个参数,则监视所有的state的数据更新,每次数据更新就重新更新一次组件,第二个参数中如果写了指定参数,就只监视指定参数的更新,也相当于componentDidUpdate(),当useEffect里返回了一个函数,这个函数就相当于componentWillUnmount()
React.useEffect(()=>{
let timer = setInterval(()=>{
setCount(count => count+1 )
},1000)
return ()=>{
clearInterval(timer)
}
},[])
6.2.4 Ref Hook
const myRef = React.useRef()6.3 Fragment
每用一个组件就得在组件最外层包裹一层div,这样堆叠的层级太多了,我们可以用Fragment组件
React识别到它时会丢弃它,从而少一层div,
import React, { Component,Fragment } from 'react'

export default class Demo extends Component {
	render() {
		return (
			<Fragment key={1}>
				<input type="text"/>
				<input type="text"/>
			</Fragment>
		)
	}
}
其实也可以用空标签(但是它俩还是有区别,Fragment可以加而且只能加key属性,当这个组件需要遍历时就可以用Fragment组件)
<>
	<input type="text"/>
	<input type="text"/>
 </>
6.4 Context
一种组件间通信方式, 常用于【祖组件】与【后代组件】间通信
在祖组件和后代组件都能接触的地方创建Context对象
//创建Context对象
const MyContext = React.createContext()
const {Provider,Consumer} = MyContext
渲染子组时,外面包裹xxxContext.Provider, 通过value属性给后代组件传递数据:
export default class A extends Component {

	state = {username:'tom',age:18}

	render() {
		const {username,age} = this.state
		return (
			<div className="parent">
				<h3>我是A组件</h3>
				<h4>我的用户名是:{username}</h4>
				<Provider value={{username,age}}>
					<B/>
				</Provider>
			</div>
		)
	}
}
类组件接收方式
class C extends Component {
	//声明接收context
	static contextType = MyContext
	render() {
		const {username,age} = this.context
		return (
			<div className="grand">
				<h3>我是C组件</h3>
				<h4>我从A组件接收到的用户名:{username},年龄是{age}</h4>
			</div>
		)
	}
}
函数组件接收方式
function C(){
	return (
		<div className="grand">
			<h3>我是C组件</h3>
			<h4>我从A组件接收到的用户名:
			<Consumer>
				{value => `${value.username},年龄是${value.age}`}
        {/* {value => <span>{value.username},年龄是{value.age}</span>} */}
			</Consumer>
			</h4>
		</div>
	)
}


 166
166


 被折叠的 条评论
为什么被折叠?
被折叠的 条评论
为什么被折叠?
 到【灌水乐园】发言


