


文章目录
一、SpringBean作用域总览
| 来源 | 说明 |
|---|---|
| singleton | 默认 Spring Bean 作用域,一个 BeanFactory 有且仅有一个实例 |
| prototype | 原型作用域,每次依赖查找和依赖注入生成新 Bean 对象 |
| request | 将 Spring Bean 存储在 ServletRequest 上下文中 |
| session | 将 Spring Bean 存储在 HttpSession 中 |
| application | 将 Spring Bean 存储在 ServletContext 中 |
我们这里说的SpringBean的作用域,并不是值全部的Spring的Bean,而是指Spring的BeanDefinition定义的Bean。
二、“singleton” Bean作用域
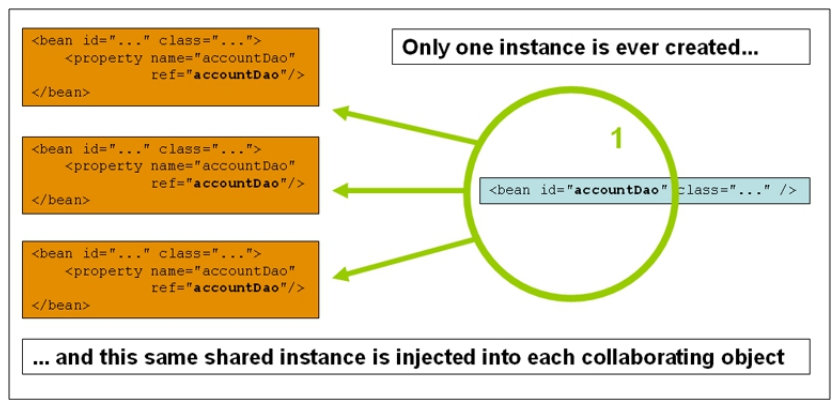
“singleton” Bean作用域,就是这个Bean是一个单例的。
// BeanDefinition
public interface BeanDefinition extends AttributeAccessor, BeanMetadataElement {

	// 重点掌握这两个作用域
	String SCOPE_SINGLETON = ConfigurableBeanFactory.SCOPE_SINGLETON; // singleton
	String SCOPE_PROTOTYPE = ConfigurableBeanFactory.SCOPE_PROTOTYPE; // prototype
	...
	// 返回此bean的当前目标作用域的名称,如果还不知道,则返回null。
	String getScope();

	// 返回是否为单例,所有调用都返回一个共享实例。
	boolean isSingleton();

	// 返回是否为Prototype,并为每个调用返回一个独立的实例。
	boolean isPrototype();

	...
}
在获取bean时,经常会看到if(bd.isSingleton())这样的代码,就是singleton和prototype不一样的作用域,导致bean的行为不同。
但是注意一点,singleton和prototype原则上是互斥的,但是代码中并不是互斥的,是可以同时为true或false。
通常在 Bean 创建时,isSingleton 方法先判断,isPrototype 后判断,详情参考 org.springframework.beans.factory.support.AbstractBeanFactory#doGetBean 方法:
// Create bean instance.
if (mbd.isSingleton()) { // 单例
	sharedInstance = getSingleton(beanName, () -> {
		try {
			return createBean(beanName, mbd, args);
		}
		catch (BeansException ex) {
			// Explicitly remove instance from singleton cache: It might have been put there
			// eagerly by the creation process, to allow for circular reference resolution.
			// Also remove any beans that received a temporary reference to the bean.
			destroySingleton(beanName);
			throw ex;
		}
	});
	beanInstance = getObjectForBeanInstance(sharedInstance, name, beanName, mbd);
}

else if (mbd.isPrototype()) { // 非单例
	// It's a prototype -> create a new instance.
	Object prototypeInstance = null;
	try {
		beforePrototypeCreation(beanName);
		prototypeInstance = createBean(beanName, mbd, args);
	}
	finally {
		afterPrototypeCreation(beanName);
	}
	beanInstance = getObjectForBeanInstance(prototypeInstance, name, beanName, mbd);
}

else { // 其他
	String scopeName = mbd.getScope();
	if (!StringUtils.hasLength(scopeName)) {
		throw new IllegalStateException("No scope name defined for bean ´" + beanName + "'");
	}
	Scope scope = this.scopes.get(scopeName);
	if (scope == null) {
		throw new IllegalStateException("No Scope registered for scope name '" + scopeName + "'");
	}
	try {
		Object scopedInstance = scope.get(beanName, () -> {
			beforePrototypeCreation(beanName);
			try {
				return createBean(beanName, mbd, args);
			}
			finally {
				afterPrototypeCreation(beanName);
			}
		});
		beanInstance = getObjectForBeanInstance(scopedInstance, name, beanName, mbd);
	}
	catch (IllegalStateException ex) {
		throw new ScopeNotActiveException(beanName, scopeName, ex);
	}
}
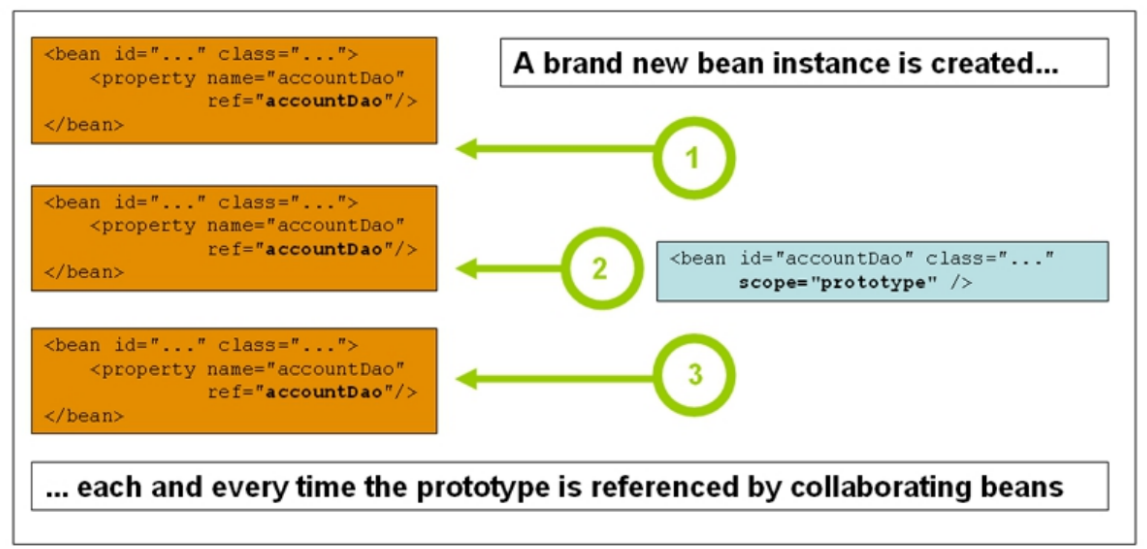
三、“prototype” Bean作用域
“prototype” Bean作用域,这个bean每次依赖查找或者依赖注入都是一个新的对象。
1、验证singleton、prototype类型的Bean
public class User implements BeanNameAware {

    private Long id;

    /**
     * 当前 Bean 的名称
     */
    private transient String beanName;

    public static User createUser() {
        User user = new User();
        user.setId(1L);
        user.setName("张三");
        return user;
    }

    @PostConstruct
    public void init() {
        System.out.println("User Bean [" + beanName + "] 初始化...");
    }

    @PreDestroy
    public void destroy() {
        System.out.println("User Bean [" + beanName + "] 销毁中...");
    }

    @Override
    public void setBeanName(String name) {
        this.beanName = name;
    }

    @Override
    public String toString() {
        return "User{" +
                "id=" + id +
                '}';
    }
}
import org.springframework.beans.BeansException;
import org.springframework.beans.factory.DisposableBean;
import org.springframework.beans.factory.annotation.Autowired;
import org.springframework.beans.factory.annotation.Qualifier;
import org.springframework.beans.factory.config.BeanDefinition;
import org.springframework.beans.factory.config.BeanPostProcessor;
import org.springframework.beans.factory.config.ConfigurableBeanFactory;
import org.springframework.beans.factory.config.ConfigurableListableBeanFactory;
import org.springframework.context.annotation.AnnotationConfigApplicationContext;
import org.springframework.context.annotation.Bean;
import org.springframework.context.annotation.Scope;

import java.util.Map;

/**
 * Bean 的作用域示例
 */
public class BeanScopeDemo implements DisposableBean {

    @Bean
    // 默认 scope 就是 "singleton"
    public static User singletonUser() {
        return createUser();
    }

    @Bean
    @Scope(ConfigurableBeanFactory.SCOPE_PROTOTYPE)
    public static User prototypeUser() {
        return createUser();
    }

    private static User createUser() {
        User user = new User();
        user.setId(System.nanoTime());
        return user;
    }

    @Autowired
    @Qualifier("singletonUser")
    private User singletonUser;

    @Autowired
    @Qualifier("singletonUser")
    private User singletonUser1;

    @Autowired
    @Qualifier("prototypeUser")
    private User prototypeUser;

    @Autowired
    @Qualifier("prototypeUser")
    private User prototypeUser1;

    @Autowired
    @Qualifier("prototypeUser")
    private User prototypeUser2;

    @Autowired
    private Map<String, User> users;

    @Autowired
    private ConfigurableListableBeanFactory beanFactory; // Resolvable Dependency

    public static void main(String[] args) {

        // 创建 BeanFactory 容器
        AnnotationConfigApplicationContext applicationContext = new AnnotationConfigApplicationContext();
        // 注册 Configuration Class(配置类) -> Spring Bean
        applicationContext.register(BeanScopeDemo.class);

        // 官方建议 可以利用 BeanPostProcessor 进行清扫工作 , 但是最好不要这么做。
        applicationContext.addBeanFactoryPostProcessor(beanFactory -> {
            beanFactory.addBeanPostProcessor(new BeanPostProcessor() {

                @Override
                public Object postProcessAfterInitialization(Object bean, String beanName) throws BeansException {
                    System.out.printf("%s Bean 名称:%s 在初始化后回调...%n", bean.getClass().getName(), beanName);
                    return bean;
                }
            });
        });

        // 启动 Spring 应用上下文
        applicationContext.refresh();

        // 结论一:
        // Singleton Bean 无论依赖查找还是依赖注入,均为同一个对象
        // Prototype Bean 无论依赖查找还是依赖注入,均为新生成的对象
        scopedBeansByLookup(applicationContext);

        // 结论二:
        // 如果依赖注入集合类型的对象,Singleton Bean 和 Prototype Bean 均会存在一个
        // Prototype Bean 有别于其他地方的依赖注入 Prototype Bean
        scopedBeansByInjection(applicationContext);

        // 结论三:
        // 无论是 Singleton 还是 Prototype Bean 均会执行初始化方法回调
        // 不过仅 Singleton Bean 会执行销毁方法回调
        // 这里显式地关闭 Spring 应用上下文
        applicationContext.close();
    }

    private static void scopedBeansByLookup(AnnotationConfigApplicationContext applicationContext) {

        for (int i = 0; i < 3; i++) {
            // singletonUser 是共享 Bean 对象
            User singletonUser = applicationContext.getBean("singletonUser", User.class);
            System.out.println("singletonUser = " + singletonUser);
            // prototypeUser 是每次依赖查找均生成了新的 Bean 对象
            User prototypeUser = applicationContext.getBean("prototypeUser", User.class);
            System.out.println("prototypeUser = " + prototypeUser);
        }
    }

    private static void scopedBeansByInjection(AnnotationConfigApplicationContext applicationContext) {
        BeanScopeDemo beanScopeDemo = applicationContext.getBean(BeanScopeDemo.class);

        System.out.println("beanScopeDemo.singletonUser = " + beanScopeDemo.singletonUser);
        System.out.println("beanScopeDemo.singletonUser1 = " + beanScopeDemo.singletonUser1);

        System.out.println("beanScopeDemo.prototypeUser = " + beanScopeDemo.prototypeUser);
        System.out.println("beanScopeDemo.prototypeUser1 = " + beanScopeDemo.prototypeUser1);
        System.out.println("beanScopeDemo.prototypeUser2 = " + beanScopeDemo.prototypeUser2);

        System.out.println("beanScopeDemo.users = " + beanScopeDemo.users);
    }

    /**
     * 手动销毁prototype的bean
     */
    @Override
    public void destroy() {

        System.out.println("当前 BeanScopeDemo Bean 正在销毁中...");

        this.prototypeUser.destroy();
        this.prototypeUser1.destroy();
        this.prototypeUser1.destroy();
        this.prototypeUser2.destroy();
        // 获取 BeanDefinition
        for (Map.Entry<String, User> entry : this.users.entrySet()) {
            String beanName = entry.getKey();
            BeanDefinition beanDefinition = beanFactory.getBeanDefinition(beanName);
            if (beanDefinition.isPrototype()) { // 如果当前 Bean 是 prototype scope
                User user = entry.getValue();
                user.destroy();
            }
        }

        System.out.println("当前 BeanScopeDemo Bean 销毁完成");
    }
}
2、总结
Spring 容器没有办法管理 prototype Bean 的完整生命周期,也没有办法记录实例的存在。销毁回调方法将不会执行,官方建议利用 BeanPostProcessor 进行清扫工作,但实际最好不要这么做,刚初始化完就销毁,总感觉很奇怪。
由上面的例子也可以看出,单例bean Spring会维护bean的整个生命周期,原型bean Spring不会维护bean的完整生命周期,在使用原型的bean时,要注意原型bean的销毁工作,使用不当甚至会导致OOM。
四、“request” Bean作用域
1、配置
1、XML -
2、Java 注解 - @RequestScope 或 @Scope(WebApplicationContext.SCOPE_REQUEST)
3、API - RequestScope
@Bean
@RequestScope
public User user() {
    User user = new User();
    user.setId(1L);
    user.setName("张三");
    return user;
}
// 注入
@Autowired
private User user; // CGLIB 代理后对象(不变的)

@GetMapping("/index.html")
public String index(Model model) {
    model.addAttribute("userObject", user);
    return "index";
}
2、简介
当我们的bean设置为request的时候,我们每次http请求的时候会形成不同的对象,会经历该对象的初始化和销毁过程。
@RequestScope的实现原理是基于AbstractRequestAttributesScope来实现的。
// org.springframework.web.context.request.AbstractRequestAttributesScope#get
// 每次http请求都会调用
@Override
public Object get(String name, ObjectFactory<?> objectFactory) {
	RequestAttributes attributes = RequestContextHolder.currentRequestAttributes();
	// 每次返回给前端页面渲染时,都是一个不同的对象
	Object scopedObject = attributes.getAttribute(name, getScope());
	if (scopedObject == null) {
		scopedObject = objectFactory.getObject();
		attributes.setAttribute(name, scopedObject, getScope());
		// Retrieve object again, registering it for implicit session attribute updates.
		// As a bonus, we also allow for potential decoration at the getAttribute level.
		Object retrievedObject = attributes.getAttribute(name, getScope());
		if (retrievedObject != null) {
			// Only proceed with retrieved object if still present (the expected case).
			// If it disappeared concurrently, we return our locally created instance.
			scopedObject = retrievedObject;
		}
	}
	return scopedObject;
}
五、“session” Bean作用域
1、配置
1、XML -
2、Java 注解 - @SessionScope 或 @Scope(WebApplicationContext.SCOPE_SESSION)
3、API - SessionScope
@Bean
@SessionScope
public User user() {
    User user = new User();
    user.setId(1L);
    user.setName("张三");
    return user;
}
2、简介
@SessionScope的实现原理也是基于AbstractRequestAttributesScope来实现的。
session作用域的对象,同一会话返回的对象都是相同的,不同会话返回的对象都是不同的。
但是这个对象可不能,像session一样设置过期时间哦~
与request作用域的对象不同,request因为是每个线程有一个对象,session作用域的对象是有线程不安全问题的,假如说同一个用户打开了两个浏览器页面,相当于多线程同时访问,所以,在代码中加了把锁。
// org.springframework.web.context.request.SessionScope
@Override
public Object get(String name, ObjectFactory<?> objectFactory) {
	Object mutex = RequestContextHolder.currentRequestAttributes().getSessionMutex();
	synchronized (mutex) {
		return super.get(name, objectFactory);
	}
}

@Override
@Nullable
public Object remove(String name) {
	Object mutex = RequestContextHolder.currentRequestAttributes().getSessionMutex();
	synchronized (mutex) {
		return super.remove(name);
	}
}
3、总结session、request作用域
Spring 将 Bean 的作用域分为三种,singleton、prototype、自定义 Scope,在 AbstractBeanFactory#doGetBean 创建 bean 时根据三种情况分别创建对象。其中 singleton、prototype 是 Spring IoC 内置的,自定义 Scope 需要实现 Scope 接口,通过 get 方法创建对象。 request/session 这两种自定义 Scope 是为了解决 web 场景,RequestScope/SessionScope 会将创建的对象和 HttpRequest/HttpSession 绑定在一起。
六、“application” Bean作用域
1、配置
1、XML -
2、Java 注解 - @ApplicationScope 或 @Scope(WebApplicationContext.SCOPE_APPLICATION)
3、API - ServletContextScope
application的bean,直接和servletContext直接打交道。
// org.springframework.web.context.support.ServletContextScope#get
@Override
public Object get(String name, ObjectFactory<?> objectFactory) {
	Object scopedObject = this.servletContext.getAttribute(name);
	if (scopedObject == null) {
		scopedObject = objectFactory.getObject();
		this.servletContext.setAttribute(name, scopedObject);
	}
	return scopedObject;
}
我们可以看到以上源码,先从servletContext取,如果没有就从ioc容器取,然后放回servletContext。
@Bean
@ApplicationScope
public User user() {
    User user = new User();
    user.setId(1L);
    user.setName("张三");
    return user;
}
ApplicationScope的bean全局都存在,在jsp页面中这样获取值:
\${userObject.name} : ${userObject.name}
\${applicationScope['scopedTarget.user'].name} : ${applicationScope['scopedTarget.user'].name}
2、总结session、request、application作用域
application作用域用途并不广泛,并且很容易出问题。
其实,Bean的scope我们只需要掌握singleton、prototype就够了,session、request、application我们只需了解,其实这三个也有其他的解决方案,用途并不是很广泛。
七、自定义 Bean 作用域
我们这里自定义一个,基于线程的Scope。
1、自定义Scope,实现Scope接口
import org.springframework.beans.factory.ObjectFactory;
import org.springframework.beans.factory.config.Scope;
import org.springframework.core.NamedThreadLocal;
import org.springframework.lang.NonNull;
import org.springframework.lang.Nullable;
import java.util.HashMap;
import java.util.Map;

/**
 * ThreadLocal 级别 Scope
 * 自定义Scope
 */
public class ThreadLocalScope implements Scope {

    public static final String SCOPE_NAME = "thread-local";

    private final NamedThreadLocal<Map<String, Object>> threadLocal = new NamedThreadLocal("thread-local-scope") {

        public Map<String, Object> initialValue() { // 创建初始化数据
            return new HashMap<>();
        }
    };

    @Override
    public Object get(String name, ObjectFactory<?> objectFactory) {

        // 非空
        Map<String, Object> context = getContext();

        Object object = context.get(name);

        if (object == null) {
            object = objectFactory.getObject();
            context.put(name, object);
        }

        return object;
    }

    @NonNull
    private Map<String, Object> getContext() {
        return threadLocal.get();
    }

    @Override
    public Object remove(String name) {
        Map<String, Object> context = getContext();
        return context.remove(name);
    }

    @Override
    public void registerDestructionCallback(String name, Runnable callback) {
        // TODO
    }

    @Override
    public Object resolveContextualObject(String key) {
        Map<String, Object> context = getContext();
        return context.get(key);
    }

    @Override
    public String getConversationId() {
        Thread thread = Thread.currentThread();
        return String.valueOf(thread.getId());
    }
}
2、注册Scope
API - org.springframework.beans.factory.config.ConfigurableBeanFactory#registerScope
import org.springframework.context.annotation.AnnotationConfigApplicationContext;
import org.springframework.context.annotation.Bean;
import org.springframework.context.annotation.Scope;

/**
 * 自定义 Scope {@link ThreadLocalScope} 示例
 */
public class ThreadLocalScopeDemo {

    @Bean
    @Scope(ThreadLocalScope.SCOPE_NAME)
    public User user() {
        return createUser();
    }

    private static User createUser() {
        User user = new User();
        user.setId(System.nanoTime());
        return user;
    }

    public static void main(String[] args) {

        // 创建 BeanFactory 容器
        AnnotationConfigApplicationContext applicationContext = new AnnotationConfigApplicationContext();
        // 注册 Configuration Class(配置类) -> Spring Bean
        applicationContext.register(ThreadLocalScopeDemo.class);

        applicationContext.addBeanFactoryPostProcessor(beanFactory -> {
            // 注册自定义 scope
            beanFactory.registerScope(ThreadLocalScope.SCOPE_NAME, new ThreadLocalScope());
        });

        // 启动 Spring 应用上下文
        applicationContext.refresh();

        scopedBeansByLookup(applicationContext);

        // 关闭 Spring 应用上下文
        applicationContext.close();
    }

    private static void scopedBeansByLookup(AnnotationConfigApplicationContext applicationContext) {

        for (int i = 0; i < 3; i++) {
            Thread thread = new Thread(() -> {
                // user 是共享 Bean 对象
                User user = applicationContext.getBean("user", User.class);
                System.out.printf("[Thread id :%d] user = %s%n", Thread.currentThread().getId(), user);
            });

            // 启动线程
            thread.start();
            // 强制线程执行完成
            try {
                thread.join();
            } catch (InterruptedException e) {
                e.printStackTrace();
            }
        }
    }

    private static void scopedBeansByInjection(AnnotationConfigApplicationContext applicationContext) {
    }
}
八、Spring Cloud RefreshScope是如何控制Bean的动态刷新
1、我们发现,RefreshScope 注解是由@Scope(“refresh”)标注。
@Target({ ElementType.TYPE, ElementType.METHOD })
@Retention(RetentionPolicy.RUNTIME)
@Scope("refresh")
@Documented
public @interface RefreshScope {

	/**
	 * @see Scope#proxyMode()
	 * @return proxy mode
	 */
	ScopedProxyMode proxyMode() default ScopedProxyMode.TARGET_CLASS;

}
2、这里会发送一个监听
// org.springframework.cloud.context.scope.refresh.RefreshScope#refreshAll
@ManagedOperation(description = "Dispose of the current instance of all beans "
		+ "in this scope and force a refresh on next method execution.")
public void refreshAll() {
	super.destroy();
	this.context.publishEvent(new RefreshScopeRefreshedEvent());
}


 2527
2527


 被折叠的 条评论
为什么被折叠?
被折叠的 条评论
为什么被折叠?
 到【灌水乐园】发言


