


前言
本文章将演示SpringBoot整合Mybatis-Plus以及常用常用注解方法
一、Mybatis-Plus简介
MyBatis-Plus (opens new window)(简称 MP)是一个 MyBatis (opens new window) 的增强工具,在 MyBatis 的基础上只做增强不做改变,为简化开发、提高效率而生。
特性
- 无侵入:只做增强不做改变,引入它不会对现有工程产生影响,如丝般顺滑
- 损耗小:启动即会自动注入基本 CURD,性能基本无损耗,直接面向对象操作
- 强大的 CRUD 操作:内置通用 Mapper、通用 Service,仅仅通过少量配置即可实现单表大部分 CRUD 操作,更有强大的条件构造器,满足各类使用需求
- 支持 Lambda 形式调用:通过 Lambda 表达式,方便的编写各类查询条件,无需再担心字段写错
- 支持主键自动生成:支持多达 4 种主键策略(内含分布式唯一 ID 生成器 - Sequence),可自由配置,完美解决主键问题
- 支持 ActiveRecord 模式:支持 ActiveRecord 形式调用,实体类只需继承 Model 类即可进行强大的 CRUD 操作
- 支持自定义全局通用操作:支持全局通用方法注入( Write once, use anywhere )
- 内置代码生成器:采用代码或者 Maven 插件可快速生成 Mapper 、 Model 、 Service 、 Controller 层代码,支持模板引擎,更有超多自定义配置等您来使用
- 内置分页插件:基于 MyBatis 物理分页,开发者无需关心具体操作,配置好插件之后,写分页等同于普通 List 查询
- 分页插件支持多种数据库:支持 MySQL、MariaDB、Oracle、DB2、H2、HSQL、SQLite、Postgre、SQLServer 等多种数据库
- 内置性能分析插件:可输出 SQL 语句以及其执行时间,建议开发测试时启用该功能,能快速揪出慢查询
- 内置全局拦截插件:提供全表 delete 、 update 操作智能分析阻断,也可自定义拦截规则,预防误操作
二、框架结构
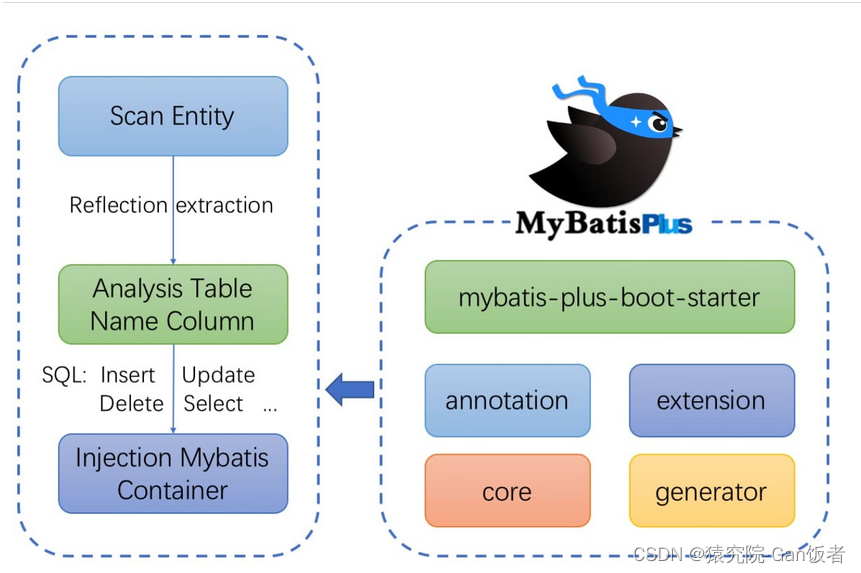
通过结构图可以看出MyBatisPlus专门提供了mybatis-plus-boot-starter供SpringBoot使用
三、SpringBoot整合Mybatis-Plus
1.依赖
<dependency>
      <groupId>com.baomidou</groupId>
      <artifactId>mybatis-plus-boot-starter</artifactId>
      <version>3.4.3</version>
</dependency>
注:此依赖整合了Mybatis和Mybatis-Plus,所以尽量不要再加mybatis的依赖,以免冲突
2.配置文件设置
mybatis:
  configuration:
  //默认是不允许自动转换驼峰命名,得自己设置为true
    map-underscore-to-camel-case: true
    //起别名
  type-aliases-package: com.apesource.pojo
mybatis-plus:
  configuration:
  	//默认是允许自动转换驼峰命名
    map-underscore-to-camel-case: true
    //开启日志
    log-impl: org.apache.ibatis.logging.stdout.StdOutImpl
注:mybatis和mybatis-plusd 配置是相互独立且生效的
四、前期准备
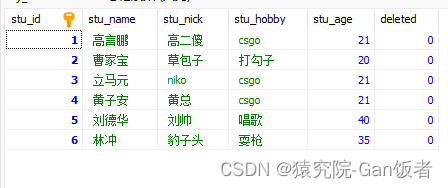
4.1数据库信息
4.2dao类
@Mapper
public interface StudentMapper extends BaseMapper<Student> {
}
dao层的接口使用@Mapper声明可以被自动注入,并且继承Mybatis-Plus提供的BaseMapper类实现通过mapper对象调用CDUR方法
4.3pojo类
@Data
@NoArgsConstructor
@AllArgsConstructor
public class Student implements Serializable {
    private int stuId;
    private String stuName;
    private String stuNick;
    private String stuHobby;
    private int stuAge;
    private int deleted;

    public Student(String stuName, String stuNick, String stuHobby, int stuAge) {
        this.stuName = stuName;
        this.stuNick = stuNick;
        this.stuHobby = stuHobby;
        this.stuAge = stuAge;
    }

    public Student(String stuName, String stuNick, String stuHobby) {
        this.stuName = stuName;
        this.stuNick = stuNick;
        this.stuHobby = stuHobby;
    }
}
五、常用注解
5.1 @TableName(value = “”)
作用:将类对应到数据库的某个表上
位置:类
参数:value=表的字段名
5.2 @TableId(value=“”,type = IdType.XXX)
作用:将数据库的主键字段映射到类的属性中
位置:成员变量
参数:value=表的字段名;type=AUTO(0),NONE(1),INPUT(2),ASSIGN_ID(3),ASSIGN_UUID(4);
5.3 @TableField(“”)
作用:将类的属性映射到表的字段
位置:成员变量
参数:value=表的字段名
5.4@TableLogic(value = “0”,delval = “1”)
作用:开启逻辑删除,0表示未删除,1表示以及删除
位置:成员变量
参数:value=正常状态的值,delval=被删除后的值
注:此注解声明的成员变量只有MybatisPlus能识别,如果使用mybatis的方法查询的话,还是能查询到状态是已删除的信息
将以上注解用与Studen类中
@TableName(value = "student")
public class Student implements Serializable {
@TableId(value="stu_id",type = IdType.AUTO)
    private int stuId;
    @TableField("stu_name")
    private String stuName;
    @TableField("stu_nick")
    private String stuNick;
    @TableField("stu_hobby")
    private String stuHobby;
    @TableField("stu_age")
    private int stuAge;

    @TableField(value = "deleted")
    @TableLogic(value = "0",delval = "1")
    private int deleted;
}
 public Student(String stuName, String stuNick, String stuHobby, int stuAge) {
        this.stuName = stuName;
        this.stuNick = stuNick;
        this.stuHobby = stuHobby;
        this.stuAge = stuAge;
    }

    public Student(String stuName, String stuNick, String stuHobby) {
        this.stuName = stuName;
        this.stuNick = stuNick;
        this.stuHobby = stuHobby;
    }
六、方法演示
6.1 新增
在测试类中注入
@Autowired
StudentMapper mapper;
@Test
    public void test01() {
        Student student = new Student("李逵", "黑旋风", "飞斧", 33);
        int i = mapper.insert(student);
        System.out.println(i);
    }
结果如图:

6.2 根据ID修改
//修改ID
    @Test
    public void test02() throws Exception {
        Student student = new Student();
        student.setStuId(7);
        student.setStuName("鲁智深");
        student.setStuAge(38);
        int i = mapper.updateById(student);
        System.out.println(i);
    }
结果如图:

6.3 根据名字修改
@Test
    public void test03() throws Exception {
        //1.修改数据
        Student student = new Student();
        student.setStuHobby("拔杨柳");
        //2.创建条件
        QueryWrapper wrapper = new QueryWrapper();
        wrapper.eq("stu_name", "鲁智深");
        int update = mapper.update(student, wrapper);
        System.out.println(update);
    }
结果如图:

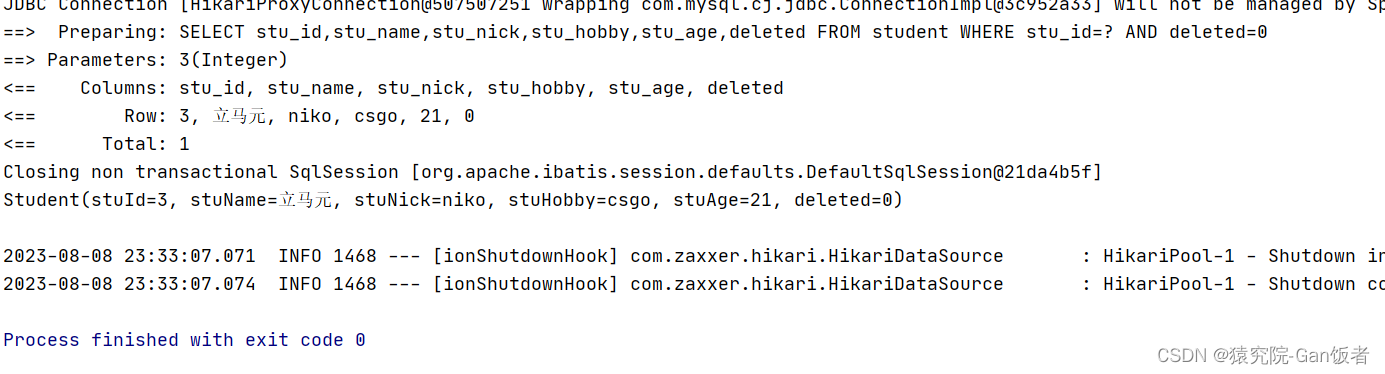
6.4 根据ID查询
//根据ID查询
    @Test
    public void test04() throws Exception {
        Student student = mapper.selectById(3);
        System.out.println(student);
    }
结果如图:
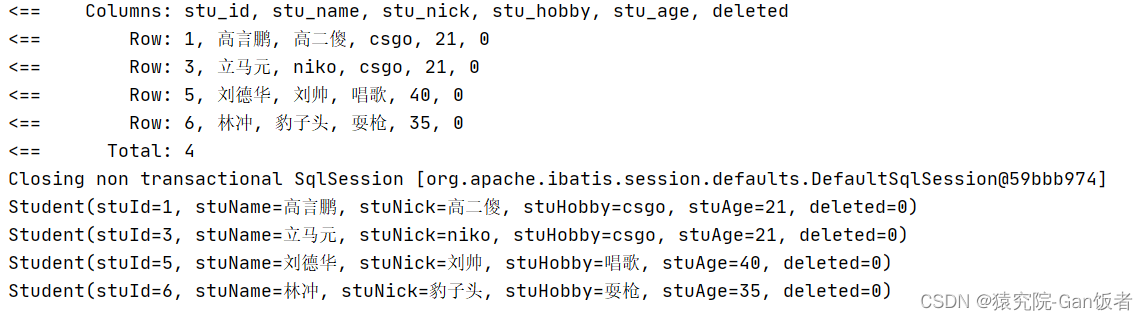
6.4 根据ID批量查询
//根据ID批量查询
    @Test
    public void test05() throws Exception {
        List<Student> students = mapper.selectBatchIds(Arrays.asList(1, 3, 5, 6));
        students.forEach(System.out::println);
    }
结果如图:
6.5 查询count
//查询count
    @Test
    public void test06() throws Exception {
        QueryWrapper<Student> wrapper = new QueryWrapper<>();
        wrapper.eq("stu_hobby", "csgo");
        Integer integer = mapper.selectCount(wrapper);
        System.out.println(integer);
    }
结果如图:

6.6 查询List
//查询list
    @Test
    public void test07() throws Exception {
        QueryWrapper<Student> wrapper = new QueryWrapper<>();
//        wrapper.eq("stu_hobby","csgo").or().eq("stu_age",21);
        wrapper.eq("stu_hobby", "csgo");
        wrapper.eq("stu_age", 21);
				//根据wrapper里的条件查询,返回一个集合
        List<Student> students = mapper.selectList(wrapper);
        students.forEach(student -> System.out.println(student));
    }
结果如图:
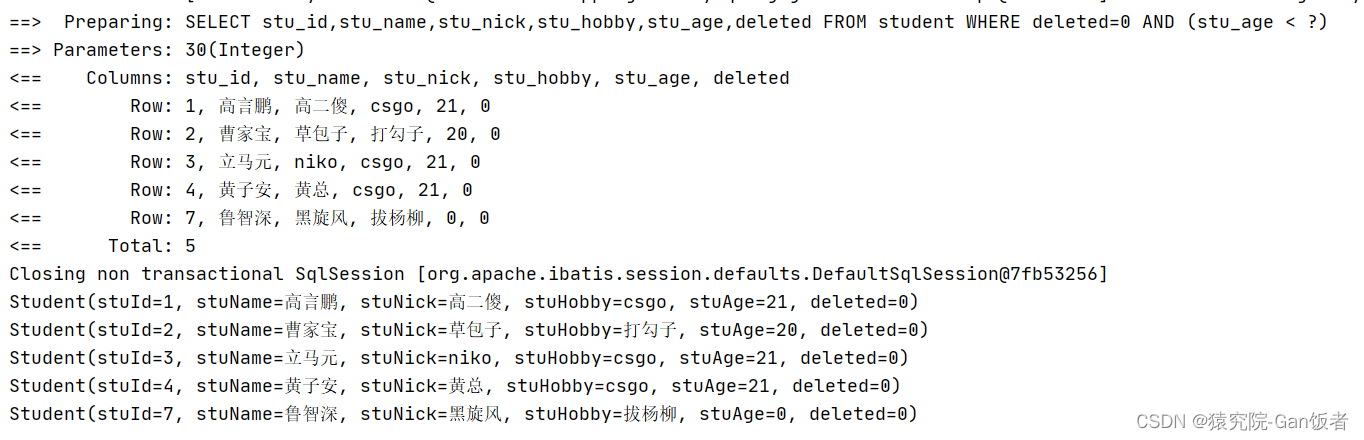
6.7 lambda表达式按照条件动态查询
//模拟动态查询
    @Test
    public void test09() {
        //1.前端发送来的数据
        Integer num1 = null;
        Integer num2 = 30;
        //1.查询条件
        LambdaQueryWrapper<Student> wrapper = new LambdaQueryWrapper<>();
        //2.判断
//        if(null != num2){
//            wrapper.lt(Student::getStuAge,num2);
//        }
//        if(null != num1){
//            wrapper.gt(Student::getStuAge,num1);
//        }
        wrapper.gt(num1 != null, Student::getStuAge, num1);
        wrapper.lt(num2 != null, Student::getStuAge, num2);
        //3.查询
        List<Student> students = mapper.selectList(wrapper);
        students.forEach(System.out::println);
    }
结果如图:
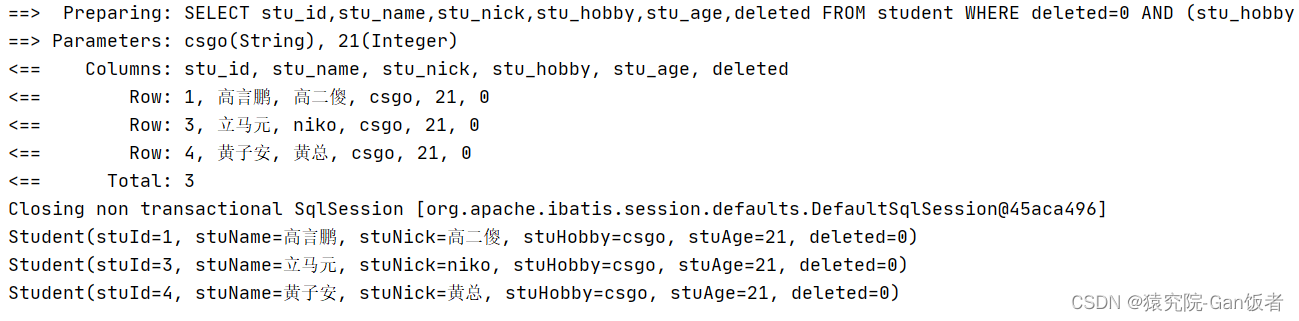
6.8 查询字段
@Test
    public void test10() {
        //1.条件
        LambdaQueryWrapper<Student> wrapper = new LambdaQueryWrapper<>();
        wrapper.select(Student::getStuName, Student::getStuHobby);
        //2.查询
        List<Student> students = mapper.selectList(wrapper);
        //4.遍历
        students.forEach(System.out::println);
    }
结果如图:
6.9 聚合查询
//投影查询-聚合查询
    @Test
    public void test11() {
        //1.查询条件
        QueryWrapper<Student> wrapper = new QueryWrapper<Student>();
        //2.判断
        wrapper.select("count(*) as total,max(stu_age) as maxage,sum(stu_age) as sumage");
        //3.查询
        List<Map<String, Object>> list = mapper.selectMaps(wrapper);
        //4.遍历
        list.forEach(Map::entrySet);
    }
结果如图:

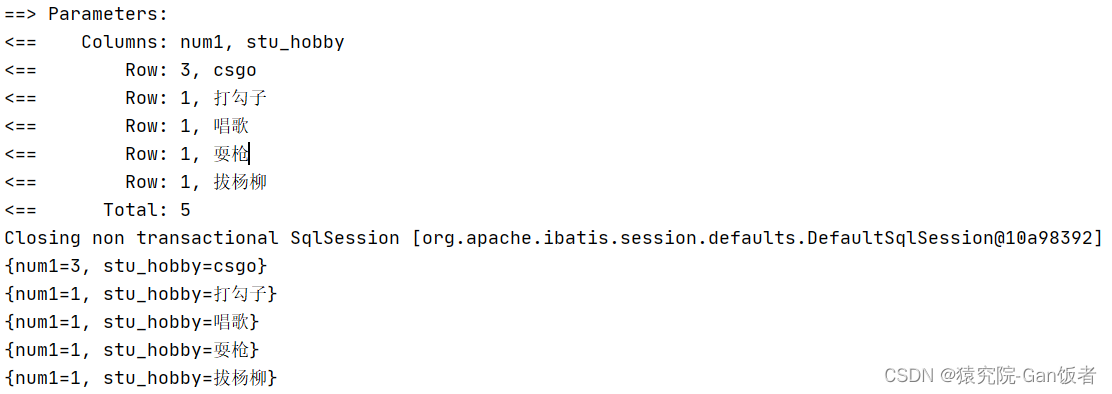
6.10 分组查询
//分组查询
    @Test
    public void test12() {
        //1.查询条件
        QueryWrapper<Student> wrapper = new QueryWrapper<Student>();
        //2.判断
        wrapper.select("count(*) as num1,stu_hobby");
        wrapper.groupBy("stu_hobby");
        //3.查询
        List<Map<String, Object>> list = mapper.selectMaps(wrapper);
        //4.遍历
        list.forEach(System.out::println);
    }
结果如图:
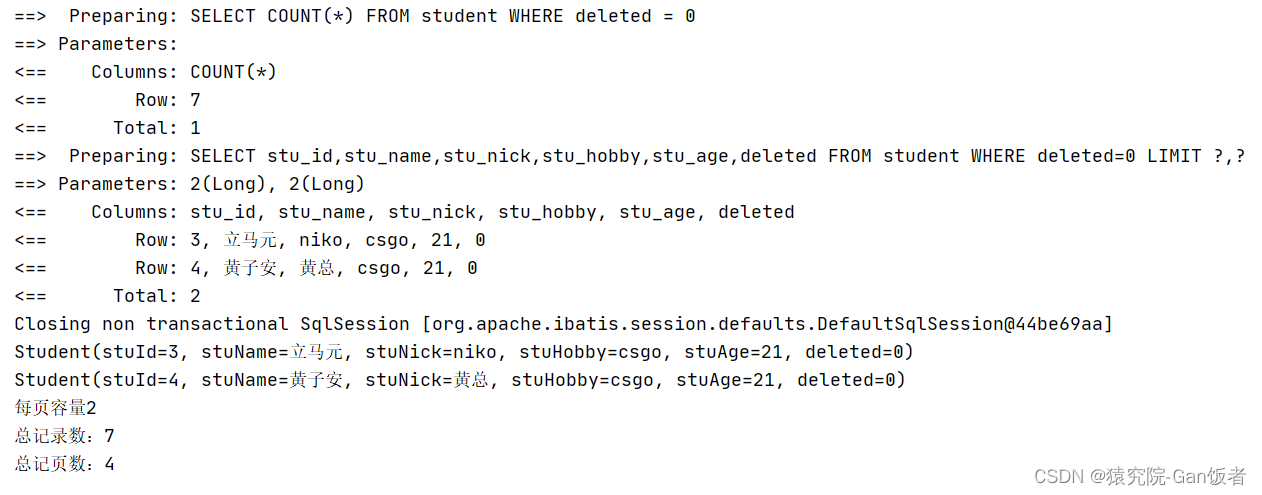
6.11 分页查询
使用分页查询需要在配置类中注入分页类
@Configuration
public class SpringBootConfig {

    //注入mp拦截器
    @Bean
    public MybatisPlusInterceptor mybatisPlusInterceptor(){
        //1.实例化拦截器
        MybatisPlusInterceptor mybatisPlusInterceptor = new MybatisPlusInterceptor();
        //2.分页拦截器
        mybatisPlusInterceptor.addInnerInterceptor(new PaginationInnerInterceptor());
//        mybatisPlusInterceptor.addInnerInterceptor(new OptimisticLockerInnerInterceptor());

        return mybatisPlusInterceptor;
    }
}
/**
     * mp分页使用
     * 注意:
     * 1.page.setCurrent(2);当前页码从1开始
     * 2.分页需要配置插件
     * 3.mp坐标版本3.1.1不能使用过高版本
     */
    @Test
    public void test13() throws Exception {
        //1.定义分页规则
        IPage<Student> page = new Page<Student>();
        page.setSize(2);//每页记录数
        page.setCurrent(2);//当前页码
        //2.查询条件(可选)
        IPage<Student> iPage = mapper.selectPage(page, null);
        List<Student> records = iPage.getRecords();//分页结果
        records.forEach(System.out::println);
        System.out.println("每页容量" + iPage.getSize());
        System.out.println("总记录数:" + iPage.getTotal());
        System.out.println("总记页数:" + iPage.getPages());

    }
结果如图:
6.12 逻辑删除
/**
     * 物理删除:业务数据从数据库中丢弃,执行的是delete操作
     * 逻辑删除:为数据设置是否可用状态字段,删除时设置状态字段为不可用状态,
     * 数据保留在数据库中,执行的是update操作
     * 实现步骤:
     * 步骤1:修改数据库表添加`deleted`列,比如`0`代表正常,`1`代表删除,可以在添加列的同时设置其默认值为`0`正常。
     * 步骤2:实体类添加属性以及注解
     *
     * @TableLogic(value="0",delval="1") private Integer deleted;
     * value为正常数据的值,delval为删除数据的值
     */

    //逻辑删除
    @Test
    public void test14() {
        mapper.deleteById(6);
    }
结果如图:


逻辑删除不会真正的将数据从数据库删除,而是对此时使用修改的方式对 @TableLogic声明的属性修改值;但是使用mybatis-plus的查询方法无法将它查到;
总结
由上可知SpringBoot整合Mybatis-Plus后对数据库操作有多方便,因为Mybatis-Plus有强大的条件构造器,满足各类使用需求内置的Mapper,通用的Service,少量配置即可实现单表大部分CRUD操作,支持Lambda形式调用提供了基本的CRUD功能,连SQL语句都不需要编写,自动解析实体关系映射转换为MyBatis内部对象注入容器


 1100
1100


 被折叠的 条评论
为什么被折叠?
被折叠的 条评论
为什么被折叠?
 到【灌水乐园】发言


