


本文涉及的主要内容为urllib类库下的request、error、parse模块
一、介绍
python2中分urllib、urllib2,python3中为urllib。
Python内置的HTTP请求库(默认安装)。
二、四大模块
- request:打开URL(模拟发送请求,可理解为输入浏览器输入网址回车一样)
- error:异常处理,保证程序不会异常中止
- parse:解析URL(拆分、解析、合并等)
- robotparser:识别网站robots.txt文件
三、实例
3.1 urlopen() 基本请求
3.1.1 抓取网页源码【例】
(抓取csdn站点源代码)
import urllib.request

response = urllib.request.urlopen("https://csdn.net")
print(response.read().decode('utf-8'))

3.1.2 查看返回类型【例】
import urllib.request

response = urllib.request.urlopen("https://csdn.net")
print(type(response))

3.1.3 读取返回状态码【例】
import urllib.request

response = urllib.request.urlopen("https://csdn.net")
print(response.status)

3.1.4 获取请求头信息【例】
import urllib.request

response = urllib.request.urlopen("https://csdn.net")
print(response.getheaders())

A data数值传递【例】
import urllib.request
import urllib.parse

# 使用data需将bytes()方法将参数转化成字节流编码格式内容,第一个参数需要urllib.parse模块中的urlencode()方法将参数字典转化成字符串,第二个指定编码格式
data = bytes(urllib.parse.urlencode({'word':'hello'}),encoding='utf-8')
response = urllib.request.urlopen('http://httpbin.org/post',data=data)
print(response.read())

B timeout超时【例】
(设置超时1s后服务器没响应抛出异常,该异常属于urllib.error)
import urllib.request

response = urllib.request.urlopen('http://httpbin.org/get',timeout=0.1)
print(response.read())

a. 超时处理【例】
可以通过超时时间控制网页长时间未响应时跳出异常,响应超时跳过抓取。(超时处理)
import socket
import urllib.request
import urllib.error
try:
	response = urllib.request.urlopen('http://httpbin.org/get',timeout=0.1)
# 捕获URLError异常
except urllib.error.URLError as e:
	# 判断异常时socket.timeout类型(超时异常)
	if isinstance(e.reason,socket.timeout):
		print('Time Out')
3.2 request请求
3.2.1 抓取网页源码【例】
import urllib.request

# 构造数据结构,调用Request类将请求独立成对象request
request = urllib.request.Request('https://csdn.net')
response = urllib.request.urlopen(request)
print(response.read().decode('utf-8'))

自定义请求头(request多参数传递)【例】
from urllib import request,parse

url = 'http://httpbin.org/post'
headers = {
	# 伪装浏览器
	'User-Agent':'Mozilla/5.0 (Windows NT 10.0; WOW64; rv:56.0) Gecko/20100101 Firefox/56.0',
	'Host':'httpbin.org'
}
# 定义data数据对象
dict = {
	'name':'Germey'
}
# 将data数据转字节流(bytes()方法和urlencode()方法)
data = bytes(parse.urlencode(dict),encoding='utf-8')
# request多参数构造
req = request.Request(url=url, data=data, headers=headers, method='POST')
response = request.urlopen(req)
print(response.read().decode('utf-8'))

3.3 request请求高级用法
3.3.0 Handler介绍
包含各种处理器,专门处理登录验证、cookies、代理设置
- urllib.request模块中的BaseHandler类是其它Handler的父类
(其它各种Handler子类继承BaseHandler类)
- HTTPRedirectHandler:处理重定向
- HTTPCookieProcessor:处理Cookies
- ProxyHandler:设置代理,默认为空
- HTTPPasswordMgr:管理密码,维护用户名和密码表
- HTTPBasicAuthHandler:管理认证(Basic Auth认证问题)
3.3.1 Basic Auth认证页爬取【例】
(如爬取如下Basic认证页面,需要输入用户名和密码才能访问具体网页)

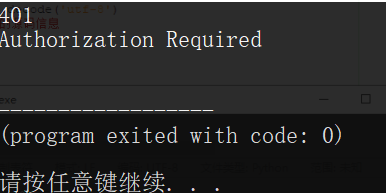
》》如果正常的爬取该页面时会报如下错误(HTTP状态码401,需要授权登录)

from urllib.request import HTTPPasswordMgrWithDefaultRealm,HTTPBasicAuthHandler,build_opener
from urllib.error import URLError

# 定义目标对象信息
username = 'Kevin'
password = '123456'
url = 'http://192.168.226.129/'

# 处理登录登录验证
# 创建密码管理对象,保存需要处理的用户名和密码
p = HTTPPasswordMgrWithDefaultRealm()
# 利用add_password类添加账户信息,第一个参数realm是与远程服务器相关域信息一般都是None(建立处理验证的Handler)
p.add_password(None, url, username, password)
# 解决认证问题(构建一个HTTP用户名/密码验证的HTTPBasicAuthHandler处理器对象,参数是创建的密码管理对象)
auth_handler = HTTPBasicAuthHandler(p)
# 利用build_opener()方法构建opener,发送请求时相当于验证成功
opener = build_opener(auth_handler)

# 处理异常
try:
	result = opener.open(url)
	html = result.read().decode('utf-8')
	# 获取到的结果就是验证后的源码信息
	print(html)
# 捕捉错误对象
except URLError as e:
	# 打印错误代码
	print(e.code)
	# 打印错误原因
	print(e.reason)
(认证正确返回认证后的源码:)

(认证错误返回错误代码和原因:)401,需要用户授权验证,这里是用户名密码错误
Tips:这里的站点是为了方便测试自己搭建的,先搭建一个Apache,然后设置访问认证即可,详情可参考:LAMP环境搭建、Apache访问认证
3.3.2 添加使用代理【例】
(本地添加一个代理,运行在9743端口之上)
from urllib.request import ProxyHandler,build_opener
from urllib.error import URLError

# 使用ProxyHandler设置添加代理
proxy_handler = ProxyHandler({
	'http':'http://127.0.0.1:9743',
	'https':'https://127.0.0.1:9743'
})
# 利用build_opener()方法和Handler构造opener
opener = build_opener(proxy_handler)

try:
	response = opener.open('https://www.baidu.com')
	print(response.read().decode('utf-8'))
except URLError as e:
	print(e.reason)

勾选了自动检测设置依旧报错

A CookieJar基础介绍
使用爬虫时,会用到Cookie进行模拟登录访问,会使用到http.cookiejar库中的CookieJar来实现,CookieJar有一些子类分别是FileCookieJar,MozillaCookieJar,LWPCookieJar
(一般使用CookieJar(),如果和本地交互使用MozillaCookieJar()或LWPCookieJar() )
- CookieJar:管理HTTP cookie值、存储HTTP请求生成的Cookie,向传出的HTTP请求添加cookie对象。整个cookie存储在内存中,对cookie进行实例垃圾回收后cookie也将丢失
- FileCookieJar(filename, delayload=None, policy=None):CookieJar派生而来,用来创建FileCookieJar实例,检索Cookie信息并存储到文件中。(fielname:存储cookie的文件名;delayload:为True时支持延时访问文件,即只有需要时才读取文件或在文件中存储数据)
- MozillaCookieJar(filename, delayload=None, policy=None):FileCookieJar派生而来,创建与Mozilla浏览器cookies.txt兼容的FileCookieJar实例。
- LWPCookieJar(filename, delayload=None, policy=None):从FileCookieJar派生来,创建与libwww-perl标准的Set-Cookie3文件格式兼容的FileCookieJar实例
3.3.3 获取网站cookie【例】
(使用Handler将网站自定义的cookie获取下来)
import http.cookiejar,urllib.request
from urllib.request import build_opener

# 声明CookieJar对象,管理存储HTTP cookie值
cookie = http.cookiejar.CookieJar()
# 处理Cookie
c_handler = urllib.request.HTTPCookieProcessor(cookie)
# 使用build_opener()方法构建opener
opener = build_opener(c_handler)
response = opener.open('https://www.baidu.com')
print(cookie)	# 演示理解用
print('\n')		# 演示理解用
for item in cookie:
	print(item.name+"="+item.value)
(为了方便理解for循环中自定义的cookie,下面黄框内是未经过处理的Cookie)

3.3.4 生成Mozilla兼容cookie【例】
from urllib.request import HTTPCookieProcessor,build_opener
import http.cookiejar,urllib.request

# 定义保存文件
filename = 'cookies_file.txt'
# 声明与Mozilla浏览器兼容的FileCookieJar实例
cookie = http.cookiejar.MozillaCookieJar(filename)
# 处理cookie
handler = urllib.request.HTTPCookieProcessor(cookie)
opener = build_opener(handler)
response = opener.open('https://www.baidu.com')
# 保存cookie到文件(ignore_discard:即使cookie将要呗丢弃也保存; ignore_expires:即使该文件中的cookie已过期也保存)
cookie.save(ignore_discard=True, ignore_expires=True)
(运行后本地和运行python脚本同级目录下会生成对应的文件)

3.3.5 生成LWP格式cookie
from urllib.request import HTTPCookieProcessor,build_opener
import http.cookiejar,urllib.request

filename = 'cookies_file.txt'
cookie = http.cookiejar.LWPCookieJar(filename)
handler = urllib.request.HTTPCookieProcessor(cookie)
opener = build_opener(handler)
response = opener.open('http://www.baidu.com')
cookie.save(ignore_discard=True, ignore_expires=True)

3.3.6 读取使用cookie
》》本地先生成一个LWP格式的cookie文件cookies.txt(代码如3.6.5)

》》读取使用本地的cookie去访问指定站点
import http.cookiejar, urllib.request
from urllib.request import build_opener

# 指定使用读取LWP格式的cookie文件
cookie = http.cookiejar.LWPCookieJar()
# load()方法读取本地cookie文件
cookie.load('cookies.txt', ignore_discard=True, ignore_expires=True)
# 构造处理cookie的HTPPCookieProcessor处理器对象对本地cookie进行处理
handler = urllib.request.HTTPCookieProcessor(cookie)
# 构建opener
opener = urllib.request.build_opener(handler)
response = opener.open('https://www.csdn.net')
print(response.read().decode('utf-8'))
》》成功使用本地的cookie读取指定站点的源代码

3.4 异常处理
为了防止程序因报错而异常终止,urllib的error模块定义了由request模块产生的异常。
3.4.1 URLError
urllib库的error模块,由request模块产生的异常都可以由这个捕获这个类来处理。
from urllib import request,error

try:
	# 打开一个不存在的页面
	response = request.urlopen('https://csdn.net/1')
except error.URLError as e:
	print(e.reason)

3.4.2 HTTPError
URLError的子类,专门处理HTTP请求错误,如认证请求失败等。
三个属性
- code:返回HTTP状态码
- reason:同父类一样,返回错误原因
- headers:返回请求头
(捕获错误异常,输出三个错误状态码、错误原因、返回头信息)
from urllib import request,error

try:
	response = request.urlopen('https://csdn.net/1')
except error.HTTPError as e:
	print(e.reason, e.code, e.headers, sep='\n')

3.4.3 捕获子类、父类错误
由于HTTPError是URLError的子类,我们可以先捕获子类错误然后再捕获父类错误
(如果不是HTTPError异常就是URLError异常)
from urllib import request,error

try:
	response = request.urlopen('https://csdn.net/1')
except error.HTTPError as e:
	print(e.reason, e.code, e.headers, sep='\n')
except error.URLError as e:
	print(e.reason)
else:
	print('Request Successfully')

3.5 解析链接
3.5.1 urlparse()(拆解URL)
url识别和分段
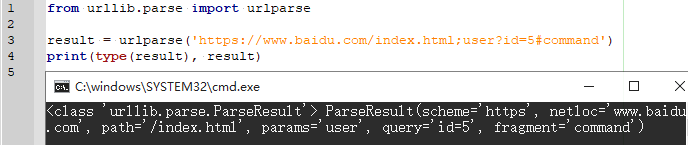
from urllib.parse import urlparse

result = urlparse('https://www.baidu.com/index.html;user?id=5#command')
print(type(result), result)
(拆分为6部分)
- scheme(协议)
- netloc(域名)
- path(访问路径)
- params(参数)
- query(查询条件)
- fragment(锚点)
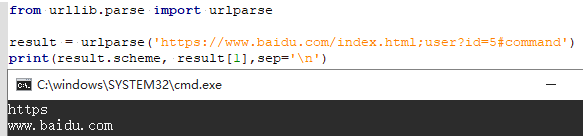
A URL字段获取
(用属性/索引获取)
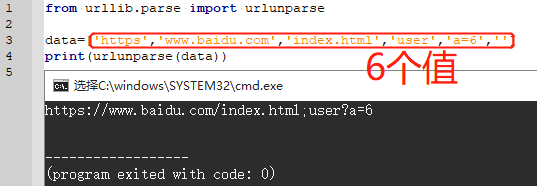
3.5.2 urlunparse() (拼接URL)
实现对URL构造,urlunparse()中接收的必须是6位的参数
from urllib.parse import urlunparse

data=['https','www.baidu.com','index.html','user','a=6','']
print(urlunparse(data))
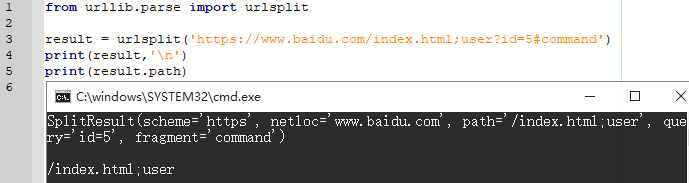
3.5.3 urlsplit()(拆解URL)
拆解URL,返回5个结果,params合并到路径
from urllib.parse import urlsplit

result = urlsplit('https://www.baidu.com/index.html;user?id=5#command')
print(result,'\n')
# 可以使用属性或者索引取值
print(result.path)
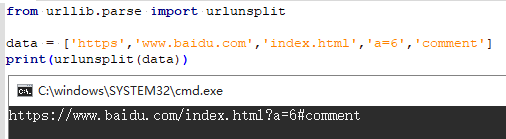
3.5.4 urlunsplit()(拼接URL)
将链接各个部分拼接成完成链接
3.5.5 urlencode()(构造URL get请求)
通过字典构造get请求

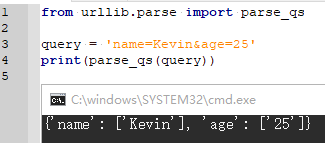
3.5.6 parse_qs() (提取URL get请求参数-字典)
反序列化get请求参数,转换为字典
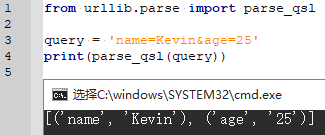
3.5.7 parse_qsl()(提取URL get请求参数-元组)
反序列化get请求参数,转换为字典
3.5.8 quote()(URL编码)
将内容转换为URL编码的格式

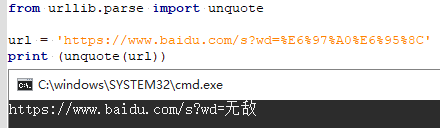
3.5.9 unquote()(URL解码)


 517
517


 被折叠的 条评论
为什么被折叠?
被折叠的 条评论
为什么被折叠?
 到【灌水乐园】发言


