


前情
在vmware workstation 17.6.1中运行虚拟机时出现:
Could not open /dev/vmmon: ?????????.
Please make sure that the kernel module `vmmon' is loaded.
电脑使用opensuse15.6,先前是opensuse15.5,然后更换了电脑原来可以用的vmware出现了这糟心的错误,但是没管,当时还不着急用,hh.
然后升级成15.6,想着都升级了,要不把vmware也升级了,就开始了以下内容。。
在终端运行
sudo /etc/init.d/vmware start出现以下内容:
Starting VMware services:
   Virtual machine monitor                                            failed
   Virtual machine communication interface                             done
   VM communication interface socket family                            done
   Virtual ethernet                                                   failed
   VMware Authentication Daemon                                        done
然后执行:
sudo vmware-modconfig --console --install-all其中也没有出现error只有一些警告(截取了警告部分以及最后结果):
/tmp/modconfig-Q5CNBC/vmmon-only/common/phystrack.o: warning: objtool: PhysTrack_Free() falls through to next function PhysTrack_Add()
/tmp/modconfig-Q5CNBC/vmmon-only/common/phystrack.o: warning: objtool: PhysTrack_Add() falls through to next function PhysTrack_Remove()
/tmp/modconfig-Q5CNBC/vmmon-only/common/phystrack.o: warning: objtool: PhysTrack_Remove() falls through to next function PhysTrack_Test()
/tmp/modconfig-Q5CNBC/vmmon-only/common/task.o: warning: objtool: .text: unexpected end of section

In file included from /tmp/modconfig-Q5CNBC/vmnet-only/userif.c:47:0:
/tmp/modconfig-Q5CNBC/vmnet-only/vnetInt.h:50:0: warning: "MAX" redefined
#define MAX(_a, _b)   (((_a) > (_b)) ? (_a) : (_b))

In file included from /tmp/modconfig-Q5CNBC/vmnet-only/driver.c:49:0:
/tmp/modconfig-Q5CNBC/vmnet-only/vnetInt.h:50:0: warning: "MAX" redefined
#define MAX(_a, _b)   (((_a) > (_b)) ? (_a) : (_b))

In file included from /tmp/modconfig-Q5CNBC/vmnet-only/procfs.c:43:0:
/tmp/modconfig-Q5CNBC/vmnet-only/vnetInt.h:50:0: warning: "MAX" redefined
#define MAX(_a, _b)   (((_a) > (_b)) ? (_a) : (_b))

In file included from /tmp/modconfig-Q5CNBC/vmnet-only/hub.c:43:0:
/tmp/modconfig-Q5CNBC/vmnet-only/vnetInt.h:50:0: warning: "MAX" redefined
#define MAX(_a, _b)   (((_a) > (_b)) ? (_a) : (_b))

In file included from /tmp/modconfig-Q5CNBC/vmnet-only/smac_compat.c:53:0:
/tmp/modconfig-Q5CNBC/vmnet-only/vnetInt.h:50:0: warning: "MAX" redefined
#define MAX(_a, _b)   (((_a) > (_b)) ? (_a) : (_b))

In file included from /tmp/modconfig-Q5CNBC/vmnet-only/bridge.c:58:0:
/tmp/modconfig-Q5CNBC/vmnet-only/vnetInt.h:50:0: warning: "MAX" redefined
#define MAX(_a, _b)   (((_a) > (_b)) ? (_a) : (_b))


In file included from /tmp/modconfig-Q5CNBC/vmnet-only/vnetUserListener.c:39:0:
/tmp/modconfig-Q5CNBC/vmnet-only/vnetInt.h:50:0: warning: "MAX" redefined
#define MAX(_a, _b)   (((_a) > (_b)) ? (_a) : (_b))

In file included from /tmp/modconfig-Q5CNBC/vmnet-only/netif.c:43:0:
/tmp/modconfig-Q5CNBC/vmnet-only/vnetInt.h:50:0: warning: "MAX" redefined
#define MAX(_a, _b)   (((_a) > (_b)) ? (_a) : (_b))


Starting VMware services:
Virtual machine monitor                                            failed
Virtual machine communication interface                             done
VM communication interface socket family                            done
Virtual ethernet                                                   failed
VMware Authentication Daemon                                        done
Unable to start services
对于vmware17.6.1安装后直接进入下面的进行内核自定义签名步骤。
对于如果想安装的是vmware17.6.1以下的版本可以使用补丁:
开源补丁中有的版本替换,然后再进行内核自定义签名。
-------------------------------------------非vmware17.6.1内容的分割线----------------------------------------
在发现使用vmware workstation 17.5.1中在执行
sudo make的时候会出现错误:
error: implicit declaration of function ‘skb_gso_segment’; did you mean ‘tcp_gso_segment’? [-Werror=implicit-function-declaration]
segs = skb_gso_segment(skb, 0);
^~~~~~~~~~~~~~~
tcp_gso_segment
所以又卸载了,换成vmware workstation17.0.2(需要每次系统有更新到内核的时候需要更新这个内核签名)
这下子没有错误了,完整过程如下:
解决步骤
在安装好后vmware workstation17.0.2后
第一步:克隆补丁库
git clone https://github.com/mkubecek/vmware-host-modules(其实我是用git cola直接克隆的,因为在使用命令行的时候一直超时。。)
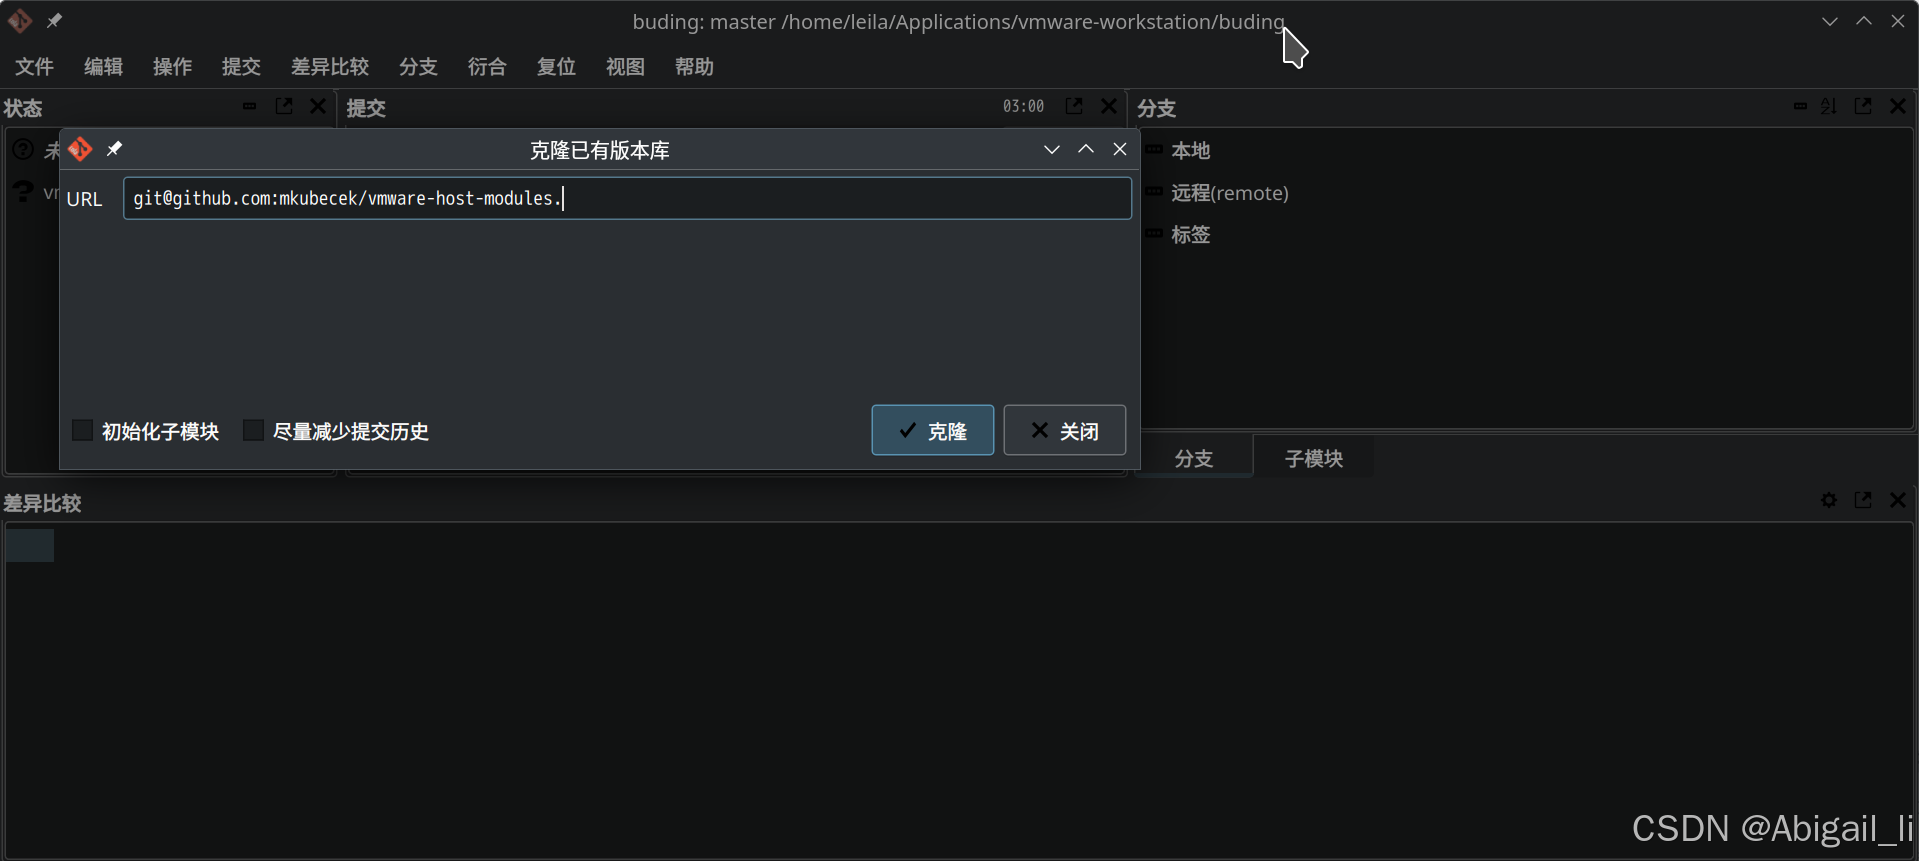
第二步:切换到需要版本的分支
git checkout workstation-17.0.2第三步:编译
sudo make这一步没有error的话就可以继续往下
第四步:安装
sudo make install然后执行:
ll /lib/modules/$(uname -r)/misc应该会出现新文件:vmmon.ko和vmnet.ko
-----------------------------------------结束非vmware17.6.1内容的分割线------------------------------------------
进行内核签名:
然后开始进行创建自定义内核签名:
下载它,然后假设签名文件的名称设置为:vmware_17.0.2_cert 版本号为20241204
然后依次执行:
one.
ID=vmware_17.0.2_cert VERSION=20241204 ./mk-keytwo.
sudo ID=vmware_17.0.2_cert PATTERN=vm*.ko MDIR=/lib/modules/$(uname -r)/misc ./mk-sign
three.
sudo ID=vmware_17.0.2_cert ./mk-uefi都没有错误后就可以直接重启,或者可以直接关机然后再开机,因为有时候我直接重启后没有进入mok模式,直接给我开机了。。
进入mok后
- 选择Enroll MOK
- 输入刚刚在three.中设置的密码
- 确认注册
- 直接选择 重启 选项
使用 mokutil --list-enrolled
这个命令可以列出所有已导入的 MOK(Machine Owner Key)密钥,包括自定义密钥。
使用 mokutil --reset
重置密钥,然后需要重启才能生效。
因为先前我升级了vm,还直接把虚拟机升级到对应的,导致现在在低版本vmware中无法打开高版本的虚拟机:
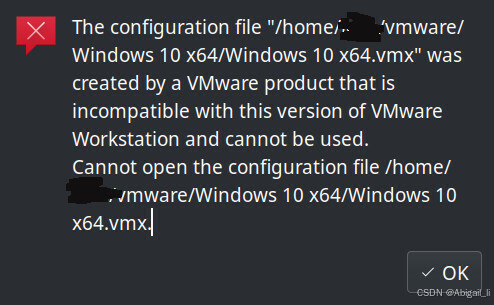
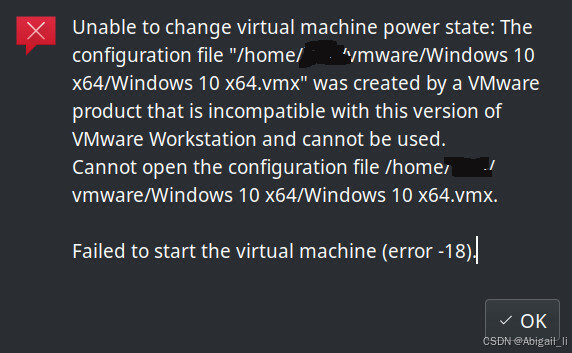
所以将虚拟机配置文件(VMX)中的virtualHW.version =“21”改为virtualHW.version =“20”终于可以使用了


 1835
1835

 被折叠的 条评论
为什么被折叠?
被折叠的 条评论
为什么被折叠?
 到【灌水乐园】发言


