


使用Hystrix实现微服务的容错处理
微服务 容错处理 Hystrix
一、实现容错的手段
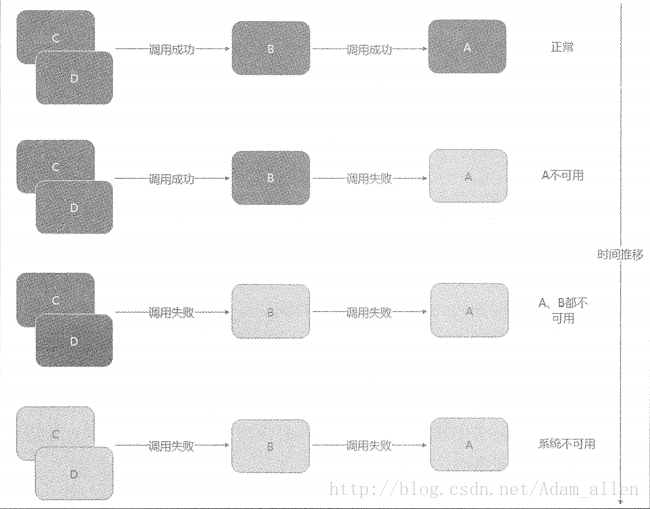
如果服务提供者响应非常缓慢,那么消费者对提供者的请求就会被强制等待,直到提供者响应或超时。在高负荷的场景下,如果不作任何处理,此类可能导致服务消费者的资源耗尽,甚至整个系统的崩溃。
如图:A作为服务提供者(基础服务),B为A的服务消费者,C和D是B的服务消费者,当A不可用引起不了B的不可用,并将不可用像滚雪球一样放大到C和D时,雪崩效应就形成了:
二、使用Hystrix实现容错
Hystrix是由Netfilx开源的一个延迟和容错库,用于隔离访问远程系统、服务或者第三方放库,防止级联失败,从而提升系统的可用性和容错性。
三、通用方式整合Hystrix
1. 复制项目microservice-consumer-movie-ribbon,将ArtifacId修改为microservice-comsumer-movie-ribbon-hystrix
2. 为项目添加以下依赖
<!--Hystrix依赖-->
        <dependency>
            <groupId>org.springframework.cloud</groupId>
            <artifactId>spring-cloud-starter-hystrix</artifactId>
        </dependency>
3. 在启动类上添加注解@EnableCircuitBreaker或@EnableHystrix
@SpringBootApplication
@EnableEurekaServer
@EnableHystrix
public class ConsumerMovieApplication {
    @Bean
    @LoadBalanced
    public RestTemplate restTemplate(){
        return new RestTemplate();
    }
    public static void main(String[] args) {
        SpringApplication.run(ConsumerMovieApplication.class, args);
    }
}
4. 修改MovieController
@RestController
public class MovieController {
    private static final Logger LOGGER = LoggerFactory.getLogger(MovieController.class);
    @Autowired
    private RestTemplate restTemplate;
    @Autowired
    private LoadBalancerClient loadBalancerClient;

    @HystrixCommand(fallbackMethod = "findByIdFallback") //为findById方法指定出错回退的方法

    @GetMapping("/user/{id}")
    public User findById(@PathVariable Long id) {
        return this.restTemplate.getForObject("http://microservice-provider-user/" + id, User.class);
    }
    public User findByIdFallback(Long id){
        User user = new User();
        user.setId(45L);
        user.setName("默认用户");
        return user;
    }

}
5. 测试
- 启动项目:microservice-discover-eureka
- 启动项目:microservice-provider-user
- 启动项目:microservice-consumer-movie-ribbon-hystrix
- 访问http://localhost:8010/user/1,获得以下结果
<User>
<id>1</id>
<username/>
<name>hyh</name>
<age>12</age>
<balance/>
</User>- 停止 microservice-provider-user
- 再次访问http://localhost:8010/user/1,获得如下结果
<User>
<id>45</id>
<username/>
<name>默认用户</name>
<age/>
<balance/>
</User>
当用户微服务不可用时,进入倒退方法!
四、Hystrix断路器的状态监控与深入理解
{"description":"Composite Discovery Client","status":"UP"}
<User>
<id>45</id>
<username/>
<name>默认用户</name>
<age/>
<balance/>
</User>
Hystrix线程隔离策略与传播上下文
五、Feign使用Hystrix
———-为Feign添加回退 ———–
1. 复制项目microservice-comsumer-movie-feign,将ArtifactId修改为microservice-consumer-movie-feign-hystrix-fallback
2. 将之前编写的Feign接口修改为如下内容:
/**
 * Feign的fallback测试
 * 使用@FeignClient的fallback属性指定回退类
 *
 */
@FeignClient(name = "microservice-provider-user", fallback = FeignClientFallback.class)
public interface UserFeignClient {
  @RequestMapping(value = "/{id}", method = RequestMethod.GET)
  public User findById(@PathVariable("id") Long id);
}
@Component
class FeignClientFallback implements UserFeignClient {
  @Override
  public com.itmuch.cloud.study.user.entity.User findById(Long id) {
    com.itmuch.cloud.study.user.entity.User user = new com.itmuch.cloud.study.user.entity.User();
    user.setId(-1L);
    user.setUsername("默认用户");
    return user;
  }
}
由代码可以看出,只许使用@FeignClient注解fallback属性,就可以指定名称的Feign客户端添加回退
3. application.yml文件添加
feign:
  hystrix:
    enabled: true
4. 测试
使用上面的测试流程即可,结果同上,自己分析
———-通过Fallback Factory 检查回退原因———
1. 复制项目microservice-comsumer-movie-feign,将ArtfactId修改为microservice-consumer-movie-feifn-hystrix-fallback-factory
2.将UserFeignClient改为如下内容
@FeignClient(name = "microservice-provider-user",fallbackFactory = FeignClientFallbackFactory.class)
public interface UserFeignClient {
  @RequestMapping(value = "/{id}", method = RequestMethod.GET)
  public User findById(@PathVariable("id") Long id);
}

@Component
class FeignClientFallbackFactory implements FallbackFactory<UserFeignClient> {
  private static final Logger LOGGER = LoggerFactory.getLogger(FeignClientFallbackFactory.class);
  @Override
  public UserFeignClient create(Throwable cause) {
    return new UserFeignClient() {
      @Override
      public User findById(Long id) {
        FeignClientFallbackFactory.LOGGER.info("fallback; reason was",cause);
        User user = new User();
        user.setId(-1L);
        user.setUsername("默认用户");
        return user;
      }
    };
  }
}
当Feign发生回退时,就会打印日志
3. 测试
- 启动项目:microservice-discover-eureka
- 启动项目:microservice-provider-user
- 启动项目:microservice-consumer-movie-ribbon-hystrix
- 访问http://localhost:8010/user/1,获得以下结果
<User>
<id>1</id>
<username/>
<name>hyh</name>
<age>12</age>
<balance/>
</User>- 停止 microservice-provider-user
- 再次访问http://localhost:8010/user/1,获得如下结果
<User>
<id>45</id>
<username/>
<name>默认用户</name>
<age/>
<balance/>
</User>
当用户微服务不可用时,进入倒退方法!
四、Hystrix断路器的状态监控与深入理解
{"description":"Composite Discovery Client","status":"UP"}
<User>
<id>45</id>
<username/>
<name>默认用户</name>
<age/>
<balance/>
</User>
五、Hystrix监控
除实现容错,Hystrix还提供了近乎实时监控,使用Hystrix的模块hystrix-metrice-event-strem,就可以将这些监控的指标信息以/text/event-stream的格式暴露给外部系统,只须为项目添加spring-boot-starter-actuator,就可以使用/hystirix.stream端点获得Hystrix的监控信息了
测试
- 启动:microservice-discovery-eureka
- 启动:microservice-provider-user
- 启动:microservice-consumer-movie-ribbon-hystrix
- 访问:http://localhost:8010/hystrix.stream,可看到浏览器一直处于请求状态,页面空白,这是此时项目注解@HystrixCommand的方法换没有被执行,因此没有任何监控
- 访问:http://localhost:8010/user/1,再次访问http://localhost:8010/hystirx.stream,可看懂页面会出现类似下面的内容
ping:

data: {"type":"HystrixCommand","name":"findById","group":"MovieController","currentTime":1516324378672,"isCircuitBreakerOpen":false,"errorPercentage":0,"errorCount":0,"requestCount":1,"rollingCountBadRequests":0,"rollingCountCollapsedRequests":0,"rollingCountEmit":0,"rollingCountExceptionsThrown":0,"rollingCountFailure":0,"rollingCountFallbackEmit":0,"rollingCountFallbackFailure":0,"rollingCountFallbackMissing":0,"rollingCountFallbackRejection":0,"rollingCountFallbackSuccess":0,"rollingCountResponsesFromCache":0,"rollingCountSemaphoreRejected":0,"rollingCountShortCircuited":0,"rollingCountSuccess":1,"rollingCountThreadPoolRejected":0,"rollingCountTimeout":0,"currentConcurrentExecutionCount":0,"rollingMaxConcurrentExecutionCount":0,"latencyExecute_mean":0,"latencyExecute":{"0":0,"25":0,"50":0,"75":0,"90":0,"95":0,"99":0,"99.5":0,"100":0},"latencyTotal_mean":0,"latencyTotal":{"0":0,"25":0,"50":0,"75":0,"90":0,"95":0,"99":0,"99.5":0,"100":0},"propertyValue_circuitBreakerRequestVolumeThreshold":20,"propertyValue_circuitBreakerSleepWindowInMilliseconds":5000,"propertyValue_circuitBreakerErrorThresholdPercentage":50,"propertyValue_circuitBreakerForceOpen":false,"propertyValue_circuitBreakerForceClosed":false,"propertyValue_circuitBreakerEnabled":true,"propertyValue_executionIsolationStrategy":"THREAD","propertyValue_executionIsolationThreadTimeoutInMilliseconds":1000,"propertyValue_executionTimeoutInMilliseconds":1000,"propertyValue_executionIsolationThreadInterruptOnTimeout":true,"propertyValue_executionIsolationThreadPoolKeyOverride":null,"propertyValue_executionIsolationSemaphoreMaxConcurrentRequests":10,"propertyValue_fallbackIsolationSemaphoreMaxConcurrentRequests":10,"propertyValue_metricsRollingStatisticalWindowInMilliseconds":10000,"propertyValue_requestCacheEnabled":true,"propertyValue_requestLogEnabled":true,"reportingHosts":1,"threadPool":"MovieController"}
上面就是Hystrix的监控,Hystrix的监控指标非常全面,例如HystrixCommand的名称、group名称、断路器状态、错误率、错误数等
使用Hystrix Dashboard
上面返回的监控信息是以文字展示的,很难通过这些数据,一眼看出系统的当前系统的运行状态。下面我们来使用Hystrix Dashboard,让监控数据图形化、可视化。更加的易于查看!
下面来编写一个Hystrix Dashboard
1. 创建一个Maven项目,ArtifactId是一个microservice-hystrix-dashboard,并为项目添加依赖
<dependency>
            <groupId>org.springframework.cloud</groupId>
            <artifactId>spring-cloud-starter-hystrix-dashboard</artifactId>
        </dependency>
2. 编写启动类,在启动类上添加@EnableHystrixDashboard
@SpringBootApplication
@EnableHystrixDashboard
public class ProviderUserApplication {

    public static void main(String[] args) {
        SpringApplication.run(ProviderUserApplication.class, args);
    }
}
3. 在配置文件application.yml中添加如下内容
server:
  port: 8030
这样简单的Hystrix Dashboard就完成了。
4. 测试
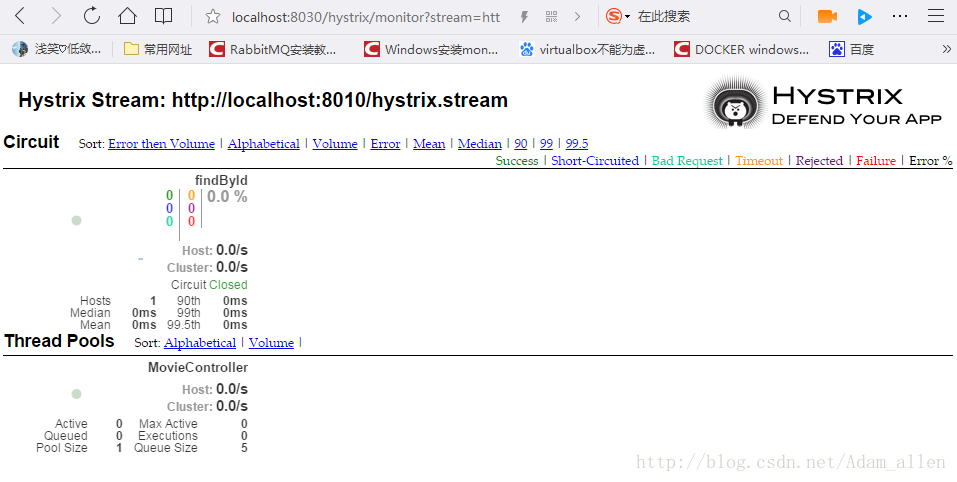
- 访问http://localhost:8010/hystrix.stream,就可以看到Hystrix Dashboard主页
- 在上节测试的基础上,在URL栏中输入http://localhost:8010/hystrix.stream,然后点击Monitor Stream按钮后,即可看到类似界面
期间我犯了一错误,地址打错了,就会出现这个问题:
Unable to connect to Command Metric Stream.
正确的地址
http://localhost:8010/hystrix.stream


 3679
3679


 被折叠的 条评论
为什么被折叠?
被折叠的 条评论
为什么被折叠?
 到【灌水乐园】发言


