


1、前提
网关路由能够正常工作。
案例 基于 Spring Cloud Gateway +Nacos 实现动态路由拓展的参考地址:Spring Cloud Gateway + Nacos 实现动态路由
详细官网案例:https://doc.xiaominfo.com/docs/middleware-sources/spring-cloud-gateway/spring-gateway-introduction
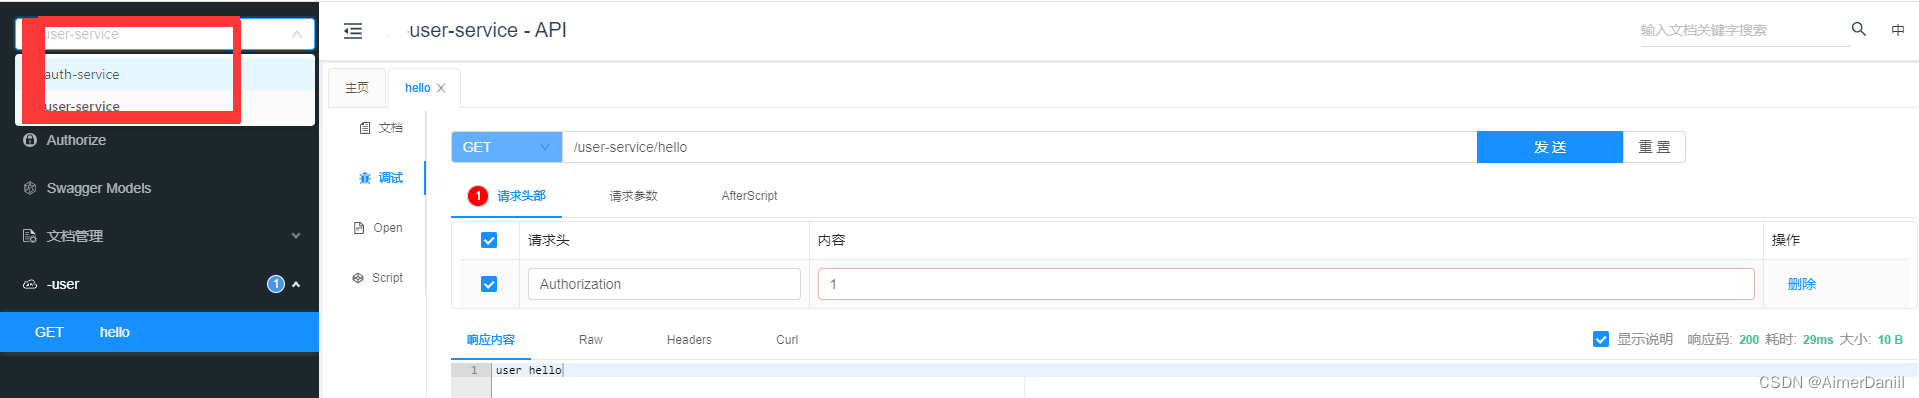
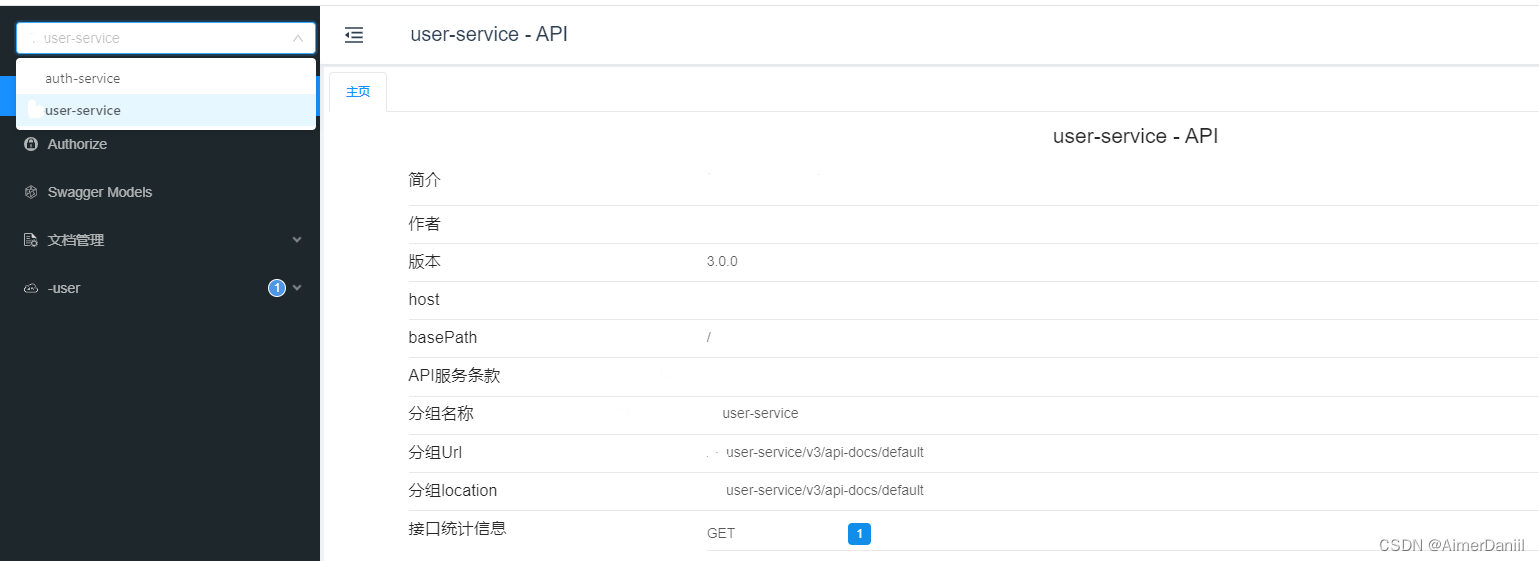
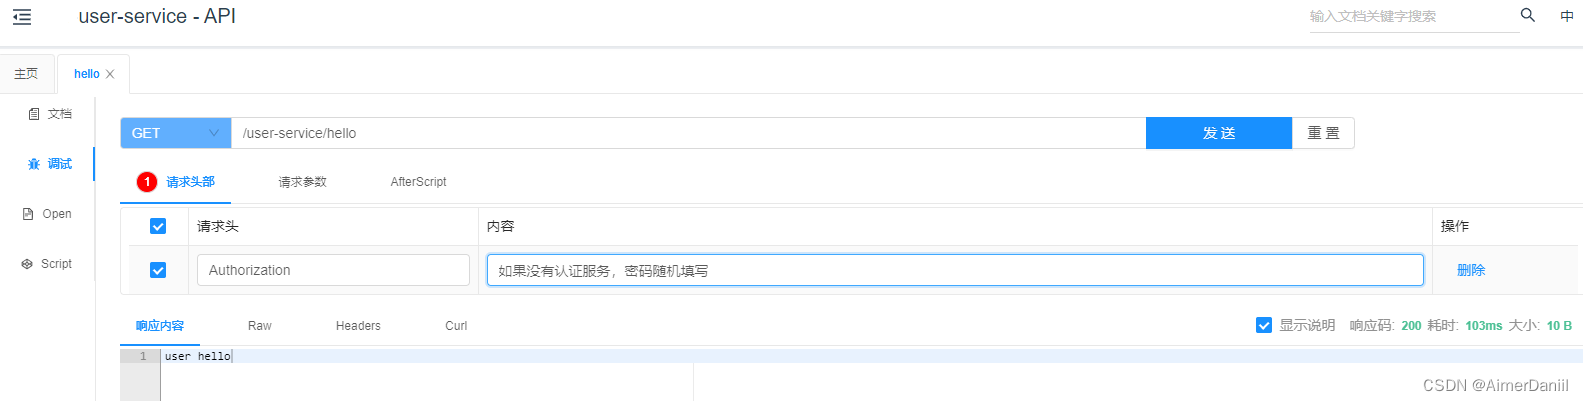
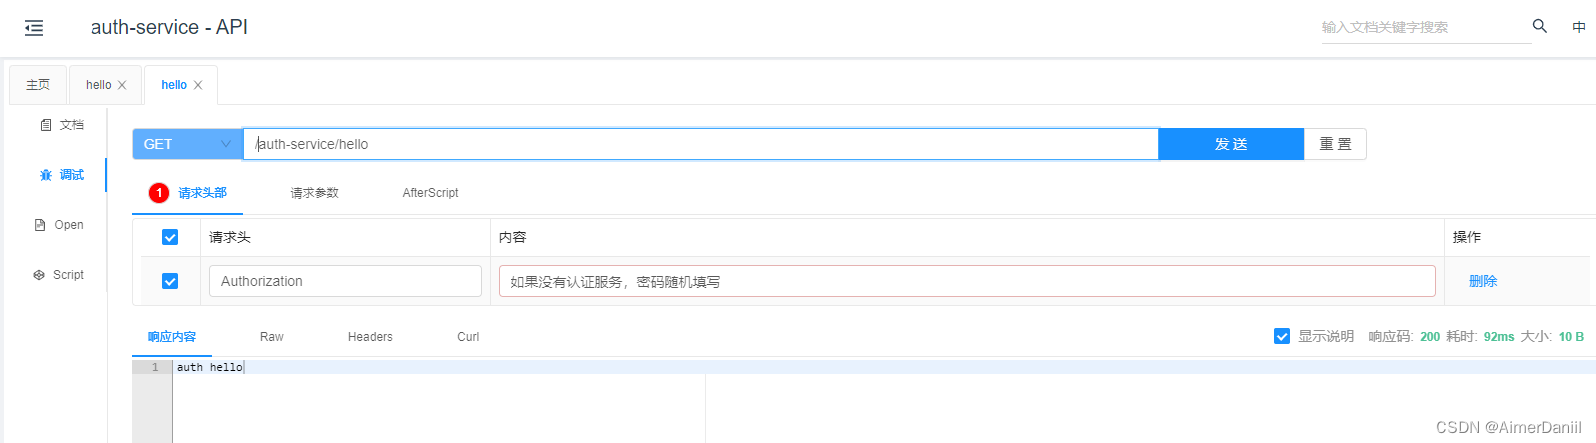
2、聚合接口文档页面
3、项目结构
gateway-service:网关、文档聚合中心,是所有微服务文档的出口
auth-service:认证服务
user-service:用户服务
4、项目配置
4.1 gateway-service
4.1.1 maven 依赖
主要依赖
		<!-- Api文档 -->
        <dependency>
            <groupId>com.github.xiaoymin</groupId>
            <artifactId>knife4j-gateway-spring-boot-starter</artifactId>
            <version>4.3.0</version>
        </dependency>
4.1.2 bootstrap.yml配置
# knife4j 网关聚合  https://doc.xiaominfo.com/docs/middleware-sources/spring-cloud-gateway/spring-gateway-introduction
knife4j:
  gateway:
    # 第一个配置,开启gateway聚合组件
    enabled: true
    # 第二行配置,设置聚合模式采用discover服务发现的模式
    strategy: discover
    # 服务发现模式的配置
    discover:
      # 第三行配置,开启discover模式
      enabled: true
      # 聚合所有子服务(swagger2规范),子服务是3规范则替换为openapi3
      version: openapi3
      # 需要排除的微服务(eg:网关服务)
      excluded-services:
          - gateway-service
4.2 auth-service
4.2.1 maven 依赖
主要依赖
 	<!-- 接口文档 -->
        <dependency>
            <groupId>com.github.xiaoymin</groupId>
            <artifactId>knife4j-openapi3-jakarta-spring-boot-starter</artifactId>
            <version>4.3.0</version>
        </dependency>
案件差不多完整主要依赖
<!--Spring boot 依赖(微服务基础)-->
        <dependency>
            <groupId>org.springframework.boot</groupId>
            <artifactId>spring-boot-starter</artifactId>
            <!--使用exclusions标签来标明要排除的包-->
            <!--排除logback-->
            <exclusions>
                <exclusion>
                    <groupId>org.springframework.boot</groupId>
                    <artifactId>spring-boot-starter-logging</artifactId>
                </exclusion>
            </exclusions>
        </dependency>

        <!--Web 服务相关-->
        <dependency>
            <groupId>org.springframework.boot</groupId>
            <artifactId>spring-boot-starter-web</artifactId>
        </dependency>

        <!-- 生成配置元数据,比如你平常在yml文件里面配置 -->
        <dependency>
            <groupId>org.springframework.boot</groupId>
            <artifactId>spring-boot-configuration-processor</artifactId>
            <optional>true</optional>
        </dependency>

        <!--单元测试依赖,子工程中需要单元测试时,不需要再次引入此依赖了-->
        <dependency>
            <groupId>org.springframework.boot</groupId>
            <artifactId>spring-boot-starter-test</artifactId>
            <scope>test</scope>
            <exclusions>
                <exclusion>
                    <groupId>org.junit.vintage</groupId>
                    <artifactId>junit-vintage-engine</artifactId>
                </exclusion>
            </exclusions>
        </dependency>

        <!--bootstrap 相关-->
        <!--SpringBoot2.4.x之后默认不加载bootstrap.yml文件,需要在pom里加上依赖-->
        <dependency>
            <groupId>org.springframework.cloud</groupId>
            <artifactId>spring-cloud-starter-bootstrap</artifactId>
			<version>4.0.0</version>
        </dependency>

        <!--服务的注册和发现-->
        <dependency>
            <groupId>com.alibaba.cloud</groupId>
            <artifactId>spring-cloud-starter-alibaba-nacos-config</artifactId>
        </dependency>

        <dependency>
            <groupId>com.alibaba.cloud</groupId>
            <artifactId>spring-cloud-starter-alibaba-nacos-discovery</artifactId>
        </dependency>

        <!--lombok 依赖,子工程中假如需要lombok,不需要再引入-->
        <!-- https://mvnrepository.com/artifact/org.projectlombok/lombok -->
        <dependency>
            <groupId>org.projectlombok</groupId>
            <artifactId>lombok</artifactId>
            <version>1.18.30</version>
            <scope>provided</scope>
        </dependency>

		 <!-- 接口文档 -->
        <dependency>
            <groupId>com.github.xiaoymin</groupId>
            <artifactId>knife4j-openapi3-jakarta-spring-boot-starter</artifactId>
            <version>4.3.0</version>
        </dependency>
4.2.2 bootstrap.yml配置
server:
  port: 2
  tomcat:
    max-http-form-post-size: -1
    max-threads: 500
    min-spare-threads: 50
  servlet:
    context-path: /
spring:
  main:
    web-application-type: reactive
     #当遇到同样名字的时候,是否允许覆盖注册
    allow-bean-definition-overriding: true
  profiles:
    active: ${SYS_ENV:} # local:本地,dev:测试,uat:uat
  application:
    name: auth-service
  cloud:
    nacos:
      # 配置中心#
      config:
        username: ${NACOS_USER:nacos}
        password: ${NACOS_PASSWORD:nacos}
        server-addr: ${NACOS_IP:nacos.com}:${NACOS_POST:8848}
        namespace: ${NACOS_NAMESPACE:}
        file-extension: yml
        refresh-enabled: true
        override-none: true  #本地配置优先
        shared-configs:
          - application.${spring.cloud.nacos.config.file-extension} # 配置文件名-Data Id

    # 安全配置
	security:
		# 验签公钥地址
	    oauth2:
	      authorizationserver:
	        token-uri: 获取密钥地址(后续根据账号、密码获取token)

# swagger配置
knife4j:
  # 开启增强配置
  enable: true
  # 开启生产环境屏蔽
  # production: true
  setting:
    language: zh_cn
  # 账户密码
  basic:
    enable: true
    username: abc
    password: abc

# Api文档信息
# springdoc-openapi 项目配置
springdoc:
  swagger-ui:
    path: /swagger-ui.html
    tags-sorter: alpha
    operations-sorter: alpha
  api-docs:
    path: /v3/api-docs
  group-configs:
    - group: 'default'
      paths-to-match: '/**'
  info:
    title: ${spring.application.name} - API
    version: 3.0.0
    description: 接口文档
    contact:
      name: 1
      url: 1
      email: 1
    license:
      name: Apache 2.0
      url: https://www.apache.org/licenses/LICENSE-2.0.html
4.2.3 接口文档配置
4.2.3.1 ApiDocInfo.java
import lombok.Data;
import org.springframework.boot.context.properties.ConfigurationProperties;
import org.springframework.stereotype.Component;

/**
 * API 信息属性
 *
 * @since 2023/12/13
 */
@Data
@ConfigurationProperties(prefix = "springdoc.info")
public class ApiDocInfo {

    /**
     * API文档标题
     */
    private String title;

    /**
     * API文档版本
     */
    private String version;

    /**
     * API文档描述
     */
    private String description;

    /**
     * 联系人信息
     */
    private Contact contact;

    /**
     * 许可证信息
     */
    private License license;

    @Data
    public static class Contact {
        /**
         * 联系人姓名
         */
        private String name;
        /**
         * 联系人主页
         */
        private String url;
        /**
         * 联系人邮箱
         */
        private String email;

    }

    /**
     * 许可证信息
     */
    @Data
    public static  class  License{
        /**
         * 许可证名称
         */
        private String name;
        /**
         * 许可证URL
         */
        private String url;
    }

}
4.2.3.2 ApiDocInfo.java
package com.fkxinli.zxyy.config.api;

import io.swagger.v3.oas.models.Components;
import io.swagger.v3.oas.models.OpenAPI;
import io.swagger.v3.oas.models.info.Contact;
import io.swagger.v3.oas.models.info.Info;
import io.swagger.v3.oas.models.info.License;
import io.swagger.v3.oas.models.security.OAuthFlow;
import io.swagger.v3.oas.models.security.OAuthFlows;
import io.swagger.v3.oas.models.security.SecurityRequirement;
import io.swagger.v3.oas.models.security.SecurityScheme;
import lombok.RequiredArgsConstructor;
import org.springframework.beans.factory.annotation.Value;
import org.springframework.boot.context.properties.EnableConfigurationProperties;
import org.springframework.context.annotation.Bean;
import org.springframework.context.annotation.Configuration;
import org.springframework.http.HttpHeaders;

/**
 * OpenAPI 配置类
 * <p>
 * 基于 OpenAPI 3.0 规范 + SpringDoc 实现 + knife4j 增强
 *
 * @author gyd
 * @since 3.0.0
 */
@Configuration
@RequiredArgsConstructor
@EnableConfigurationProperties(ApiDocInfo.class)
public class OpenApiConfig {

    /**
     * OAuth2 认证 endpoint
     */
    @Value("${spring.security.oauth2.authorizationserver.token-uri}")
    private String tokenUrl;

    /**
     * API 文档信息属性
     */
    private final ApiDocInfo apiDocInfo;


    /**
     * OpenAPI 配置(元信息、安全协议)
     */
    @Bean
    public OpenAPI apiInfo() {
        return new OpenAPI()
                .components(new Components()
                        .addSecuritySchemes(HttpHeaders.AUTHORIZATION,
                                new SecurityScheme()
                                        // OAuth2 授权模式
                                        .type(SecurityScheme.Type.OAUTH2)
                                        .name(HttpHeaders.AUTHORIZATION)
                                        .flows(new OAuthFlows()
                                                .password(
                                                        new OAuthFlow()
                                                                .tokenUrl(tokenUrl)
                                                                .refreshUrl(tokenUrl)
                                                )
                                        )
                                        // 安全模式使用Bearer令牌(即JWT)
                                        .in(SecurityScheme.In.HEADER)
                                        .scheme("Bearer")
                                        .bearerFormat("JWT")
                        )
                )
                // 接口全局添加 Authorization 参数
                .addSecurityItem(new SecurityRequirement().addList(HttpHeaders.AUTHORIZATION))
                // 接口文档信息(不重要)
                .info(new Info()
                        .title(apiDocInfo.getTitle())
                        .version(apiDocInfo.getVersion())
                        .description(apiDocInfo.getDescription())
                        .contact(new Contact()
                                .name(apiDocInfo.getContact().getName())
                                .url(apiDocInfo.getContact().getUrl())
                                .email(apiDocInfo.getContact().getEmail())
                        )
                        .license(new License().name(apiDocInfo.getLicense().getName())
                                .url(apiDocInfo.getLicense().getUrl())
                        ));
    }

}
4.3 user-service
4.2.1 maven 依赖
主要依赖
 	<!-- 接口文档 -->
        <dependency>
            <groupId>com.github.xiaoymin</groupId>
            <artifactId>knife4j-openapi3-jakarta-spring-boot-starter</artifactId>
            <version>4.3.0</version>
        </dependency>
案件差不多完整主要依赖
<!--Spring boot 依赖(微服务基础)-->
        <dependency>
            <groupId>org.springframework.boot</groupId>
            <artifactId>spring-boot-starter</artifactId>
            <!--使用exclusions标签来标明要排除的包-->
            <!--排除logback-->
            <exclusions>
                <exclusion>
                    <groupId>org.springframework.boot</groupId>
                    <artifactId>spring-boot-starter-logging</artifactId>
                </exclusion>
            </exclusions>
        </dependency>

        <!--Web 服务相关-->
        <dependency>
            <groupId>org.springframework.boot</groupId>
            <artifactId>spring-boot-starter-web</artifactId>
        </dependency>

        <!-- 生成配置元数据,比如你平常在yml文件里面配置 -->
        <dependency>
            <groupId>org.springframework.boot</groupId>
            <artifactId>spring-boot-configuration-processor</artifactId>
            <optional>true</optional>
        </dependency>

        <!--单元测试依赖,子工程中需要单元测试时,不需要再次引入此依赖了-->
        <dependency>
            <groupId>org.springframework.boot</groupId>
            <artifactId>spring-boot-starter-test</artifactId>
            <scope>test</scope>
            <exclusions>
                <exclusion>
                    <groupId>org.junit.vintage</groupId>
                    <artifactId>junit-vintage-engine</artifactId>
                </exclusion>
            </exclusions>
        </dependency>

        <!--bootstrap 相关-->
        <!--SpringBoot2.4.x之后默认不加载bootstrap.yml文件,需要在pom里加上依赖-->
        <dependency>
            <groupId>org.springframework.cloud</groupId>
            <artifactId>spring-cloud-starter-bootstrap</artifactId>
			<version>4.0.0</version>
        </dependency>

        <!--服务的注册和发现-->
        <dependency>
            <groupId>com.alibaba.cloud</groupId>
            <artifactId>spring-cloud-starter-alibaba-nacos-config</artifactId>
        </dependency>

        <dependency>
            <groupId>com.alibaba.cloud</groupId>
            <artifactId>spring-cloud-starter-alibaba-nacos-discovery</artifactId>
        </dependency>

        <!--lombok 依赖,子工程中假如需要lombok,不需要再引入-->
        <!-- https://mvnrepository.com/artifact/org.projectlombok/lombok -->
        <dependency>
            <groupId>org.projectlombok</groupId>
            <artifactId>lombok</artifactId>
            <version>1.18.30</version>
            <scope>provided</scope>
        </dependency>

		 <!-- 接口文档 -->
        <dependency>
            <groupId>com.github.xiaoymin</groupId>
            <artifactId>knife4j-openapi3-jakarta-spring-boot-starter</artifactId>
            <version>4.3.0</version>
        </dependency>
4.2.2 bootstrap.yml配置
server:
  port: 2
  tomcat:
    max-http-form-post-size: -1
    max-threads: 500
    min-spare-threads: 50
  servlet:
    context-path: /
spring:
  main:
    web-application-type: reactive
     #当遇到同样名字的时候,是否允许覆盖注册
    allow-bean-definition-overriding: true
  profiles:
    active: ${SYS_ENV:} # local:本地,dev:测试,uat:uat
  application:
    name: user-service
  cloud:
    nacos:
      # 配置中心#
      config:
        username: ${NACOS_USER:nacos}
        password: ${NACOS_PASSWORD:nacos}
        server-addr: ${NACOS_IP:nacos.com}:${NACOS_POST:8848}
        namespace: ${NACOS_NAMESPACE:}
        file-extension: yml
        refresh-enabled: true
        override-none: true  #本地配置优先
        shared-configs:
          - application.${spring.cloud.nacos.config.file-extension} # 配置文件名-Data Id

    # 安全配置
	security:
		# 验签公钥地址
	    oauth2:
	      authorizationserver:
	        token-uri: 获取密钥地址(后续根据账号、密码获取token)

# swagger配置
knife4j:
  # 开启增强配置
  enable: true
  # 开启生产环境屏蔽
  # production: true
  setting:
    language: zh_cn
  # 账户密码
  basic:
    enable: true
    username: abc
    password: abc

# Api文档信息
# springdoc-openapi 项目配置
springdoc:
  swagger-ui:
    path: /swagger-ui.html
    tags-sorter: alpha
    operations-sorter: alpha
  api-docs:
    path: /v3/api-docs
  group-configs:
    - group: 'default'
      paths-to-match: '/**'
  info:
    title: ${spring.application.name} - API
    version: 3.0.0
    description: 接口文档
    contact:
      name: 1
      url: 1
      email: 1
    license:
      name: Apache 2.0
      url: https://www.apache.org/licenses/LICENSE-2.0.html
4.2.3 接口文档配置
4.2.3.1 ApiDocInfo.java
import lombok.Data;
import org.springframework.boot.context.properties.ConfigurationProperties;
import org.springframework.stereotype.Component;

/**
 * API 信息属性
 *
 * @since 2023/12/13
 */
@Data
@ConfigurationProperties(prefix = "springdoc.info")
public class ApiDocInfo {

    /**
     * API文档标题
     */
    private String title;

    /**
     * API文档版本
     */
    private String version;

    /**
     * API文档描述
     */
    private String description;

    /**
     * 联系人信息
     */
    private Contact contact;

    /**
     * 许可证信息
     */
    private License license;

    @Data
    public static class Contact {
        /**
         * 联系人姓名
         */
        private String name;
        /**
         * 联系人主页
         */
        private String url;
        /**
         * 联系人邮箱
         */
        private String email;

    }

    /**
     * 许可证信息
     */
    @Data
    public static  class  License{
        /**
         * 许可证名称
         */
        private String name;
        /**
         * 许可证URL
         */
        private String url;
    }

}
4.2.3.2 ApiDocInfo.java
package com.fkxinli.zxyy.config.api;

import io.swagger.v3.oas.models.Components;
import io.swagger.v3.oas.models.OpenAPI;
import io.swagger.v3.oas.models.info.Contact;
import io.swagger.v3.oas.models.info.Info;
import io.swagger.v3.oas.models.info.License;
import io.swagger.v3.oas.models.security.OAuthFlow;
import io.swagger.v3.oas.models.security.OAuthFlows;
import io.swagger.v3.oas.models.security.SecurityRequirement;
import io.swagger.v3.oas.models.security.SecurityScheme;
import lombok.RequiredArgsConstructor;
import org.springframework.beans.factory.annotation.Value;
import org.springframework.boot.context.properties.EnableConfigurationProperties;
import org.springframework.context.annotation.Bean;
import org.springframework.context.annotation.Configuration;
import org.springframework.http.HttpHeaders;

/**
 * OpenAPI 配置类
 * <p>
 * 基于 OpenAPI 3.0 规范 + SpringDoc 实现 + knife4j 增强
 *
 * @author gyd
 * @since 3.0.0
 */
@Configuration
@RequiredArgsConstructor
@EnableConfigurationProperties(ApiDocInfo.class)
public class OpenApiConfig {

    /**
     * OAuth2 认证 endpoint
     */
    @Value("${spring.security.oauth2.authorizationserver.token-uri}")
    private String tokenUrl;

    /**
     * API 文档信息属性
     */
    private final ApiDocInfo apiDocInfo;


    /**
     * OpenAPI 配置(元信息、安全协议)
     */
    @Bean
    public OpenAPI apiInfo() {
        return new OpenAPI()
                .components(new Components()
                        .addSecuritySchemes(HttpHeaders.AUTHORIZATION,
                                new SecurityScheme()
                                        // OAuth2 授权模式
                                        .type(SecurityScheme.Type.OAUTH2)
                                        .name(HttpHeaders.AUTHORIZATION)
                                        .flows(new OAuthFlows()
                                                .password(
                                                        new OAuthFlow()
                                                                .tokenUrl(tokenUrl)
                                                                .refreshUrl(tokenUrl)
                                                )
                                        )
                                        // 安全模式使用Bearer令牌(即JWT)
                                        .in(SecurityScheme.In.HEADER)
                                        .scheme("Bearer")
                                        .bearerFormat("JWT")
                        )
                )
                // 接口全局添加 Authorization 参数
                .addSecurityItem(new SecurityRequirement().addList(HttpHeaders.AUTHORIZATION))
                // 接口文档信息(不重要)
                .info(new Info()
                        .title(apiDocInfo.getTitle())
                        .version(apiDocInfo.getVersion())
                        .description(apiDocInfo.getDescription())
                        .contact(new Contact()
                                .name(apiDocInfo.getContact().getName())
                                .url(apiDocInfo.getContact().getUrl())
                                .email(apiDocInfo.getContact().getEmail())
                        )
                        .license(new License().name(apiDocInfo.getLicense().getName())
                                .url(apiDocInfo.getLicense().getUrl())
                        ));
    }

}
5、测试
启动所有服务后,访问地址:http://{gateway.host}:{gateway.port}/doc.html


 1877
1877


 被折叠的 条评论
为什么被折叠?
被折叠的 条评论
为什么被折叠?
 到【灌水乐园】发言


