


1.数据模拟
2.存入elasticsearch数据库
通过线程模拟系统日志数据和用户行为数据。数据格式如下:
日志服务数据:17705|event_login|1486832460300|192.168.56.17
用户行为数据:{“browse”:“chrome:true version:72.0”,“custid”:“42329”,“cm”:{“eventCategory”:“href_click”,“position”:“128 52”,“time”:“2017-10-09 08:39:00”,“pageName”:“http://localhost:8088/list.html”,“msg”:“ccc”}}
json格式数据嵌套一个json格式数据
数据模拟
1.idea中创建一个普通java项目,导入json依赖包。
    <!-- https://mvnrepository.com/artifact/com.fasterxml.jackson.core/jackson-core -->
    <dependency>
      <groupId>com.fasterxml.jackson.core</groupId>
      <artifactId>jackson-core</artifactId>
      <version>2.9.9</version>
    </dependency>
    <!-- https://mvnrepository.com/artifact/com.fasterxml.jackson.core/jackson-databind -->
    <dependency>
      <groupId>com.fasterxml.jackson.core</groupId>
      <artifactId>jackson-databind</artifactId>
      <version>2.9.9</version>
    </dependency>
2.创建两个实体类Events和BrowseInfo,分别对应用户行为数据的两个json数据对象。
BrowseInfol类:对应外层json数据,属性有browse、custid、cm(内层json)
package com.njdbqn.demo1;

public class BrowseInfo {
    private String browse;
    private String custid;
    private Events cm;

    public BrowseInfo() {
    }

    public BrowseInfo(String browse, String custid, Events cm) {
        this.browse = browse;
        this.custid = custid;
        this.cm = cm;
    }

    public String getBrowse() {
        return browse;
    }

    public void setBrowse(String browse) {
        this.browse = browse;
    }

    public String getCustid() {
        return custid;
    }

    public void setCustid(String custid) {
        this.custid = custid;
    }

    public Events getCm() {
        return cm;
    }

    public void setCm(Events cm) {
        this.cm = cm;
    }
}
Events类:对应内存json,属性有eventCategory、position、time、pageName、msg。
package com.njdbqn.demo1;

public class Events {
    private String eventCategory;
    private String position;
    private String time;
    private String pageName;
    private String msg;

    public Events() {
    }

    public Events(String eventCategory, String position, String time, String pageName, String msg) {
        this.eventCategory = eventCategory;
        this.position = position;
        this.time = time;
        this.pageName = pageName;
        this.msg = msg;
    }

    public String getEventCategory() {
        return eventCategory;
    }

    public void setEventCategory(String eventCategory) {
        this.eventCategory = eventCategory;
    }

    public String getPosition() {
        return position;
    }

    public void setPosition(String position) {
        this.position = position;
    }

    public String getTime() {
        return time;
    }

    public void setTime(String time) {
        this.time = time;
    }

    public String getPageName() {
        return pageName;
    }

    public void setPageName(String pageName) {
        this.pageName = pageName;
    }

    public String getMsg() {
        return msg;
    }

    public void setMsg(String msg) {
        this.msg = msg;
    }
}
3.数据模拟类中提供日志服务数据制造方法makeServiceLog()和用户行为数据制造方法makeActionLog(),同时还提供数据写入文件的方法writeLog()。
静态变量设定。
    private static Date date;
    private static Random rand=new Random();
    private static SimpleDateFormat sdf =new SimpleDateFormat("yyyy-MM-dd HH:mm:ss");//时间格式
    //用于将java对象转换为json字符串的形式
    private static ObjectMapper om =new ObjectMapper();
    private static long userid=10000;
    private static  Calendar cal =Calendar.getInstance();
    //各属性的可选值
    private String [] browsers= {"mozilla:true version:76.0","chrome:true version:72.0"};
    private String [] pageName={"list.html","index.html"};
    private String [] msgs={"hello world!","ccc","dada up"};
    private String [] eventNames={"href_click","btn_click","text_input"};
    static{//日期初始设定年、月、日、时、分、秒
        cal.set(2016,1,1,0,0,0);
        date=cal.getTime()
    }
makeServiceLog(),日志服务数据模拟。
//数据格式:17705|event_login|1486832460300|192.168.56.17
    //制造日志服务器日志
    private  String makeServiceLog(){
    	//userid 【0-9】 5位数
        userid=10000+rand.nextInt(80000);
        //日期随机增加0-1000小时
        cal.add(Calendar.HOUR,rand.nextInt(1000));
        date=cal.getTime();
        String str=userid+"|event_login|"+sdf.format(date)+"|192.168.56."+rand.nextInt(256);
        return str;
    }
makeActionLog(),用户行为数据模拟。
//制造用户行为日志
    private  String makeActionLog(){
        int pos =rand.nextInt(2);
        Events es =new Events(eventNames[rand.nextInt(3)],
                "128 52",sdf.format(date),
                "http://localhost:8088/"+pageName[rand.nextInt(2)],
                msgs[rand.nextInt(3)]);
        BrowseInfo bi =new BrowseInfo(browsers[pos],userid+"",es);
        //自动向前增加一分钟
        cal.add(Calendar.MINUTE,1);
        date =cal.getTime();
        userid=10000+rand.nextInt(80000);
        String res = null;
        try {
        	//java对象转换为json字符串格式
            res = om.writeValueAsString(bi);
        } catch (JsonProcessingException e) {
            e.printStackTrace();
        }
        return res;
    }
writeLog(),按照线程名分类将模拟的数据分类写入文件sys.log和act.log中。RandomAccessFile 类实现数据的写入。
 //写入文件
    public void writeLog(String threadName){
        String msg = threadName.equalsIgnoreCase("action")?makeActionLog():makeServiceLog();
//        String path = threadName.equalsIgnoreCase("action")?"/d:/Log/act.log":"/d:/Log/sys.log";//windows文件
        String path = threadName.equalsIgnoreCase("action")?"/opt/action/act.log":"/opt/system/sys.log";//虚拟机文件
        try {
            RandomAccessFile raf =new RandomAccessFile(path,"rw");
            long size =raf.length();
            raf.seek(size);
            raf.writeBytes(msg+"\r\n");
            raf.close();
        }catch (IOException e){
            e.printStackTrace();
        }
    }
4.线程类LogService ,用户日志行为生成服务
/**
 * 用户日志行为生成服务
 */
public class LogService extends Thread{
    public MyStore ms;
    //修改线程名、等级
    public LogService(String name,int level,MyStore ms){
        setName(name);
        setPriority(level);
        this.ms=ms;
    }
    @Override
    public void run() {
        String name =Thread.currentThread().getName();
        int xun =300;
        if (name.equalsIgnoreCase("action")){
            xun=10000;
        }
        for (int i = 0; i<xun;i++){
           execute(Thread.currentThread().getName());
        }
    }

    public void execute(String threadName){
        synchronized(ms){
            ms.writeLog(threadName);
        }
    }
}
5.测试类,两个线程模拟日志服务数据和用户行为日志数据。
        MyStore ms =new MyStore();
        new LogService("action",10,ms).start();
        new LogService("system",1,ms).start();
6.先在windows环境下运行,文件写入到windows中,d:/Log/act.log和d:/Log/sys.log
sys.log文件中:
20388|event_login|2012-01-11 03:01:00|192.168.56.153
81646|event_login|2012-02-11 16:01:00|192.168.56.69
82718|event_login|2012-03-19 02:01:00|192.168.56.29
69073|event_login|2012-04-11 14:01:00|192.168.56.130
85166|event_login|2012-04-27 19:01:00|192.168.56.199
89570|event_login|2012-05-01 13:01:00|192.168.56.113
40593|event_login|2012-06-02 05:01:00|192.168.56.251
23238|event_login|2012-06-23 02:01:00|192.168.56.25
66920|event_login|2012-07-27 05:01:00|192.168.56.6
54088|event_login|2012-08-24 05:01:00|192.168.56.236
48502|event_login|2012-09-07 05:01:00|192.168.56.170
act.log文件中:
{"browse":"chrome:true version:72.0","custid":"36293","cm":{"eventCategory":"btn_click","position":"128 52","time":"2000-02-01 00:07:00","pageName":"http://localhost:8088/list.html","msg":"ccc"}}
{"browse":"chrome:true version:72.0","custid":"88645","cm":{"eventCategory":"href_click","position":"128 52","time":"2000-02-01 00:08:00","pageName":"http://localhost:8088/list.html","msg":"hello world!"}}
{"browse":"chrome:true version:72.0","custid":"78084","cm":{"eventCategory":"href_click","position":"128 52","time":"2000-02-01 00:09:00","pageName":"http://localhost:8088/index.html","msg":"dada up"}}
{"browse":"chrome:true version:72.0","custid":"35896","cm":{"eventCategory":"text_input","position":"128 52","time":"2000-02-01 00:10:00","pageName":"http://localhost:8088/list.html","msg":"hello world!"}}
{"browse":"mozilla:true version:76.0","custid":"29140","cm":{"eventCategory":"text_input","position":"128 52","time":"2000-02-01 00:11:00","pageName":"http://localhost:8088/list.html","msg":"ccc"}}
{"browse":"chrome:true version:72.0","custid":"27039","cm":{"eventCategory":"text_input","position":"128 52","time":"2000-02-01 00:12:00","pageName":"http://localhost:8088/index.html","msg":"hello world!"}}
7.打胖包,这里引入了jackson依赖包。修改pom.xml文件的 内容(粘贴下面代码,覆盖原标签),中填入当前程序的主类路径。
<plugins>
        <plugin>
          <artifactId>maven-compiler-plugin</artifactId>
          <version>2.3.2</version>
          <configuration>
            <source>1.8</source>
            <target>1.8</target>
          </configuration>
        </plugin>
        <plugin>
          <artifactId>maven-assembly-plugin</artifactId>
          <configuration>
            <descriptorRefs>
              <descriptorRef>jar-with-dependencies</descriptorRef>
            </descriptorRefs>
            <archive>
              <manifest>
              <!--   主函数,即测试类的路径       -->
                <mainClass>com.njdbqn.logger.App</mainClass>
              </manifest>
            </archive>
          </configuration>
          <executions>
            <execution>
              <id>make-assembly</id>
              <phase>package</phase>
              <goals>
                <goal>single</goal>
              </goals>
            </execution>
          </executions>
        </plugin>
      </plugins>
8.writeLog()中将数据写入文件路径修改为虚拟机中文件存储路径,并打胖包,将项目导入虚拟机/opt文件中执行。
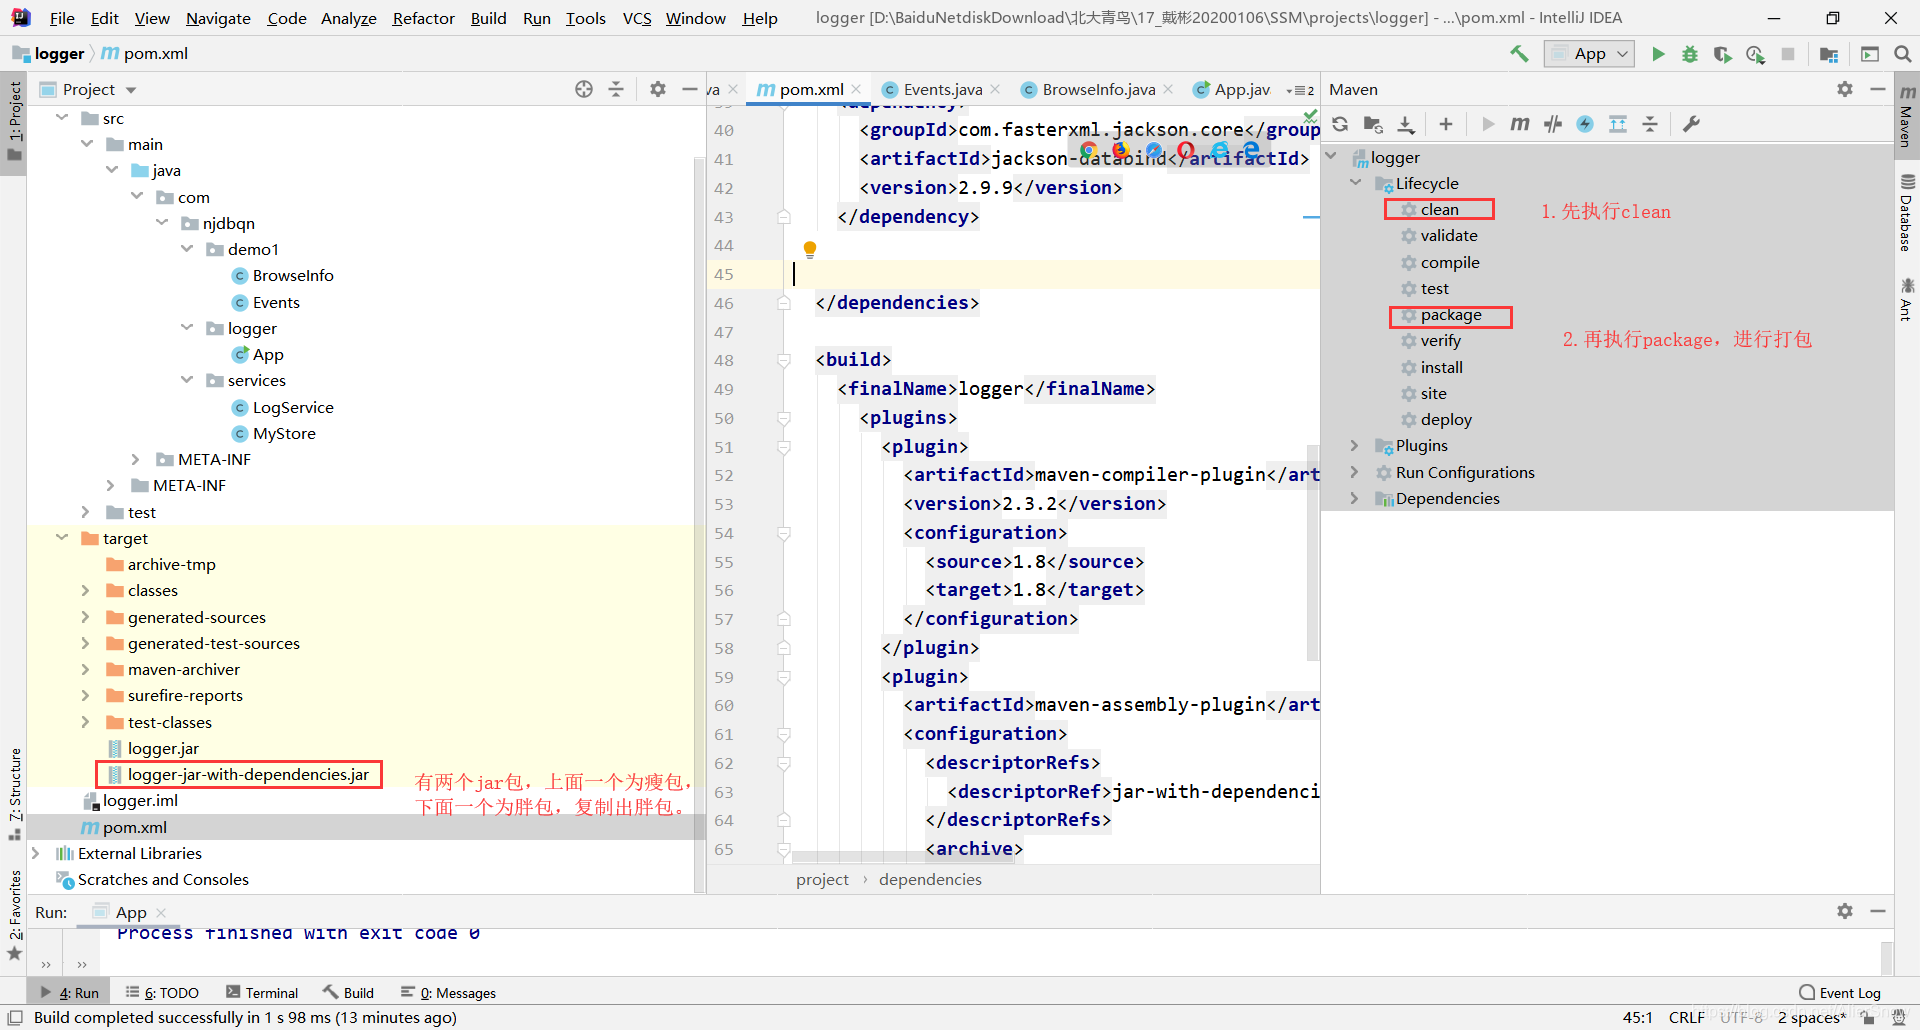 9.执行java程序,logger-jar-with-dependencies.jar
java -jar logger-jar-with-dependencies.jar
在/opt/action/act.log和/opt/action/sys.log两个文件中可以看到模拟数据。
数据存入Elasticsearch数据库
logstash实现数据存储的核心有三个,input中编辑数据源文件,filter中编辑过滤规则(数据格式,筛选内容),output中编辑数据保存位置。
编辑mylog.conf文件,用于logstash将模拟数据存入elasticsearch数据库中。sys.log和act.log数据分别存入system/sys和action/act中。mylog.conf文件配置:
input {
	file {
		path => "/opt/system/sys.log"
		start_position => "beginning"
		sincedb_path => "/dev/null"
		type => "system"
	}
	file {
		path => "/opt/action/act.log"
		start_position => "beginning"
		sincedb_path  => "/dev/null"
		codec => json
		type => "action"
	}
}
filter {
	if [type] == "system" {
		grok {
			match => { "message" => "(?<user_id>[0-9]+)\|(?<event_name>[a-zA-Z_]+)\|(?<times>[0-9]+)\|(?<client_ip>[0-9]{1,3}\.[0-9]{1,3}\.[0-9]{1,3}\.[0-9]{1,3})"}
			remove_field => [ "message" ]
		}
	}else{
		mutate {
			add_field => { "@adv" => "%{cm}" }
		}
		json {
			source => "@adv"
			remove_field => [ "@adv","cm" ]
		}
	}
}
output {
	if [type] == "system" {
		elasticsearch {
			hosts => "http://192.168.56.110:9200"
			index => "system"
			document_type => "sys"
		}
	}else {
		elasticsearch {
			hosts => "http://192.168.56.110:9200"
			index => "action"
			document_type => "act"
		}
	}
}
进入logstash/bin目录下执行 ./logstash -f /opt/config/mylog.conf,至此数据就存入elasticsearch数据库中了。
./logstash -f /opt/config/mylog.conf


 131
131


 被折叠的 条评论
为什么被折叠?
被折叠的 条评论
为什么被折叠?
 到【灌水乐园】发言


