


前言
学习Oracle知识的第一步应该就是安装oracle软件吧,看完各种安装教程后,也就陷入了“从入门到放弃”。本次教程我将采用最简单的Oracle安装方法,初学者完全可以参照本教程进行搭建,不用过多关注环境变量、监听、dbca、数据库等,用最便捷的方式先入门,然后再学习SQL语句,随着学习的更加深入,回头再看其他教程也就明朗了许多。
环境
系统:Oracle Linux 7.9 (CentOS 7也可以)
硬盘:建议30G以上(我默认分配了20G,后续又扩容了)
安装Oracle
准备阶段
- 下载Oracle 19c安装包
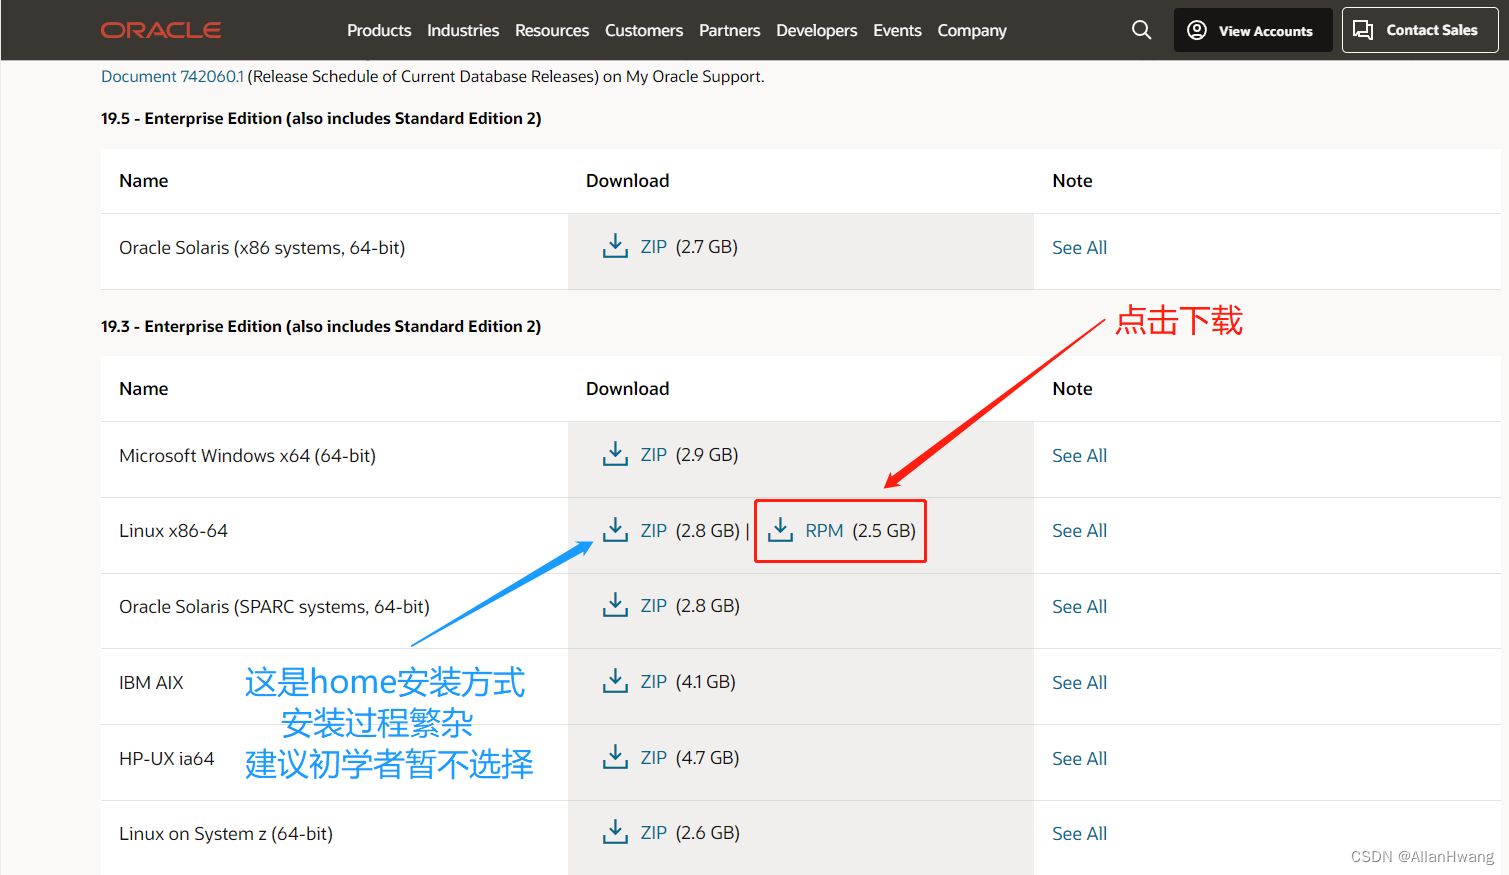
- 下载Oracle 19c预安装包
如果是CentOS 7则需要下载该安装包
如果是Oracle Linux 7则无需下载 - 将上述安装包上传至服务器
方式一:安装xftp软件(建议),然后上传至/root目录下即可。
方式二:服务器执行命令安装软件 yum install lrzsz (Oracle Linux 7.9默认已安装该软件),然后输入命令 rz 会弹出本地电脑的文件夹,选择上述安装包即可上传至服务器。【小文件建议采用这种方法】
安装阶段
1. 安装 预安装包
Oracle Linux 7:
[root@192 ~]# yum -y install oracle-database-preinstall-19c
Loaded plugins: langpacks, ulninfo
Resolving Dependencies
--> Running transaction check
---> Package oracle-database-preinstall-19c.x86_64 0:1.0-3.el7 will be installed
......#  省略中间过程
Installed:
  oracle-database-preinstall-19c.x86_64 0:1.0-3.el7

Dependency Installed:
  compat-libcap1.x86_64 0:1.10-7.el7                        glibc-devel.x86_64 0:2.17-326.0.1.el7_9
  glibc-headers.x86_64 0:2.17-326.0.1.el7_9                 kernel-headers.x86_64 0:3.10.0-1160.80.1.0.1.el7
  ksh.x86_64 0:20120801-144.0.1.el7_9                       libaio-devel.x86_64 0:0.3.109-13.el7
  libstdc++-devel.x86_64 0:4.8.5-44.0.3.el7

Dependency Updated:
  glibc.x86_64 0:2.17-326.0.1.el7_9                         glibc-common.x86_64 0:2.17-326.0.1.el7_9

Complete!
CentOS 7:
[root@192 ~]# cd /root  # 先切换到软件所在目录
[root@192 ~]# yum install oracle-database-preinstall-21c-1.0-1.el7.x86_64.rpm
此处的rpm包通常使用安装命令:rpm -ivh oracle-database-preinstall-21c-1.0-1.el7.x86_64.rpm
但这种方式会提示缺少很多依赖包,缺少的依赖包需要执行yum install xxxx安装,比较繁琐。
2. 安装Oracle 19c软件
[root@192 ~]# yum install -y oracle-database-ee-19c-1.0-1.x86_64.rpm
Loaded plugins: langpacks, ulninfo
Examining oracle-database-ee-19c-1.0-1.x86_64.rpm: oracle-database-ee-19c-1.0-1.x86_64
Marking oracle-database-ee-19c-1.0-1.x86_64.rpm to be installed
Resolving Dependencies
--> Running transaction check
---> Package oracle-database-ee-19c.x86_64 0:1.0-1 will be installed
--> Finished Dependency Resolution

Dependencies Resolved

=============================================================================================================================
 Package                           Arch              Version           Repository                                       Size
=============================================================================================================================
Installing:
 oracle-database-ee-19c            x86_64            1.0-1             /oracle-database-ee-19c-1.0-1.x86_64            6.9 G

Transaction Summary
=============================================================================================================================
Install  1 Package

Total size: 6.9 G
Installed size: 6.9 G
Downloading packages:
Running transaction check
Running transaction test
Transaction test succeeded
Running transaction
  Installing : oracle-database-ee-19c-1.0-1.x86_64                                                                                      1/1
[INFO] Executing post installation scripts...
[INFO] Oracle home installed successfully and ready to be configured.
To configure a sample Oracle Database you can execute the following service configuration script as root: /etc/init.d/oracledb_ORCLCDB-19c configure
  Verifying  : oracle-database-ee-19c-1.0-1.x86_64                                                                                      1/1

Installed:
  oracle-database-ee-19c.x86_64 0:1.0-1

Complete!
3. 初始化Oracle数据库
[root@192 ~]# /etc/init.d/oracledb_ORCLCDB-19c configure
Configuring Oracle Database ORCLCDB.
Prepare for db operation
8% complete
Copying database files
31% complete
Creating and starting Oracle instance
32% complete
36% complete
40% complete
43% complete
46% complete
Completing Database Creation
51% complete
54% complete
Creating Pluggable Databases
58% complete
77% complete
Executing Post Configuration Actions
100% complete
Database creation complete. For details check the logfiles at:
 /opt/oracle/cfgtoollogs/dbca/ORCLCDB.
Database Information:
Global Database Name:ORCLCDB
System Identifier(SID):ORCLCDB
Look at the log file "/opt/oracle/cfgtoollogs/dbca/ORCLCDB/ORCLCDB.log" for further details.

Database configuration completed successfully. The passwords were auto generated, you must change them by connecting to the database using 'sqlplus / as sysdba' as the oracle user.
4. 设置环境变量
经过上述步骤,系统已经为我们创建好了oracle用户和相关组,我们切换至oracle用户下,进行环境变量的配置。(此步骤可省略,但不建议)
[root@192 ~]# passwd oracle  # 建议设置密码,但不强制
Changing password for user oracle.
New password:
BAD PASSWORD: The password is shorter than 8 characters
Retype new password:
passwd: all authentication tokens updated successfully.
[root@192 ~]# su - oracle  # 切换至oracle用户
Last login: Wed Nov  9 03:50:35 EST 2022 on pts/1
接下来配置环境变量
[oracle@192 ~]$ vim ~/.bash_profile
修改为:
# .bash_profile

# Get the aliases and functions
if [ -f ~/.bashrc ]; then
        . ~/.bashrc
fi

# User specific environment and startup programs

PATH=$PATH:$HOME/.local/bin:$HOME/bin

export PATH


export ORACLE_HOME=/opt/oracle/product/19c/dbhome_1
export PATH=$PATH:/opt/oracle/product/19c/dbhome_1/bin
export ORACLE_SID=ORCLCDB
stty erase
export NLS_LANG="AMERICAN_AMERICA.UTF8"
执行命令 source ~/.bash_profile,使其配置生效
数据库相关操作
1. 登录数据库
[oracle@192 ~]$ sqlplus / as sysdba

SQL*Plus: Release 19.0.0.0.0 - Production on Wed Nov 9 04:04:56 2022
Version 19.3.0.0.0

Copyright (c) 1982, 2019, Oracle.  All rights reserved.


Connected to:
Oracle Database 19c Enterprise Edition Release 19.0.0.0.0 - Production
Version 19.3.0.0.0

SQL>
2. 设置数据库密码
SQL> alter user system identified by 123456;

User altered.
3. 简单查询例句
SQL> show user;
USER is "SYS"
SQL> show pdbs;

    CON_ID CON_NAME			  OPEN MODE  RESTRICTED
---------- ------------------------------ ---------- ----------
	 2 PDB$SEED			  READ ONLY  NO
	 3 ORCLPDB1			  READ WRITE NO
通过外部软件连接数据库
1. 安全组&防火墙要放开限制,此处实验阶段采取直接关闭防火墙的手段
[root@192 ~]# systemctl status firewalld.service  # 检查防火墙状态
[root@192 ~]# systemctl stop firewalld.service  # 暂时关闭防火墙
[root@192 ~]# systemctl disable firewalld.service  # 彻底关闭防火墙
2. 使用Navicat Premiun连接数据库
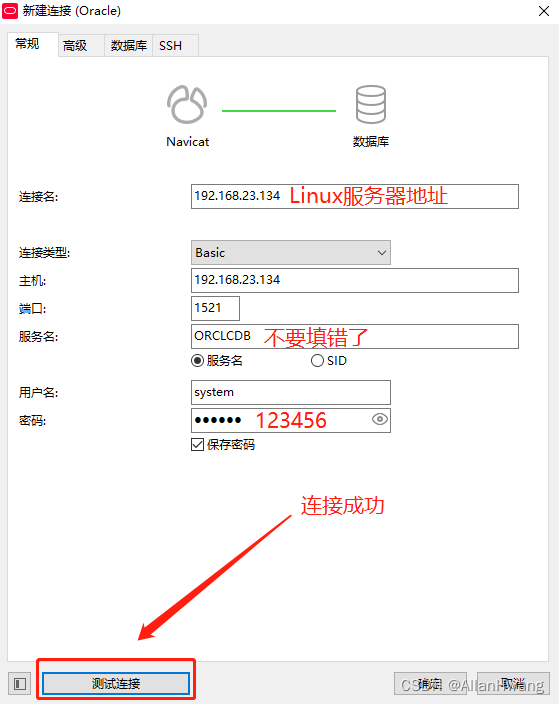
注意此处的用户名为system,如果使用sys和sysdba用户,则需要在高级选项中选择角色为SYSDBA,且使用 alter user 用户 identified by 密码 设置了密码;
3. 使用PL/SQL Developer连接数据库,请百度查阅其他文档。
数据库启动/关闭
服务器重启后,Oracle则无法连接。
启动步骤
1. 切换至oracle用户下
2. 启动监听 lsnrctl start
[oracle@192 ~]$ lsnrctl start

LSNRCTL for Linux: Version 19.0.0.0.0 - Production on 09-NOV-2022 04:37:57

Copyright (c) 1991, 2019, Oracle.  All rights reserved.

Starting /opt/oracle/product/19c/dbhome_1/bin/tnslsnr: please wait...

TNSLSNR for Linux: Version 19.0.0.0.0 - Production
System parameter file is /opt/oracle/product/19c/dbhome_1/network/admin/listener.ora
Log messages written to /opt/oracle/diag/tnslsnr/192/listener/alert/log.xml
Listening on: (DESCRIPTION=(ADDRESS=(PROTOCOL=tcp)(HOST=192.168.23.134)(PORT=1521)))
Listening on: (DESCRIPTION=(ADDRESS=(PROTOCOL=ipc)(KEY=EXTPROC1521)))

Connecting to (DESCRIPTION=(ADDRESS=(PROTOCOL=TCP)(HOST=192.168.23.134)(PORT=1521)))
STATUS of the LISTENER
------------------------
Alias                     LISTENER
Version                   TNSLSNR for Linux: Version 19.0.0.0.0 - Production
Start Date                09-NOV-2022 04:37:59
Uptime                    0 days 0 hr. 0 min. 0 sec
Trace Level               off
Security                  ON: Local OS Authentication
SNMP                      OFF
Listener Parameter File   /opt/oracle/product/19c/dbhome_1/network/admin/listener.ora
Listener Log File         /opt/oracle/diag/tnslsnr/192/listener/alert/log.xml
Listening Endpoints Summary...
  (DESCRIPTION=(ADDRESS=(PROTOCOL=tcp)(HOST=192.168.23.134)(PORT=1521)))
  (DESCRIPTION=(ADDRESS=(PROTOCOL=ipc)(KEY=EXTPROC1521)))
The listener supports no services
The command completed successfully
3. 登录数据库
[oracle@192 ~]$ sqlplus / as sysdba

SQL*Plus: Release 19.0.0.0.0 - Production on Wed Nov 9 04:39:00 2022
Version 19.3.0.0.0

Copyright (c) 1982, 2019, Oracle.  All rights reserved.

Connected to an idle instance.

SQL>
4. 启动数据库
SQL> startup
ORACLE instance started.

Total System Global Area 2415918608 bytes
Fixed Size		    9137680 bytes
Variable Size		  520093696 bytes
Database Buffers	 1879048192 bytes
Redo Buffers		    7639040 bytes
Database mounted.
Database opened.
- 使用Navicat或者PL/SQL Developer连接数据库进行操作(可选)
关闭步骤
1. 关闭数据库
在SQL界面执行 shutdown immediate
SQL> shutdown immediate
Database closed.
Database dismounted.
ORACLE instance shut down.
SQL>
*2. 退出数据库 Control + d 或者输入 exit
SQL> exit
Disconnected from Oracle Database 19c Enterprise Edition Release 19.0.0.0.0 - Production
Version 19.3.0.0.0
[oracle@192 ~]$
3. 关闭监听
[oracle@192 ~]$ lsnrctl stop

LSNRCTL for Linux: Version 19.0.0.0.0 - Production on 09-NOV-2022 10:20:15

Copyright (c) 1991, 2019, Oracle.  All rights reserved.

Connecting to (DESCRIPTION=(ADDRESS=(PROTOCOL=TCP)(HOST=192.168.23.134)(PORT=1521)))
The command completed successfully


 1070
1070


 被折叠的 条评论
为什么被折叠?
被折叠的 条评论
为什么被折叠?
 到【灌水乐园】发言


