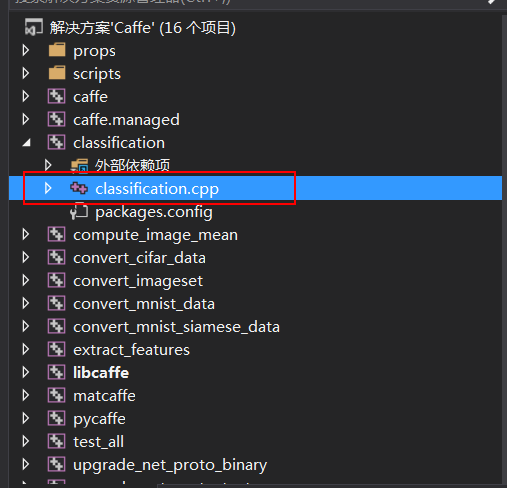
要根据已有caffemodel等文件进行图像分类,需要阅读classification.cpp文件,然后在此cpp文件基础上修改相应代码即可。
打开E:\study_materials\Caffe\caffe-master\caffe-master\windows根目录下的Caffe.sln,然后找到如图所示的cpp文件
解读此cpp文件,可参考网址:
http://m.blog.csdn.net/wanggao_1990/article/details/78118062
主要的调用函数
Classifier classifier(model_file, trained_file, mean_file, label_file);//输入的待测图片
string file = argv[5];
cv::Mat img = cv::imread(file, -1);
std::vector<Prediction> predictions = classifier.Classify(img);
实例运行1:用以训练好的模型进行图像分类
http://blog.csdn.net/shakevincent/article/details/52995253
http://blog.csdn.net/sinat_30071459/article/details/50974695
model下载地址:链接:http://pan.baidu.com/s/1hs3CF9y 密码:j7m4
该代码逐张读取文件夹下的图像并将分类结果显示在图像左上角,按任意键(除Esc键)进入下一张,按Esc键结束程序。
结果显示在左上角,有英文和中文两种标签可选,如果显示中文,需要使用Freetype库。
运行过程:
(前提:按 http://blog.csdn.net/Angela_qin/article/details/79429377 所述,配置好了相应属性)
vs2013上新建一个 Win32控制台应用程序空项目
1. 添加classification.cpp,内容如下:(基本是在源码基础上修改了一下)
#include <caffe/caffe.hpp>
#include <opencv2/core/core.hpp>
#include <opencv2/highgui/highgui.hpp>
#include <opencv2/imgproc/imgproc.hpp>
#include <algorithm>
#include <iosfwd>
#include <memory>
#include <string>
#include <utility>
#include <vector>

#include <iostream>
#include <string>
#include <sstream>
#include "io.h"

#include "stdio.h"
#include "stdlib.h"
#include "time.h"
#include"caffe_layers_registry.hpp"

using namespace caffe;  // NOLINT(build/namespaces)
using std::string;

/* Pair (label, confidence) representing a prediction. */
typedef std::pair<string, float> Prediction;

class Classifier {
public:
	Classifier(const string& model_file,
		const string& trained_file,
		const string& mean_file,
		const string& label_file);

	std::vector<Prediction> Classify(const cv::Mat& img, int N = 5);

private:
	void SetMean(const string& mean_file);

	std::vector<float> Predict(const cv::Mat& img);

	void WrapInputLayer(std::vector<cv::Mat>* input_channels);

	void Preprocess(const cv::Mat& img,
		std::vector<cv::Mat>* input_channels);

private:
	shared_ptr<Net<float> > net_;
	cv::Size input_geometry_;
	int num_channels_;
	cv::Mat mean_;
	std::vector&


 本文详细介绍了如何在Windows上使用VS2013结合Caffe进行图像分类。通过加载预先训练好的Caffemodel,修改classification.cpp和添加caffe_layers_registry.hpp文件,实现对图像的分类。此外,还提供了用自己训练的模型进行分类的步骤,包括修改deploy.prototxt、labels.txt、mean_file以及存放测试图片的路径。

 最低0.47元/天 解锁文章


 200
200

 被折叠的 条评论
为什么被折叠?


