


项目代码地址:https://gitee.com/chenfenbgin/mybatisplus
MyBatis Plus
一、快速入门
国产的开源框架,基于 MyBatis
核心功能就是简化 MyBatis 的开发,提高效率。
MyBatis Plus 快速上手
Spring Boot(2.4.4) + MyBatis Plus(国产的开源框架,并没有接入到 Spring 官方孵化器中),我们需要手动去导
1、创建 Maven 工程
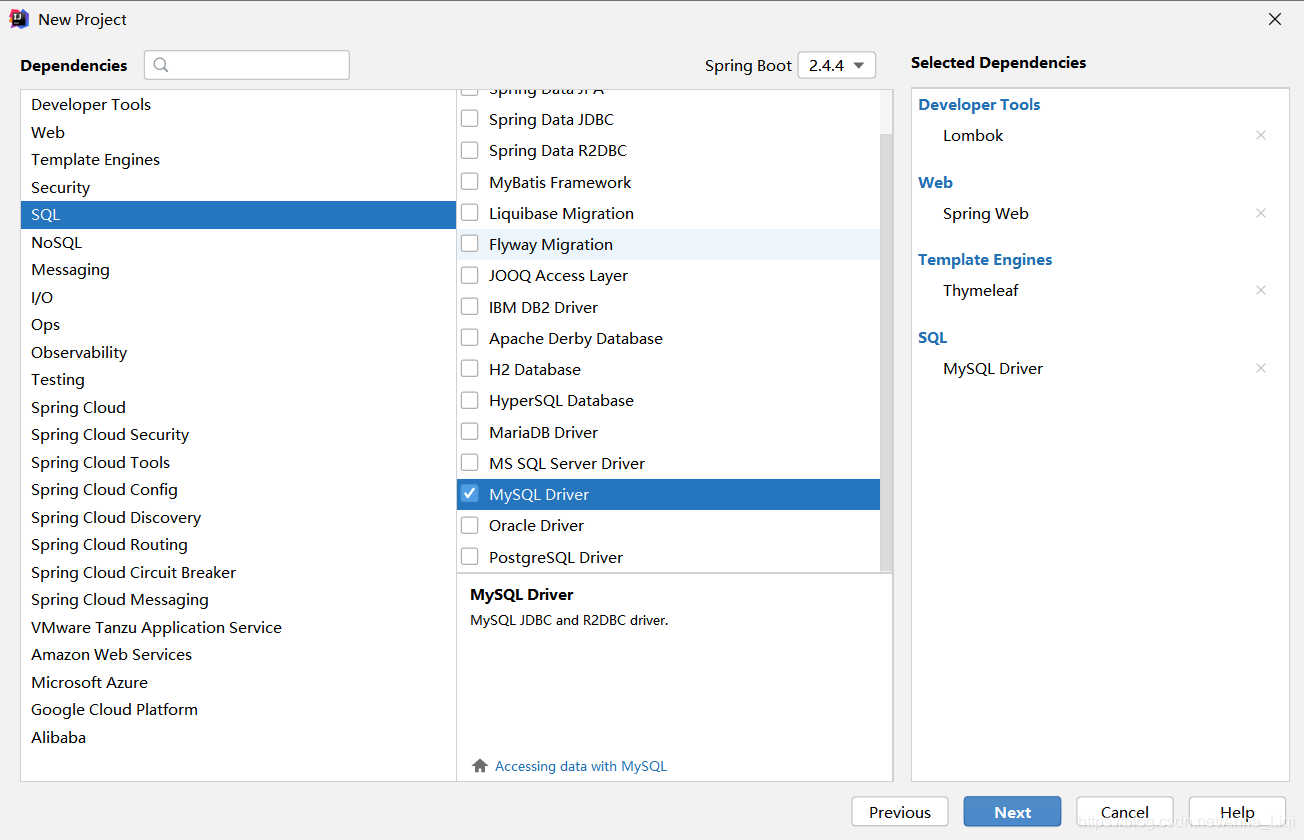
2、pom.xml 引入 MyBatis Plus 的依赖
<dependency>
    <groupId>com.baomidou</groupId>
    <artifactId>mybatis-plus-boot-starter</artifactId>
    <version>3.3.1.tmp</version>
</dependency>
3、创建实体类
package com.southwind.mybatisplus.entity;

import lombok.Data;

@Data
public class User {
    private Integer id;
    private String name;
    private Integer age;
}
4、创建 Mapper 接口
package com.southwind.mybatisplus.mapper;

import com.baomidou.mybatisplus.core.mapper.BaseMapper;
import com.southwind.mybatisplus.entity.User;

public interface UserMapper extends BaseMapper<User> {

}
5、application.yml
spring:
  datasource:
    driver-class-name: com.mysql.jdbc.Driver
    url: jdbc:mysql://localhost:3306/myabtisplus?useUnicode=true&characterEncoding=UTF-8
    username: root
    password: 123456
mybatis-plus:   # 这个类是专门打印日志的,就可以看到很详细的sql语句了
  configuration:
    log-impl: org.apache.ibatis.logging.stdout.StdOutImpl
6、创建实体类User
@Data
@TableName(value = "user")
public class User {
    private Integer id;
    private String name;
    private Integer age;
}
7、创建UserMapper,只要继承BaseMapper就可以了
public interface UserMapper extends BaseMapper<User> {
}
8、启动类需要添加 @MapperScan(“mapper所在的包”),否则无法加载 Mppaer bean。
import org.mybatis.spring.annotation.MapperScan;
import org.springframework.boot.SpringApplication;
import org.springframework.boot.autoconfigure.SpringBootApplication;

@SpringBootApplication
@MapperScan("com.fengbin.mybatisplus.mapper")
public class MybatisplusApplication {

    public static void main(String[] args) {
        SpringApplication.run(MybatisplusApplication.class, args);
    }

}
9、测试, 创建测试类UserMapperTest
package com.fengbin.mybatisplus.mapper;

import org.junit.jupiter.api.Test;
import org.springframework.beans.factory.annotation.Autowired;
import org.springframework.boot.test.context.SpringBootTest;

import javax.annotation.Resource;

import static org.junit.jupiter.api.Assertions.*;

@SpringBootTest
class UserMapperTest {

    @Autowired
    private UserMapper userMapper;

    @Test
    void test(){
        // 创建null表示不加条件,所有数据都会被查询出来。
        //userMapper.selectList(null);
        //我们使用foreach(System.out::println)打印出来,这是java8新特性
        userMapper.selectList(null).forEach(System.out::println);
    }
}
之所以可以这么写,主要是使用了动态代理的方式,动态生成实现类,根据类来创建对象,只有程序运行才可以看得到。
动态代理两种方式,mybatisplus使用的是 cglib 动态代理,还有一种叫jdk动态代理。
二、常用注解
1、@TableName
映射数据库的表名, 就比如我们将之前的User类改名为Accout,就会发现包表不存在错误,它是根据类型去查询的;就是如果实体类的名字跟数据库表名不一致,我们就可以使用@TableName进行映射。
import com.baomidou.mybatisplus.annotation.TableName;
import lombok.Data;

@Data
@TableName(value = "user")
public class Account {
    private Integer id;
    private String name;
    private Integer age;
}
2、@TableId 设置主键映射,
value 属性映射主键字段名
type 属性 设置主键类型,就是设置主键的生成策略;类型是用一组枚举来表示的,叫 IdType, 如下:
AUTO(0),
NONE(1),
INPUT(2),
ASSIGN_ID(3),
ASSIGN_UUID(4),
/** @deprecated */
@Deprecated
ID_WORKER(3),
/** @deprecated */
@Deprecated
ID_WORKER_STR(3),
/** @deprecated */
@Deprecated
UUID(4);
如果不写,默认类型就是NONE
2.1、下面我们测试None,我们将User修改一下:
@Data
@TableName(value = "user")
public class User {
    @TableId
    private Integer id;
    @TableField(value = "name")
    private String name;
    private Integer age;
}
运行测试类
// 测试主键生成策略 默认NONE
@Test
void save(){
    User user = new User();
    user.setName("车封闭");
    user.setAge(24);
    userMapper.insert(user);
}
发现报一下错误:
 报错解决方法:


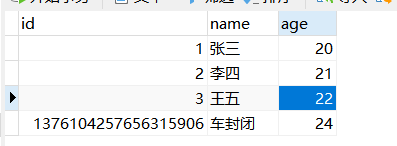
生成的主键如图:
2.2、下面我们测试INPUT,我们将User修改一下:
@Data
@TableName(value = "user")
public class User {
    @TableId(type = IdType.INPUT)
    private Long id;
    @TableField(value = "name")
    private String name;
    private Integer age;
}
测试save()方法:
@Test
void save(){
   User user = new User();
   user.setName("车封闭");
   user.setAge(24);
   userMapper.insert(user);
}
测试结果如下:可以插入,但是 id是为空的

可以存进去,但是id变成null了。
| 值 | 描述 |
|---|---|
| AUTO | 数据库自增 |
| NONE | MP set 主键,雪花算法实现 |
| INPUT | 需要开发者手动赋值 |
| ASSIGN_ID | MP 分配 ID,Long、Integer、String |
| ASSIGN_UUID | 分配 UUID,Strinig |
- INPUT 如果开发者没有手动赋值,则数据库通过自增的方式给主键赋值,如果开发者手动赋值,则存入该值。
- AUTO 默认就是数据库自增,开发者无需赋值。
- ASSIGN_ID MP 自动赋值,雪花算法。
- ASSIGN_UUID 主键的数据类型必须是 String,自动生成 UUID 进行赋值
3、@TableField
映射非主键字段,value 映射字段名
exist 表示是否为数据库字段 false,如果实体类中的成员变量在数据库中没有对应的字段,则可以使用 exist,VO、DTO
@Data
@TableName(value = "user")
public class User {
    @TableId(type = IdType.INPUT)
    private Long id;
    @TableField(value = "name")
    private String name;
    private Integer age;

    //默认是true,设置为false查询数据库的时候不会带上。即他不是数据库字段
    @TableField(exist = false)
    private String gender;
}
测试查询的结果如下:
4、select 表示是否查询该字段
测试的结果如下:


5、fill 表示是否自动填充,将对象存入数据库的时候,由 MyBatis Plus 自动给某些字段赋值,create_time、update_time
5.1、给表添加 create_time、update_time 字段
5.2、实体类中添加成员变量, create_time、update_time这两个的值,是由处理器做的,自动填充
- 创建时间只是INSERT,就是在创建的时候赋值,之后就不变了
- 更新时间是INSERT和UPDATE,创建的时候有值,更新后也要有的
import com.baomidou.mybatisplus.annotation.FieldFill;
import com.baomidou.mybatisplus.annotation.TableField;
import com.baomidou.mybatisplus.annotation.TableId;
import com.baomidou.mybatisplus.annotation.TableName;
import lombok.Data;

import java.util.Date;

@Data
@TableName(value = "user")
public class User {
    @TableId
    private String id;
    @TableField(value = "name",select = false)
    private String title;
    private Integer age;
    @TableField(exist = false)
    private String gender;

	//创建时间只是INSERT,就是在创建的时候赋值,之后就不变了
	// 更新时间是INSERT和UPDATE,创建的时候有值,更新后也要有的
    @TableField(fill = FieldFill.INSERT)
    private Date createTime;
    @TableField(fill = FieldFill.INSERT_UPDATE)
    private Date updateTime;
}
5.3、创建自动填充处理器
package com.fengbin.mybatisplus.handler;

import com.baomidou.mybatisplus.core.handlers.MetaObjectHandler;
import org.apache.ibatis.reflection.MetaObject;
import org.springframework.stereotype.Component;

import java.util.Date;

@Component
class MyMetaObjectHandler implements MetaObjectHandler {
    @Override
    public void insertFill(MetaObject metaObject) {
        this.setFieldValByName("createTime",new Date(),metaObject);
        this.setFieldValByName("updateTime",new Date(),metaObject);
    }

    @Override
    public void updateFill(MetaObject metaObject) {
        this.setFieldValByName("updateTime",new Date(),metaObject);
    }
}
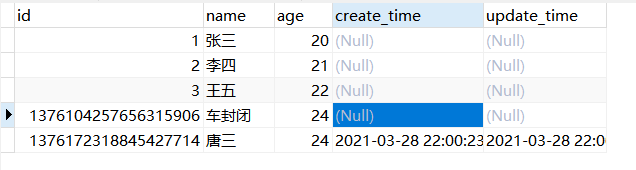
5.4、测试
测试之前的数据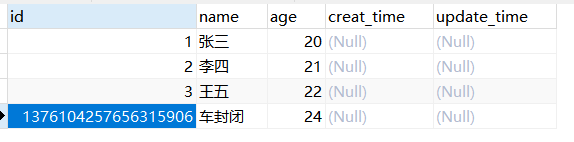
测试代码和结果:

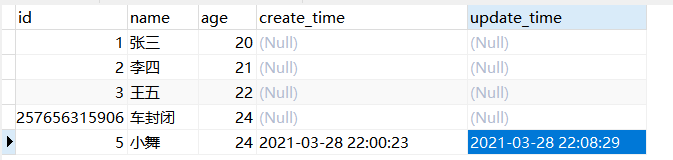
数据库中的数据:
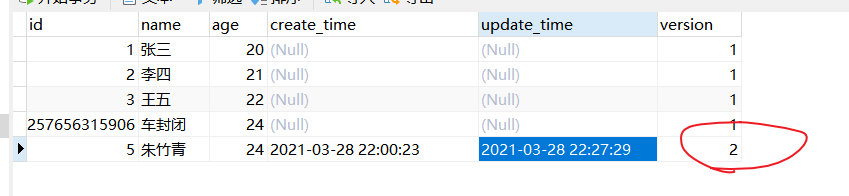
测试更新时间代码和结果: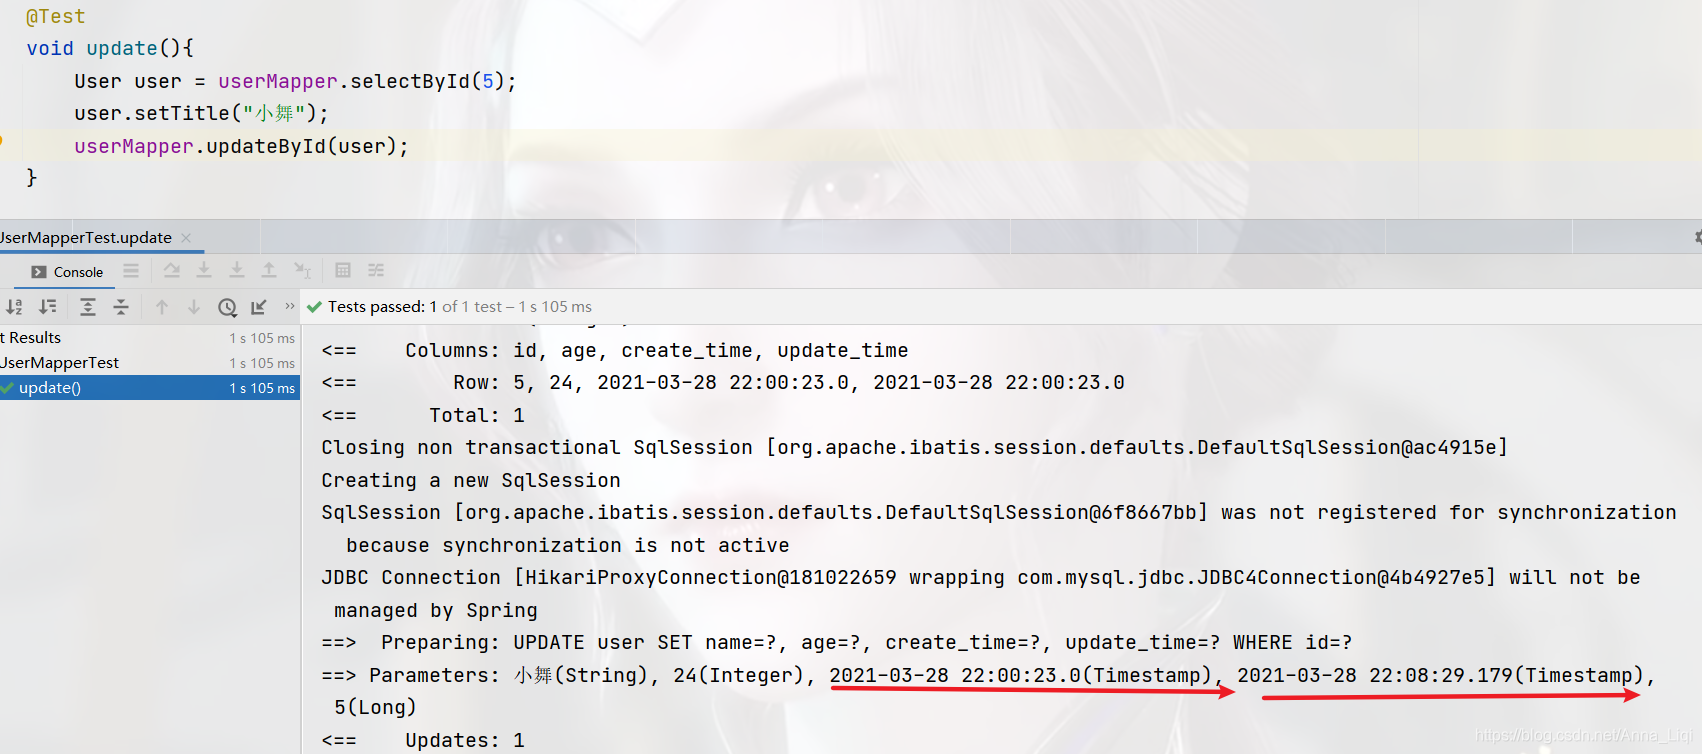
6、@Version
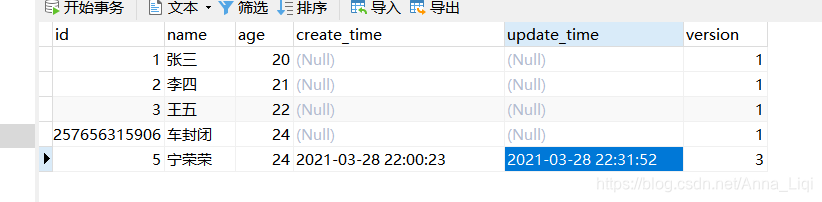
标记乐观锁,乐观锁就是通过 version 字段来保证数据的安全性,当修改数据的时候,会以 version 作为条件,当条件成立的时候才会修改成功。
version = 2 多线程的时候才会修改一次语句,并发的时候啦
线程 1:update … set version = 2 where version = 1(version=1成立就执行修改,修改之后version=2,同时有两个线程执行update就有这个问题)
线程2 :update … set version = 2 where version = 1
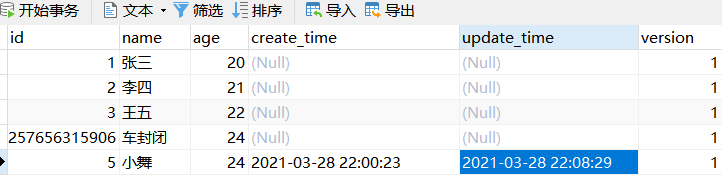
6.1、数据库表添加 version 字段,默认值为 1
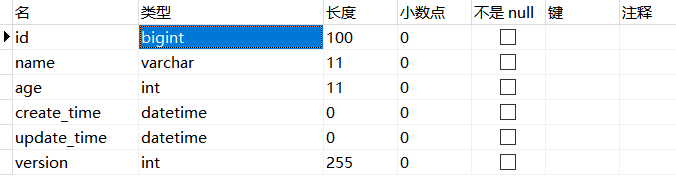
6.2、实体类添加 version 成员变量,并且添加 @Version
package com.southwind.mybatisplus.entity;

import com.baomidou.mybatisplus.annotation.*;
import lombok.Data;

import java.util.Date;

@Data
@TableName(value = "user")
public class User {
    @TableId
    private String id;
    @TableField(value = "name",select = false)
    private String title;
    private Integer age;
    @TableField(exist = false)
    private String gender;
    @TableField(fill = FieldFill.INSERT)
    private Date createTime;
    @TableField(fill = FieldFill.INSERT_UPDATE)
    private Date updateTime;
    @Version
    private Integer version;
}
3、注册配置类
import com.baomidou.mybatisplus.extension.plugins.OptimisticLockerInterceptor;
import org.springframework.context.annotation.Bean;
import org.springframework.context.annotation.Configuration;

@Configuration
public class MyBatisPlusConfig {

    // 返回一个乐观锁的拦截器
    @Bean
    public OptimisticLockerInterceptor optimisticLockerInterceptor(){
        return new OptimisticLockerInterceptor();
    }

}
测试代码如下:

我们测试同时操作:

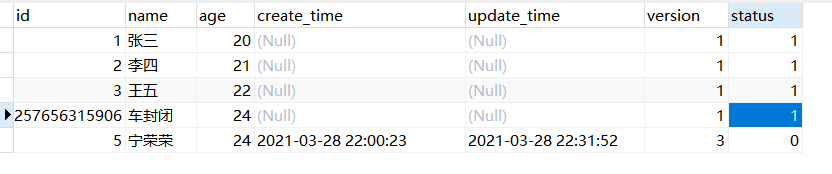
7、@EnumValue
添加字段

7.1、通用用枚举类注解,将数据库字段映射成实体类的枚举类型成员变量
第一种方式
package com.fengbin.mybatisplus.enums;

import com.baomidou.mybatisplus.annotation.EnumValue;

public enum StatusEnum {
    WORK(1,"上班"),// 就是数据库读到1,就映射成上班这个状态
    REST(0,"休息");

    StatusEnum(Integer code, String msg) {
        this.code = code;
        this.msg = msg;
    }

    @EnumValue
    private Integer code;
    private String msg;
}
7.2、修改java类
import com.baomidou.mybatisplus.annotation.*;
import com.southwind.mybatisplus.enums.StatusEnum;
import lombok.Data;

import java.util.Date;

@Data
@TableName(value = "user")
public class User {
    @TableId
    private String id;
    @TableField(value = "name",select = false)
    private String title;
    private Integer age;
    @TableField(exist = false)
    private String gender;
    @TableField(fill = FieldFill.INSERT)
    private Date createTime;
    @TableField(fill = FieldFill.INSERT_UPDATE)
    private Date updateTime;
    @Version
    private Integer version;
    private StatusEnum status;
}
7.3、在application.yml配置枚举包
type-enums-package:
  com.fengbin.mybatisplus.enums
7.4、测试代码如下,我们查询数据库中的数据,先看看查询之前的字段。

第二种方式: 实现接口
7.5、我们将age改为枚举
package com.fengbin.mybatisplus.enums;

import com.baomidou.mybatisplus.core.enums.IEnum;

/**
 * 实现接口,如果使用注解,直接加 @EnumValue
 */
public enum AgeEnum implements IEnum<Integer> {
    ONE(1,"一岁"),
    TWO(2,"两岁"),
    THREE(3,"三岁");

    private Integer code;
    private String msg;

    AgeEnum(Integer code, String msg) {
        this.code = code;
        this.msg = msg;
    }

    @Override
    public Integer getValue() {
        return this.code;
    }
}
7.6、实体类中要将age类型改为AgeEnum
@Data
@TableName(value = "user")
public class User {
    @TableId
    private long id;
    @TableField(value = "name",select = false)
    private String title;
    private AgeEnum age;    // 实现类的方式,需要将age改为AgeEnum
    @TableField(exist = false)
    private String gender;

    //创建时间只是INSERT,就是在创建的时候赋值,之后就不变了
    // 更新时间是INSERT和UPDATE,创建的时候有值,更新后也要有的
    @TableField(fill = FieldFill.INSERT)
    private Date createTime;
    @TableField(fill = FieldFill.INSERT_UPDATE)
    private Date updateTime;

    @Version
    private Integer version;
    private StatusEnum status;
}
8、@TableLogic : 映射逻辑删除
8.1、数据表添加 deleted 字段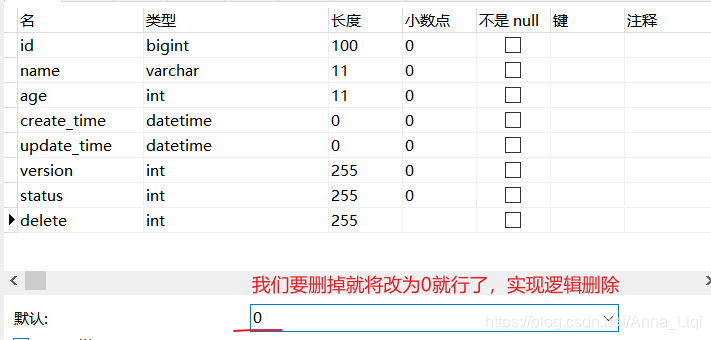
8.2、实体类添加注解
package com.southwind.mybatisplus.entity;

import com.baomidou.mybatisplus.annotation.*;
import com.southwind.mybatisplus.enums.AgeEnum;
import com.southwind.mybatisplus.enums.StatusEnum;
import lombok.Data;

import java.util.Date;

@Data
@TableName(value = "user")
public class User {
    @TableId
    private String id;
    @TableField(value = "name",select = false)
    private String title;
    private AgeEnum age;
    @TableField(exist = false)
    private String gender;
    @TableField(fill = FieldFill.INSERT)
    private Date createTime;
    @TableField(fill = FieldFill.INSERT_UPDATE)
    private Date updateTime;
    @Version
    private Integer version;
    @TableField(value = "status")
    private StatusEnum statusEnum;

    @TableLogic // 逻辑删除
    private Integer deleted;
}
8.3、application.yml 添加配置
global-config:
  db-config:
    logic-not-delete-value: 0 # 0表示没有删除
    logic-delete-value: 1     # 1表示没有删除
8.4、测试删除代码,

8.4、数据库中的字段变为*
8.5、数据仍然存在,但是我们执行查询语句,王五这条记录是查不出来的。**

三、查询
1、查询
    // 测试crud
    @Test
    void select(){
        //不加条件,进行全部查询
        userMapper.selectList(null);

        //单条件查询
        QueryWrapper wrapper = new QueryWrapper();
        wrapper.eq("name", "宁荣荣");
        System.out.println(userMapper.selectList(wrapper));

        System.out.println("______________________________");

        // 多条件查询
        QueryWrapper wrapper1 = new QueryWrapper();
        HashMap<String, Object> map = new HashMap<>();
        map.put("name", "宁荣荣");
        map.put("age", 4);
        wrapper1.allEq(map);
        wrapper1.gt("age", 4);      //年龄大于4
        wrapper1.ne("name", "宁荣荣"); //ne,不等于
        System.out.println(userMapper.selectList(wrapper1));
        System.out.println("_____________________________________");

        // 联合查询
        QueryWrapper wrapper2 = new QueryWrapper();
        //inSQL
        wrapper.inSql("id","select id from user where id < 10");
        wrapper.inSql("age","select age from user where age > 1");
        System.out.println(userMapper.selectList(wrapper2));
    }
inSQL查询控制台打印的SQL语句, 如图:

 //排序, 按照年龄升序
        QueryWrapper wrapper3 = new QueryWrapper();
        wrapper3.orderByAsc("age");
        // 升序的时候,可加上条件,筛选出id>8的字段
        wrapper3.having("id > 8");
        userMapper.selectList(wrapper3).forEach(System.out::println);
//        System.out.println(mapper.selectById(7));
//        mapper.selectBatchIds(Arrays.asList(7,8,9)).forEach(System.out::println);

//Map 只能做等值判断,逻辑判断需要使用 Wrapper 来处理
//        Map<String,Object> map = new HashMap<>();
//        map.put("id",7);
//        mapper.selectByMap(map).forEach(System.out::println);

QueryWrapper wrapper = new QueryWrapper();
wrapper.eq("id",7);
        System.out.println(mapper.selectCount(wrapper));
//
//        //将查询的结果集封装到Map中
//        mapper.selectMaps(wrapper).forEach(System.out::println);
//        System.out.println("-------------------");
//        mapper.selectList(wrapper).forEach(System.out::println);

//分页查询, 我们在使用分页的时候,应该注入一个拦截器,在MyBatisPlusConfig类中进行配置,加入到IOC容器中
//        Page<User> page = new Page<>(2,2);
//        Page<User> result = mapper.selectPage(page,null);
//        System.out.println(result.getSize());
//        System.out.println(result.getTotal());
//        result.getRecords().forEach(System.out::println);

//        Page<Map<String,Object>> page = new Page<>(1,2);
//        mapper.selectMapsPage(page,null).getRecords().forEach(System.out::println);

//        mapper.selectObjs(null).forEach(System.out::println);


System.out.println(mapper.selectOne(wrapper));
2、自定义 SQL(多表关联查询)
2.1 vo, 结果集我们映射到vo里面
import lombok.Data;

@Data
public class ProductVO {
    private Integer category;
    private Integer count;
    private String description;
    private Integer userId;
    private String userName;
}
2.2、手写sql,加上注解@Select注解
import com.baomidou.mybatisplus.core.mapper.BaseMapper;
import com.southwind.mybatisplus.entity.ProductVO;
import com.southwind.mybatisplus.entity.User;
import org.apache.ibatis.annotations.Select;

import java.util.List;

public interface UserMapper extends BaseMapper<User> {
    @Select("select p.*,u.name userName from product p,user u where p.user_id = u.id and u.id = #{id}")
    List<ProductVO> productList(Integer id);
}
2.3、测试自定义查询,一对一查询
添加
User user = new User();
user.setTitle("小明");
user.setAge(22);
mapper.insert(user);
System.out.println(user);
删除
//mapper.deleteById(1);
//        mapper.deleteBatchIds(Arrays.asList(7,8));
//        QueryWrapper wrapper = new QueryWrapper();
//        wrapper.eq("age",14);
//        mapper.delete(wrapper);

Map<String,Object> map = new HashMap<>();
map.put("id",10);
mapper.deleteByMap(map);
修改
//        //update ... version = 3 where version = 2
//        User user = mapper.selectById(7);
//        user.setTitle("一号");
//
//        //update ... version = 3 where version = 2
//        User user1 = mapper.selectById(7);
//        user1.setTitle("二号");
//
//        mapper.updateById(user1);
//        mapper.updateById(user);

User user = mapper.selectById(1);
user.setTitle("小红");
QueryWrapper wrapper = new QueryWrapper();
wrapper.eq("age",22);
mapper.update(user,wrapper);
四、MyBatisPlus 自动生成
根据数据表自动生成实体类、Mapper、Service、ServiceImpl、Controller
1、pom.xml 导入 MyBatis Plus Generator
<dependency>
    <groupId>com.baomidou</groupId>
    <artifactId>mybatis-plus-generator</artifactId>
    <version>3.3.1.tmp</version>
</dependency>

<dependency>
    <groupId>org.apache.velocity</groupId>
    <artifactId>velocity</artifactId>
    <version>1.7</version>
</dependency>
Velocity(默认)、Freemarker、Beetl
2、启动类
package com.fengbin.mybatisplus;

import com.baomidou.mybatisplus.annotation.DbType;
import com.baomidou.mybatisplus.generator.AutoGenerator;
import com.baomidou.mybatisplus.generator.config.DataSourceConfig;
import com.baomidou.mybatisplus.generator.config.GlobalConfig;
import com.baomidou.mybatisplus.generator.config.PackageConfig;
import com.baomidou.mybatisplus.generator.config.StrategyConfig;
import com.baomidou.mybatisplus.generator.config.rules.NamingStrategy;

public class Main {
    public static void main(String[] args) {
        //创建generator对象, 对这个对象进行操作进行了
        AutoGenerator autoGenerator = new AutoGenerator();
        //数据源
        DataSourceConfig dataSourceConfig = new DataSourceConfig();
        dataSourceConfig.setDbType(DbType.MYSQL);
        dataSourceConfig.setUrl("jdbc:mysql://localhost:3306/test?useUnicode=true&characterEncoding=UTF-8");
        dataSourceConfig.setUsername("root");
        dataSourceConfig.setPassword("123456");
        dataSourceConfig.setDriverName("com.mysql.jdbc.Driver");
        autoGenerator.setDataSource(dataSourceConfig);
        //全局配置
        GlobalConfig globalConfig = new GlobalConfig();
        globalConfig.setOutputDir(System.getProperty("user.dir")+"/src/main/java");//user.dir来到当前工程
        globalConfig.setOpen(false);    //创建完是否自动打开
        globalConfig.setAuthor("chenfengbin");
        globalConfig.setServiceName("%sService");
        autoGenerator.setGlobalConfig(globalConfig);

        //包信息
        PackageConfig packageConfig = new PackageConfig();
        packageConfig.setParent("com.fengbin"); //父包
        packageConfig.setModuleName("mybatisplusgenerator");
        packageConfig.setController("controller");
        packageConfig.setService("service");
        packageConfig.setServiceImpl("service.impl");
        packageConfig.setMapper("mapper");
        packageConfig.setEntity("entity");
        autoGenerator.setPackageInfo(packageConfig);

        //配置策略
        StrategyConfig strategyConfig = new StrategyConfig();
        strategyConfig.setEntityLombokModel(true);  //加上lombok
        strategyConfig.setNaming(NamingStrategy.underline_to_camel);
        strategyConfig.setColumnNaming(NamingStrategy.underline_to_camel);
        autoGenerator.setStrategy(strategyConfig);

        autoGenerator.execute();
    }
}
五、Spring Boot + MyBatis Plus 打包应用,直接发布 阿里云 上云
1.打包,我们直接使用maven中的打包就行了,双击pakage
学习了一遍,是不是感觉跟没学差不多,在多看一遍吧!!!!!!!!!


 5476
5476


 被折叠的 条评论
为什么被折叠?
被折叠的 条评论
为什么被折叠?
 到【灌水乐园】发言


