 Swift中手势与动画实战


二十一、手势识别:UIGestureRecognizer
UIGestureRecognizer 是用于识别用户触摸手势的抽象基类,UIKit 提供多种具体手势子类(如点击、长按、滑动、拖曳、缩放、旋转),通过绑定 target-action 或代理,实现手势与视图的交互,适用于自定义交互(如图片缩放、视图拖曳)。
21.1 核心手势类型与功能
| 手势类型 | 核心功能 | 适用场景 |
|---|---|---|
UITapGestureRecognizer | 点击(单指/多指、单击/多击) | 按钮点击、列表项选中、图片查看 |
UILongPressGestureRecognizer | 长按(指定长按时间) | 弹出菜单、删除确认、预览内容 |
UISwipeGestureRecognizer | 滑动(上下左右方向) | 页面返回、删除项、显示隐藏菜单 |
UIPanGestureRecognizer | 拖曳(实时跟踪触摸位置) | 视图移动、滑块调整、画板绘图 |
UIPinchGestureRecognizer | 缩放(双指捏合/张开) | 图片放大缩小、文本字号调整 |
UIRotationGestureRecognizer | 旋转(双指旋转) | 图片旋转、图形调整 |
21.2 关键属性与方法
| 手势类型 | 关键属性/方法 | 作用说明 |
|---|---|---|
| Tap(点击) | numberOfTapsRequired | 触发手势需点击的次数(如 2 表示双击) |
numberOfTouchesRequired | 触发手势需的手指数量(如 2 表示双指点击) | |
require(toFail:) | 依赖其他手势失败后才触发(如单双击冲突时,双击失败才触发单击) | |
| LongPress(长按) | minimumPressDuration | 触发长按需的最小时间(默认 0.5 秒) |
| Swipe(滑动) | direction | 滑动方向(如 .up/.left,需单独创建不同方向的手势) |
| Pan(拖曳) | location(in:) | 获取拖曳时的当前位置(相对于指定视图) |
| Pinch(缩放) | scale | 缩放比例(1.0 为原尺寸,>1 放大,<1 缩小) |
| Rotation(旋转) | rotation | 旋转弧度(正为顺时针,负为逆时针,需转换为角度 弧度×(180/π)) |
| 通用 | addTarget(_:action:for:) | 绑定手势触发的方法(action 为回调 selector) |
state | 手势状态(如 .began/.changed/.ended,用于区分手势阶段) |
21.3 代码逻辑解析
场景1:点击(Tap)与长按(LongPress)
class ViewController: UIViewController {
    override func viewDidLoad() {
        super.viewDidLoad()

        // 1. 双指单击手势
        let doubleFingerTap = UITapGestureRecognizer(target: self, action: #selector(doubleTap(_:)))
        doubleFingerTap.numberOfTapsRequired = 1 // 单击
        doubleFingerTap.numberOfTouchesRequired = 2 // 双指
        view.addGestureRecognizer(doubleFingerTap)

        // 2. 单指双击手势(依赖双指单击失败才触发)
        let singleFingerDoubleTap = UITapGestureRecognizer(target: self, action: #selector(singleTap(_:)))
        singleFingerDoubleTap.numberOfTapsRequired = 2 // 双击
        singleFingerDoubleTap.numberOfTouchesRequired = 1 // 单指
        singleFingerDoubleTap.require(toFail: doubleFingerTap) // 双指单击失败才触发
        view.addGestureRecognizer(singleFingerDoubleTap)

        // 3. 长按手势
        let longPress = UILongPressGestureRecognizer(target: self, action: #selector(longPress(_:)))
        view.addGestureRecognizer(longPress)
    }

    // 双指单击回调
    @objc func doubleTap(_ recognizer: UITapGestureRecognizer) {
        print("双指单击触发")
        printFingersPosition(recognizer) // 打印手指位置
    }

    // 单指双击回调
    @objc func singleTap(_ recognizer: UITapGestureRecognizer) {
        print("单指双击触发")
        printFingersPosition(recognizer)
    }

    // 长按回调(区分开始和结束状态)
    @objc func longPress(_ recognizer: UILongPressGestureRecognizer) {
        if recognizer.state == .began {
            print("长按开始")
        } else if recognizer.state == .ended {
            print("长按结束")
        }
    }

    // 打印手指位置
    func printFingersPosition(_ recognizer: UITapGestureRecognizer) {
        let fingerCount = recognizer.numberOfTouches
        for i in 0..<fingerCount {
            let position = recognizer.location(ofTouch: i, in: view)
            print("第 \(i+1) 指位置:x=\(position.x), y=\(position.y)")
        }
    }
}
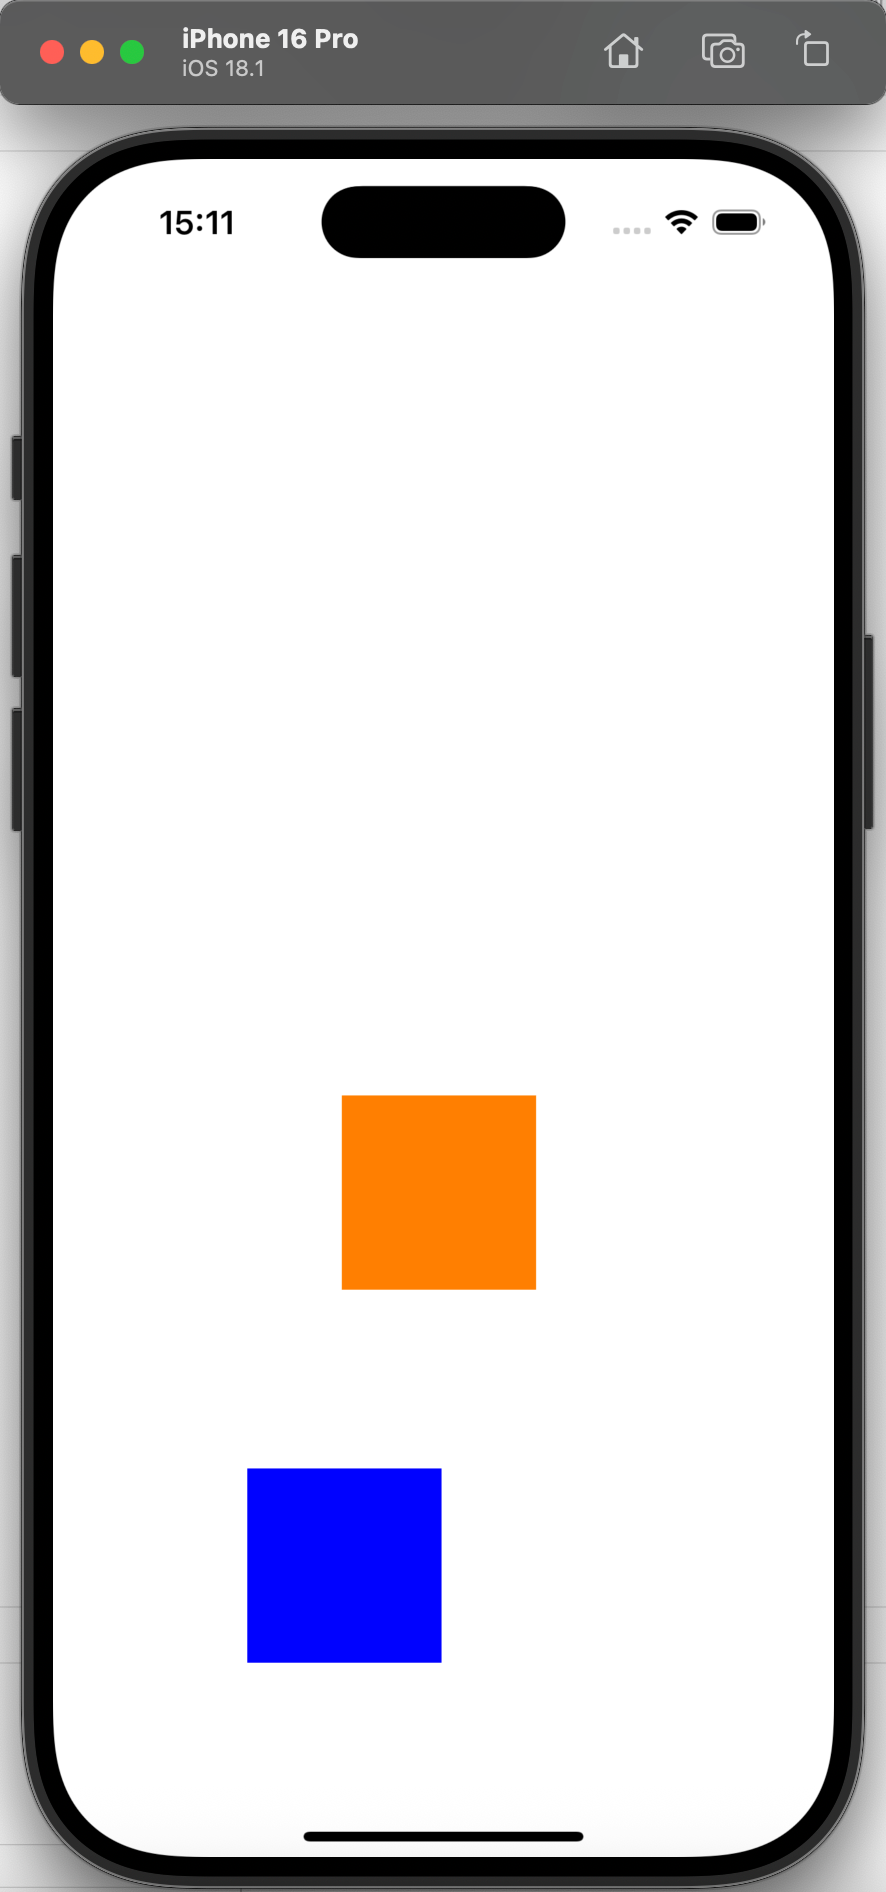
场景2:拖曳(Pan)与滑动(Swipe)
class ViewController: UIViewController {
    let fullSize = UIScreen.main.bounds.size
    var draggableView: UIView! // 可拖曳的视图
    var swipeableView: UIView! // 可滑动的视图

    override func viewDidLoad() {
        super.viewDidLoad()

        // 1. 可滑动的视图(蓝色,初始在左上角)
        swipeableView = UIView(frame: CGRect(x: 0, y: 0, width: 100, height: 100))
        swipeableView.backgroundColor = .blue
        view.addSubview(swipeableView)

        // 2. 滑动手势(上下左右四个方向,需单独创建)
        let swipeUp = UISwipeGestureRecognizer(target: self, action: #selector(swipe(_:)))
        swipeUp.direction = .up
        view.addGestureRecognizer(swipeUp)

        let swipeLeft = UISwipeGestureRecognizer(target: self, action: #selector(swipe(_:)))
        swipeLeft.direction = .left
        view.addGestureRecognizer(swipeLeft)

        let swipeDown = UISwipeGestureRecognizer(target: self, action: #selector(swipe(_:)))
        swipeDown.direction = .down
        view.addGestureRecognizer(swipeDown)

        let swipeRight = UISwipeGestureRecognizer(target: self, action: #selector(swipe(_:)))
        swipeRight.direction = .right
        view.addGestureRecognizer(swipeRight)

        // 3. 可拖曳的视图(橙色,初始在屏幕中央)
        draggableView = UIView(frame: CGRect(x: 0, y: 0, width: 100, height: 100))
        draggableView.backgroundColor = .orange
        draggableView.center = CGPoint(x: fullSize.width * 0.5, y: fullSize.height * 0.5)
        view.addSubview(draggableView)

        // 4. 拖曳手势(绑定到可拖曳视图,仅该视图响应)
        let pan = UIPanGestureRecognizer(target: self, action: #selector(pan(_:)))
        pan.minimumNumberOfTouches = 1 // 最少1指
        pan.maximumNumberOfTouches = 1 // 最多1指
        draggableView.addGestureRecognizer(pan)
    }

    // 滑动手势回调:视图移动100pt(边界限制)
    @objc func swipe(_ recognizer: UISwipeGestureRecognizer) {
        let currentCenter = swipeableView.center
        switch recognizer.direction {
        case .up:
            let newY = currentCenter.y - 100
            swipeableView.center = CGPoint(x: currentCenter.x, y: max(newY, 50)) // 不超过顶部50pt
        case .left:
            let newX = currentCenter.x - 100
            swipeableView.center = CGPoint(x: max(newX, 50), y: currentCenter.y) // 不超过左侧50pt
        case .down:
            let newY = currentCenter.y + 100
            swipeableView.center = CGPoint(x: currentCenter.x, y: min(newY, fullSize.height - 50)) // 不超过底部50pt
        case .right:
            let newX = currentCenter.x + 100
            swipeableView.center = CGPoint(x: min(newX, fullSize.width - 50), y: currentCenter.y) // 不超过右侧50pt
        default: break
        }
    }

    // 拖曳手势回调:视图跟随手指移动
    @objc func pan(_ recognizer: UIPanGestureRecognizer) {
        // 获取手指相对于父视图的位置
        let fingerPosition = recognizer.location(in: view)
        // 视图中心设为手指位置
        draggableView.center = fingerPosition
    }
}
场景3:缩放(Pinch)与旋转(Rotation)
class ViewController: UIViewController {
    let fullSize = UIScreen.main.bounds.size
    var pinchImageView: UIImageView! // 可缩放的图片
    var rotationImageView: UIImageView! // 可旋转的图片

    override func viewDidLoad() {
        super.viewDidLoad()

        // 1. 可缩放的图片(01.jpg,初始在左上角)
        pinchImageView = UIImageView(image: UIImage(named: "01.jpg"))
        pinchImageView.frame = CGRect(x: 50, y: 50, width: 200, height: 200)
        view.addSubview(pinchImageView)

        // 2. 缩放手势(绑定到父视图,整个屏幕可触发)
        let pinch = UIPinchGestureRecognizer(target: self, action: #selector(pinch(_:)))
        view.addGestureRecognizer(pinch)

        // 3. 可旋转的图片(02.jpg,初始在屏幕下方中央)
        rotationImageView = UIImageView(image: UIImage(named: "02.jpg"))
        rotationImageView.frame = CGRect(x: 0, y: 0, width: 200, height: 200)
        rotationImageView.center = CGPoint(x: fullSize.width * 0.5, y: fullSize.height * 0.75)
        view.addSubview(rotationImageView)

        // 4. 旋转手势(绑定到父视图)
        let rotation = UIRotationGestureRecognizer(target: self, action: #selector(rotation(_:)))
        view.addGestureRecognizer(rotation)
    }

    // 缩放手势回调:限制缩放范围(0.5~2倍)
    @objc func pinch(_ recognizer: UIPinchGestureRecognizer) {
        guard let imageView = pinchImageView else { return }
        let currentFrame = imageView.frame

        // 缩放比例(实时更新)
        let scale = recognizer.scale
        // 计算新尺寸
        let newWidth = currentFrame.width * scale
        let newHeight = currentFrame.height * scale

        // 限制缩放范围:宽度100~400pt
        if newWidth > 100 && newWidth < 400 {
            imageView.frame = CGRect(
                x: currentFrame.origin.x,
                y: currentFrame.origin.y,
                width: newWidth,
                height: newHeight
            )
        }

        // 重置scale(避免累积缩放)
        if recognizer.state == .ended {
            recognizer.scale = 1.0
        }
    }

    // 旋转手势回调:根据弧度旋转图片
    @objc func rotation(_ recognizer: UIRotationGestureRecognizer) {
        guard let imageView = rotationImageView else { return }
        // 旋转弧度(recognizer.rotation 为从初始位置的累积弧度)
        let radian = recognizer.rotation
        // 转换为角度(便于打印)
        let angle = radian * (180 / CGFloat(Double.pi))
        print("旋转角度:\(angle)°")

        // 应用旋转变换(相对于图片中心)
        imageView.transform = CGAffineTransform(rotationAngle: radian)

        // 重置rotation(可选,根据需求决定是否累积旋转)
        if recognizer.state == .ended {
            recognizer.rotation = 0.0
        }
    }
}

21.4 注意事项
-
手势冲突:多个手势可能冲突(如单双击、滑动与拖曳),可通过
require(toFail:)设定依赖关系,或在代理方法gestureRecognizer(_:shouldRecognizeSimultaneouslyWith:)允许同时识别; -
手势绑定对象:手势绑定到哪个视图,只有该视图及其子视图的触摸才会触发手势(如拖曳手势绑定到
draggableView,仅拖曳该视图时触发); -
状态区分:部分手势(如 LongPress、Pinch)有多个状态(
.began/.changed/.ended),需根据状态处理逻辑(如长按开始显示菜单,结束隐藏菜单); -
坐标系统:
location(in:)方法的参数决定坐标相对于哪个视图(如in: view为父视图坐标,in: draggableView为视图自身坐标),需根据需求选择。
二十二、视图动画:UIView Animation
UIView Animation 是用于实现基础视图动画的 API,无需复杂动画框架,通过 UIView.animate(withDuration:) 系列方法,即可实现视图属性(如位置、大小、透明度、颜色)的平滑过渡,适用于页面切换、控件交互反馈、数据加载动画等场景。
22.1 核心功能
- 支持多种视图属性动画:
bounds(大小)、center(位置)、alpha(透明度)、backgroundColor(背景色)、transform(旋转/缩放/平移); - 自定义动画参数:时长、延迟、过渡曲线(如
curveEaseIn/curveEaseOut)、弹簧效果; - 组合动画:同时对多个属性执行动画;
- 动画回调:
completion闭包在动画结束后执行,用于后续操作。
22.2 关键方法与参数
| 类别 | 方法/参数 | 作用说明 |
|---|---|---|
| 基础动画 | UIView.animate(withDuration:animations:) | 基础动画:指定时长和动画闭包(需修改的视图属性) |
| 带延迟与曲线 | UIView.animate(withDuration:delay:options:animations:completion:) | 进阶动画:指定延迟时间、过渡曲线、动画闭包、结束回调 |
| 弹簧动画 | UIView.animate(withDuration:delay:usingSpringWithDamping:initialSpringVelocity:options:animations:completion:) | 弹簧动画:usingSpringWithDamping(弹性,0~1,越小越弹)、initialSpringVelocity(初始速度) |
| 动画属性 | bounds | 视图大小动画(如从 50×50 变为 150×150) |
center | 视图位置动画(如从左上角移动到右下角) | |
alpha | 透明度动画(如从 1.0 变为 0.25,实现淡入淡出) | |
backgroundColor | 背景色动画(如从黑色变为蓝色) | |
transform | 变换动画(旋转 rotationAngle、缩放 scale、平移 translation) | |
| 过渡曲线 | options: .curveEaseIn | 先慢后快(适用于进入动画) |
options: .curveEaseOut | 先快后慢(适用于退出动画) | |
options: .curveEaseInOut | 先慢后快再慢(默认,适用于大多数场景) |
22.3 代码逻辑解析
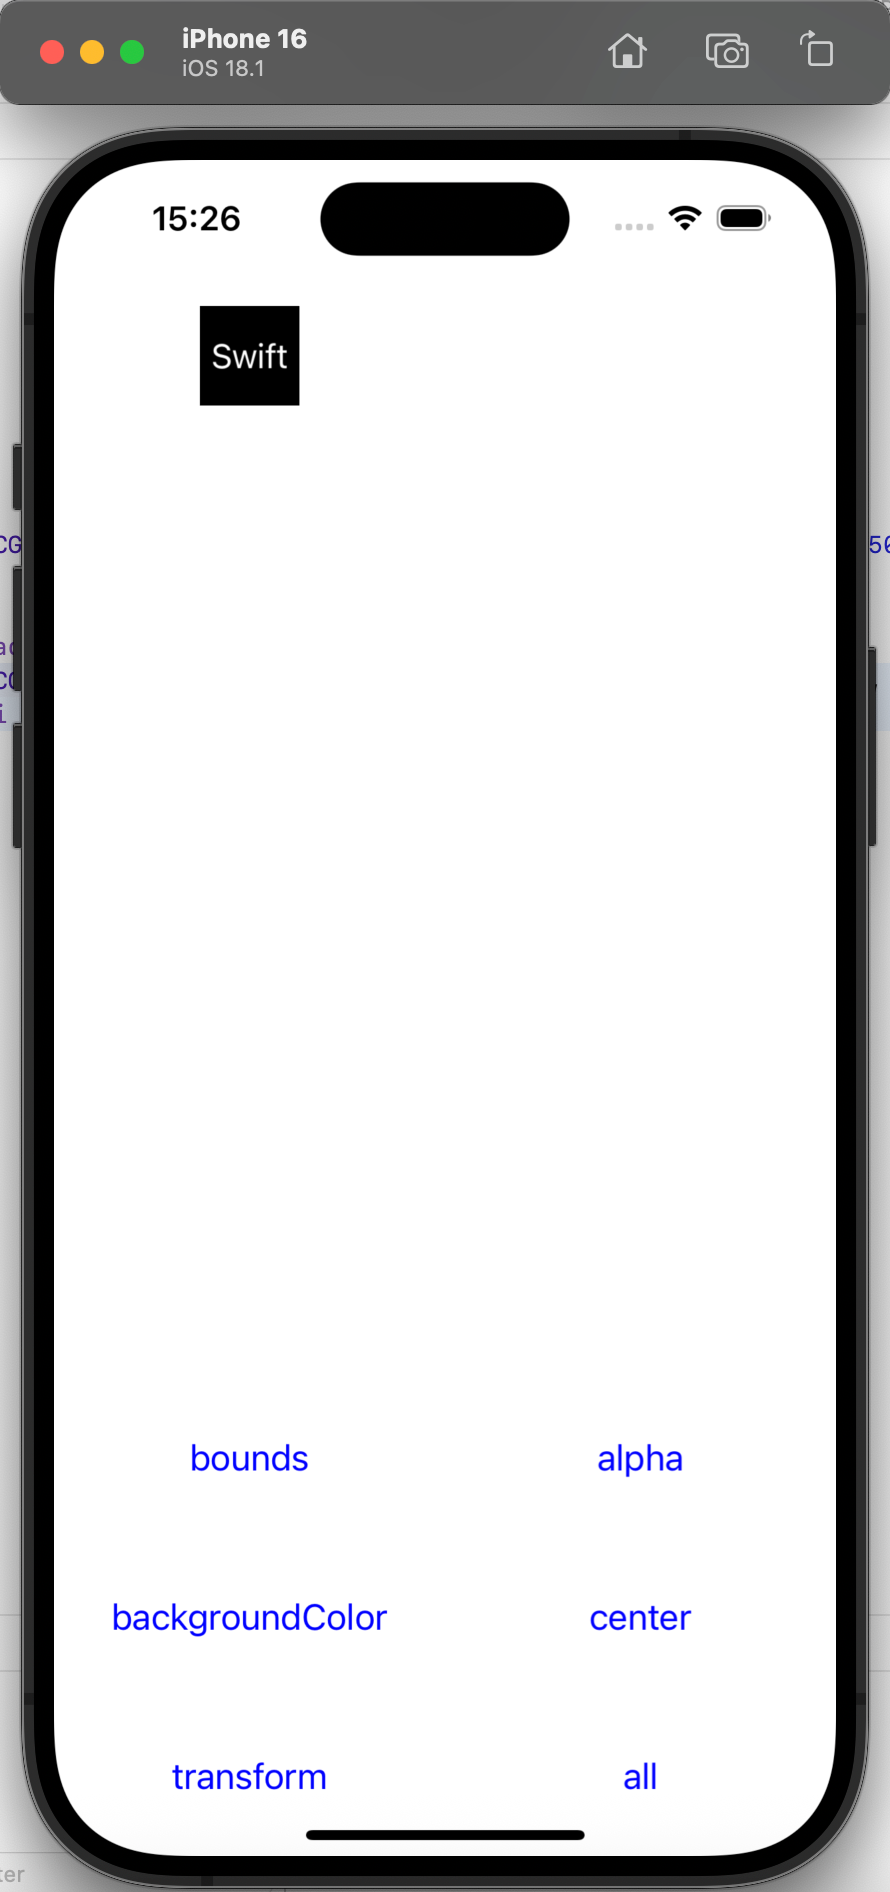
场景1:单个属性动画(透明度、背景色)
class ViewController: UIViewController {
    let fullSize = UIScreen.main.bounds.size
    var animateLabel: UILabel! // 动画目标视图(标签)
    // 动画参数数组(循环切换)
    let arrAlpha = [0.25, 0.75, 0.5, 1.0]
    let arrBackgroundColor = [UIColor.cyan, UIColor.green, UIColor.orange, UIColor.black]
    var indexAlpha = 0 // 透明度参数索引
    var indexBgColor = 0 // 背景色参数索引

    override func viewDidLoad() {
        super.viewDidLoad()
        createAnimateLabelAndButtons()
    }

    // 创建动画目标标签和控制按钮
    func createAnimateLabelAndButtons() {
        // 1. 动画目标标签(显示“Swift”,初始在左上角)
        animateLabel = UILabel(frame: CGRect(x: 0, y: 0, width: 50, height: 50))
        animateLabel.text = "Swift"
        animateLabel.textColor = .white
        animateLabel.textAlignment = .center
        animateLabel.backgroundColor = .black
        animateLabel.center = CGPoint(x: fullSize.width * 0.25, y: fullSize.height * 0.25)
        view.addSubview(animateLabel)

        // 2. 透明度动画按钮
        let alphaBtn = UIButton(frame: CGRect(x: 0, y: 0, width: fullSize.width * 0.5, height: 80))
        alphaBtn.setTitle("alpha", for: .normal)
        alphaBtn.setTitleColor(.blue, for: .normal)
        alphaBtn.addTarget(self, action: #selector(AnimateAlpha), for: .touchUpInside)
        alphaBtn.center = CGPoint(x: fullSize.width * 0.75, y: fullSize.height - 2.5 * 80)
        view.addSubview(alphaBtn)

        // 3. 背景色动画按钮
        let bgColorBtn = UIButton(frame: CGRect(x: 0, y: 0, width: fullSize.width * 0.5, height: 80))
        bgColorBtn.setTitle("backgroundColor", for: .normal)
        bgColorBtn.setTitleColor(.blue, for: .normal)
        bgColorBtn.addTarget(self, action: #selector(AnimateBackgroundColor), for: .touchUpInside)
        bgColorBtn.center = CGPoint(x: fullSize.width * 0.25, y: fullSize.height - 1.5 * 80)
        view.addSubview(bgColorBtn)
    }

    // 透明度动画(0.5秒,带延迟0.2秒,先慢后快曲线)
    @objc func AnimateAlpha() {
        UIView.animate(withDuration: 0.5, animations: {
            self.animateLabel.alpha = CGFloat(self.arrAlpha[self.indexAlpha])
        }, completion: { _ in
            print("透明度动画完成")
        })
        // 更新索引(循环切换参数)
        indexAlpha = indexAlpha >= 3 ? 0 : indexAlpha + 1
    }

    // 背景色动画(1秒,延迟0.2秒,先慢后快曲线)
    @objc func AnimateBackgroundColor() {
        UIView.animate(withDuration: 1, delay: 0.2, options: .curveEaseIn, animations: {
            self.animateLabel.backgroundColor = self.arrBackgroundColor[self.indexBgColor]
        }, completion: { _ in
            print("背景色动画完成")
        })
        // 更新索引(循环切换参数)
        indexBgColor = indexBgColor >= 3 ? 0 : indexBgColor + 1
    }
}
场景2:位置与变换动画(带弹簧效果)
class ViewController: UIViewController {
    let fullSize = UIScreen.main.bounds.size
    var animateLabel: UILabel!
    let arrCenter = [ // 位置参数数组(四角+中心)
        CGPoint(x: fullSize.width * 0.75, y: fullSize.height * 0.25),
        CGPoint(x: fullSize.width * 0.75, y: fullSize.height * 0.75),
        CGPoint(x: fullSize.width * 0.25, y: fullSize.height * 0.75),
        CGPoint(x: fullSize.width * 0.25, y: fullSize.height * 0.25)
    ]
    let arrTransform = [ // 旋转参数数组(45°、225°、315°、360°)
        CGAffineTransform(rotationAngle: CGFloat(Double.pi * 0.25)),
        CGAffineTransform(rotationAngle: CGFloat(Double.pi * 1.25)),
        CGAffineTransform(rotationAngle: CGFloat(Double.pi * 1.75)),
        CGAffineTransform(rotationAngle: CGFloat(Double.pi * 2))
    ]
    var indexCenter = 0
    var indexTransform = 0

    // 位置动画(带弹簧效果)
    @objc func AnimateCenter() {
        UIView.animate(withDuration: 1.5, delay: 0.1,
            usingSpringWithDamping: 0.4, // 弹性:0.4(较弹)
            initialSpringVelocity: 0,    // 初始速度:0
            options: .curveEaseInOut,
            animations: {
                self.animateLabel.center = self.arrCenter[self.indexCenter]
            }, completion: { _ in
                print("位置动画完成")
            }
        )
        indexCenter = indexCenter >= 3 ? 0 : indexCenter + 1
    }

    // 旋转动画(0.5秒)
    @objc func AnimateTransform() {
        UIView.animate(withDuration: 0.5, animations: {
            self.animateLabel.transform = self.arrTransform[self.indexTransform]
        })
        indexTransform = indexTransform >= 3 ? 0 : indexTransform + 1
    }
}
场景3:组合动画(同时修改多个属性)
class ViewController: UIViewController {
    let fullSize = UIScreen.main.bounds.size
    var animateLabel: UILabel!
    let arrBounds = [ // 大小参数数组
        CGSize(width: 100, height: 100),
        CGSize(width: 50, height: 50),
        CGSize(width: 150, height: 150),
        CGSize(width: 50, height: 50)
    ]
    var indexBounds = 0
    var indexAlpha = 0
    var indexBgColor = 0
    var indexCenter = 0
    var indexTransform = 0

    // 组合动画:同时修改大小、透明度、背景色、位置、旋转
    @objc func AnimateAll() {
        let newSize = arrBounds[indexBounds]
        let originCenter = animateLabel.center // 保持中心不变(避免大小变化导致位置偏移)

        UIView.animate(withDuration: 0.5, animations: {
            // 1. 大小动画(bounds)
            self.animateLabel.bounds = CGRect(x: 0, y: 0, width: newSize.width, height: newSize.height)
            // 2. 透明度动画
            self.animateLabel.alpha = CGFloat(self.arrAlpha[self.indexAlpha])
            // 3. 背景色动画
            self.animateLabel.backgroundColor = self.arrBackgroundColor[self.indexBgColor]
            // 4. 位置动画
            self.animateLabel.center = self.arrCenter[self.indexCenter]
            // 5. 旋转动画
            self.animateLabel.transform = self.arrTransform[self.indexTransform]
        })

        // 更新所有参数索引
        updateIndex("all")
    }

    // 更新参数索引(循环)
    func updateIndex(_ type: String) {
        if type == "all" {
            indexBounds = indexBounds >= 3 ? 0 : indexBounds + 1
            indexAlpha = indexAlpha >= 3 ? 0 : indexAlpha + 1
            indexBgColor = indexBgColor >= 3 ? 0 : indexBgColor + 1
            indexCenter = indexCenter >= 3 ? 0 : indexCenter + 1
            indexTransform = indexTransform >= 3 ? 0 : indexTransform + 1
        }
    }
}
22.4 注意事项
- 动画属性限制:仅部分视图属性支持动画(如
frame/bounds/center/alpha/backgroundColor/transform),tag/isHidden等属性不支持动画; - 弹簧参数:
usingSpringWithDamping取值范围 0~1,值越小弹性越强;initialSpringVelocity为初始速度,值越大初始冲力越强; - 动画嵌套:可在
completion闭包中嵌套另一个动画,实现连续动画(如先移动再缩放); - 性能优化:避免对大量视图同时执行动画,或动画时长过短(<0.1秒),否则可能导致卡顿;复杂动画(如粒子效果)建议使用
Core Animation而非基础动画。


 668
668

 被折叠的 条评论
为什么被折叠?
被折叠的 条评论
为什么被折叠?
 到【灌水乐园】发言


