


【递归】将layout布局文件转换为多叉树
闲聊
首先!!让我自己来说:我是懂标题的!
好久没写文了,Jetpack 系列写着写着就荒废了,后面看情况再续写吧(别打我)。

在Android中 Jetpack Compose 出来之前,对于UI的操作除了xml构建,就是动态为ViewGroup添加child。
layou.xml 文件再经过LayoutInflater.inflate(...)之后,也会转变为ViewGroup。
小Tips: ViewGroup实际上就是一个多叉树。
本文之所以放在逆向专栏下,是因为对View树的操作或者某子节点的获取,通常在逆向时会用上。
正文
Layout树的概念
首先,我们来看一下layout树的基本结构:
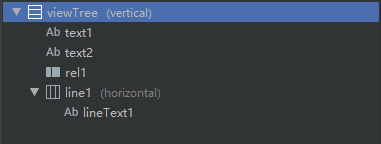
对应下来的结构树图应该是这样子的:
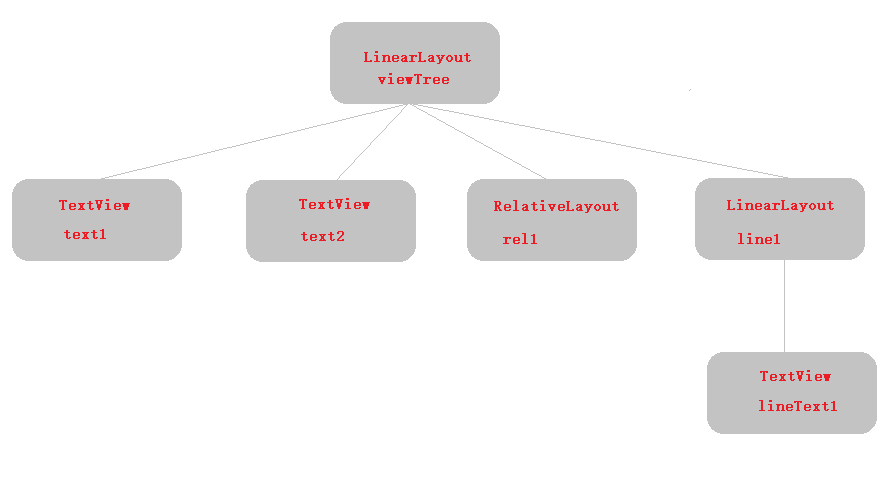
代码里则是这样的:
<LinearLayout
    android:id="@+id/viewTree"
    android:layout_width="match_parent"
    android:layout_height="wrap_content"
    android:orientation="vertical">

    <TextView
        android:id="@+id/text1"
        android:layout_width="match_parent"
        android:layout_height="wrap_content" />

    <TextView
        android:id="@+id/text2"
        android:layout_width="match_parent"
        android:layout_height="wrap_content" />

    <RelativeLayout
        android:id="@+id/rel1"
        android:layout_width="match_parent"
        android:layout_height="wrap_content" />

    <LinearLayout
        android:id="@+id/line1"
        android:layout_width="match_parent"
        android:layout_height="wrap_content">

        <TextView
            android:id="@+id/lineText1"
            android:layout_width="match_parent"
            android:layout_height="wrap_content" />
    </LinearLayout>
</LinearLayout>
将 ViewGroup 转换为多叉节点
逻辑梳理:
这里,我们将
@id/viewTree作为根节点;
其下其他的:@id/text1、@id/text2等作为子节点;
而当@id/rel1、@id/line1作为@id/viewTree的子节点的时候,实际上它俩又是一个容器节点(父节点);
啊这。。。不就是俄罗斯套娃嘛?既然套娃都出来了,那递归的概念不就出来了!
树节点的定义
上面已经说了, ViewGroup 就是一个俄罗斯套娃,而对于套娃的最方便、简洁的解决方式就是递归解娃。
再来个 ViewGroup 继承关系的图:
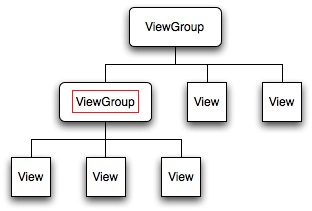
说到递归,巨大的支配感立马涌上心头(作者也是将它刻到骨子里了)。不过这里的递归还真没那么难,通过上图可以看到,被红框圈住的 ViewGroup 上面还有一个ViewGroup,下面又有View作为子节点
我们将上面的逻辑抽象成class,单个 ViewGroup 节点就应该是以下格式
class ViewNode {
    //父视图
    public ViewGroup parent;
    //当前视图(为什么这里是View? 因为ViewGroup是继承至View的, 这里的关系各位一定要清晰哦)
    public View view;
    //子节点
    public List<ViewNode> children;
    //当前树的深度
    public int depth;
}
如何遍历 ViewGroup 呢?会用递归可真香!
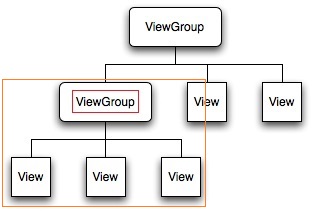
接下来定义一个方法,老图新用,我们看到红框里的 ViewGroup 它有一个父节点,那它就是根节点。
//构建根节点树, 将顶层 ViewGroup 作为 root 节点
private ViewNode buildViewTree(ViewGroup root) {
    //创建主树
    ViewNode rootNode = new ViewNode();
    //顶层ViewGroup没有父节点了.
    rootNode.parent = null; //rootNode.parent = (ViewGroup) viewGroup.getParent();
    //当前视图就是顶层ViewGroup
    rootNode.view = viewGroup;
    //当前深度1
    rootNode.depth = 1;
    //这里写个伪代码带入一下, 顶层的ViewGroup就包含了以下三个节点, 那么这三个节点怎么获取呢?
    rootNode.children = [ViewGroup, View, View]; //复制记得删除这行哦!
    //我们可以默认 children 为空
    rootNode.children = new ArrayList();
    //然后, 将 root 的子集取出来 [ViewGroup, View, View], 然后将它们添加到主树中
    int childCount = root.getChildCount();
    if (childCount == 0) return rootNode;
    for (int i = 0; i < childCount; i++) {
        View childAt = root.getChildAt(i);
        //构建子节点
        ViewNode viewNode = new ViewNode();
        viewNode.parent = root;
        rootNode.view = childAt;
        rootNode.depth = 2;
        //接入主树
        rootNode.children.add(viewNode);
    }

    return rootNode;
}
好了,已经搞完了, ViewNode的构建逻辑已经成型。上述代码执行下来,下图蓝框的内容应该就被添加到节点树中了。

但是,但是!子集中可还存在一个 ViewGroup 啊!代表什么?它有children的呀!
再次,图来!!
那么我们得改改上面的代码。
//构建根节点树, 将顶层 ViewGroup 作为 root 节点
public ViewNode buildViewTree(ViewGroup root) {
    ...省略;
    int childCount = root.getChildCount();
    if (childCount == 0) return rootNode;
    for (int i = 0; i < childCount; i++) {
        View childAt = root.getChildAt(i);
        //构建子节点
        ViewNode viewNode = new ViewNode();
        viewNode.parent = root;
        viewNode.view = childAt;
        viewNode.depth = 2;
        if(childAt instanceof ViewGroup){
            //这里怎么办呢?
            //好办, 再写一个一模一样的循环就是...
        } else {
            //接入主树
            rootNode.children.add(viewNode);
        }
    }
    return rootNode;
}
对对对,再写上一个一模一样的循环,

傻啦吧唧的。
将for循环抽出来不行?看代码:
//构建根节点树, 将顶层 ViewGroup 作为 root 节点
public ViewNode buildViewTree(ViewGroup root) {
    ...省略;
    rootNode.depth = 1;
    rootNode.children = new ArrayList();
    return _buildViewNodeChild(root, rootNode, rootNode.depth + 1); //注意这里哦
}

//抽出构建子树的 for 循环
private ViewNode _buildViewNodeChild(ViewGroup chidViewGroup, ViewNode rootNode, int depth){
    int childCount = chidViewGroup.getChildCount();
    if(childCount == 0) return rootNode;
    for (int i = 0; i < childCount; i++) {
        View childAt = chidViewGroup.getChildAt(i);
        //构建子节点
        ViewNode viewNode = new ViewNode();
        viewNode.parent = root;
        viewNode.view = childAt;
        viewNode.depth = depth;
        if(childAt instanceof ViewGroup){
            //既然是一模一样的循环, 那么, 我直接上来就偷袭, 将当前子节点看做根节点, 也就是将上面橙色的框中的ViewGroup看做最顶层.
            ViewNode tmepNode = _buildViewNodeChild((ViewGroup) childAt, viewNode, viewNode.depth + 1);
            //接入主树
            rootNode.children.add(tmepNode);
        } else {
            //接入主树
            rootNode.children.add(viewNode);
        }
    }

    return rootNode;
}
最终实现
结束了?rnm退钱!!!
完整代码:
/**
  * 将某个ViewGroup 转换为 视图多叉树
  *
  * @param viewGroup 目标根视图
  * @return 多叉树root节点
  */
public static ViewNode getViewTree(ViewGroup viewGroup) {
    //当前视图作为树根
    ViewNode rootNode = new ViewNode();
    rootNode.parent = null;  //rootNode.parent = (ViewGroup) viewGroup.getParent();
    rootNode.view = viewGroup;
    rootNode.depth = 1;
    rootNode.children = new ArrayList<>();
    //构建子树
    return _buildViewNodeChild(viewGroup, rootNode, rootNode.depth + 1); //注意这里哦
}

private static ViewNode _buildViewNodeChild(ViewGroup viewGroup, ViewNode rootNode, int depth) {
    //获取root视图下的所有子视图
    int childCount = viewGroup.getChildCount();
    if (childCount == 0) return rootNode;
    for (int i = 0; i < childCount; i++) {
        View childAt = viewGroup.getChildAt(i);
        ViewNode childNode = new ViewNode();
        childNode.parent = viewGroup;
        childNode.view = childAt;
        childNode.depth = depth;
        childNode.children = new ArrayList<>();
        //如果该子视图是ViewGroup, 将它作为下一个根遍历
        if (childAt instanceof ViewGroup) {
            //接入主树
            rootNode.children.add(_buildViewNodeChild((ViewGroup) childAt, childNode, childNode.depth + 1));
        } else {
            //接入主树
            rootNode.children.add(childNode);
        }
    }
    return rootNode;
}
节点类:
//视图节点多叉树
public class ViewNode {
    //父视图
    public ViewGroup parent;
    //当前视图
    public View view;
    //当前树的深度
    public int depth;
    //子节点
    public List<GViewNode> children;

    //销毁节点树
    public void destroy() {
        destroyChildren(this);
    }

    private void destroyChildren(ViewNode viewNode) {
        viewNode.parent = null;
        viewNode.view = null;
        viewNode.depth = 0;
        if (!viewNode.children.isEmpty()) {
            for (ViewNode child : viewNode.children) {
                destroyChildren(child);
            }
        }
        viewNode.children.clear();
    }

    public String toSimpleString() {
        if (view == null) {
            return "ViewNode{parent=" + parent + ", view=null, depth=" + depth + ", hashCode=" + this.hashCode() + "}";
        }

        return "ViewNode{view=" + view.getClass().getSimpleName() +
                ", idHex=" + (view.getId() == -1 ? "-1" : "0x" + Integer.toHexString(view.getId())) +
                ", idName="+ (view.getId() == -1 ? "-1" : "@id/" + view.getContext().getResources().getResourceEntryName(view.getId())) +
                ", depth=" + depth +
                ", childrenSize=" + children.size() +
                ", hashCode=" + this.hashCode() +
                "}";
    }

    @NonNull
    @Override
    public String toString() {
        return "ViewNode{" +
                "parent=" + parent +
                ", view=" + view +
                ", depth=" + depth +
                ", children=" + children +
                '}';
    }
}
写个测试方法试一试:
/**
  * 测试视图多叉树
  *
  * @param viewNode 需要测试的树节点, 允许是子节点, 也可以是根节点.
  *                 该方法将某个节点下的所有子节点作层级打印
  */
public static void testViewTree(ViewNode viewNode) {
    System.out.println("┌────────────────────────────────────────────────────────");
    System.out.println("├" + viewNode.toSimpleString());
    _printlnViewTree(viewNode, "---");
    System.out.println("└────────────────────────────────────────────────────────");
}

private static void _printlnViewTree(ViewNode viewNode, String indent) {
    if (viewNode.children.isEmpty()) return;
    for (ViewNode child : viewNode.children) {
        System.out.println("├" + indent + child.toSimpleString());
        if (!child.children.isEmpty()) {
            _printlnViewTree(child, indent + "---");
        }
    }
}
打印结果:


 1966
1966


 被折叠的 条评论
为什么被折叠?
被折叠的 条评论
为什么被折叠?
 到【灌水乐园】发言


