


Ansible常用模块
常用模块帮助文档参考:
https://docs.ansible.com/ansible/latest/modules/modules_by_category.html
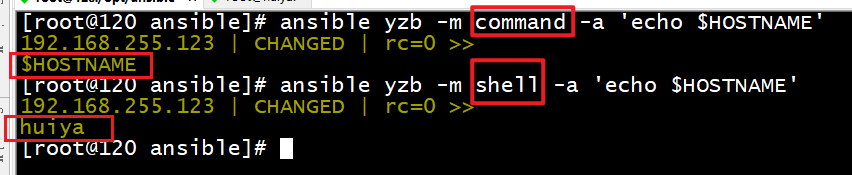
Command 模块
功能:在远程主机执行命令,此为默认模块,可忽略-m选项
注意:此命令不支持 $VARNAME < > | ; & 等,用shell模块实现
范例:
[root@120 ansible]# ansible yzb -m command -a 'cat /etc/centos-release'
192.168.255.123 | CHANGED | rc=0 >>
CentOS Linux release 7.9.2009 (Core)
Shell模块
功能:和command相似,但是支持特殊符号,可用shell执行命令
范例:
[root@120 ansible]# ansible yzb -m shell -a 'ls -l /etc/shadow'
192.168.255.123 | CHANGED | rc=0 >>
---------- 1 root root 747 Mar 21 15:18 /etc/shadow
注意:调用bash执行命令 类似 cat /opt/test.txt | awk -F‘|’ ‘{print $1,$2}’ &> /tmp/test.txt 这些复杂命令,使用shell也可能会失败。解决办法:写到脚本,copy到远程执行,再把需要的结果拉回执行命令的机器
将shell模块代替command,设为模块
[root@ansible ~]#vim /etc/ansible/ansible.cfg
#修改下面一行
module_name = shell
Script模块
功能:在远程主机上运行ansible服务器上的脚本
范例:
ansible websrvs -m script -a '/opt/test.sh'Copy模块
功能:从ansible服务器主控端复制文件到远程主机
src:控制端所在的文件路径
dest:拷贝到被控端的哪个路径下
owner:属主
group:属组
mode:权限
backup:备份
content:填充一个内容
#如目标存在,默认覆盖,此处指定先备份
ansible websrvs -m copy -a “src=/root/test1.sh dest=/tmp/test2.sh    owner=root  mode=600 backup=yes”
#在被控端创建目标文件,并写入content里的内容
ansible websrvs -m copy -a "content='test line1\ntest line2' dest=/tmp/test.txt"
#复制/etc/下的文件,不包括/etc/目录自身
ansible websrvs -m copy -a “src=/etc/ dest=/backup”
Fetch模块
功能:从远程主机提取文件至ansible的主控端,copy相反,目前不支持目录
范例:
ansible websrvs -m fetch -a ‘src=/root/test.sh dest=/data/scripts’File模块
功能:设置文件属性
path:被控端创建文件的路径
owner: 属主
group:属组
mode:权限
state:
link:软链接
ouch:文件
directory:目录
recurse:递归
范例:
#创建空文件
ansible all -m  file  -a 'path=/data/test.txt state=touch'
#创建目录
ansible all -m file -a "path=/data/mysql state=directory owner=mysql group=mysql"
#创建软链接
ansible all -m file -a ‘src=/data/testfile  dest=/data/testfile-link state=link’
unarchive模块
功能:解包解压缩
实现有两种用法:
1、将ansible主机上的压缩包传到远程主机后解压缩至特定目录,设置copy=yes
2、将远程主机上的某个压缩包解压缩到指定路径下,设置copy=no
常见参数:
- copy:默认为yes,当copy=yes,拷贝的文件是从ansible主机复制到远程主机上,如果设置为copy=no,会在远程主机上寻找src源文件
- remote_src:和copy功能一样且互斥,yes表示在远程主机,不在ansible主机,no表示文件在ansible主机上
- src:源路径,可以是ansible主机上的路径,也可以是远程主机上的路径,如果是远程主机上的路径,则需要设置copy=no
- dest:远程主机上的目标路径
- mode:设置解压缩后的文件权限
范例:
ansible all -m unarchive -a 'src=/data/foo.tgz dest=/var/lib/foo'
ansible all -m unarchive -a 'src=/tmp/foo.zip dest=/data copy=no mode=0777'
ansible all -m unarchive -a 'src=https://example.com/example.zip dest=/data copy=no'
Archive模块
功能:打包压缩
范例:
ansible websrvs -m archive -a 'path=/var/log/ dest=/data/log.tar.bz2 format=bz2 owner=wang mode=0600'Hostname模块
功能:管理主机名
范例:
ansible node1 -m hostname -a “name=websrv”
ansible 192.168.100.18 -m hostname -a 'name=node18.magedu.com'
Cron模块
功能:计划任务
支持时间:minute,hour,day,month,weekday
范例:
#备份数据库脚本
[root@centos8 ~]#cat mysql_backup.sh
mysqldump -A -F --single-transaction --master-data=2 -q -uroot |gzip > /data/mysql_date +%F_%T.sql.gz
#创建任务
ansible 10.0.0.8 -m cron -a 'hour=2 minute=30 weekday=1-5 name="backup mysql" job=/root/mysql_backup.sh'
ansible websrvs   -m cron -a "minute=*/5 job='/usr/sbin/ntpdate 172.20.0.1 &>/dev/null' name=Synctime"
#禁用计划任务
ansible websrvs   -m cron -a "minute=*/5 job='/usr/sbin/ntpdate 172.20.0.1 &>/dev/null' name=Synctime disabled=yes"
#启用计划任务
ansible websrvs   -m cron -a "minute=*/5 job='/usr/sbin/ntpdate 172.20.0.1 &>/dev/null' name=Synctime disabled=no"
#删除任务
ansible websrvs -m cron -a "name='backup mysql' state=absent"
ansible websrvs -m cron -a 'state=absent name=Synctime'
Yum模块
功能:管理软件包,只支持RHEL,CentOS,fedora,不支持Ubuntu其它版本
范例:
ansible websrvs -m yum -a ‘name=httpd state=present’  #安装
ansible websrvs -m yum -a ‘name=httpd state=absent’  #删除
Service模块
功能:管理服务
范例:
ansible all -m service -a 'name=httpd state=started enabled=yes'
ansible all -m service -a 'name=httpd state=stopped'
ansible all -m service -a 'name=httpd state=reloaded’
ansible all -m shell -a "sed -i 's/^Listen 80/Listen 8080/' /etc/httpd/conf/httpd.conf"
ansible all -m service -a 'name=httpd state=restarted'
User模块
功能:管理用户
范例:
#创建用户
ansible all -m user -a 'name=user1 comment=“test user” uid=2048 home=/app/user1 group=root'

ansible all -m user -a 'name=nginx comment=nginx uid=88 group=nginx groups="root,daemon" shell=/sbin/nologin system=yes create_home=no  home=/data/nginx non_unique=yes'

#删除用户及家目录等数据
ansible all -m user -a 'name=nginx state=absent remove=yes'
Group模块
功能:管理组
范例:
#创建组
ansible websrvs -m group  -a 'name=nginx gid=88 system=yes'
#删除组
ansible websrvs -m group  -a 'name=nginx state=absent'
Systemd模块
功能:管理服务
name:启动的服务名称
state:状态
started 启动
stopped 关闭
restarted 重启
reloaded 重载
enabled 开启自启yes 不自启no
范例:
ansible all -m systemd -a "name=nginx state=started enabled=yes"mount模块
功能:磁盘操作
src:我要挂载的设备
path:挂载到哪个路径下
fstype:挂载的设备类型
opts:挂载时使用的参数
state:
mounted 立即挂载并添加开机自动挂载
absent 临时卸载载,取消开机自动挂载
present 现在不挂载,开机自动挂载
unmounted 临时卸载,不取消开机自动挂载
范例:
ansible all -m mount -a 'src=10.0.0.1:/data path=/opt fstype=nfs opts=defaults state=mounted'
ansible all -m mount -a 'src=10.0.0.1:/data path=/opt fstype=nfs opts=defaults state=absent'
Setup模块
功能: setup 模块来收集主机的系统信息,这些 facts 信息可以直接以变量的形式使用,但是如果主机较多,会影响执行速度,可以使用gather_facts: no来禁止 Ansible 收集 facts 信息
范例:
ansible all -m setup
ansible all -m setup -a "filter=ansible_nodename"
ansible all -m setup -a "filter=ansible_hostname"
ansible all -m setup -a "filter=ansible_domain"
ansible all -m setup -a "filter=ansible_memtotal_mb"
ansible all -m setup -a "filter=ansible_memory_mb"
ansible all -m setup -a "filter=ansible_memfree_mb"
ansible all -m setup -a "filter=ansible_os_family"
ansible all -m setup -a "filter=ansible_distribution_major_version"
ansible all -m setup -a "filter=ansible_distribution_version"
ansible all -m setup -a "filter=ansible_processor_vcpus"
ansible all -m setup -a "filter=ansible_all_ipv4_addresses"
ansible all -m setup -a "filter=ansible_architecture"
ansible all -m  setup  -a "filter=ansible_processor*"
范例:
[root@ansible ~]#ansible all  -m  setup -a 'filter=ansible_python_version'
10.0.0.7 | SUCCESS => {
    "ansible_facts": {
        "ansible_python_version": "2.7.5",
        "discovered_interpreter_python": "/usr/bin/python"
    },
    "changed": false
}
10.0.0.6 | SUCCESS => {
    "ansible_facts": {
        "ansible_python_version": "2.6.6",
        "discovered_interpreter_python": "/usr/bin/python"
    },
    "changed": false
}
10.0.0.8 | SUCCESS => {
    "ansible_facts": {
        "ansible_python_version": "3.6.8",
        "discovered_interpreter_python": "/usr/libexec/platform-python"
    },
    "changed": false
}
[root@ansible ~]#


 559
559


 被折叠的 条评论
为什么被折叠?
被折叠的 条评论
为什么被折叠?
 到【灌水乐园】发言


