


@Async为什么要使用自定义线程池
通过上一篇对@Async的初步分析,我们可以知道当使用@Async不指定线程池时,Spring会默认使用SimpleAsyncTaskExecutor线程池,那么SimpleAsyncTaskExecutor有什么缺点呢?下面我们通过源码分析SimpleAsyncTaskExecutor为什么不建议使用。

SimpleAsyncTaskExecutor

此类特点概括为以下几点:
-
为每个任务启动一个新线程,异步执行它。
-
支持通过“concurrencyLimit”bean 属性限制并发线程。默认情况下,并发线程数是无限的。
-
注意:此实现不重用线程!
-
考虑一个线程池 TaskExecutor 实现,特别是用于执行大量短期任务。
默认情况下,SimpleAsyncTaskExecutor不会限制线程创建的个数,这会导致资源耗尽。这个线程池和我们印象中的的线程池可以说是相悖的。如果需要使用SimpleAsyncTaskExecutor,则需指定线程上限(调用setConcurrencyLimit方法),避免在极端情况下出现资源耗尽的问题。另外,该任务执行器并没有执行拒绝策略,这也是在线上环境需谨慎使用的原因之一。
@Async使用自定义线程池
自定义线程池配置:
@Slf4j
@Configuration
@EnableConfigurationProperties({TaskExecutorProperties.class,ExportExecutorProperties.class})
public class ExecutePoolConfig {

    // 普通任务线程池配置
    private final TaskExecutorProperties taskExecutorProperties;

    // 导出任务线程池配置
    private final ExportExecutorProperties exportExecutorProperties;

    @Autowired
    public ExecutePoolConfig(TaskExecutorProperties taskExecutorProperties,ExportExecutorProperties exportExecutorProperties) {
        this.taskExecutorProperties = taskExecutorProperties;
        this.exportExecutorProperties = exportExecutorProperties;
    }

    @Bean("taskExecutor")
    public Executor taskExecutor() {
        return buildExecutor(taskExecutorProperties);
    }
    @Bean("exportExecutor")
    public Executor exportExecutor() {
        return buildExecutor(exportExecutorProperties);
    }

    /**
     * 构建线程池
     *
     * @param executorProperties ExecutorBaseProperties
     * @return {@link Executor}
     */
    private Executor buildExecutor(ExecutorBaseProperties executorProperties) {

        ThreadPoolTaskExecutor executor = new ThreadPoolTaskExecutor();

        // 设置核心线程数
        executor.setCorePoolSize(executorProperties.getCorePoolSize());

        // 设置最大线程数
        executor.setMaxPoolSize(executorProperties.getMaxPoolSize());

        // 设置队列大小
        executor.setQueueCapacity(executorProperties.getQueueCapacity());

        // 设置线程池维护线程所允许的空闲时间
        executor.setKeepAliveSeconds(executorProperties.getKeepAliveSeconds());

        // 设置线程池关闭的时候等待所有任务都完成再继续销毁其他的Bean
        executor.setWaitForTasksToCompleteOnShutdown(true);

        // 设置线程池中任务的等待时间,如果超过这个时候还没有销毁就强制销毁
        executor.setAwaitTerminationSeconds(30);

        // 设置线程池中的线程的名称前缀
        executor.setThreadNamePrefix(executorProperties.getThreadNamePrefix());

        // rejection-policy:当pool已经达到max size的时候,如何处理新任务
        // CALLER_RUNS:不在新线程中执行任务,而是有调用者所在的线程来执行
        RejectedExecutionHandler rejectedExecutionHandler = null;

        try {

            Class<?> clazz = Class
                .forName("java.util.concurrent.ThreadPoolExecutor$" + executorProperties.getRejectionPolicyName());
            rejectedExecutionHandler = (RejectedExecutionHandler)clazz.newInstance();

        } catch (ClassNotFoundException | IllegalAccessException | InstantiationException e) {
            log.error("获取rejection-policy异常,请查看配置文件", e);
            return null;

        }

        executor.setRejectedExecutionHandler(rejectedExecutionHandler);
        // 执行初始化
        executor.initialize();
        return executor;

    }
}

@Data
@Component
@ConfigurationProperties(prefix = "task.executor.conf")
public class TaskExecutorProperties extends ExecutorBaseProperties {

    /**
     * 核心线程数
     */
    private int corePoolSize = 10;

    /**
     * 最大线程数
     */
    private int maxPoolSize = 20;

    /**
     * 队列大小
     */
    private int queueCapacity = 200;

    /**
     * 线程池维护线程所允许的空闲时间
     */
    private int keepAliveSeconds = 60;

    /**
     * 线程的名称前缀
     */
    private String threadNamePrefix = "taskExecutor-";

    /**
     * 拒绝策略
     */
    private String rejectionPolicyName = "CallerRunsPolicy";

}
@Data
public class ExecutorBaseProperties {

    /**
     * 核心线程数
     */
    private int corePoolSize = 10;

    /**
     * 最大线程数
     */
    private int maxPoolSize = 20;

    /**
     * 队列大小
     */
    private int queueCapacity = 200;

    /**
     * 线程池维护线程所允许的空闲时间
     */
    private int keepAliveSeconds = 60;

    /**
     * 线程的名称前缀
     */
    private String threadNamePrefix = "taskExecutor-";

    /**
     * 拒绝策略
     */
    private String rejectionPolicyName = "CallerRunsPolicy";

}
线程池的使用:
@RestController
public class TestController {

    @Resource
    private AsyncTestService asyncTestService;

    @RequestMapping("/exportTest")
    public String exportTest() {
        System.out.println("父线程userId:" + UserUtils.getUserId());
        System.out.println("父线程traceId:" + MDC.get("traceId"));
        for (int i = 0; i < 10; i++) {
            asyncTestService.exportTest();
        }
        return "OK";
    }

    @RequestMapping("/taskTest")
    public String taskTest() {
        for (int i = 0; i < 10; i++) {
            asyncTestService.taskTest();
        }
        return "OK";
    }

}

public interface AsyncTestService {
    /**
     * exportTest
     */
    void exportTest();

    /**
     * taskTest
     */
    void taskTest();
}

@Service
public class AsyncTestServiceImpl implements AsyncTestService {

    @Async("exportExecutor")
    @Override
    public void exportTest() {
        System.out.println("子线程userId:" + UserUtils.getUserId());
        System.out.println("子线程traceId:"  + MDC.get("traceId"));
        System.out.println("我是自定义类型的线程池:" + Thread.currentThread().getName());
    }

    @Async
    @Override
    public void taskTest() {
        System.out.println("我是beanName使用taskExecutor名字的线程:" + Thread.currentThread().getName());
    }
}

/**
 *使用ThreadLocal存储共享的数据变量,如登录的用户信息
 */
public class UserUtils {
    private static final ThreadLocal<String> userLocal = new ThreadLocal<>();

    public static String getUserId() {
        return userLocal.get();
    }

    public static void setUserId(String userId) {
        userLocal.set(userId);
    }

    public static void clear() {
        userLocal.remove();
    }

}
执行结果:
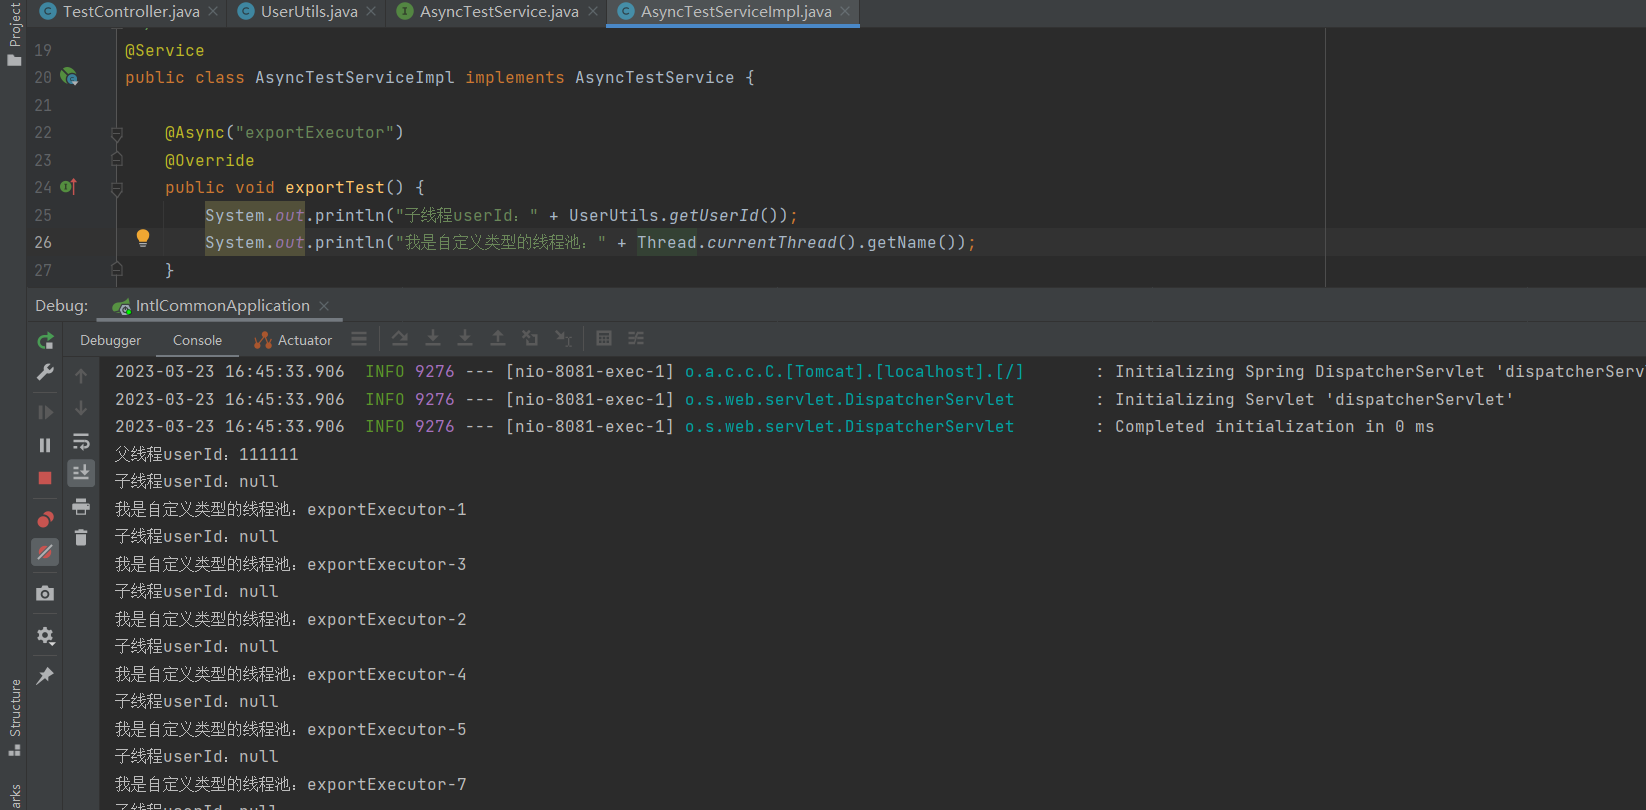

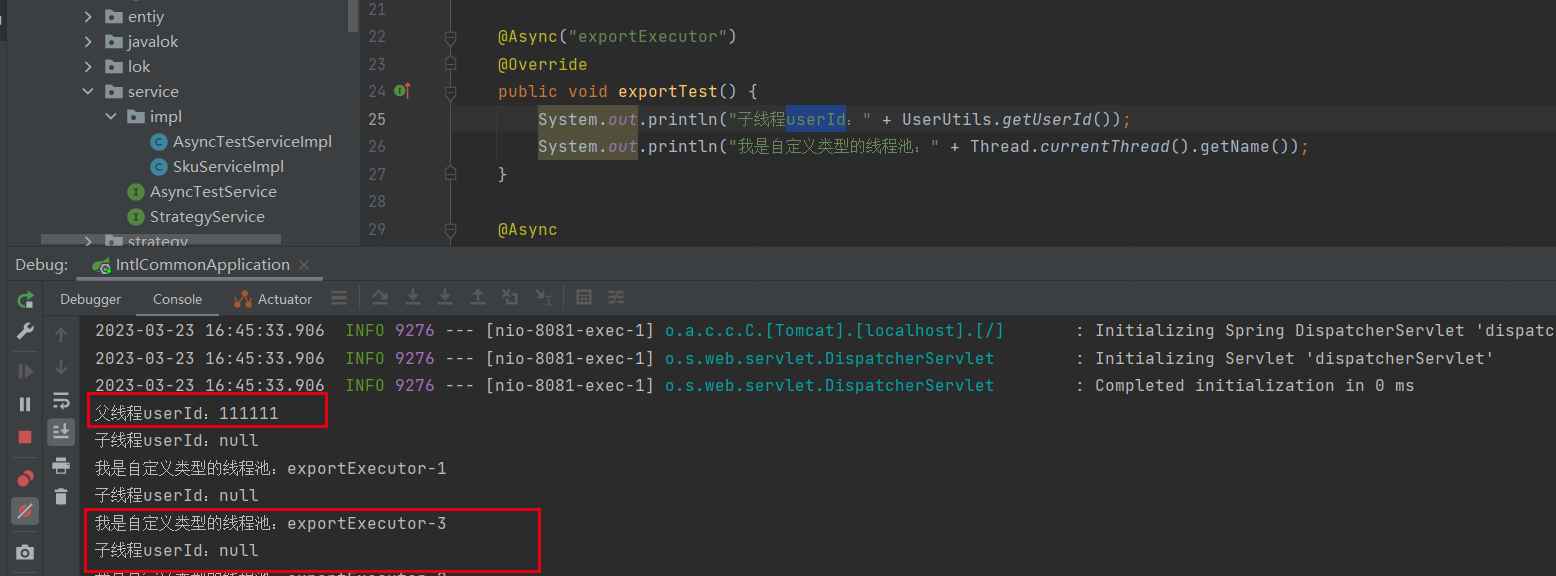
可以看到两种线程池都生效了,通过自定义配置可以让我们达到对@Async使用的掌控,以避免使用默认线程池带来的弊端。
但是也来了新的问题,在实际开发过程中我们需要父子线程之间传递一些数据,比如用户信息,分布式系统中用来链路追踪的tranceId等。通过上方的执行结果我们可以看到在子线程中是无法正常获取到父线程的线程数据的。
@Async实现父子线程之间的数据传递
多线程的情况下实现父子线程之间的数据传递方式有多种,这里我们介绍两种方式实现父子线程之间数据传递。
阿里巴巴TransmittableThreadLocal实现父子线程之间的用户数据传递
public class UserUtils {
    private static final ThreadLocal<String> userLocal = new TransmittableThreadLocal<>();

    public static String getUserId() {
        return userLocal.get();
    }

    public static void setUserId(String userId) {
        userLocal.set(userId);
    }

    public static void clear() {
        userLocal.remove();
    }

}
MDC实现线程池tranceId全链路传递
1:首先定义一个自定义线程池类继承ThreadPoolTaskExecutor
// 首先定义一个自定义线程池类继承ThreadPoolTaskExecutor
public class ThreadPoolExecutorMdcWrapper extends ThreadPoolTaskExecutor {
@Override
public void execute(Runnable task) {
super.execute(ThreadMdcUtil.wrap(task, MDC.getCopyOfContextMap()));
}
@Override
public <T> Future<T> submit(Callable<T> task) {
return super.submit(ThreadMdcUtil.wrap(task, MDC.getCopyOfContextMap()));
}
@Override
public Future<?> submit(Runnable task) {
return super.submit(ThreadMdcUtil.wrap(task, MDC.getCopyOfContextMap()));
}
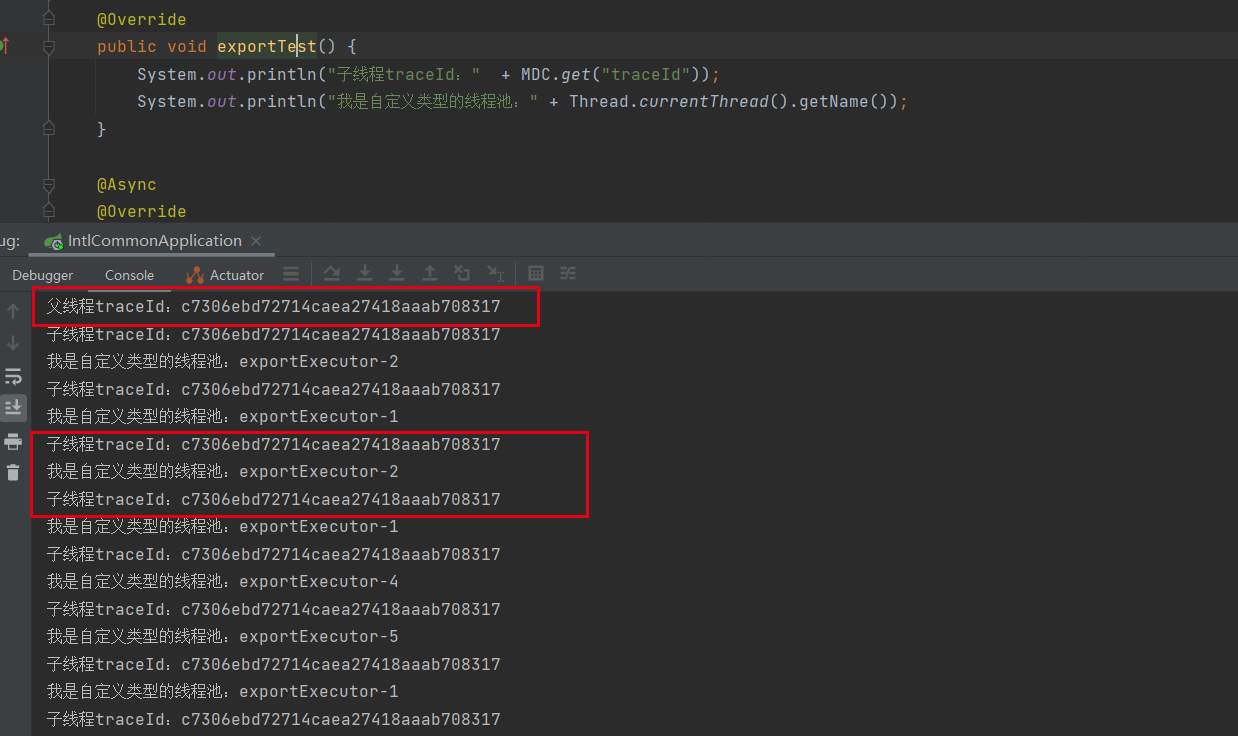
}2:编写tranceid包装工具类,判断当前线程对应MDC的上下文是否存在,存在则是子线程,设置MDC中的traceId值,不存在则生成新的tranceid,再执行run方法,执行结束之后清除线程tranceId
// 编写tranceid包装工具类
// 判断当前线程对应MDC的上下文是否存在,存在则是子线程,设置MDC中的traceId值
// 不存在则生成新的tranceid,再执行run方法,执行结束之后清除线程tranceId
public class ThreadMdcUtil {
    private final static String MDC_TRACE_ID = "traceId";

    public static void setTraceIdIfAbsent() {
        if (MDC.get(MDC_TRACE_ID) == null) {
            MDC.put(MDC_TRACE_ID, UUID.randomUUID().toString().replaceAll("-", ""));
        }
    }

    public static <T> Callable<T> wrap(final Callable<T> callable, final Map<String, String> context) {
        return () -> {
            if (context == null) {
                MDC.clear();
            } else {
                MDC.setContextMap(context);
            }
            setTraceIdIfAbsent();
            try {
                return callable.call();
            } finally {
                MDC.clear();
            }
        };
    }

    public static Runnable wrap(final Runnable runnable, final Map<String, String> context) {
        return () -> {
            if (context == null) {
                MDC.clear();
            } else {
                MDC.setContextMap(context);
            }
            setTraceIdIfAbsent();
            try {
                runnable.run();
            } finally {
                MDC.clear();
            }
        };
    }
}
3:使用ThreadPoolExecutorMdcWrapper改造自定义线程池
// 初始化自定义线程池
@Slf4j
@Configuration
@EnableConfigurationProperties({TaskExecutorProperties.class,ExportExecutorProperties.class})
public class ExecutePoolConfig {

    // 普通任务线程池配置
    private final TaskExecutorProperties taskExecutorProperties;

    // 导出任务线程池配置
    private final ExportExecutorProperties exportExecutorProperties;

    @Autowired
    public ExecutePoolConfig(TaskExecutorProperties taskExecutorProperties,ExportExecutorProperties exportExecutorProperties) {
        this.taskExecutorProperties = taskExecutorProperties;
        this.exportExecutorProperties = exportExecutorProperties;
    }

    @Bean("taskExecutor")
    public Executor taskExecutor() {
        return buildExecutor(taskExecutorProperties);
    }
    @Bean("exportExecutor")
    public Executor exportExecutor() {
        return buildExecutor(exportExecutorProperties);
    }

    /**
     * 构建线程池
     *
     * @param executorProperties ExecutorBaseProperties
     * @return {@link Executor}
     */
    private Executor buildExecutor(ExecutorBaseProperties executorProperties) {

        ThreadPoolExecutorMdcWrapper executor = new ThreadPoolExecutorMdcWrapper();

        // 设置核心线程数
        executor.setCorePoolSize(executorProperties.getCorePoolSize());

        // 设置最大线程数
        executor.setMaxPoolSize(executorProperties.getMaxPoolSize());

        // 设置队列大小
        executor.setQueueCapacity(executorProperties.getQueueCapacity());

        // 设置线程池维护线程所允许的空闲时间
        executor.setKeepAliveSeconds(executorProperties.getKeepAliveSeconds());

        // 设置线程池关闭的时候等待所有任务都完成再继续销毁其他的Bean
        executor.setWaitForTasksToCompleteOnShutdown(true);

        // 设置线程池中任务的等待时间,如果超过这个时候还没有销毁就强制销毁
        executor.setAwaitTerminationSeconds(30);

        // 设置线程池中的线程的名称前缀
        executor.setThreadNamePrefix(executorProperties.getThreadNamePrefix());

        // rejection-policy:当pool已经达到max size的时候,如何处理新任务
        // CALLER_RUNS:不在新线程中执行任务,而是有调用者所在的线程来执行
        RejectedExecutionHandler rejectedExecutionHandler = null;

        try {

            Class<?> clazz = Class
                .forName("java.util.concurrent.ThreadPoolExecutor$" + executorProperties.getRejectionPolicyName());
            rejectedExecutionHandler = (RejectedExecutionHandler)clazz.newInstance();

        } catch (ClassNotFoundException | IllegalAccessException | InstantiationException e) {
            log.error("获取rejection-policy异常,请查看配置文件", e);
            return null;

        }

        executor.setRejectedExecutionHandler(rejectedExecutionHandler);
        // 执行初始化
        executor.initialize();
        //return TtlExecutors.getTtlExecutor(executor);
        return executor;
    }
}
4:执行结果


 1万+
1万+


 被折叠的 条评论
为什么被折叠?
被折叠的 条评论
为什么被折叠?
 到【灌水乐园】发言


