


引言
大家好,上期我们介绍了装饰模式在Python中的实现,今天,我们将继续探讨装饰模式,并展示如何在Java中实现它。
装饰模式概述
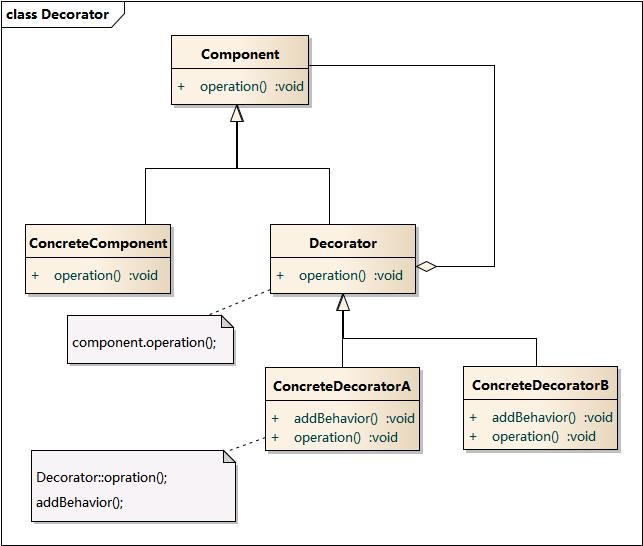
装饰模式的核心思想是将功能附加到对象上,而不是通过继承来实现,这种模式包含以下几个关键组成部分:
- 组件接口:定义基本功能;
- 具体组件:实现基本功能的类;
- 装饰器基类:实现组件接口,并包含一个指向组件对象的引用;
- 具体装饰器:扩展装饰器基类,实现额外的功能。
装饰模式与其他设计模式(如代理模式、适配器模式)不同之处在于,装饰模式注重动态地为对象添加职责,而不改变对象的接口。
模式结构
类图
示意图

装饰模式的Java实现
在Java中,装饰模式通常通过继承和组合来实现。以下是几种常见的实现方式:
基本实现
以下是一个简单的装饰器例子,它为组件添加打印日志的功能:
// 组件接口
interface Component {
    void operation();
}

// 具体组件
class ConcreteComponent implements Component {
    @Override
    public void operation() {
        System.out.println("Executing operation in ConcreteComponent");
    }
}

// 装饰器基类
abstract class Decorator implements Component {
    protected Component component;

    public Decorator(Component component) {
        this.component = component;
    }

    @Override
    public void operation() {
        component.operation();
    }
}

// 具体装饰器
class LoggingDecorator extends Decorator {
    public LoggingDecorator(Component component) {
        super(component);
    }

    @Override
    public void operation() {
        System.out.println("Logging before operation");
        super.operation();
        System.out.println("Logging after operation");
    }
}

// 测试
public class DecoratorPatternExample {
    public static void main(String[] args) {
        Component component = new ConcreteComponent();
        Component decoratedComponent = new LoggingDecorator(component);
        decoratedComponent.operation();
    }
}
多层装饰器的使用
装饰器可以叠加使用,实现多层装饰:
class UppercaseDecorator extends Decorator {
    public UppercaseDecorator(Component component) {
        super(component);
    }

    @Override
    public void operation() {
        System.out.println("Converting to uppercase");
        super.operation();
        System.out.println("Converted to uppercase");
    }
}

public class MultiDecoratorExample {
    public static void main(String[] args) {
        Component component = new ConcreteComponent();
        Component decoratedComponent = new LoggingDecorator(new UppercaseDecorator(component));
        decoratedComponent.operation();
    }
}
实际应用案例
装饰模式在实际项目中有很多应用场景,例如日志记录、权限验证和性能监控等。
日志记录功能的装饰
通过装饰器为组件添加日志记录功能,可以避免在每个组件中重复写日志代码:
class LoggingDecorator extends Decorator {
    public LoggingDecorator(Component component) {
        super(component);
    }

    @Override
    public void operation() {
        System.out.println("Logging before operation");
        super.operation();
        System.out.println("Logging after operation");
    }
}

public class LoggingExample {
    public static void main(String[] args) {
        Component component = new ConcreteComponent();
        Component loggingComponent = new LoggingDecorator(component);
        loggingComponent.operation();
    }
}
权限验证功能的装饰
通过装饰器为组件添加权限验证功能,可以在调用实际业务逻辑之前进行权限检查:
class PermissionDecorator extends Decorator {
    public PermissionDecorator(Component component) {
        super(component);
    }

    @Override
    public void operation() {
        if (hasPermission()) {
            super.operation();
        } else {
            System.out.println("Access denied");
        }
    }

    private boolean hasPermission() {
        // 模拟权限验证逻辑
        return true; // 可以根据实际情况修改
    }
}

public class PermissionExample {
    public static void main(String[] args) {
        Component component = new ConcreteComponent();
        Component permissionComponent = new PermissionDecorator(component);
        permissionComponent.operation();
    }
}
性能监控功能的装饰
通过装饰器为组件添加性能监控功能,可以方便地记录组件的执行时间:
class TimingDecorator extends Decorator {
    public TimingDecorator(Component component) {
        super(component);
    }

    @Override
    public void operation() {
        long startTime = System.currentTimeMillis();
        super.operation();
        long endTime = System.currentTimeMillis();
        System.out.println("Operation took " + (endTime - startTime) + " milliseconds");
    }
}

public class TimingExample {
    public static void main(String[] args) {
        Component component = new ConcreteComponent();
        Component timingComponent = new TimingDecorator(component);
        timingComponent.operation();
    }
}
装饰模式的优缺点
优点
- 单一职责原则:可以将职责划分到不同的类中,使每个类的功能更加单一和明确;
- 动态扩展功能:可以在运行时添加或删除功能,而无需修改原有代码;
- 灵活性高:通过不同的装饰器组合,可以实现多种不同的功能扩展;
- 减少代码重复:可以避免在多个类中重复实现相同的功能,减少代码冗余。
缺点
- 增加复杂性:装饰器的嵌套使用可能会导致代码结构复杂,不易理解和维护;
- 调试困难:由于装饰器改变了函数的行为,调试时可能不容易追踪到问题的根源;
- 性能开销:多层装饰器可能会增加函数调用的开销,影响性能。
应用场景
装饰模式适用于以下场景:
- 需要动态添加功能:例如为已有功能添加日志记录、性能监控或权限验证等;
- 功能扩展频繁:例如在项目中需要经常为不同对象添加或移除功能;
- 不希望修改原有代码:例如在使用第三方库时,不希望直接修改其源代码,而是通过装饰器来扩展其功能;
- 跨切面关注点:例如在面向切面编程中,装饰模式可以用于处理日志、事务管理、异常处理等横切关注点。
总结
通过这篇文章,希望读者能够更好地理解装饰模式在Java中的实现,并能够在实际开发中灵活应用这种设计模式。如果你有任何疑问或想法,欢迎在下方留言!别忘了关注我们的公众号,获取更多有趣的编程知识和实用的代码技巧,我们期待与你的交流与分享!


 445
445

 被折叠的 条评论
为什么被折叠?
被折叠的 条评论
为什么被折叠?
 到【灌水乐园】发言


