


在iOS中,图形的绘制是基于UIView来绘制的,所以,我们要先创建一个用来绘制图形的UIView类。
UIView的类中有一个方法是专门用来绘制图形的:
/*
// Only override drawRect: if you perform custom drawing.
// An empty implementation adversely affects performance during animation.
- (void)drawRect:(CGRect)rect {
    // Drawing code
}
*/
我尝试了一些简单的图形绘制命令:
/*
// Only override drawRect: if you perform custom drawing.
// An empty implementation adversely affects performance during animation.
*/
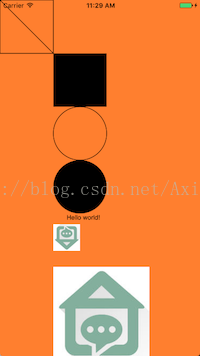
- (void)drawRect:(CGRect)rect {
// Drawing code
//获取当前设备的上下文(画布)
CGContextRef context = UIGraphicsGetCurrentContext();
//画笔移到某一点
CGContextMoveToPoint(context, 0, 0);
//从一点到某一点画条线
CGContextAddLineToPoint(context, 100, 100);
//给线渲染涂色
CGContextStrokePath(context);
//矩形框
CGContextAddRect(context, CGRectMake(0, 0, 100, 100));
CGContextStrokeRect(context, CGRectMake(0, 0, 100, 100));
//实心矩形
CGContextFillRect(context, CGRectMake(100, 100, 100, 100));
//空心圆
CGContextStrokeEllipseInRect(context, CGRectMake(100, 200, 100, 100));
//实心圆
CGContextFillEllipseInRect(context, CGRectMake(100, 300, 100, 100));
//绘制文字
NSString * str = @"Hello world!";
[str drawAtPoint:CGPointMake(125, 400) withAttributes:nil];
//绘制图片
[img drawAtPoint:CGPointMake(100, 500)];
[img drawAsPatternInRect:CGRectMake(100, 400, 50, 50)]; //平铺填充
CGContextDrawImage(context, CGRectMake(100, 500, 80, 80), [img CGImage]);//自由缩放
}效果看起来笨笨的,哈哈,继续学习ing


 499
499

 被折叠的 条评论
为什么被折叠?
被折叠的 条评论
为什么被折叠?
 到【灌水乐园】发言


