


Spring框架概述
1、轻量级的开源JavaEE框架,可以解决企业应用开发的负责性
2、两个核心:IOC、AOP
- IOC:控制反转,把创建对象过程交给Spring进行管理
- AOP:面向切面,不修改源代码进行功能增强
3、Spring特点 - 方便解耦,简化开发
- AOP编程支持
- 方便程序测试
- 方便和其他框架整合使用
- 方便进行事务操作
- 降低API开发难度
<?xml version="1.0" encoding="UTF-8" ?>
<beans xmlns = "http://www.springframework.org/schema/beans"
       xmlns:xsi="http://www.w3.org/2001/XMLSchema-instance"
       xsi:schemaLocation="http://www.springframework.org/schema/beans http://www.springframework.org/schema/spring-beans.xsd">
       //配置User对象创建
    <bean id="user" class="com.ayu.spring5.User"></bean>
</beans>
package testdemo;
import org.junit.Test;
public class TestSpring5 {

    @Test
    public void testAdd(){
  	  //加载配置文件
        ClassPathXmlApplicationContext context = new ClassPathXmlApplicationContext("bean1.xml");
        //获取配置创建的对象
        User user = context.getBean("user", User.class);
        System.out.println(user);
        user.add();
    }
}
IOC容器
IOC:控制反转,把对象的创建和对象之间的调用过程,交给Spring进行管理
使用IOC目的:为了耦合度降低
底层原理
xml解析、工厂模式、反射
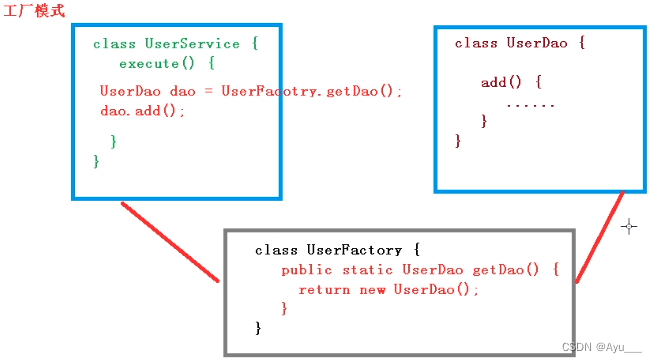
解耦: 如果UserDao发生改变,不需要修改每一个调用UserDao的类,只需要修改UserFactory即可。
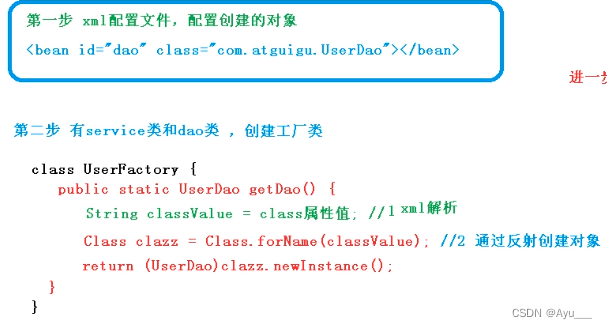
IOC过程
1、第一步 xml配置文件,配置创建的对象
2、第二步 有Service类和Dao类,创建工厂类
IOC接口(BeanFactory)
IOC作用举例
1、IOC思想基于IOC容器完成,IOC容器底层就是对象工厂
2、Spring提供IOC容器两种实现方式:(两个接口)
- BeanFactory: IOC容器基本实现,是Spring内部的使用接口,不提供开发人员进行使用
加载配置文件时不创建对象,在获取/使用对象时才去创建
BeanFactory context = new XmlBeanFactory(new ClassPathResource("bean1.xml"));//已弃用
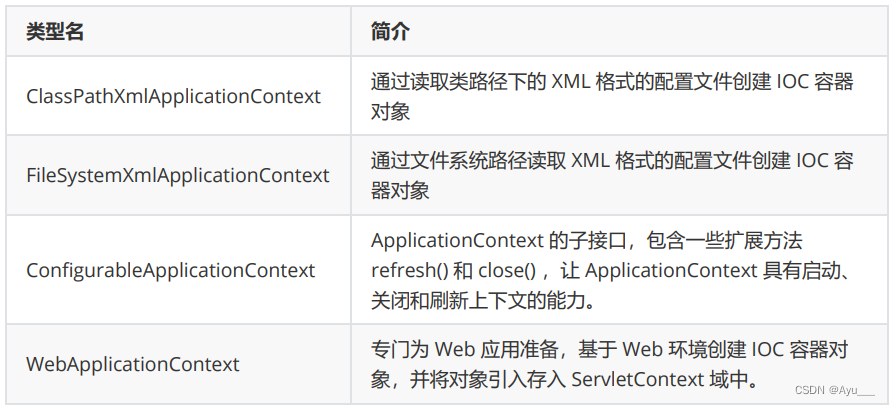
- ApplicationContext:BeanFactory接口的子接口,提供更多更强大的功能,一般由开发人员进行使用。
加载配置文件时就会把配置文件对象进行创建
ApplicationContext接口的两个实现类
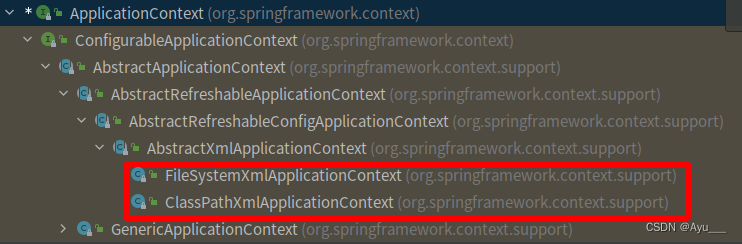
FileSystemXmlApplicationContext(“绝对路径 /home/lxy/src/bean.xml”)
ClassPathXmlApplicationContext(“bean.xml”)
Bean管理指的是两个操作:Spring创建对象、Spring注入属性
Bean标签的属性
- id:唯一标识
- class:类全路径(包类路径)
- name:与id相似,可以加特殊字符
创建对象时,默认调用无参构造方法完成对象创建
IOC操作Bean管理(基于xml)
0、获取Bean的三种方式
(1)方式一:根据id获取
由于 id 属性指定了 bean 的唯一标识,所以根据 bean 标签的 id 属性可以精确获取到一个组件对象。
HelloWorld bean = ac.getBean("helloworld");
(2)方式二:根据类型获取
HelloWorld bean = ac.getBean(HelloWorld.class);
当根据类型获取bean时,要求IOC容器中指定类型的bean有且只能有一个
根据类型来获取bean时,在满足bean唯一性的前提下,其实只是看:『对象 instanceof 指定的类型』的返回结果,只要返回的是true就可以认定为和类型匹配,能够获取到
(3)方式三:根据id和类型
HelloWorld bean = ac.getBean("helloworld", HelloWorld.class);
1、DI:依赖注入,就是注入属性
(1)第一种注入方式:set,property标签
package com.ayu.study;
public class Book {
    private String bname;
    private String bauthor;

    public void setBauthor(String bauthor) {
        this.bauthor = bauthor;
    }
    public void setBname(String bname) {
        this.bname = bname;
    }
    public void testDemo(){
        System.out.println(bname+"::"+bauthor);
    }
}
<!--1 创建对象-->
    <bean id="book" class="com.ayu.study.Book">
        <!-- 2 set方法注入属性
                name:类里面属性名称(与set方法相关)
                value:向属性注入的值
         -->
        <property name="bname" value="山海经"></property>
        <property name="bauthor" value="unkonwn"></property>
    </bean>
(2)第二种注入方式:有参构造注入 ,constructor-arg标签
创建类,定义属性,创建属性对应有参数构造方法。
    public Order(String oname, String address) {
        this.oname = oname;
        this.address = address;
    }
    <bean id="order" class="com.ayu.study.Order">
        <constructor-arg name="oname" value="food"></constructor-arg>
        <constructor-arg name="address" value="china"></constructor-arg>
    </bean>
(3)p名称空间注入(了解),是set注入的一种简化
1、使用p名称空间注入,可以简化基于xml配置方式
第一步:添加p名称空间在配置文件中
<beans xmlns="http://www.springframework.org/schema/beans"
       xmlns:xsi="http://www.w3.org/2001/XMLSchema-instance"
       xmlns:p="http://www.springframework.org/schema/p"
       xsi:schemaLocation="http://www.springframework.org/schema/beans http://www.springframework.org/schema/beans/spring-beans.xsd">
第二步:进行属性注入,在bean标签里面进行操作
<bean id="book" class="com.ayu.study.Book" p:bauthor="lxy" p:bname="wanwan"></bean>
(4)xml注入其他类型属性
1、字面量:null值/属性值包括特殊符号
<!--null值-->
<property name="address" >
<null/>
</property>
<!--特殊符号<<>>
1.转义: ><
2.CDATA:<value><![CDATA[xxxxxxxx]]></value> (快捷键:CD回车,只能以一个标签的方式去使用)
-->
<property name="bauthor" >
<value><![CDATA[<<unkonwn>>]]></value>
</property>
<property name="address" value="<lxy>"></property>
(5)注入属性-外部bean
1、创建两个类service类和dao类
package com.ayu.study.Service;
import com.ayu.study.Dao.UserDao;

public class UserService {
   private UserDao userDao;

    public void add(){
        System.out.println("service add...");
        userDao.add();
    }

    public void setUserDao(UserDao userDao) {
        this.userDao = userDao;
    }
}
package com.ayu.study.Dao;

public interface UserDao {
    public void add();
}
package com.ayu.study.Dao;

public class UserDaoImpl implements UserDao{
    @Override
    public void add() {
        System.out.println("UserDao add...");
    }
}
2、在service调用dao里面的方法
3、在spring的配置文件中配置
<?xml version="1.0" encoding="UTF-8"?>
<beans xmlns="http://www.springframework.org/schema/beans"
       xmlns:xsi="http://www.w3.org/2001/XMLSchema-instance"
       xsi:schemaLocation="http://www.springframework.org/schema/beans http://www.springframework.org/schema/beans/spring-beans.xsd">

    <bean id="userService" class="com.ayu.study.Service.UserService">
        <property name="userDao" ref="userDao"></property>
    </bean>
    <bean id="userDao" class="com.ayu.study.Dao.UserDaoImpl"></bean>
</beans>
(6)注入属性-内部bean和级联赋值
1、一对多关系:部门和员工
一个部门有多个员工,一个员工属于一个部门
2、在实体类之间表示一对多关系,员工表示所属部门,使用对象类型属性表示
package com.ayu.study.Bean;
public class emp {
    private String name;
    private String gender;
    private dept dept;
    public void setName(String name) {
        this.name = name;
    }
    public void setGender(String gender) {
        this.gender = gender;
    }
    public void setDept(com.ayu.study.Bean.dept dept) {
        this.dept = dept;
    }
    public void add(){
        System.out.println(name+"::"+gender+"::"+dept);
    }
}
方法一:内部bean(只能在当前bean内部使用,不能之间通过IOC容器获取)
<bean id="emp" class="com.ayu.study.Bean.emp">
        <property name="name" value="lxy"></property>
        <property name="gender" value="女"></property>
        <property name="dept">
            <bean id="dept" class="com.ayu.study.Bean.dept">
                <property name="dname" value="art"></property>
            </bean>
        </property>
</bean>
方法二:级联赋值:同时对多个实体类赋值(需要先创建级联对象,再赋值)
<!--需要在Emp类里生成dept属性的get方法,如此才能emp.getdept().setName()-->
<bean id="emp" class="com.ayu.study.Bean.Emp">
        <property name="name" value="lxy"></property>
        <property name="gender" value="女"></property>
        <property name="dept" ref="dept"></property>
        <property name="dept.dname" value="sing"></property>
    </bean>
    <bean id="dept" class="com.ayu.study.Bean.Dept">
        <property name="dname" value="art"></property>
    </bean>
(7)注入集合类型属性
public class Student {
    private String[] courses;
    private List<String> lists;
    private Map<String,String> maps;
    private Set<String> sets;

    public void setCourses(String[] courses) {
        this.courses = courses;
    }

    public void setLists(List<String> lists) {
        this.lists = lists;
    }

    public void setMaps(Map<String, String> maps) {
        this.maps = maps;
    }

    public void setSets(Set<String> sets) {
        this.sets = sets;
    }

	 private Set<Teacher> teachers;
	 public void setTeachers(Set<Teacher> teachers) {
        this.teachers = teachers;
    }
}
<!-- 创建对象-->
<bean id="stu" class="com.ayu.study.collection.Student" >
<!-- 1.数组类型 -->
        <property name="courses">
            <array>
                <value>数学</value>
                <value>语文</value>
            </array>
        </property>
<!--2 list类型 -->

        <property name="lists">
            <list>
                <value>lxy</value>
                <value>ayu</value>
                <ref bean="studentOne"></ref>
            </list>
        </property>
<!-- 3.map集合-->
        <property name="maps">
            <map>
                <entry key="one" value="first"></entry>
                <entry key="two" value="second"></entry>
            </map>
        </property>
<!-- 4 sets类型-->
        <property name="sets">
            <set>
                <value>1</value>
                <value>2</value>
            </set>
        </property>
<!-- 5 对象集合-->
         <property name="teachers">
            <set>
                <ref bean="lxy"></ref>
                <ref bean="ayu"></ref>
            </set>
        </property>
    </bean>
    <bean id="lxy" class="com.ayu.study.collection.Teacher">
        <property name="tname" value="lxyname"></property>
    </bean>
    <bean id="ayu" class="com.ayu.study.collection.Teacher">
        <property name="tname" value="ayuname"></property>
    </bean>
把集合注入部分提取出来
1、在spring配置文件中引入名称空间util
<?xml version="1.0" encoding="UTF-8"?>
<beans xmlns="http://www.springframework.org/schema/beans"
       xmlns:xsi="http://www.w3.org/2001/XMLSchema-instance"
       xmlns:p="http://www.springframework.org/schema/p"
       xmlns:util="http://www.springframework.org/schema/util"
       xsi:schemaLocation="http://www.springframework.org/schema/beans http://www.springframework.org/schema/beans/spring-beans.xsd
                           http://www.springframework.org/schema/util   http://www.springframework.org/schema/util/spring-util.xsd">
</beans>
2、使用util标签完成list集合注入提取
private List<String> lists;
	<util:list id="my_book">
        <value>我的天才女友</value>
        <value>新名字的故事</value>
        <value>离开的留下的</value>
        <value>消失的孩子</value>
    </util:list>
    <bean id="book" class="com.ayu.study.collection.Book">
        <property name="lists" ref="my_book"></property>
    </bean>
2、FactoryBean
1、Spring有两种类型bean,一种普通bean,另一种是工程bean(FactoryBean)
2、普通bean:在配置文件中定义bean类型就是返回类型
3、工厂bean:在配置文件中定义bean的类型可以和返回类型不一样
- 第一步:创建类,让这个类作为工厂bean,实现接口FactoryBean
- 第二步:实现接口里面的方法,在实现的方法中定义返回的bean类型
FactoryBean是一个接口,需要创建一个类实现该接口,其中有三个方法:
(1)getObject():创建一个对象交给IOC容器管理
(2)getObjectType():设置所提供对象的类型
(3)isSingleton():所提供的对象是否单例
当把FactoryBean的实现类配置为bean时,会将当前类中的getObject()所返回的对象交给IOC容器管理。<bean class="com.atguigu.spring.factoryBean.TeacherFactoryBean"/>
package com.ayu.study.FactoryBean;

import com.ayu.study.collection.Teacher;
import org.springframework.beans.factory.FactoryBean;

public class MyBean implements FactoryBean<Teacher> {
//定义返回bean
    @Override
    public Teacher getObject() throws Exception {
        Teacher teacher = new Teacher();
        teacher.setTname("lxy");
        return teacher;
    }
    @Override
    public Class<?> getObjectType() {
        return null;
    }
}
3、IOC操作Bean管理(bean作用域)
1、在Spring里面,设置创建bean实例是单实例(只有一个对象)还是多实例(getBean每次都能获得新对象)
2、在Spring里面,默认情况下,bean是单实例对象
3、如何设置单实例还是多实例
配置文件bean标签里面有scope用于设置
- singleton (默认): 单实例,加载spring配置文件时就会创建单例对象
- prototype :多实例,不是在加载spring配置文件时创建对象,在调用getBean方法时创建多实例对象
4、IOC操作Bean管理(bean生命周期)
1、生命周期:从对象创建到对象销毁的过程
2、bean生命周期
(1)通过构造器创建bean实例(无参数构造)
(2)为bean的属性设置值和对其他bean引用(调用set方法)
(3)调用bean的初始化方法(需要进行配置)
(4)bean可以使用了(对象获取到了)
(5)当容器关闭时候,调用bean的销毁方法(需要进行配置销毁的方法)
注:若bean的作用域为单例时,生命周期的前三个步骤会在获取IOC容器时执行
若bean的作用域为多例时,生命周期的前三个步骤会在获取bean时执行
<bean id="orders" class="com.ayu.study.life.Order" init-method="initMechod" destroy-method="destoryMethod">
</bean>
3、bean的后置处理器,bean生命周期有七步
(1)通过构造器创建bean实例(无参数构造)
(2)为bean的属性设置值和对其他bean引用(调用set方法)
before(3)把bean实例传递给bean后置处理器的方法
(3)调用bean的初始化方法(需要进行配置)
after(3)把bean实例传递给bean后置处理器的方法
(4)bean可以使用了(对象获取到了)
(5)当IOC容器关闭时候,调用bean的销毁方法(需要进行配置销毁的方法)
public class MyBeanPost implements BeanPostProcessor {
    @Override
    public Object postProcessBeforeInitialization(Object bean, String beanName) throws BeansException {
        System.out.println("before");
        return BeanPostProcessor.super.postProcessBeforeInitialization(bean, beanName);
    }

    @Override
    public Object postProcessAfterInitialization(Object bean, String beanName) throws BeansException {
        System.out.println("after");
        return BeanPostProcessor.super.postProcessAfterInitialization(bean, beanName);
    }
}
<bean id="myBeanPost" class="com.ayu.study.life.MyBeanPost" ></bean>
在xml中配置后置处理器后,整个xml中配置的所有bean生命周期都会加上这两步。
5、xml自动装配
手动装配:
1、自动装配:根据指定装配规则(属性名称或属性类型),Spring自动将匹配的属性值进行注入。autowire
(1)根据属性名称自动注入 byName。注入值的bean的id值和类属性名称一样。
(2)根据属性类型 byType。根据要注入的属性的类型找到相应bean
(3)default/no表示不自动装配
注意:
- 若通过类型没有找到任何一个类型匹配的bean,此时不装配,属性使用默认值
- 若通过类型找到了多个类型匹配的bean,此时会抛出异常,NoUniqueBeanDefinitionException。
    <bean id="emp" class="com.ayu.study.autowire.Emp" autowire="byType"></bean>
    <bean id="dept" class="com.ayu.study.autowire.Dept"></bean>
6、外部属性文件
1、修改xml添加
 http://www.springframework.org/schema/context
 http://www.springframework.org/schema/context/spring-context.xsd
引入druid.jar包
<?xml version="1.0" encoding="UTF-8"?>
<beans xmlns="http://www.springframework.org/schema/beans"
       xmlns:xsi="http://www.w3.org/2001/XMLSchema-instance"
       xmlns:context="http://www.springframework.org/schema/context"
       xsi:schemaLocation="http://www.springframework.org/schema/beans
        http://www.springframework.org/schema/beans/spring-beans.xsd
        http://www.springframework.org/schema/context
        http://www.springframework.org/schema/context/spring-context.xsd">
	<!--引入jdbc.properties,之后可以通过${key}的方式访问value-->
    <context:property-placeholder location="jdbc.properties"/>
    <bean id="dataSource" class="com.alibaba.druid.pool.DruidDataSource">
        <property name="driverClassName" value="${prop.driverClass}"/>
        <property name="url" value="${prop.url}"/>
        <property name="username" value="${prop.username}"/>
        <property name="password" value="${prop.password}"/>
    </bean>
</beans>
2、写jdbc.properties
prop.driverClass=ayu
prop.url=196.187.1.123
prop.username=lxy
prop.password=123
IOC操作Bean管理(基于注解)
1、什么是注解
(1)注解是代码特殊标记,格式:@注解名称(属性名称)
(2)使用注解。注解作用在类上面、方法上、属性上
(3)使用注解的,目的:简化xml配置
2、Spring针对Bean管理中创建对象提供注解
(1)@Component:普通组件
(2)@Service:业务层组件
(3)@Controller:控制层组件
(4)@Repository:持久层组件
上面四个注解功能是一样的,都可以用来创建bean实例
加上注解就相当于在xml文件上配置了一个bean
3、基于注解方式实现对象创建
第一步 引入依赖

第二步 开启组件扫描
<?xml version="1.0" encoding="UTF-8"?>
<beans xmlns="http://www.springframework.org/schema/beans"
       xmlns:xsi="http://www.w3.org/2001/XMLSchema-instance"
       xmlns:context="http://www.springframework.org/schema/context"
       xsi:schemaLocation="http://www.springframework.org/schema/beans
        http://www.springframework.org/schema/beans/spring-beans.xsd
        http://www.springframework.org/schema/context
        http://www.springframework.org/schema/context/spring-context.xsd">
<!-- 开启组件扫描
     1、如果扫描多个包。多个包使用逗号隔开
     2、也可以直接扫描包上层目录
     -->
<context:component-scan base-package="com.ayu.spring"/>

</beans>
第三步 创建类,在类上添加注解(在注解里面value为bean的id名称,可以省略不写,默认值是首字母小写的类名称)
package com.ayu.spring.service;
import org.springframework.stereotype.Service;

@Service //相当于<bean id="userService" class="com.ayu.spring.UserService"/>
public class UserService {
    public void add(){
        System.out.printf("add...");
    }
}
4、开启组件扫描细节配置
<!--
    use-default-filters="false" 表示不使用默认的fillter(全部扫描),自己设置filtter
    context:include-filter 设置扫描哪些内容:扫描base-package下的@Controller注解
    -->
    <context:component-scan base-package="com.ayu.spring" use-default-filters="false">
        <context:include-filter type="annotation" expression="org.springframework.stereotype.Controller"/>
        <context:include-filter type="annotation" expression="org.springframework.stereotype.Controller"/>
    </context:component-scan>
    <!--
    下面配置扫描包所有内容
    context:exclude-filter:设置哪些内容不进行扫描
    -->
    <context:component-scan base-package="com.ayu.spring">
        <context:exclude-filter type="annotation" expression="org.springframework.stereotype.Controller"/>
        <context:exclude-filter type="assignable"expression="com.atguigu.spring.controller.UserController"/>
    </context:component-scan>
type=“annotation” 排除掉特定的注解
type=“assignable” 排除掉特点的类
5、基于注解方式实现属性注入
(1)@Autowired:根据属性类型进行自动装配
- 默认通过byType的方式,在IOC容器中通过类型匹配某个bean为属性赋值
- 若有多个类型匹配的bean,此时会自动转换为byName的方式实现自动装配的效果
第一步:把service和dao对象创建,在service和dao类添加创建对象注解
第二步:在service中注入dao对象,在service中定义dao类型属性(不需要添加set方法),添加注入属性注解。
//UserDaoImpl.java
@Repository
public class UserDaoImpl implements UserDao{
    @Override
    public void add() {
        System.out.println("UserDao add..");
    }
}
@Service
public class UserService {
    @Autowired
    private UserDao userDao;
    public void add(){
        System.out.printf("add...");
        userDao.add();
    }
}
(2)@Qualifier:根据属性名称进行注入
这个注解的使用需要和@Autowired一起使用(一个接口有两个实现类的情况)
@Autowired
    @Qualifier("UserDaoImpl1")
    private UserDao userDao;
(3)@Resource:可以根据类型注入,也可以根据名称注入
@Resource(name="UserDaoImpl1")//根据名称注入
@Resource(type="")//根据类型注入
(4)@Value:注入普通属性(替代property)
@Value(value = "lxy")
 private String name;
6、完全注解开发
(1)创建配置类,替代xml配置文件
@Configuration
@ComponentScan(basePackages = {"com.ayu.spring"})
public class MyConfig {
}
(2)编写测试类
ApplicationContext context = new AnnotationConfigApplicationContext(MyConfig.class);


 2540
2540


 被折叠的 条评论
为什么被折叠?
被折叠的 条评论
为什么被折叠?
 到【灌水乐园】发言


