


场景
若依前后端分离版本地搭建开发环境并运行项目的教程:
若依前后端分离版手把手教你本地搭建环境并运行项目_本地运行若依前后端分离-CSDN博客
若依前后端分离版如何集成的mybatis以及修改集成mybatisplus实现Mybatis增强:
https://blog.csdn.net/BADAO_LIUMANG_QIZHI/article/details/136203040
基于以上基础,测试批量将万级以上数据插入到mysql数据中的多种方式。
注:
实现
1、数据准备
参考上面集成mp时测试用的SysStudent表以及相关代码,每种方式执行前首先将数据库中
表清空。
application.yml中连接mysql的url中添加开启批处理模式的配置
&rewriteBatchedStatements=true
2、方式一:最基本的for循环批量插入的方式
直接使用mapper自带的insert方法使用for循环插入数据
编写单元测试
    @Test
    public void foreachInsertData() {
        StopWatch stopWatch = new StopWatch();
        stopWatch.start();
        for (int i = 0; i < 50000; i++) {
            SysStudent sysStudent = SysStudent.builder().studentName("test").studentAge(i).studentHobby("test").build();
            sysStudentMapper.insert(sysStudent);
        }
        stopWatch.stop();
        System.out.println(stopWatch.shortSummary());
    }
运行结果
时间较长,高达179秒,不推荐使用。
利用for循环进行单条插入时,每次都是在获取连接(Connection)、释放连接和资源关闭等操作上,
(如果数据量大的情况下)极其消耗资源,导致时间长。
当然所有测试时间均是在单元测试中进行,运行时间受多方面影响,不代表最终业务层运行实际时间,
仅用作同等条件方式下耗时对比。

3、方式二:使用拼接sql方式实现批量插入数据
在mapper中新增方法
public interface SysStudentMapper extends BaseMapper<SysStudent>
{
    @Insert("<script>" +
            "insert into sys_student (student_name, student_age, student_hobby) values " +
            "<foreach collection='studentList' item='item' separator=','> " +
            "(#{item.studentName}, #{item.studentAge},#{item.studentHobby}) " +
            "</foreach> " +
            "</script>")
    int insertSplice(@Param("studentList") List<SysStudent> studentList);
}
编写单元测试
    @Test
    public void spliceSqlInsertData() {
        ArrayList<SysStudent> students = new ArrayList<>();
        StopWatch stopWatch = new StopWatch();
        stopWatch.start();
        for (int i = 0; i < 50000; i++) {
            SysStudent sysStudent = SysStudent.builder().studentName("test").studentAge(i).studentHobby("test").build();
            students.add(sysStudent);
        }
        sysStudentMapper.insertSplice(students);
        stopWatch.stop();
        System.out.println(stopWatch.shortSummary());
    }
运行结果
拼接结果就是将所有的数据集成在一条SQL语句的value值上,其由于提交到服务器上的insert语句少了,网络负载少了,
性能也就提上去。但是当数据量上去后,可能会出现内存溢出、解析SQL语句耗时等情况。

4、方式三:使用mybatisplus的saveBatch实现批量插入
使用MyBatis-Plus实现IService接口中批处理saveBatch()方法
编写单元测试
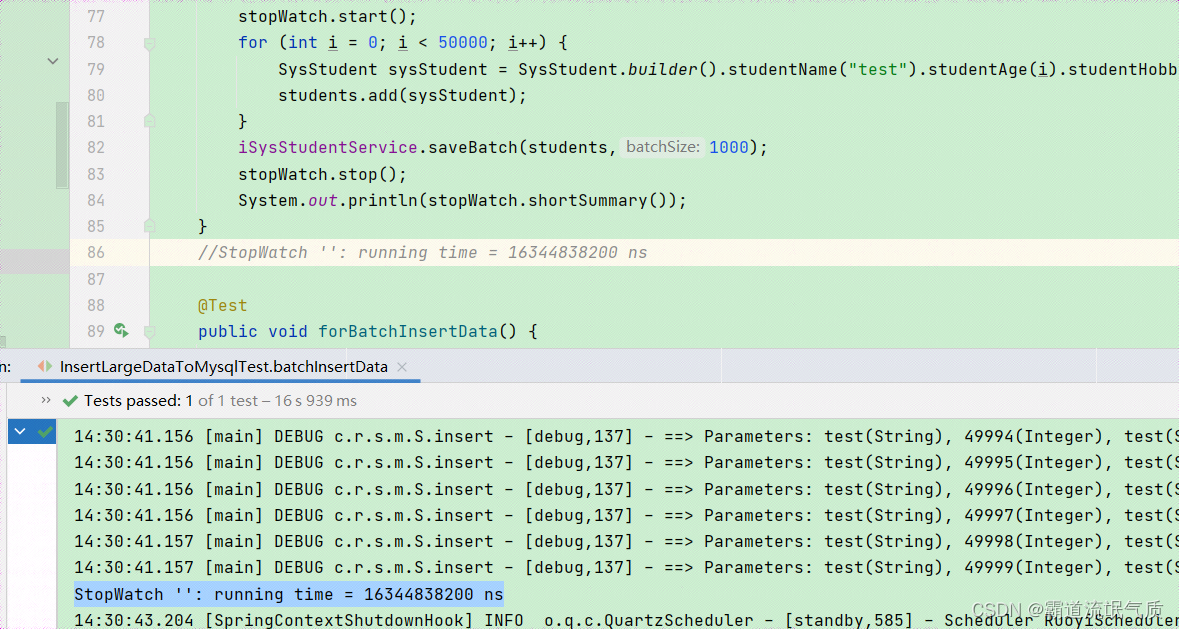
    @Test
    public void batchInsertData() {
        ArrayList<SysStudent> students = new ArrayList<>();
        StopWatch stopWatch = new StopWatch();
        stopWatch.start();
        for (int i = 0; i < 50000; i++) {
            SysStudent sysStudent = SysStudent.builder().studentName("test").studentAge(i).studentHobby("test").build();
            students.add(sysStudent);
        }
        iSysStudentService.saveBatch(students,1000);
        stopWatch.stop();
        System.out.println(stopWatch.shortSummary());
    }
运行结果
5、方式四:共用SqlSession,关闭自动提交事务实现for循环批量插入大数据量数据
由于同一个SqlSession省去对资源相关操作的耗能、减少对事务处理的时间等,从而极大程度上提高执行效率。
编写单元测试
    @Test
    public void forBatchInsertData() {
        //开启批处理处理模式 BATCH,关闭自动提交事务
        SqlSession sqlSession = sqlSessionFactory.openSession(ExecutorType.BATCH,false);
        //反射获取 Mapper
        SysStudentMapper sysStudentMapper = sqlSession.getMapper(SysStudentMapper.class);
        StopWatch stopWatch = new StopWatch();
        stopWatch.start();
        for (int i = 0; i < 50000; i++) {
            SysStudent sysStudent = SysStudent.builder().studentName("test").studentAge(i).studentHobby("test").build();
            sysStudentMapper.insert(sysStudent);
        }
        //一次性提交事务
        sqlSession.commit();
        //关闭资源
        sqlSession.close();
        stopWatch.stop();
        System.out.println(stopWatch.shortSummary());
    }
引入依赖
    @Autowired
    private SqlSessionFactory sqlSessionFactory;
运行结果
推荐使用

6、方式五:使用ThreadPoolTaskExecuror线程池实现批量插入大数据量数据到mysql
将要插入的数据列表按照指定的批次大小分割成多个子列表,并开启多个线程来执行插入操作。
通过 TransactionManager 获取事务管理器,并使用 TransactionDefinition 定义事务属性。
在每个线程中,我们通过 transactionManager.getTransaction() 方法获取事务状态,并在插入操作中使用该状态来管理事务。
在插入操作完成后,根据操作结果调用transactionManager.commit()或 transactionManager.rollback() 方法来提交或回滚事务。
在每个线程执行完毕后,都会调用 CountDownLatch 的 countDown() 方法,以便主线程等待所有线程都执行完毕后再返回。
Java中使用CountDownLatch实现并发流程控制:
Java中使用CountDownLatch实现并发流程控制_countdownlatch设置为几-CSDN博客
SpringBoot中使用Spring自带线程池ThreadPoolTaskExecutor与Java8CompletableFuture实现异步任务示例:
编写单元测试:
    @Test
    public void threadPoolInsertData() {
        ArrayList<SysStudent> students = new ArrayList<>();
        StopWatch stopWatch = new StopWatch();
        stopWatch.start();
        for (int i = 0; i < 50000; i++) {
            SysStudent sysStudent = SysStudent.builder().studentName("test").studentAge(i).studentHobby("test").build();
            students.add(sysStudent);
        }
        int count = students.size();
        int pageSize = 1000; //每批次插入的数据量
        int threadNum = count%pageSize == 0?(count/pageSize):(count/pageSize+1); //线程数
        CountDownLatch countDownLatch = new CountDownLatch(threadNum);
        for (int i = 0; i < threadNum; i++) {
            int startIndex = i * pageSize;
            int endIndex = Math.min(count,(i+1)*pageSize);
            List<SysStudent> subList = students.subList(startIndex,endIndex);
            threadPoolTaskExecutor.execute(()->{
                DefaultTransactionDefinition transactionDefinition = new DefaultTransactionDefinition();
                TransactionStatus status = transactionManager.getTransaction(transactionDefinition);
                try{
                    sysStudentMapper.insertSplice(subList);
                    transactionManager.commit(status);
                }catch (Exception exception){
                    transactionManager.rollback(status);
                    throw exception;
                }finally {
                    countDownLatch.countDown();
                }
            });
        }
        try{
            countDownLatch.await();
        }catch (InterruptedException e){
            e.printStackTrace();
        }
        stopWatch.stop();
        System.out.println(stopWatch.shortSummary());
    }
需要引入依赖
    @Autowired
    private ThreadPoolTaskExecutor threadPoolTaskExecutor;

    @Autowired
    private PlatformTransactionManager transactionManager;
运行结果
推荐使用


 3446
3446


 被折叠的 条评论
为什么被折叠?
被折叠的 条评论
为什么被折叠?
 到【灌水乐园】发言


