


链接:
实现:
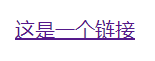
<a href="https://www.runoob.com">这是一个链接</a>
效果:
备注:
- 添加
target="_blank"使点击打开新标签页 - url编写时请始终将正斜杠添加到子文件夹,即在最后加个
/,否则会向服务器产生两次http请求。 - 使用href可以实现跳转到网页的特定位置,这被称为目标锚,倘若目标锚在本页面内,则直接“#id”,如果在其他页面内,则“相对地址#id”,如
<a href="#C4">查看章节 4</a>

<h2><a id="C4">章节 4</a></h2>
- 可以通过"#top"回到顶部,例如:
<a href="#top">Back to top</a>
图片:
语法:
<img src="url" alt="some_text">
实现:
<img src="/images/logo.png" width="258" height="39" />
备注:
- 在开始标签中进行关闭
- 在
<a>中插入<img>即可实现图片链接 - 加入
alt属性用来为图像定义一串预备的可替换的文本。在浏览器无法载入图像时,替换文本属性告诉读者她们失去的信息。 - 利用
usemap可以创建图片映射:
<img src="planets.gif" width="145" height="126" alt="Planets" usemap="#planetmap">

<map name="planetmap">
  <area shape="rect" coords="0,0,82,126" alt="Sun" href="sun.htm">
  <area shape="circle" coords="90,58,3" alt="Mercury" href="mercur.htm">
  <area shape="circle" coords="124,58,8" alt="Venus" href="venus.htm">
</map>
水平线
实现:
<hr />
效果:
<p>这是段落。</p>
<hr />
<p>这是段落。</p>

文本格式化
参考:文本格式化
头部
<title>定义标题
<base>定义页面中所有链接默认的链接目标地址。
例如:
<base href="//www.runoob.com/images/" target="_blank">
设置了图片的相对地址,当图片src属性为"logo.png"时,实际就是"http://www.runoob.com/images/logo.png"
<mata>描述HTML文档的描述,关键词,作者,字符集等。
<link>标签定义了文档与外部资源之间的关系,通常用于链接到样式表:
<head>
<link rel="stylesheet" type="text/css" href="mystyle.css">
</head>
<style>标签定义了HTML文档的样式文件引用地址,你也可以直接添加样式来渲染 HTML 文档
<head>
<style type="text/css">
body {background-color:yellow}
p {color:blue}
</style>
</head>
表格
每个表格从一个 table 标签开始。
表格的表头使用 标签进行定义,显示为粗体居中的文本。
每行从 tr 标签开始。
每列从 td 标签开始。
示例:
<h4>水平标题:</h4>
<table border="1">
<tr>
  <th>Name</th>
  <th>Telephone</th>
  <th>Telephone</th>
</tr>
<tr>
  <td>Bill Gates</td>
  <td>555 77 854</td>
  <td>555 77 855</td>
</tr>
</table>

<h4>垂直标题:</h4>
<table border="1">
<tr>
  <th>First Name:</th>
  <td>Bill Gates</td>
</tr>
<tr>
  <th>Telephone:</th>
  <td>555 77 854</td>
</tr>
<tr>
  <th>Telephone:</th>
  <td>555 77 855</td>
</tr>
</table>
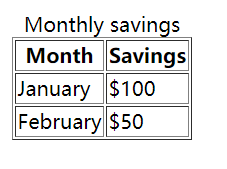
效果:

备注:
- 添加标题
<caption>
<table border="1">
  <caption>Monthly savings</caption>
  <tr>
    <th>Month</th>
    <th>Savings</th>
  </tr>
  <tr>
    <td>January</td>
    <td>$100</td>
  </tr>
  <tr>
    <td>February</td>
    <td>$50</td>
  </tr>
</table>
效果:
- 单元格跨行
<h4>单元格跨两列:</h4>
<table border="1">
<tr>
  <th>Name</th>
  <th colspan="2">Telephone</th>
</tr>
<tr>
  <td>Bill Gates</td>
  <td>555 77 854</td>
  <td>555 77 855</td>
</tr>
</table>

<h4>单元格跨两行:</h4>
<table border="1">
<tr>
  <th>First Name:</th>
  <td>Bill Gates</td>
</tr>
<tr>
  <th rowspan="2">Telephone:</th>
  <td>555 77 854</td>
</tr>
<tr>
  <td>555 77 855</td>
</tr>
</table>
效果:

- 单元格边距
<table border="1" cellpadding="100">

<table border="1" cellspacing="100">

列表
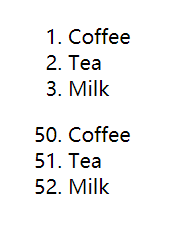
有序
<ol>
  <li>Coffee</li>
  <li>Tea</li>
  <li>Milk</li>
</ol>

<ol start="50">
  <li>Coffee</li>
  <li>Tea</li>
  <li>Milk</li>
</ol>
无序
<ul>
  <li>Coffee</li>
  <li>Tea</li>
  <li>Milk</li>
</ul>

布局
使用<div>布局:
<div id="container" style="width:500px">

<div id="header" style="background-color:#FFA500;">
<h1 style="margin-bottom:0;">主要的网页标题</h1></div>

<div id="menu" style="background-color:#FFD700;height:200px;width:100px;float:left;">
<b>菜单</b><br>
HTML<br>
CSS<br>
JavaScript</div>

<div id="content" style="background-color:#EEEEEE;height:200px;width:400px;float:left;">
内容在这里</div>

<div id="footer" style="background-color:#FFA500;clear:both;text-align:center;">
版权 © runoob.com</div>

</div>

表单和输入
-
action:表示当前表单中的内容提交给哪个页面进行处理 -
method:表示当前表单提交的方式,常见的有get和post方式,默认是get提交- get提交与post提交:

详细:GET和POST两种基本请求方法的区别
- get提交与post提交:
-
<input>有多种形式:
<form action="">
Username: <input type="text" name="user"><br>	<!--文本-->
Password: <input type="password" name="password"><br />	<!--密码-->
<br />

<input type="radio" name="sex" value="male">Male<br>	<!--单选-->
<input type="radio" name="sex" value="female">Female<br />
<br />

<input type="checkbox" name="vehicle" value="Bike">I have a bike<br>	<!--复选-->
<input type="checkbox" name="vehicle" value="Car">I have a car<br />
<br />
</form>

<form name="input" action="html_form_action.php" method="get">
Username: <input type="text" name="user">
<input type="submit" value="Submit">
</form>

下拉列表:
<form action="">
<select name="cars">
<option value="volvo">Volvo</option>
<option value="saab">Saab</option>
<option value="fiat">Fiat</option>
<option value="audi">Audi</option>
</select>
</form>
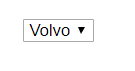
预定的下拉列表
<form action="">
<select name="cars">
<option value="volvo">Volvo</option>
<option value="saab">Saab</option>
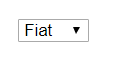
<option value="fiat" selected>Fiat</option>
<option value="audi">Audi</option>
</select>
</form>
框架
使用框架,你可以在同一个浏览器窗口中显示不止一个页面。
水平框架 h5不支持
<frameset rows="25%,50%,25%">

  <frame src="/example/html/frame_a.html">
  <frame src="/example/html/frame_b.html">
  <frame src="/example/html/frame_c.html">

</frameset>
效果:

垂直框架h5不支持
<frameset cols="25%,50%,25%">

  <frame src="/example/html/frame_a.html">
  <frame src="/example/html/frame_b.html">
  <frame src="/example/html/frame_c.html">

</frameset>
效果:

内嵌框架
<iframe src="demo_iframe.htm" width="200" height="200"></iframe>

备注:
- 设置属性
frameborder值为 “0” 移除iframe的边框 - 利用
<a>的target指向内嵌框架可以让<a>指定页面在框架内打开。
<iframe src="demo_iframe.htm" name="iframe_a"></iframe>
<p><a href="//www.runoob.com" target="iframe_a">RUNOOB.COM</a></p>
字符实体
在 HTML 中,某些字符是预留的。例如在 HTML 中不能使用小于号(<)和大于号(>),这是因为浏览器会误认为它们是标签。
| 显示 | 实体名称 | 实体编号 |
|---|---|---|
| 空格 |  ; |  ; |
| < | &It; | <; |
| > | >; | >; |


 569
569


 被折叠的 条评论
为什么被折叠?
被折叠的 条评论
为什么被折叠?
 到【灌水乐园】发言


