


Java框架-MyBatis 详细介绍(crud+缓存+联表+缓存+#{}与${}+日志…)
一、MyBatis的介绍
1.1 回顾一下JDBC
下面这个代码是使用JDBC实现基于id查询员工信息,我们来分析分析有什么弊端。
public Employee selectById(Long id) {
    Connection conn = null;
    PreparedStatement ps = null;
    ResultSet rs = null;
    try {
        conn = JDBCUtils.getConnection();
        ps = conn.prepareStatement("select * from employee where id = ?");
        ps.setLong(1,id);
        rs = ps.executeQuery();
        if (rs.next()){
            Employee employee = new Employee();
            employee.setId(rs.getLong("id"));
            employee.setName(rs.getString("name"));
            employee.setAge(rs.getInt("age"));
            employee.setSex(rs.getInt("sex"));
            employee.setPhone(rs.getString("phone"));
            employee.setAddress(rs.getString("address"));
            employee.setCreatedate(rs.getTimestamp("createdate"));
            return employee;
        }
    } catch (SQLException e) {
        e.printStackTrace();
    } finally {
        JDBCUtils.close(conn,ps,rs);
    }
    return null;
}
弊端如下:
1、SQL代码耦合在Java代码中。
2、SQL中的参数需要自己手动设置,获得结果集后需要自己进行结果的封装。
3、每次需要自己获取连接,用完以后关闭连接。
而这些问题,都可以使用mybatis框架来解决。
2.1 MyBatis的介绍
MyBatis官网英文版:https://mybatis.org/mybatis-3
MyBatis官网中文版:https://mybatis.org/mybatis-3/zh/index.html
MyBatis整合Spring:http://mybatis.org/spring/zh/index.html
MyBatis 是一款优秀的持久层框架,它支持自定义 SQL、存储过程以及高级映射。MyBatis 免除了几乎所有的 JDBC 代码以及设置参数和获取结果集的工作。MyBatis 可以通过简单的 XML 或注解来配置和映射原始类型、接口和 Java POJO(Plain Old Java Objects,普通老式 Java 对象)为数据库中的记录。
同时MyBatis也是一款半ORM映射的框架。ORM-对象关系映射。
二、MyBatis基础入门
提前准备数据库表
库名:mytest
表名:user
CREATE TABLE `user` (
  `id` int(11) NOT NULL AUTO_INCREMENT,
  `password` varchar(100) DEFAULT NULL,
  `username` varchar(100) DEFAULT NULL,
  PRIMARY KEY (`id`)
) ENGINE=InnoDB AUTO_INCREMENT=10 DEFAULT CHARSET=utf8;
2.1 导入依赖
<dependency>
    <groupId>org.mybatis</groupId>
    <artifactId>mybatis</artifactId>
    <version>3.5.6</version>
</dependency>
<dependency>
    <groupId>mysql</groupId>
    <artifactId>mysql-connector-java</artifactId>
    <version>8.0.21</version>
</dependency>
2.2 创建SqlSessionFactory
咱们使用从 XML 中构建 SqlSessionFactory对象的方式。
① 准备配置文件:在resources目录中新建mybatis核心配置文件mybatis-config.xml,内容如下:
<?xml version="1.0" encoding="UTF-8" ?>
<!DOCTYPE configuration
PUBLIC "-//mybatis.org//DTD Config 3.0//EN"
"http://mybatis.org/dtd/mybatis-3-config.dtd">
<configuration>
<!--environments:MyBatis可以配置多种连接环境(开发,测试,线上)
default属性关联具体配置的id-->
<environments default="development">
<!--具体的环境配置,id必须唯一 -->
<environment id="development">
<!--配置事务管理器,MyBatis中有两种类型的事务管理器:JDBC和MANAGED
JDBC: 使用了JDBC的提交和回滚功能
MANAGED:不使用事务
-->
<transactionManager type="JDBC"/>
<!--数据源相关配置
type="POOLED" 使用mybatis自己带连接池
type="UNPOOLED" 不使用连接池,每次都新建连接,用完关闭连接
type="JNDI" 采用服务器提供的JNDI技术实现,获取DataSource
-->
<dataSource type="POOLED">
<property name="driver" value="com.mysql.cj.jdbc.Driver"/>
<property name="url" value="jdbc:mysql://localhost:3306/mytest?characterEncoding=utf8&useSSL=false&serverTimezone=Asia/Shanghai"/>
<property name="username" value="root"/>
<property name="password" value="123456"/>
</dataSource>
</environment>
</environments>
</configuration>
② 读取配置文件,创建SqlSessionFactory对象
//1.读取配置文件
InputStream in = Resources.getResourceAsStream("mybatis-config.xml");
//2.创建Sql会话工厂对象
SqlSessionFactory sqlSessionFactory = new SqlSessionFactoryBuilder().build(in);
③ 还可以将数据库连接参数(driver,url,username,password)抽离出去,职责单一化。
在resources目录中新建db.propertis内容如下:
driver=com.mysql.cj.jdbc.Driver
url=jdbc:mysql://localhost:3306/mytest?characterEncoding=utf8&useSSL=false&serverTimezone=Asia/Shanghai
username=root
password=123456
mybatis-config.xml内容修改如下:
<?xml version="1.0" encoding="UTF-8" ?>
<!DOCTYPE configuration
        PUBLIC "-//mybatis.org//DTD Config 3.0//EN"
        "http://mybatis.org/dtd/mybatis-3-config.dtd">
<configuration>
    <!--引入配置文件-->
    <properties resource="db.properties"></properties>
    <environments default="development">
        <environment id="development">
            <transactionManager type="JDBC"/>
            <dataSource type="POOLED">
                <!--使用: ${key}的方式取值即可-->
                <property name="driver" value="${driver}"/>
                <property name="url" value="${url}"/>
                <property name="username" value="${username}"/>
                <property name="password" value="${password}"/>
            </dataSource>
        </environment>
    </environments>
</configuration>
2.3 获取SqlSession并执行SQL
① 创建User实体类
package cn.mybatis.domain;
public class User {
    private Integer id;
    private String password;
    private String username;
    //省略 get  set  toString
}
② 编写映射文件Mapper.xml,将SQL语句抽离到映射文件中。
在resources目录新建mapper目录,在其中创建UserMapper.xml
即:resources/mapper/UserMapper.xml
<?xml version="1.0" encoding="UTF-8" ?>
<!DOCTYPE mapper
        PUBLIC "-//mybatis.org//DTD Mapper 3.0//EN"
        "http://mybatis.org/dtd/mybatis-3-mapper.dtd">
<!-- namespace:命名空间,可以任意取名,但必须唯一 -->
<mapper namespace="cn.mybatis.mapper.UserMapper">
    <!-- id:用于区分sql,在当前命名空间下必须唯一,与命名空间配合定位sql。语法:命名空间.id
         parameterType:参数类型
         resultType:返回值类型
    -->
    <select id="selectById" parameterType="int" resultType="cn.mybatis.domain.User">
        select * from user where id = #{id}
    </select>
</mapper>

<!--
	说明:
	#{id}  是参数的占位符,调用时会替换为真实的id值。
-->
③ 加载UserMapper.xml文件
在 mybatis-config.xml 中添加配置,加载mapper映射文件
<mappers>
    <mapper resource="mapper/UserMapper.xml"></mapper>
</mappers>
④ 使用SqlSession执行sql
//1.读取mybatis配置文件
InputStream in = Resources.getResourceAsStream("mybatis-config.xml");
//2.创建sql会话工厂对象
SqlSessionFactory sqlSessionFactory = new SqlSessionFactoryBuilder().build(in);
//3.创建sql会话对象
SqlSession session = sqlSessionFactory.openSession();
//4.执行sql
// 参数1:定位sql,命名空间.id
// 参数2:执行sql时的参数
User user = session.selectOne("cn.mybatis.mapper.UserMapper.selectById", 1);
System.out.println(user);
//5.关闭会话
session.close();
三、MyBatis实现CRUD
3.1 新增User
① 映射文件编写sql
<?xml version="1.0" encoding="UTF-8" ?>
<!DOCTYPE mapper
        PUBLIC "-//mybatis.org//DTD Mapper 3.0//EN"
        "http://mybatis.org/dtd/mybatis-3-mapper.dtd">
<mapper namespace="cn.mybatis.mapper.UserMapper">
    <insert id="insert" parameterType="cn.mybatis.pojo.User">
        insert into user(username,password) values(#{username},#{password})
    </insert>
</mapper>
② 执行sql
//1.读取mybatis配置文件
InputStream in = Resources.getResourceAsStream("mybatis-config.xml");
//2.创建sql会话工厂对象
SqlSessionFactory sqlSessionFactory = new SqlSessionFactoryBuilder().build(in);
//3.创建sql会话对象
SqlSession session = sqlSessionFactory.openSession();
//4.执行sql
User user = new User();
user.setUsername("张三");
user.setPassword("123456");
// 参数1:定位sql,命名空间.id
// 参数2:执行sql时的参数
session.insert("cn.mybatis.mapper.UserMapper.insert",user);
//5.提交事务(mybatis需要手动提交事务)
session.commit();
//6.关闭会话
session.close();
3.2 修改User
① 映射文件编写sql
<?xml version="1.0" encoding="UTF-8" ?>
<!DOCTYPE mapper
        PUBLIC "-//mybatis.org//DTD Mapper 3.0//EN"
        "http://mybatis.org/dtd/mybatis-3-mapper.dtd">
<mapper namespace="cn.mybatis.mapper.UserMapper">
    <update id="update" parameterType="cn.mybatis.domain.User">
        update user set username=#{username},password=${password} where id = #{id}
    </update>
</mapper>

<!--
	说明:
	#{username}等占位符,取值时调用的是对象相应的get方法,#{username}就是调用getUsername()
-->
② 执行sql
//1.读取mybatis配置文件
InputStream in = Resources.getResourceAsStream("mybatis-config.xml");
//2.创建sql会话工厂对象
SqlSessionFactory sqlSessionFactory = new SqlSessionFactoryBuilder().build(in);
//3.创建sql会话对象
SqlSession session = sqlSessionFactory.openSession();
//4.执行sql
User user = new User();
user.setId(1);
user.setUsername("张三");
user.setPassword("123456");
// 参数1:定位sql,命名空间.id
// 参数2:执行sql时的参数
session.update("cn.mybatis.mapper.UserMapper.update",user);
//5.提交事务(mybatis需要手动提交事务)
session.commit();
//6.关闭会话
session.close();
3.3 删除User
① 映射文件编写sql
<?xml version="1.0" encoding="UTF-8" ?>
<!DOCTYPE mapper
        PUBLIC "-//mybatis.org//DTD Mapper 3.0//EN"
        "http://mybatis.org/dtd/mybatis-3-mapper.dtd">
<mapper namespace="cn.mybatis.mapper.UserMapper">
    <delete id="delete" parameterType="int">
        delete from user where id = #{id}
    </delete>
</mapper>
② 执行sql
//1.读取mybatis配置文件
InputStream in = Resources.getResourceAsStream("mybatis-config.xml");
//2.创建sql会话工厂对象
SqlSessionFactory sqlSessionFactory = new SqlSessionFactoryBuilder().build(in);
//3.创建sql会话对象
SqlSession session = sqlSessionFactory.openSession();
//4.执行sql
// 参数1:定位sql,命名空间.id
// 参数2:执行sql时的参数
session.delete("cn.mybatis.mapper.UserMapper.delete",1);
//5.提交事务(mybatis需要手动提交事务)
session.commit();
//6.关闭会话
session.close();
3.4 查询全部User
① 映射文件编写sql
<?xml version="1.0" encoding="UTF-8" ?>
<!DOCTYPE mapper
        PUBLIC "-//mybatis.org//DTD Mapper 3.0//EN"
        "http://mybatis.org/dtd/mybatis-3-mapper.dtd">
<mapper namespace="cn.mybatis.mapper.UserMapper">
	<!-- 这里返回的是多条结果,mybatis会自动封装为集合返回
		但是,返回类型不是写集合类型,而是写集合中存储的元素类型
	-->
    <select id="selectAll" resultType="cn.mybatis.domain.User">
        select * from user
    </select>
</mapper>
② 执行sql
//1.读取mybatis配置文件
InputStream in = Resources.getResourceAsStream("mybatis-config.xml");
//2.创建sql会话工厂对象
SqlSessionFactory sqlSessionFactory = new SqlSessionFactoryBuilder().build(in);
//3.创建sql会话对象
SqlSession session = sqlSessionFactory.openSession();
//4.执行sql
// 参数1:定位sql,命名空间.id
List<Object> userList = session.selectList("cn.mybatis.mapper.UserMapper.selectAll");
System.out.println(userList);
//5.关闭会话
session.close();
经过以上的CRUD练习,我们可以体会到,在mybatis中sql参数的设置和结果集的封装都不需要我们手动完成,简化了编码步骤,但是,可以看出,咱们代码量貌似并没有随之减少。 不用担心,mybatis提供了映射器的方式,可以简化代码。
四、MyBatis映射器
4.1 介绍
MyBatis映射器允许我们只为其提供接口以及相关抽象方法,还有Mapper映射文件,MyBatis就能够使用代理模式为我们进行具体的实现,从而完成数据库操作。
4.2 实现CRUD
4.2.1 提供接口
接口命名规则:XxxxMapper
package cn.mybatis.mapper;
...
public interface UserMapper {
    //增
    void insert(User user);
    //删
    void delete(Integer id);
    //改
    void update(User user);
    //基于id查询
    User selectById(Integer id);
    //查询全部
    List<User> selectAll();
}
4.2.2 提供mapper映射文件
映射文件mapper/UserMapper.xml,核心配置文件mybatis-config.xml不用修改
<?xml version="1.0" encoding="UTF-8" ?>
<!DOCTYPE mapper
        PUBLIC "-//mybatis.org//DTD Mapper 3.0//EN"
        "http://mybatis.org/dtd/mybatis-3-mapper.dtd">
<!-- namespace:必须为mapper接口的全限定名(包名.类名) -->
<mapper namespace="cn.mybatis.mapper.UserMapper">
    <!--sql的id必须与接口中的方法名一致-->
    <!--void insert(User user);-->
    <insert id="insert" parameterType="cn.mybatis.domain.User">
        insert into user(username,password) values(#{username},#{password})
    </insert>
    <!--void delete(Integer id);-->
    <delete id="delete" parameterType="int">
        delete from user where id = #{id}
    </delete>
    <!--void update(User user);-->
    <update id="update" parameterType="cn.mybatis.domain.User">
        update user set username=#{username},password=${password} where id = #{id}
    </update>
    <!--User selectById(Integer id);-->
    <select id="selectById" parameterType="int" resultType="cn.mybatis.pojo.User">
        select * from user where id = #{id}
    </select>
    <!--List<User> selectAll();-->
    <select id="selectAll" resultType="cn.mybatis.domain.User">
        select * from user
    </select>
</mapper>
4.2.3 测试
public class MyBatisTest1 {
    @Test //新增
    public void t1() throws IOException {
        //1.读取mybatis配置文件
        InputStream in = Resources.getResourceAsStream("mybatis-config.xml");
        //2.创建sql会话工厂对象
        SqlSessionFactory sqlSessionFactory = new SqlSessionFactoryBuilder().build(in);
        //3.创建sql会话对象
        SqlSession session = sqlSessionFactory.openSession();
        //4.获取映射器(mapper接口)实现类对象(代理模式实现)
        UserMapper mapper = session.getMapper(UserMapper.class);
        //5.执行sql
        User user = new User();
        user.setUsername("张三");
        user.setPassword("123456");
        mapper.insert(user);
        //5.提交事务(mybatis需要手动提交事务)
        session.commit();
        //5.关闭会话
        session.close();
    }

    @Test //删除
    public void t2() throws IOException {
        //1.读取mybatis配置文件
        InputStream in = Resources.getResourceAsStream("mybatis-config.xml");
        //2.创建sql会话工厂对象
        SqlSessionFactory sqlSessionFactory = new SqlSessionFactoryBuilder().build(in);
        //3.创建sql会话对象
        SqlSession session = sqlSessionFactory.openSession();
        //4.获取映射器(mapper接口)实现类对象(代理模式实现)
        UserMapper mapper = session.getMapper(UserMapper.class);
        //5.执行sql
        mapper.delete(11);
        //6.提交事务(mybatis需要手动提交事务)
        session.commit();
        //7.关闭会话
        session.close();
    }

    @Test //修改
    public void t3() throws IOException {
        //1.读取mybatis配置文件
        InputStream in = Resources.getResourceAsStream("mybatis-config.xml");
        //2.创建sql会话工厂对象
        SqlSessionFactory sqlSessionFactory = new SqlSessionFactoryBuilder().build(in);
        //3.创建sql会话对象
        SqlSession session = sqlSessionFactory.openSession();
        //4.获取映射器(mapper接口)实现类对象(代理模式实现)
        UserMapper mapper = session.getMapper(UserMapper.class);
        //5.执行sql
        User user = new User();
        user.setId(12);
        user.setUsername("李四");
        user.setPassword("123456");
        mapper.update(user);
        //6.提交事务(mybatis需要手动提交事务)
        session.commit();
        //7.关闭会话
        session.close();
    }

    @Test //基于id查询
    public void t4() throws IOException {
        //1.读取mybatis配置文件
        InputStream in = Resources.getResourceAsStream("mybatis-config.xml");
        //2.创建sql会话工厂对象
        SqlSessionFactory sqlSessionFactory = new SqlSessionFactoryBuilder().build(in);
        //3.创建sql会话对象
        SqlSession session = sqlSessionFactory.openSession();
        //4.获取映射器(mapper接口)实现类对象(代理模式实现)
        UserMapper mapper = session.getMapper(UserMapper.class);
        //5.执行查询
        User user = mapper.selectById(12);
        System.out.println(user);
        //6.关闭会话
        session.close();
    }
    @Test //查询全部
    public void t5() throws IOException {
        //1.读取mybatis配置文件
        InputStream in = Resources.getResourceAsStream("mybatis-config.xml");
        //2.创建sql会话工厂对象
        SqlSessionFactory sqlSessionFactory = new SqlSessionFactoryBuilder().build(in);
        //3.创建sql会话对象
        SqlSession session = sqlSessionFactory.openSession();
        //4.获取映射器(mapper接口)实现类对象(代理模式实现)
        UserMapper mapper = session.getMapper(UserMapper.class);
        //5.执行查询
        List<User> users = mapper.selectAll();
        System.out.println(users);
        //6.关闭会话
        session.close();
    }
}
五、注解方式
对于UserMapper 这样的映射器类来说,还有另一种方法来完成语句映射。 它们映射的语句可以不用 XML 来配置,而可以使用 Java 注解来配置。
public interface UserMapper {
    //基于id查询
    @Select("select * from user where id = #{id}")
    User selectById(Integer id);
	...
}
六、类型别名
类型别名(参数类型或返回值类型)可为 Java 类型设置一个缩写名字。 它仅用于 XML 配置,意在降低冗余的全限定类名书写。
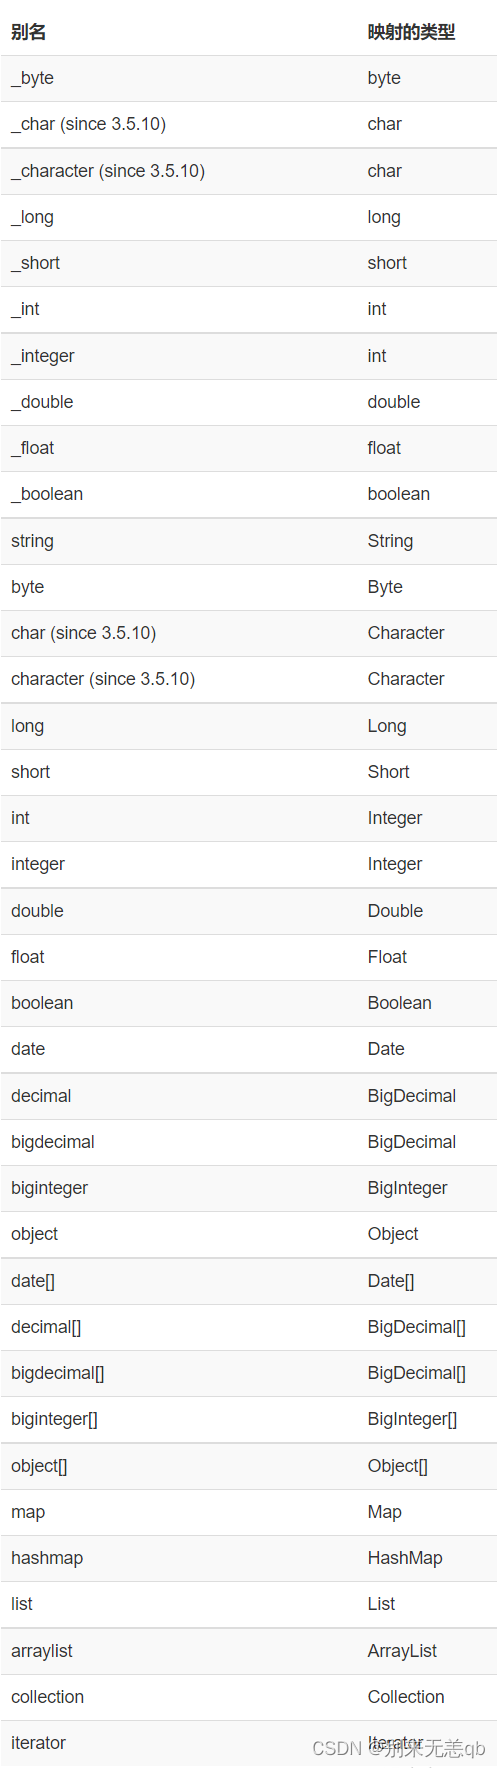
6.1 内置别名
6.2 设置自定义别名
在核心配置文件mybatis-config.xml中增加自定义别名配置。
<!--别名设置-->
<typeAliases>
    <!--方式1:type="包名.类型" alias="别名"-->
    <!-- <typeAlias type="cm.mybatis.domain.User" alias="User" /> -->
    <!--方式2:name="包名",使用时就可以省略包名-->
    <package name="cn.mybatis.domain"/>
</typeAliases>

<!--
	设置别名后,在参数类型和返回值类型中就不用写全限定类名,仅仅写类名即可,简化操作
-->
② 执行新增,并获取id
InputStream in = Resources.getResourceAsStream("mybatis-config.xml");
SqlSessionFactory sqlSessionFactory = new SqlSessionFactoryBuilder().build(in);
SqlSession session = sqlSessionFactory.openSession();
UserMapper mapper = session.getMapper(UserMapper.class);
User user = new User();
user.setUsername("tom");
user.setPassword("123456");
//---------新增前 没有id---------
System.out.println("新增前:"+user);
mapper.insert(user);
session.commit();
//---------新增后 有id---------
System.out.println("新增后:"+user);
session.close();
八、打印日志
Mybatis 通过使用内置的日志工厂提供日志功能。支持如下日志方式:
- SLF4J
- Apache Commons Logging
- Log4j 2
- Log4j (3.5.9 起废弃)
- JDK logging
咱们使用 Log4j 的方式打印mybatis的日志:
① pom.xml 中添加依赖
<dependency>
  <groupId>log4j</groupId>
  <artifactId>log4j</artifactId>
  <version>1.2.17</version>
</dependency>
② 在resources目录下新增配置文件:log4j.properties 名字必须一致
#设置日志级别,优先级从高到低分别是ERROR、WARN、INFO、DEBUG、TRACE
log4j.rootLogger=DEBUG, myLog

#设置对谁打印日志
## 表示对cn.mybatis.mapper.UserMapper打印日志
log4j.logger.cn.mybatis.mapper.UserMapper=DEBUG
## log4j.logger.cn.mybatis.mapper=DEBUG   表示对cn.mybatis.mapper包下的所有类都打印日志

#日志打印到控制台
log4j.appender.myLog=org.apache.log4j.ConsoleAppender
#使用自定义布局
log4j.appender.myLog.layout=org.apache.log4j.PatternLayout
#设置输出内容格式
# %d 表示当前系统时间
# %t 执行该业务的线程名
# %p 日志级别, 5表示输出字符的个数
# %c  表示指定业务所在的类的完全限定名(包名.类名)
# %m -- 输出额外信息,%n -- 表示换行
log4j.appender.myLog.layout.ConversionPattern=%d [%t] %5p [%c] - %m%n
九、#{}和${}的区别
默认情况下,mybatis使用 #{} 参数语法时,MyBatis 会创建 PreparedStatement参数占位符,并通过占位符安全地设置参数(就像JDBC中使用 ? 一样)。 这样做更安全,更迅速,通常也是首选做法,不过有时你就是想直接在 SQL 语句中直接插入一个不转义的字符串。 比如 ORDER BY 子句,这时候你可以使用 ${}作为占位符,例如:ORDER BY ${columnName},此时,MyBatis 会通过创建 Statement对象来完成。
咱们通过日志打印,来直观的看看 #{} 和 ${} 的区别。
① 使用 #{}
<insert id="insert" parameterType="cn.mybatis.domain.User">
   insert into user(username,password) values(#{username},#{password})
</insert>
总结:#{}占位符其底层使用PreparedStatement和?号,能够防止sql注入,安全。
② 使用 ${}
<insert id="insert" parameterType="cn.mybatis.domain.User">
   insert into user(username,password) values(${username},${password})
</insert>
日志如下,会发现报错了,原因是直接替换参数,缺少了引号。
[cn.mybatis.mapper.UserMapper.insert] - ==>  Preparing: insert into user(username,password) values(root,123456)
[cn.mybatis.mapper.UserMapper.insert] - ==> Parameters:
org.apache.ibatis.exceptions.PersistenceException:
### Error updating database.  Cause: java.sql.SQLSyntaxErrorException: Unknown column 'root' in 'field list'
想要插入成功,就需要自己根据数据类型来加引号。
<insert id="insert" parameterType="cn.mybatis.domain.User">
	insert into user(username,password) values('${username}','${password}')
</insert>
总结:${}占位符本质就是字符串拼接,使用Statement完成,会有sql注入的风险,不安全。但是在一些特殊情况下,例如:ORDER BY ${字段名} 或者 GROUP BY ${字段名}等场景就可以使用${}占位符。
十、动态SQL
准备数据
CREATE TABLE `blog` (
  `id` bigint(20) NOT NULL AUTO_INCREMENT,
  `title` varchar(255) DEFAULT NULL,
  `author` varchar(255) DEFAULT NULL,
  `content` varchar(255) DEFAULT NULL,
  `state` varchar(255) DEFAULT NULL,
  PRIMARY KEY (`id`)
) ENGINE=InnoDB AUTO_INCREMENT=5 DEFAULT CHARSET=utf8;

INSERT INTO `blog` VALUES (1, '学Java', 'msk', '学学学学学学学学', 'active');
INSERT INTO `blog` VALUES (2, '学php', '张三', '习习习习习习', 'active');
INSERT INTO `blog` VALUES (3, '学JS', '王五', '学习学习学习学习学习', 'disable');
INSERT INTO `blog` VALUES (4, '学py', '王五', '入门到放弃', 'disable');
实体类
public class Blog {
    private Long id;
    private String title;
    private String author;
    private String content;
    private String state;
    //省略 get  set  toString
}
10.1 if
BlogMapper接口
public interface BlogMapper {
    /**
     * 根据条件查询博客
     * @param blog
     * @return
     */
    List<Blog> selectBlog(Blog blog);
}
BlogMapper.xml
<?xml version="1.0" encoding="UTF-8" ?>
<!DOCTYPE mapper PUBLIC "-//mybatis.org//DTD Mapper 3.0//EN" "http://mybatis.org/dtd/mybatis-3-mapper.dtd">
<mapper namespace="cn.mybatis.mapper.BlogMapper">
    <!-- List<Blog> selectBlog(Blog blog); -->
    <select id="selectBlog" resultType="Blog">
        select * from blog
        where state = 'active'
        <if test="title!=null and title!=''">
            and title = #{title}
        </if>
        <if test="author!=null and author!=''">
            and author = #{author}
        </if>
    </select>
    <!--
		如果没有传 title 和 author 那么就只会查询出state = 'active'的博客,
		如果传递了title,则条件就变为:state='active' and title=#{title},
		这样,整个sql变为了动态的条件。
	-->
</mapper>
在update语句中也适用,来看这样一段伪代码:
<update id="update" parameterType="User">
    update user set username=#{username}
    <if test="password!=null and password!=''">
    	,password=${password}
    </if>
    where id = #{id}
</update>
10.2 where
if语句能够通过判断实现动态sql,但是如果出现下面场景,可能就会出现问题,看代码:
<select id="selectBlog" resultType="Blog">
    select * from blog
    where
    <if test="state!=null and state!=''">
        state = #{state}
    </if>
    <if test="title!=null and title!=''">
        and title = #{title}
    </if>
    <if test="author!=null and author!=''">
        and author = #{author}
    </if>
</select>
如果此时,3个条件都不传,就是出现这样的sql:
select * from blog where
如果只传了title,是这样的sql:
select * from blog where and title =?
为了解决这个问题,mybatis提供了where标签,使用方式如下:
<select id="selectBlog" resultType="Blog">
    select * from blog
    <where>
        <if test="state!=null and state!=''">
            state = #{state}
        </if>
        <if test="title!=null and title!=''">
            and title = #{title}
        </if>
        <if test="author!=null and author!=''">
            and author = #{author}
        </if>
    </where>
</select>
<!--
语法说明:
	1.where中只要有一个条件满足,就会拼接where关键字并跟条件,如果条件都不满足则整体忽略
	2.如果语句中出现 where and 或者 where or的时候,mybatis会自行去掉第一个and或者or,使sql语法合法。
-->
10.3 foreach
这里咱们使用两个案例来讲解foreach标签。
案例1:批量删除
public interface BlogMapper {
    //批量删除
    void deleteBatch(List<Long> ids);
}
SQL编写:
<!--
    批量删除语法:delete from blog where id in (xx,xx,xx)

    collection:被遍历的是谁。
        需要注意:针对list和array,mybatis将他们封装为了map,key分别为:list和array,value就是传入的实参
                所以,collection="list"就是获取list的值,collection="array"就是获取数组的值,而不是collection="ids"
    item:遍历的当前项
    open:开始符号
    separator:分隔符
    close:结束符号
-->
<delete id="deleteBatch">
    delete from blog where id in
    <foreach collection="list" item="id" open="(" separator="," close=")">
        #{id}
    </foreach>
</delete>
案例2:批量插入
public interface BlogMapper {
    //批量插入
    void insertBatch(List<Blog> blogs);
}
SQL编写:
<insert id="insertBatch">
    insert into blog(title,author,content,state)
    values
    <foreach collection="list" item="blog" separator=",">
        (#{blog.title},#{blog.author},#{blog.content},#{blog.state})
    </foreach>
</insert>
10.4 set
以修改为例,咱们来学习一下set元素,set 元素可以用于动态包含需要更新的列,忽略其它不更新的列。
public interface BlogMapper {
    //修改博客
    void updateBlog(Blog blog);
}
SQL编写:
<update id="updateBlog">
    update blog
    <set>
        <if test="title!=null">
            title = #{title},
        </if>
        <if test="author!=null">
            author = #{author},
        </if>
        <if test="content!=null">
            content = #{content},
        </if>
        <if test="state!=null">
            state = #{state}
        </if>
    </set>
    where id = #{id}
</update>
<!--
set 元素会动态地在行首插入 SET 关键字,并会删掉额外的逗号保证语法正确。
-->
10.5 choose、when、otherwise
有时候,我们不想使用所有的条件,而只是想从多个条件中选择一个使用。针对这种情况,MyBatis 提供了 choose 元素,它有点像 Java 中的 switch 语句。
public interface BlogMapper {
    //基于条件查询博客
    List<Blog> findActiveBlog(Blog blog);
}
SQL编写:
<select id="findActiveBlog" resultType="Blog">
    select * from blog WHERE state = 'active'
    <choose>
        <when test="title != null">
            AND title = #{title}
        </when>
        <when test="content != null">
            AND content = #{content}
        </when>
        <otherwise>
            AND author = 'msk'
        </otherwise>
    </choose>
</select>
10.6 trim
trim 元素可以用来定制自己的SQL。他包含4个属性:prefix - 前缀,prefixOverrides - 前置覆盖,suffix - 后缀,suffixOverrides - 后置覆盖。
案例1:查询中使用trim
<!--原本的查询sql-->
<select id="selectBlog" resultType="Blog">
    select * from blog
    <where>
        <if test="state!=null and state!=''">
            state = #{state}
        </if>
        <if test="title!=null and title!=''">
            and title = #{title}
        </if>
        <if test="author!=null and author!=''">
            and author = #{author}
        </if>
    </where>
</select>

<!--
	上边的查询使用trim元素可以达到相同的效果。
    prefix:前缀,其在有if元素满足条件的情况下生效,否则整体忽略。
    prefixOverrides:前置覆盖,意思是:如果出现 where and 或者 where or的时候去除掉 and 或者 or。
-->
<select id="selectBlog" resultType="Blog">
    select * from blog
    <trim prefix="where" prefixOverrides="and | or">
        <if test="state!=null and state!=''">
            state = #{state}
        </if>
        <if test="title!=null and title!=''">
            and title = #{title}
        </if>
        <if test="author!=null and author!=''">
            and author = #{author}
        </if>
    </trim>
</select>
案例2:修改中使用trim
<!--原本的修改sql-->
<update id="updateBlog">
    update blog
    <set>
        <if test="title!=null">
            title = #{title},
        </if>
        <if test="author!=null">
            author = #{author},
        </if>
        <if test="content!=null">
            content = #{content},
        </if>
        <if test="state!=null">
            state = #{state}
        </if>
    </set>
    where id = #{id}
</update>
<!--
	使用trim修改达到相同效果。
	prefix:前缀。
	suffixOverrides:后置覆盖,如果出现 `, where` 时把逗号去除。
-->
<update id="updateBlog">
    update blog
    <trim prefix="set" suffixOverrides=",">
        <if test="title!=null">
            title = #{title},
        </if>
        <if test="author!=null">
            author = #{author},
        </if>
        <if test="content!=null">
            content = #{content},
        </if>
        <if test="state!=null">
            state = #{state}
        </if>
    </trim>
    where id = #{id}
</update>

<!--甚至你可以改为如下代码-->
<update id="updateBlog">
    update blog
    <trim prefix="set" suffixOverrides="," suffix="where id = #{id}">
        <if test="title!=null">
            title = #{title},
        </if>
        <if test="author!=null">
            author = #{author},
        </if>
        <if test="content!=null">
            content = #{content},
        </if>
        <if test="state!=null">
            state = #{state}
        </if>
    </trim>
</update>
10.7 sql
使用sql元素,可以抽取sql片段。
<!--提取sql片段,id需唯一-->
<sql id="columnName">
    id,title,author,content,state
</sql>

<!-- include引入sql片段,refid="id值" -->
<select id="selectAll" resultType="Blog">
    select <include refid="columnName"/> from blog
</select>
十一、关联查询
准备测试数据
-- 部门表
CREATE TABLE `department` (
  `id` bigint(20) NOT NULL AUTO_INCREMENT,
  `name` varchar(30) DEFAULT NULL,
  PRIMARY KEY (`id`)
) ENGINE=InnoDB AUTO_INCREMENT=4 DEFAULT CHARSET=utf8;
INSERT INTO `department` VALUES (1, '研发部');
INSERT INTO `department` VALUES (2, '产品部');
INSERT INTO `department` VALUES (3, '测试部');

-- 员工表
CREATE TABLE `employee` (
  `id` bigint(20) NOT NULL AUTO_INCREMENT,
  `name` varchar(30) DEFAULT NULL,
  `dept_id` bigint(20) DEFAULT NULL,
  PRIMARY KEY (`id`)
) ENGINE=InnoDB AUTO_INCREMENT=5 DEFAULT CHARSET=utf8;
INSERT INTO `employee` VALUES (1, '张三', 2);
INSERT INTO `employee` VALUES (2, '李四', 1);
INSERT INTO `employee` VALUES (3, '王五', 1);
INSERT INTO `employee` VALUES (4, '赵六', 3);
对应实体类
public class Department {
    private Long id;
    private String name;
	//get set toString...
}
public class Employee{
    private Long id;
    private String name;
	//get set toString...
}
11.1 自定义映射ResultMap
咱们以部门表为例来演示自定义映射ResultMap,假设实体类中部门名称不是name,而是myname,进行查询后,会怎么样呢?部门名称会被查询出来吗?
package cn.mybatis.mapper;

public interface DepartmentMapper {
    //查询部门
    List<Department> selectAll();
}
DepartmentMapper.xml
<?xml version="1.0" encoding="UTF-8" ?>
<!DOCTYPE mapper
        PUBLIC "-//mybatis.org//DTD Mapper 3.0//EN"
        "http://mybatis.org/dtd/mybatis-3-mapper.dtd">
<mapper namespace="cn.mybatis.mapper.DepartmentMapper">
    <select id="selectAll" resultType="Department">
        select * from department
    </select>
</mapper>
使用自定义映射ResultMap来实现部门名称的查询。
<?xml version="1.0" encoding="UTF-8" ?>
<!DOCTYPE mapper
        PUBLIC "-//mybatis.org//DTD Mapper 3.0//EN"
        "http://mybatis.org/dtd/mybatis-3-mapper.dtd">
<mapper namespace="cn.mybatis.mapper.DepartmentMapper">
    <!--使用 resultMap 指向自定义映射的id-->
    <select id="selectAll" resultMap="departmentMap">
        select * from department
    </select>
    <!--自定义结果映射
        id:自定义映射的id
        type:被映射的类型
    -->
    <resultMap id="departmentMap" type="Department">
        <!--对id主键进行映射,column:列名(字段名),property:属性名-->
        <id column="id" property="id"></id>
        <!--其他非主键字段使用result映射-->
        <result column="name" property="myname"></result>
    </resultMap>
</mapper>
11.2 一对多
从部门的角度出发,一个部门可以包含多个员工,即:1对多。
需求:查询出部门信息,以及每个部门下的员工信息。
11.2.1 实现方式1:关联查询
① SQL编写
SELECT d.*,e.id,e.name FROM department d
LEFT JOIN employee e
ON d.id = e.dept_id
② 对实体类进行改造
public class Employee {
    private Long id;  //员工id
    private String name; //员工姓名
    // get set toString...
}
public class Department {
    private Long id;   //部门id
    private String name; //部门名称
    private List<Employee> employees;//部门下的员工
    // get set toString...
}
③ mapper接口
public interface DepartmentMapper {
    //查询部门和部门下的员工信息
    List<Department> selectDepartmentAndEmp();
}
④ mapper映射文件:DepartmentMapper.xml
<select id="selectDepartmentAndEmp" resultMap="deptMap">
    SELECT d.*,e.id,e.name FROM department d LEFT JOIN employee e ON d.id = e.dept_id
</select>
<resultMap id="deptMap" type="Department">
    <id column="id" property="id"></id>
    <result column="name" property="name"></result>
    <!--使用collection标签对集合属性进行映射,property:属性名,ofType:集合中的元素类型-->
    <collection property="employees" ofType="Employee">
        <!--员工id-->
        <id column="id" property="id"></id>
        <!--员工姓名-->
        <result column="name" property="name"></result>
    </collection>
</resultMap>
会发现这样查的话,因为恰巧部门和员工都有id和name属性,会导致查询结果是:
Department{id=1, name='研发部', employees=[Department{id=1, name='研发部'}]}
Department{id=2, name='产品部', employees=[Department{id=2, name='产品部'}]}
Department{id=3, name='测试部', employees=[Department{id=3, name='测试部'}]}
解决办法是:可以为员工的字段名设置别名。
<select id="selectDepartmentAndEmp" resultMap="deptMap">
    SELECT d.*,e.id eid,e.name ename FROM department d LEFT JOIN employee e ON d.id = e.dept_id
</select>
<resultMap id="deptMap" type="Department">
    <id column="id" property="id"></id>
    <result column="name" property="name"></result>
    <!--使用collection标签对集合属性进行映射,property:属性名,ofType:集合中的元素类型-->
    <collection property="employees" ofType="Employee">
        <!--员工id-->
        <id column="eid" property="id"></id>
        <!--员工姓名-->
        <result column="ename" property="name"></result>
    </collection>
</resultMap>
最终查询结果为:
Department{id=1, name='研发部', employees=[Department{id=2, name='李四'}, Department{id=3, name='王五'}]}
Department{id=2, name='产品部', employees=[Department{id=1, name='张三'}]}
Department{id=3, name='测试部', employees=[Department{id=4, name='赵六'}]}
11.2.2 实现方式2:子查询
<select id="selectDepartmentAndEmp" resultMap="deptMap">
    SELECT * FROM department
</select>
<resultMap id="deptMap" type="Department">
    <id column="id" property="id"></id>
    <result column="name" property="name"></result>
    <!--使用select调用子查询完成查询
        select:使用id调用查询语句
        column:以部门的id作为参数传递给select所指向的sql语句
    -->
    <collection property="employees" ofType="Employee" select="selectEmp" column="id"></collection>
</resultMap>
<select id="selectEmp" resultType="Employee">
    select * from employee where dept_id = #{deptId}
</select>
11.3 多对一
从员工的角度出发,多个员工隶属于一个部门,即:多对一。
需求:查询员工信息,以及每个员工所属部门信息。
11.3.1 实现方式1:关联查询
① SQL编写
SELECT e.id,e.name,d.id did,d.name dname FROM employee e
LEFT JOIN department d
ON e.dept_id=d.id
② 对实体类进行改造
public class Employee {
    private Long id;     //员工id
    private String name; //员工姓名
    private Department department; //员工所属部门
    // get set toString...
}
public class Department {
    private Long id;   //部门id
    private String name; //部门名称
    //get set toString
}
③ mapper接口
public interface EmployeeMapper {
    //查询员工和对应的部门信息
    List<Employee> selectEmployeeAndDept();
}
④ mapper映射文件:EmployeeMapper.xml
<select id="selectEmployeeAndDept" resultMap="EmployeeMap">
    SELECT e.id,e.name,d.id did,d.name dname FROM employee e
    LEFT JOIN department d
    ON e.dept_id=d.id
</select>
<resultMap id="EmployeeMap" type="Employee">
    <id column="id" property="id"></id>
    <result column="name" property="name"></result>
    <!-- 使用association标签对Department属性进行映射配置, javaType:类型-->
    <association property="department" javaType="Department">
        <id column="did" property="id"></id>
        <result column="dname" property="name"></result>
    </association>
</resultMap>
11.3.2 实现方式2:子查询
<select id="selectEmployeeAndDept" resultMap="EmployeeMap">
    SELECT *  FROM employee
</select>
<resultMap id="EmployeeMap" type="Employee">
    <id column="id" property="id"></id>
    <result column="name" property="name"></result>
    <!-- 使用association标签对Department属性进行映射配置, javaType:类型
        select:执行子查询语句(语句的id)
        column:使用dept_id为参数
    -->
    <association property="department" javaType="Department" select="selectDepartmentById" column="dept_id"></association>
</resultMap>
<select id="selectDepartmentById" resultType="Department">
    SELECT *  FROM department where id = #{id}
</select>
十二、mybatis的缓存
mybatis为了提高查询效率,使用缓存的方式将查询结果缓存到内存中,当相同的查询执行第二次时,并不会真实的执行数据库查询,而是从缓存中获取数据返回。mybatis提供了两种缓存方式。
12.1 mybatis的一级缓存
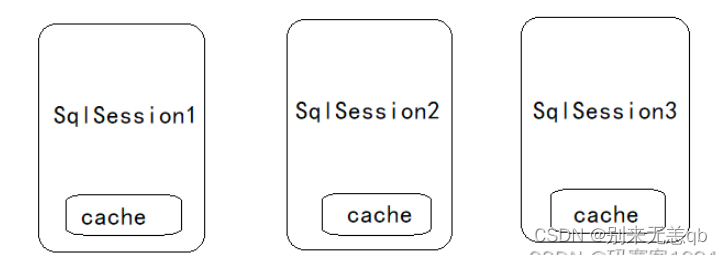
一级缓存:也称为SqlSession(会话)级别的缓存,用于保存用户在一次会话过程中查询的结果,如果用户使用同一个SqlSession执行了两次相同的查询,第二次则会使用缓存中的数据,而不会执行数据库查询,同时,一级缓存是自动开启的。
@Test
public void testselectByPrimaryKey() throws IOException {
    InputStream in = Resources.getResourceAsStream("mybatis-config.xml");
    SqlSessionFactory sqlSessionFactory = new SqlSessionFactoryBuilder().build(in);
    SqlSession session = sqlSessionFactory.openSession();
    BlogMapper mapper = session.getMapper(BlogMapper.class);
    //第一次查询
    Blog blog1 = mapper.selectByPrimaryKey(4L);
    System.out.println(blog1);
    //第二次查询
    Blog blog2 = mapper.selectByPrimaryKey(4L);
    System.out.println(blog2);
    session.close();
}
从日志从可以看出,仅会执行一次查询:

但是由于每个SqlSession有自己的缓存,这就会导致出现脏数据的问题。
12.2 mybatis的二级缓存
二级缓存:也称为全局缓存或者跨会话级别的缓存。可以实现不同的SqlSession执行同一个Mapper(namespace命名空间)下的查询SQL时,相同查询第二次就会从缓存中获取返回,而不会真正的执行数据库查询。

默认情况下是没有开启二级缓存的,需要手动开启。
1.在核心配置文件mybatis-config.xml中加入:
<!--开启二级缓存-->
<settings>
    <setting name="cacheEnabled" value="true"/>
</settings>
2.在mapper映射文件中加入:
<mapper namespace="...">
    ...
    <cache/>
    ...
</mapper>
3.测试看结果
@Test
public void testselectByPrimaryKey() throws IOException {
    InputStream in = Resources.getResourceAsStream("mybatis-config.xml");
    SqlSessionFactory sqlSessionFactory = new SqlSessionFactoryBuilder().build(in);
    SqlSession session1 = sqlSessionFactory.openSession();
    BlogMapper mapper1 = session1.getMapper(BlogMapper.class);
    //第一个SqlSession查询
    Blog blog1 = mapper1.selectByPrimaryKey(4L);
    System.out.println(blog1);
    session1.close();

    //第二个SqlSession查询
    SqlSession session2 = sqlSessionFactory.openSession();
    BlogMapper mapper2 = session2.getMapper(BlogMapper.class);
    Blog blog2 = mapper2.selectByPrimaryKey(4L);
    System.out.println(blog2);
    session2.close();
}


 1566
1566


 被折叠的 条评论
为什么被折叠?
被折叠的 条评论
为什么被折叠?
 到【灌水乐园】发言


