


跳转动画实际操作的是什么?
startActivity调用之后进行页面跳转,会有一系列的涉及到ActivitStar,ActivityTask,ActivityManager等类的操作,最终在执行动画会调用到SurfaceControl中去,相关代码如下
public final class SurfaceControl implements Parcelable {
//省略代码
    @NonNull
        public Transaction setAlpha(@NonNull SurfaceControl sc,
                @FloatRange(from = 0.0, to = 1.0) float alpha) {
            checkPreconditions(sc);
            nativeSetAlpha(mNativeObject, sc.mNativeObject, alpha);
            return this;
        }
//省略代码
 @UnsupportedAppUsage
        public Transaction setMatrix(SurfaceControl sc, Matrix matrix, float[] float9) {
            matrix.getValues(float9);
            setMatrix(sc, float9[MSCALE_X], float9[MSKEW_Y],
                    float9[MSKEW_X], float9[MSCALE_Y]);
            setPosition(sc, float9[MTRANS_X], float9[MTRANS_Y]);
            return this;
        }
//这个是调用到native的函数
 @UnsupportedAppUsage
        public Transaction setMatrix(SurfaceControl sc,
                float dsdx, float dtdx, float dtdy, float dsdy) {
            checkPreconditions(sc);
            nativeSetMatrix(mNativeObject, sc.mNativeObject,
                    dsdx, dtdx, dtdy, dsdy);
            return this;
        }
  @UnsupportedAppUsage
        public Transaction setPosition(SurfaceControl sc, float x, float y) {
            checkPreconditions(sc);
            nativeSetPosition(mNativeObject, sc.mNativeObject, x, y);
            return this;
        }
//省略代码
}
以上函数就负责了窗口的透明度以及大小,还有位置的变换.
可以看到相应的设置函数,最终都会调用到native层去,我们选一个cpp的代码看一下
//android_view_SurfaceControl.cpp
static void nativeSetPosition(JNIEnv* env, jclass clazz, jlong transactionObj,
        jlong nativeObject, jfloat x, jfloat y) {
    auto transaction = reinterpret_cast<SurfaceComposerClient::Transaction*>(transactionObj);

    SurfaceControl* const ctrl = reinterpret_cast<SurfaceControl *>(nativeObject);
    transaction->setPosition(ctrl, x, y);
}

//SurfaceComposerClient.cpp
SurfaceComposerClient::Transaction& SurfaceComposerClient::Transaction::setPosition(
        const sp<SurfaceControl>& sc, float x, float y) {
    layer_state_t* s = getLayerState(sc);
    if (!s) {
        mStatus = BAD_INDEX;
        return *this;
    }
    s->what |= layer_state_t::ePositionChanged;
    s->x = x;
    s->y = y;

    registerSurfaceControlForCallback(sc);
    return *this;
}
以上代码调用到native去了之后会把相关设置的值赋值给layer,如果需要再cpp中定制动画相关的设置
可以修改这一块.
关于SurfaceControl 的调用链路如下图,WindowContainer,ActivityRecord大家应该都不陌生

窗口怎么知道应该执行什么动画,是透明,还是平移,还是缩放,旋转?
class WindowContainer<E extends WindowContainer> extends ConfigurationContainer<E>
implements Comparable<WindowContainer>, Animatable, SurfaceFreezer.Freezable,
BLASTSyncEngine.TransactionReadyListener {
private Animation loadAnimation(WindowManager.LayoutParams lp, int transit, boolean enter,
boolean isVoiceInteraction) {
//省略代码
//通过Transition获取动画对象
final Animation a = getDisplayContent().mAppTransition.loadAnimation(lp, transit, enter,
displayConfig.uiMode, displayConfig.orientation, frame, displayFrame, insets,
surfaceInsets, stableInsets, isVoiceInteraction, inFreeformWindowingMode(), this);
//省略代码
}
}
public class AppTransition implements Dump {
Animation loadAnimation(LayoutParams lp, int transit, boolean enter, int uiMode,
int orientation, Rect frame, Rect displayFrame, Rect insets,
@Nullable Rect surfaceInsets, @Nullable Rect stableInsets, boolean isVoiceInteraction,
boolean freeform, WindowContainer container) {
//这里面有一堆判定,但是普通应用的时候是不会通过的,会再调用到loadAnimationAttr
a = animAttr != 0 ? loadAnimationAttr(lp, animAttr, transit) : null;
return a;
}
//调用getCachedAnimations获取Entry
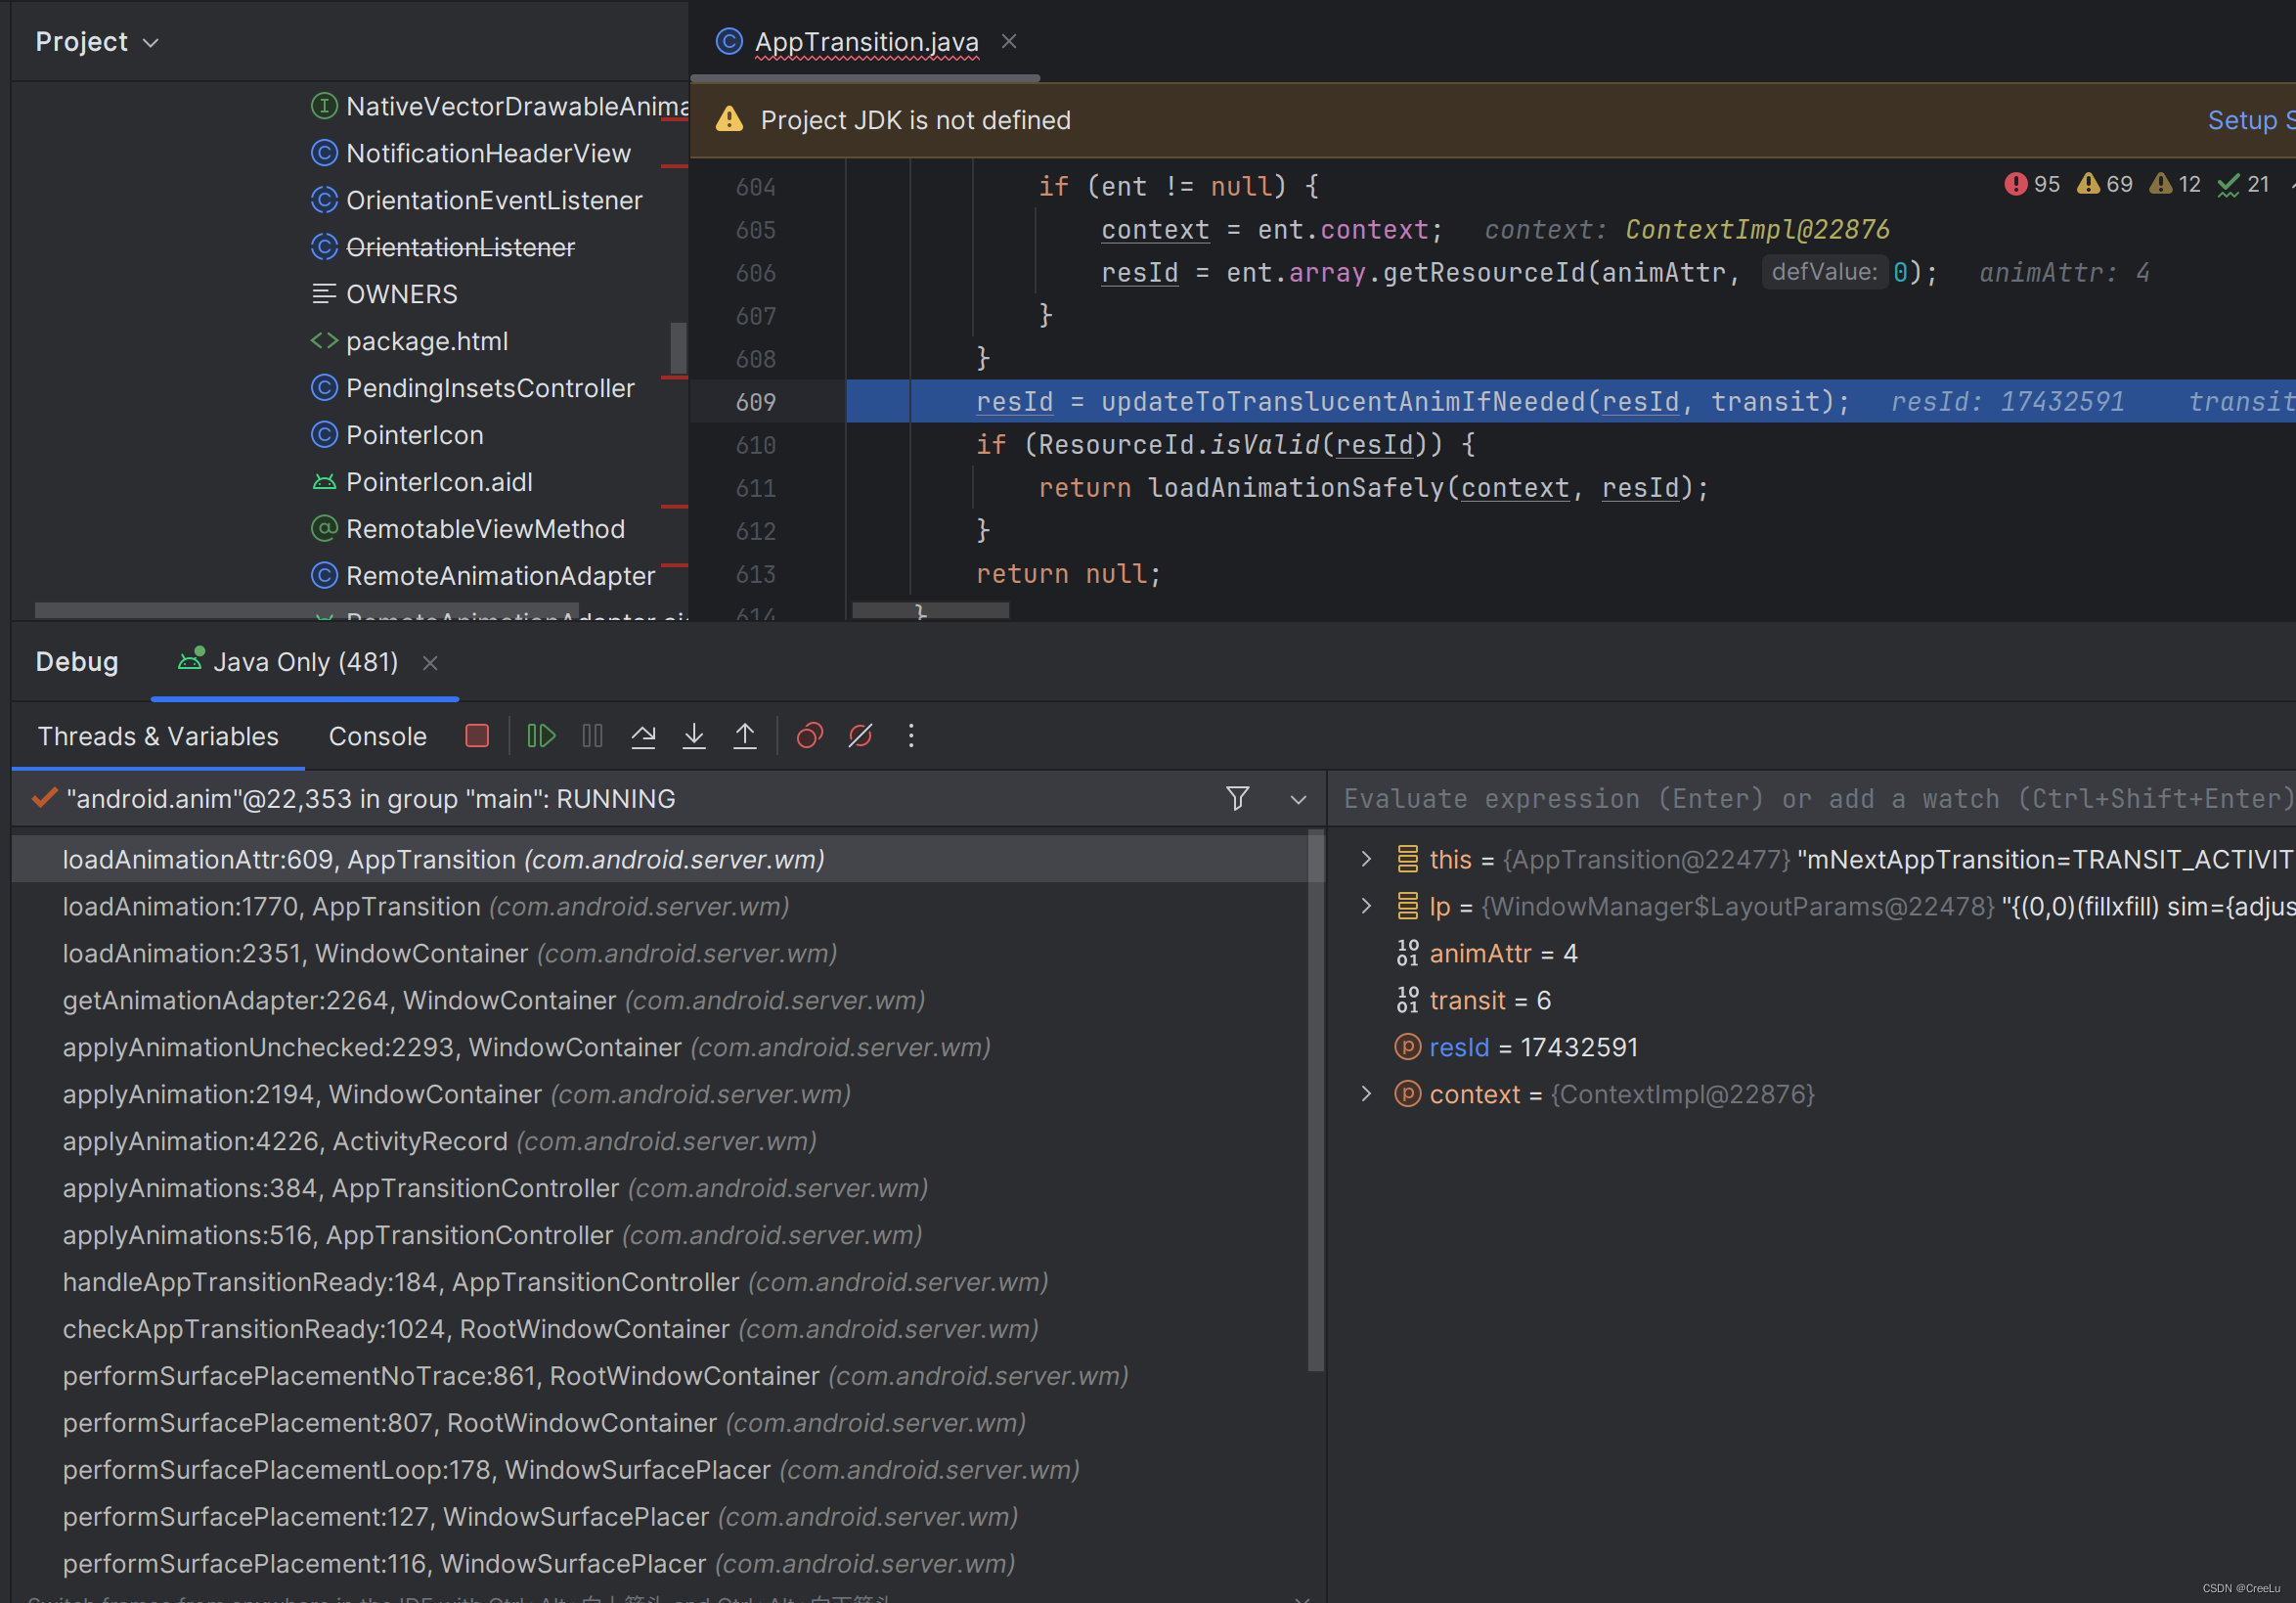
Animation loadAnimationAttr(LayoutParams lp, int animAttr, int transit) {
int resId = Resources.ID_NULL;
Context context = mContext;
if (animAttr >= 0) {
AttributeCache.Entry ent = getCachedAnimations(lp);
if (ent != null) {
context = ent.context;
resId = ent.array.getResourceId(animAttr, 0);
}
}
resId = updateToTranslucentAnimIfNeeded(resId, transit);
if (ResourceId.isValid(resId)) {
return loadAnimationSafely(context, resId);
}
return null;
}
//获取Styleable中的动画主题
private AttributeCache.Entry getCachedAnimations(LayoutParams lp) {
if (DEBUG_ANIM) Slog.v(TAG, "Loading animations: layout params pkg="
+ (lp != null ? lp.packageName : null)
+ " resId=0x" + (lp != null ? Integer.toHexString(lp.windowAnimations) : null));
if (lp != null && lp.windowAnimations != 0) {
// If this is a system resource, don't try to load it from the
// application resources. It is nice to avoid loading application
// resources if we can.
String packageName = lp.packageName != null ? lp.packageName : "android";
int resId = getAnimationStyleResId(lp);
if ((resId&0xFF000000) == 0x01000000) {
packageName = "android";
}
if (DEBUG_ANIM) Slog.v(TAG, "Loading animations: picked package="
+ packageName);
return AttributeCache.instance().get(packageName, resId,
com.android.internal.R.styleable.WindowAnimation, mCurrentUserId);
}
return null;
}
}
在执行以上代码以后,就会从主题中获取到定义的窗口切换动画资源了.
相关的调用栈如下:
-
获取到默认的启动动画资源,这个会对应一个anim的xml文件,以下文件位于
frameworks/base/core/res/res/anim路径.
android:anim/activity_open_enter -
退出的时候默认动画如下
android:anim/activity_close_enter
在获取到以上资源以后动画会调用到WindowAnimationSpec类中去执行如下代码
    @Override
    public void apply(Transaction t, SurfaceControl leash, long currentPlayTime) {
        final TmpValues tmp = mThreadLocalTmps.get();
        tmp.transformation.clear();
        mAnimation.getTransformation(currentPlayTime, tmp.transformation);
        tmp.transformation.getMatrix().postTranslate(mPosition.x, mPosition.y);
        t.setMatrix(leash, tmp.transformation.getMatrix(), tmp.floats);
        t.setAlpha(leash, tmp.transformation.getAlpha());

        boolean cropSet = false;
        if (mStackClipMode == STACK_CLIP_NONE) {
            if (tmp.transformation.hasClipRect()) {
                t.setWindowCrop(leash, tmp.transformation.getClipRect());
                cropSet = true;
            }
        } else {
            mTmpRect.set(mStackBounds);
            if (tmp.transformation.hasClipRect()) {
                mTmpRect.intersect(tmp.transformation.getClipRect());
            }
            t.setWindowCrop(leash, mTmpRect);
            cropSet = true;
        }

        // We can only apply rounded corner if a crop is set, as otherwise the value is meaningless,
        // since it doesn't have anything it's relative to.
        if (cropSet && mAnimation.hasRoundedCorners() && mWindowCornerRadius > 0) {
            t.setCornerRadius(leash, mWindowCornerRadius);
        }
    }
以上代码中 mAnimation.getTransformation(currentPlayTime, tmp.transformation);这一行就是通过之前得到的动画对象去计算应该设置的透明,平移等参数值,以用于去设置视图.
简单看一下这个计算吧,感兴趣的可以深入研究一下
public abstract class Animation implements Cloneable {

   public boolean getTransformation(long currentTime, Transformation outTransformation) {
        if (mStartTime == -1) {
            mStartTime = currentTime;
        }

        final long startOffset = getStartOffset();
        final long duration = mDuration;
        float normalizedTime;
        if (duration != 0) {
            normalizedTime = ((float) (currentTime - (mStartTime + startOffset))) /
                    (float) duration;
        } else {
            // time is a step-change with a zero duration
            normalizedTime = currentTime < mStartTime ? 0.0f : 1.0f;
        }

        final boolean expired = normalizedTime >= 1.0f || isCanceled();
        mMore = !expired;

        if (!mFillEnabled) normalizedTime = Math.max(Math.min(normalizedTime, 1.0f), 0.0f);

        if ((normalizedTime >= 0.0f || mFillBefore) && (normalizedTime <= 1.0f || mFillAfter)) {
            if (!mStarted) {
                fireAnimationStart();
                mStarted = true;
                if (NoImagePreloadHolder.USE_CLOSEGUARD) {
                    guard.open("cancel or detach or getTransformation");
                }
            }

            if (mFillEnabled) normalizedTime = Math.max(Math.min(normalizedTime, 1.0f), 0.0f);

            if (mCycleFlip) {
                normalizedTime = 1.0f - normalizedTime;
            }

            final float interpolatedTime = mInterpolator.getInterpolation(normalizedTime);
            applyTransformation(interpolatedTime, outTransformation);
        }

        if (expired) {
            if (mRepeatCount == mRepeated || isCanceled()) {
                if (!mEnded) {
                    mEnded = true;
                    guard.close();
                    fireAnimationEnd();
                }
            } else {
                if (mRepeatCount > 0) {
                    mRepeated++;
                }

                if (mRepeatMode == REVERSE) {
                    mCycleFlip = !mCycleFlip;
                }

                mStartTime = -1;
                mMore = true;

                fireAnimationRepeat();
            }
        }

        if (!mMore && mOneMoreTime) {
            mOneMoreTime = false;
            return true;
        }

        return mMore;
    }

}
以上在各种计算之后再调用到子类的applyTransformation函数去赋值给传入进来的对象Transformation outTransformation,赋值完了之后,后续的动画都会依赖这个计算出来的值进行设置了.


 1399
1399


 被折叠的 条评论
为什么被折叠?
被折叠的 条评论
为什么被折叠?
 到【灌水乐园】发言


