


###一 摘要
今天给大家介绍一下基于HTML5 之APP购物车的具体实现,代码较多,这里只能罗列一些比较关键的代码.
首先引用别人对购物车流程的形象和购物车实现关键的解释,下面我们来看看具体的解释.
###二 购物车流程
购物车相当于现实中超市的购物车,不同的是一个是实体车,一个是虚拟车而已。用户可以在购物网站的不同页面之间跳转,以选购自己喜爱的商品,点击购买时,该商品就自动保存到你的购物车中,重复选购后,最后将选中的所有商品放在购物车中统一到付款台结账,这也是尽量让客户体验到现实生活中购物的感觉。服务器通过追踪每个用户的行动,以保证在结账时每件商品都物有其主。
1.把商品添加到购物车,即订购
2.删除购物车中已定购的商品
3.修改购物车中某一本图书的订购数量
4.清空购物车
5.显示购物车中商品清单及数量、价格
###三 购物车实现关键
实现购物车的关键在于服务器识别每一个用户并维持与他们的联系。但是HTTP协议是一种“无状态(Stateless)”的协议,因而服务器不能记住是谁在购买商品,当把商品加入购物车时,服务器也不知道购物车里原先有些什么,使得用户在不同页面间跳转时购物车无法“随身携带”,这都给购物车的实现造成了一定的困难。
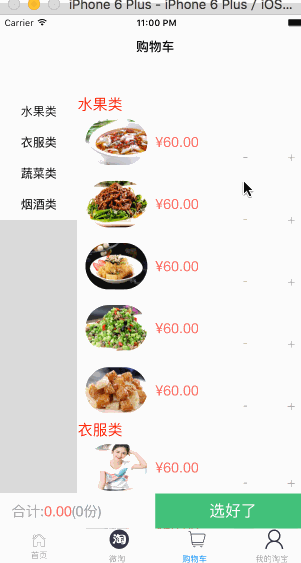
###四 购物车效果图
###五 关键HTML代码实现
<div class="nav-lf">
<ul id="nav">
  <li class="current"><a href="#st1">水果类</a><b></b></li>
  <li><a href="#st2">衣服类</a><b>1</b></li>
  <li><a href="#st3">蔬菜类</a><b>3</b></li>
  <li><a href="#st4">烟酒类</a><b>6</b></li>
</ul>
</div>

<div id="container" class="container">
  <div class="section" id="st1">
  	 <div style="width: 100%;height: 20px;color: red;font-size: 20px;">水果类</div>
  	<div class="prt-lt">
    	<div class="lt-lt"><img src="../images/index/prt_1.jpg"></div>
        <div class="lt-ct">
            <p class="pr">¥<span class="price">60.00</span></p>
        </div>
        <div class="lt-rt">
        	<input type="button" class="minus"  value="-">
        	<input type="text" class="result" value="0">
        	<input type="button" class="add" value="+">
        </div>
    </div>

  	<div class="prt-lt">
    	<div class="lt-lt"><img src="../images/index/prt_2.jpg"></div>
        <div class="lt-ct">
            <p class="pr">¥<span class="price">60.00</span></p>
        </div>
        <div class="lt-rt">
        	<input type="button" class="minus"  value="-">
        	<input type="text" class="result" value="0">
        	<input type="button" class="add" value="+">
        </div>
    </div>

  	<div class="prt-lt">
    	<div class="lt-lt"><img src="../images/index/prt_3.jpg"></div>
        <div class="lt-ct">
            <p class="pr">¥<span class="price">60.00</span></p>
        </div>
        <div class="lt-rt">
        	<input type="button" class="minus"  value="-">
        	<input type="text" class="result" value="0">
        	<input type="button" class="add" value="+">
        </div>
    </div>
    ............................
###六 关键js代码实现
var mySwiper = new Swiper('.swiper-container',{
loop : true,
autoplay : 5000,
})
setInterval("mySwiper.slidePrev()", 2000);
$(function(){
	$('#nav').onePageNav();
});

</script>
<script>
$(function(){

$(".add").click(function(){
var t=$(this).parent().find('input[class*=result]');
t.val(parseInt(t.val())+1);
setTotal();
})

$(".minus").click(function(){
var t=$(this).parent().find('input[class*=result]');
t.val(parseInt(t.val())-1);
if(parseInt(t.val())<0){
t.val(0);
}
setTotal();


})

function setTotal(){
var s=0;
var v=0;
var n=0;
<!--计算总额-->
$(".lt-rt").each(function(){
s+=parseInt($(this).find('input[class*=result]').val())*parseFloat($(this).siblings().find('span[class*=price]').text());

});

<!--计算菜种-->
var nIn = $("li.current a").attr("href");
$(nIn+" input[type='text']").each(function() {
	if($(this).val()!=0){
		n++;
	}
});

<!--计算总份数-->
$("input[type='text']").each(function(){
	v += parseInt($(this).val());
});
if(n>0){
	$(".current b").html(n).show();
	}else{
	$(".current b").hide();
		}
$(".share").html(v);
$("#total").html(s.toFixed(2));
}
setTotal();

})
###七 整个app效果
###八 结束
代码稍后会上传到github上,大家感兴趣的自己下载.


 166
166

 被折叠的 条评论
为什么被折叠?
被折叠的 条评论
为什么被折叠?
 到【灌水乐园】发言


