


 超级会员免费看
上一篇:11【泛型、Map、异常】
文章目录
12【多线程、锁机制、lock锁】
一、多线程概念
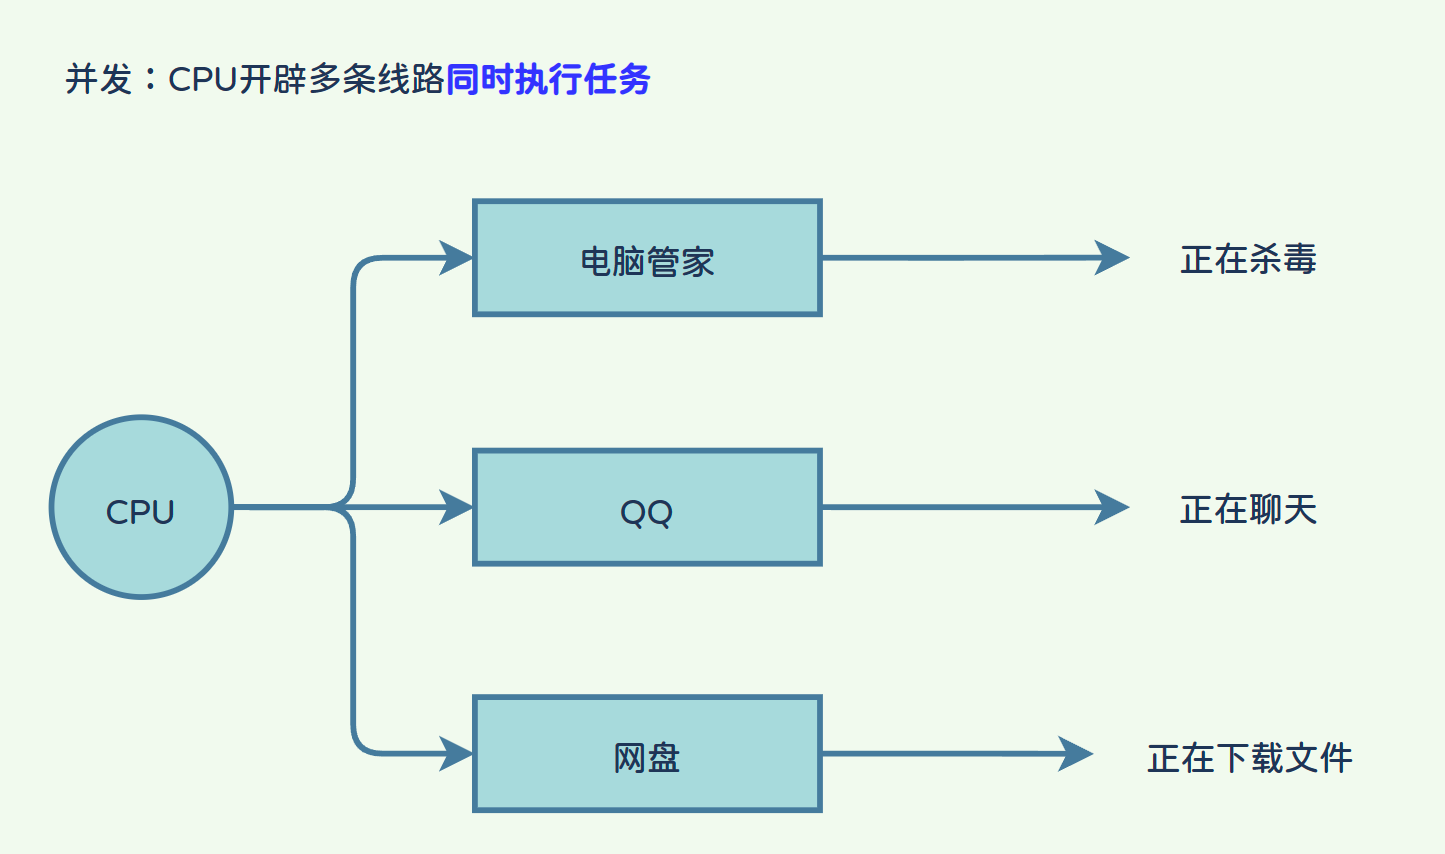
在实际应用中,多线程非常有用。例如,一个浏览器可以同时下载几幅图片,一个浏览器需要同时服务来自客户端的请求,我们的电脑管家也可以一边杀毒一边清理垃圾再一边进行电脑体检等任务,这些都是多线程的应用场景。Java中的多线程技术可以让程序同时运行多个任务,从而提高程序的响应速度和性能。
1.1 程序的并发与并行
1.1.1 程序的并行
程序的并行指的是多个应用程序真正意义上的同时执行,CPU分配多个执行单元共同执行这些任务,效率高,但这依赖于CPU的硬件支持,需要CPU多核心的支持,单核处理器的CPU是不能并行的处理多个任务的。
1.1.2 程序的并发
程序的并发指的是多个应用程序交替执行,CPU分配给每个应用程序一些“执行时间片”用于执行该应用程序,由于CPU的处理速度极快,并且分配个每个线程的“执行时间片”极短,给人们造成视觉上的误感,让人们以为是“同时”执行,其实是交替执行。
需要注意的是:虽然是交替执行,但是程序的并发解决了多个程序之间不能“同时”执行的问题,并且程序的并发利用了CPU的空余时间,能将CPU的性能较好的发挥,另外并发不受CPU硬件的限制,实际开发中,并发往往使我们考虑的重点。
Tips:程序并行执行需要依赖于CPU的硬件支持,而并发却不需要;

1.2 进程与线程
1.2.1 进程
- 进程:是指一个内存中运行的应用程序,我们开启的应用如QQ、微信、google浏览器、idea开发工具等都是一个应用,一个应用最少具备一个进程,也有可能有多个进程,每个进程都有一个独立的内存空间,进程是系统运行程序的基本单位;

Tips:多个进程的执行可以是并行也可以是并发;
1.2.2 线程
- 线程:线程是进程中的一个执行单元,负责当前进程中程序的执行,是一个程序内部的一条执行路径,一个进程中至少有一个线程。一个进程中是可以有多个线程的,这个应用程序也可以称之为多线程程序;

关于进程和线程的概念我们理解即可,上图中电脑管家的“首页体检”、“病毒查杀”等功能也有可能是一个进程来完成,关于病毒查杀功能下面可能还有其他小功能,有可能是线程完成,也有可能还是一个独立的进程来完成;
1.2.3 多线程并发就一定快吗?
我们知道,并发本质上其实是多条线程交替执行,线程在交替过程中需要损耗一部分性能,由于CPU分配给这些线程执行的时间片非常短,线程交替也非常频繁,因此线程交替是一个比较消耗性能的步骤;
在大部分情况下,多线程的并发能够提升我们程序的执行速度,如:
- 当应用程序需要同时处理多个任务时,每一个任务都需要花费大量的时间,这个时候我们可以开辟多条程序执行线路来并发的"同时"处理多个任务;
- 但是当任务处理时间很短,这个时候根本不需要开启多个线程来"同时"处理多个任务,因为任务处理时间非常短暂,还没等CPU切换到其他线程任务就执行完毕了,这个时候多线程反而使得程序效率低;
这就好比如我们的任务是"烧水",我们需要烧开10壶水,每一壶水的烧开都是一个漫长的时间过程。
- 在单线程环境中:在水烧开的过程中,CPU只能干等着,等第一壶水烧开了后,才可以烧第二壶水,以此类推…这样效率非常慢
- 在多线程环境中:在水烧开的过程中,CPU去分配时间去其他的线程,让其他的线程也来烧水,这样可以让多个水壶同时烧水,效率快;
这样下来,多线程效率更高;
但是现在我们的任务如果变为了"拍蒜",我们需要拍10个蒜,拍一瓣蒜的速度非常快;
- 在单线程环境中:拿起一把刀拍一个蒜,然后马上拍另一瓣蒜…拍10个蒜的时间花费8秒。
- 在多线程环境中:拿起一把刀拍一个蒜,然后马上换另一把刀拍一个蒜…拍10个蒜的时间花费15秒。
这样下来,单线程效率更高;
Tips:在上述案例中,不管是"烧水"还是"拍蒜"都是一个人(CPU核心)在操作多个器具(调度多个线程),如果出现了多个人来同时操作多个器具那就不属于并发的范畴了,而是属于并行;
二、Java中的多线程
2.1 Java线程体验
Java使用java.lang.Thread类代表线程,所有的线程对象都必须是Thread类或其子类的实例。每个线程的作用是完成一定的任务,实际上就是执行一段程序代码。
继承Thread类都将变为线程类,调用Thread类中的start()方法即开启线程;当线程开启后,将会执行Thread类中的run方法,因此我们要做的就是重写Thread中的run方法,将线程要执行的任务由我们自己定义;
2.1.1 线程初体验
- 定义线程类:
class MyThread extends Thread {

    // 封装了线程执行的任务
    @Override
    public void run() {
        for (int i = 0; i < 10000; i++) {
            System.out.println("MyThread..");
        }
    }
}
- 测试类:
package com.dfbz.demo01_线程的创建;

/**
 * @author lscl
 * @version 1.0
 * @intro:
 */
public class Demo01_多线程初体验 {
    public static void main(String[] args) {
        MyThread thread=new MyThread();

        // 开启线程,开启线程执行的是run
        thread.start();

        for (int i = 0; i < 10000; i++) {
            System.out.println("main....");
        }
    }
}
运行结果:

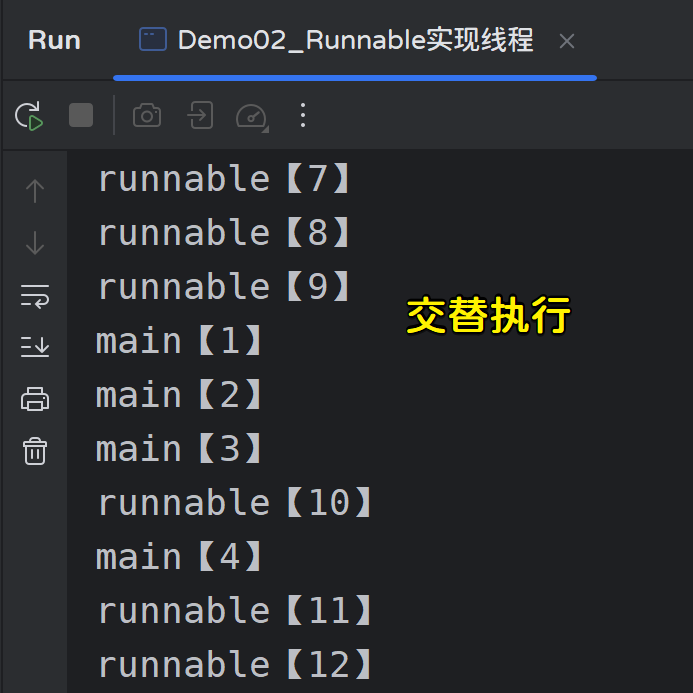
运行测试代码,观察是否交替执行;如果没有,可能是因为执行任务太少,CPU分配的一点点时间片就足以将线程中的任务全部执行完毕,可以扩大循环次数;观察效果;
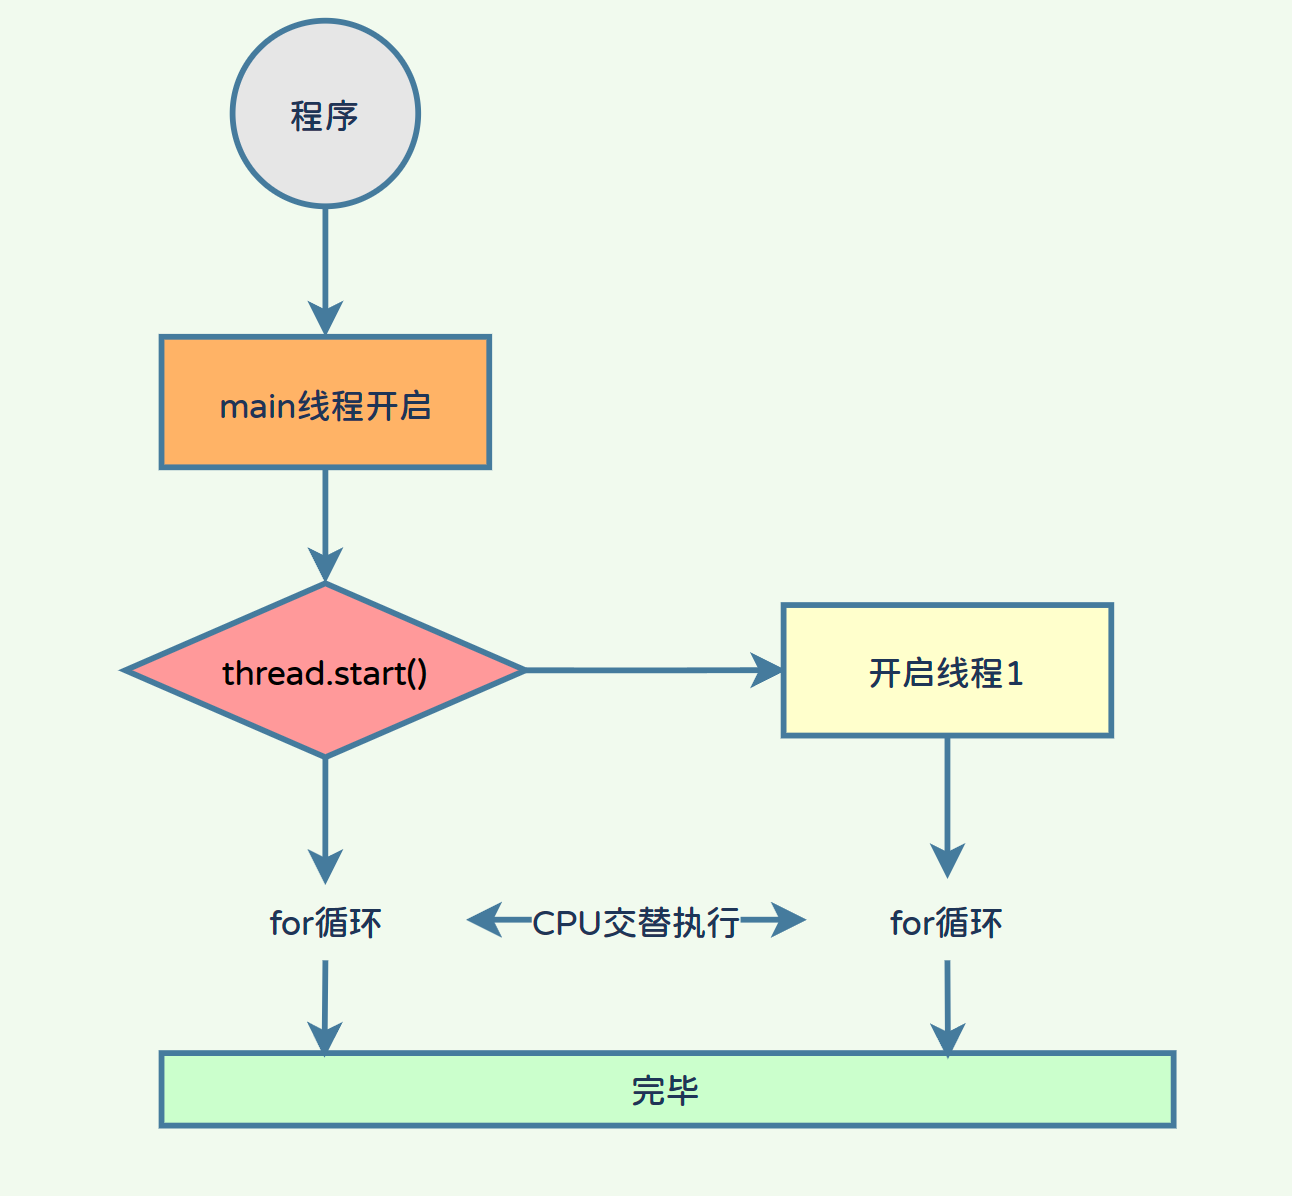
2.1.2 线程执行流程
首先程序运行开启main线程执行代码,执行start()方法时开启一条新的线程来执行任务,新的线程与main线程争夺CPU的执行权在交替执行;
2.2 线程类
2.2.1 常用方法
构造方法:
public Thread():分配一个新的线程对象。public Thread(String name):分配一个指定名字的新的线程对象。public Thread(Runnable target):分配一个带有指定目标新的线程对象。public Thread(Runnable target,String name):分配一个带有指定目标新的线程对象并指定名字。
常用方法:
public String getName():获取当前线程名称。public void start():导致此线程开始执行; Java虚拟机调用此线程的run方法。public void run():此线程要执行的任务在此处定义代码。public static void sleep(long millis):使当前正在执行的线程以指定的毫秒数暂停(暂时停止执行)。public static Thread currentThread():返回对当前正在执行的线程对象的引用。
我们前面定义线程时说到过,run方法中规定了线程执行的任务,因此我们重写run方法即可;
现在我们翻开run方法的源码看看:
public class Thread implements Runnable {
    private volatile String name;
    private int            priority;
    private Thread         threadQ;
	....

    /* What will be run. */
    private Runnable target;

    public Thread(Runnable target) {
        init(null, target, "Thread-" + nextThreadNum(), 0);
    }

    public Thread(String name) {
        init(null, null, name, 0);
    }
    ...

    @Override
    public void run() {
        if (target != null) {
            target.run();
        }
    }

    ...
}
发现执行的是Runnable对象的run方法,我们打开Runnable查看源码:
@FunctionalInterface
public interface Runnable {
    /**
     * When an object implementing interface <code>Runnable</code> is used
     * to create a thread, starting the thread causes the object's
     * <code>run</code> method to be called in that separately executing
     * thread.
     * <p>
     * The general contract of the method <code>run</code> is that it may
     * take any action whatsoever.
     *
     * @see     java.lang.Thread#run()
     */
    public abstract void run();
}
发现Runnable是个接口,并且只有一个抽象方法run()
@FunctionalInterface:标注此注解的接口只有一个抽象方法,也被称为函数式接口;
2.2.2 使用Runnable创建线程
我们前面翻阅源码得知,Thread执行的run方法实质就是执行Runnable接口中的run方法,因此我们可以传递一个Runnable对象给Thread,此Runnable封装了我们要执行的任务;
采用java.lang.Runnable也是非常常见的一种,我们只需要重写run方法即可。
步骤如下:
- 定义Runnable接口的实现类,并重写该接口的run()方法,该run()方法的方法体同样是该线程的线程执行体。
- 创建Runnable实现类的实例,并以此实例作为Thread的target来创建Thread对象,该Thread对象才是真正的线程对象。
- 调用线程对象的start()方法来启动线程;
- 定义Runnable接口:
class MyRunnable implements Runnable{
    @Override
    public void run() {
        for (int i = 0; i < 10000; i++) {
            System.out.println("runnable....");
        }
    }
}
- 测试类:
package com.dfbz.demo01_线程的创建;

/**
 * @author lscl
 * @version 1.0
 * @intro:
 */
public class Demo02_Runnable实现线程 {
    public static void main(String[] args) {
        // 我们的任务
        Runnable runnable=new MyRunnable();

        // 创建一个线程对象,传递任务(Runnable)
        Thread thread=new Thread(runnable);

        // 开启线程,线程执行的任务就是Runnable中的run方法
        thread.start();

        for (int i = 0; i < 10000; i++) {
            System.out.println("main...");
        }
    }
}
运行结果:
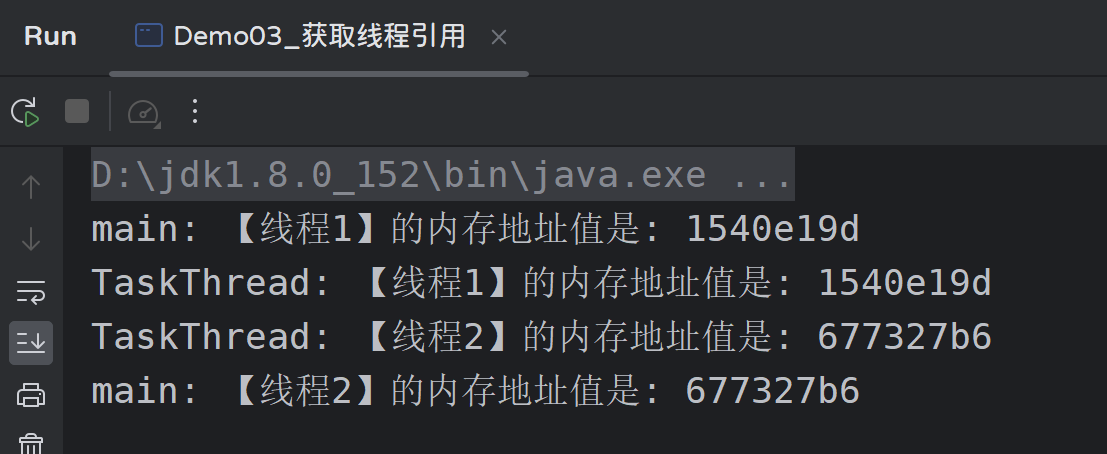
2.2.3 获取线程引用
| 方法名 | 介绍 |
|---|---|
public static Thread currentThread() | 返回对当前正在执行的线程对象的引用。 |
【定义线程类】
class TaskThread extends Thread {

    public TaskThread() {
    }

    public TaskThread(String name) {
        super(name);
    }

    @Override
    public void run() {
        // 获取正在这些这段代码的这个线程对象
        Thread thread = Thread.currentThread();
        // 获取这个对象的内存地址值
        String memoryAddr = Integer.toHexString(thread.hashCode());

        System.out.println("TaskThread: 【" + thread.getName() + "】的内存地址值是: " + memoryAddr);
    }
}
【测试代码】
package com.dfbz.demo01_线程的创建;

/**
 * @author lscl
 * @version 1.0
 * @intro:
 */
public class Demo03_获取线程引用 {
    public static void main(String[] args) {
        // 创建线程对象并指定线程的名称
        TaskThread t1 = new TaskThread("线程1");
        TaskThread t2 = new TaskThread("线程2");

        t1.start();
        t2.start();

        // 获取这两个对象的内存地址值
        String memoryAdd_t1 = Integer.toHexString(t1.hashCode());
        String memoryAdd_t2 = Integer.toHexString(t2.hashCode());

        // 获取t1对象的内存地址值
        System.out.println("main: 【" + t1.getName() + "】的内存地址值是: " + memoryAdd_t1);
        System.out.println("main: 【" + t2.getName() + "】的内存地址值是: " + memoryAdd_t2);
    }
}
执行效果:
2.2.3 使用匿名内部类创建线程
Runnable接口封装了线程要执行的任务,我们启动线程之后线程将会执行Runnable接口中的run方法,我们定义Runnable的目的也只是为了重写run方法,将Runnable对象传递给线程对象,因此这种情况我们可以用匿名内部类来简化之前的代码,每次要定义一个新的任务时用匿名内部类的方式会简便很多;
再者,匿名内部类的本质是创建了一个指定类的子类对象,在匿名内部类中重写父类的指定方法,不局限与函数式接口,普通类也可以使用匿名内部类的方式来定义一个子类对象,因此Thread也可以使用匿名内部类来创建子类对象;
1) Runnable方式创建线程
package com.dfbz.demo01_线程的创建;

/**
 * @author lscl
 * @version 1.0
 * @intro:
 */
public class Demo04_匿名内部类创建线程_Runnable {
    public static void main(String[] args) {

        /*
         相当于:
         class Xxx implements Runnable{
            @Override
            public void run() {
                for (int i = 0; i < 10000; i++) {
                    // 获取正在执行这一行代码的线程对象的名称
                    System.out.println(Thread.currentThread().getName());
                }
            }
         }
         Runnable runnable = new Xxx();
         */
        Runnable runnable = new Runnable() {
            @Override
            public void run() {
                for (int i = 0; i < 10000; i++) {
                    // 获取正在执行这一行代码的线程对象的名称
                    System.out.println(Thread.currentThread().getName());
                }
            }
        };

        Thread thread = new Thread(runnable);
        thread.start();

        for (int i = 0; i < 10000; i++) {
            System.out.println(Thread.currentThread().getName());
        }
    }
}
2) Thread方式创建
package com.dfbz.demo01_线程的创建;

/**
 * @author lscl
 * @version 1.0
 * @intro:
 */
public class Demo05_匿名内部类创建线程_Thread {
    public static void main(String[] args) {

        /*
         相当于:
         class Xxx extends Thread{
            @Override
            public void run() {
                for (int i = 0; i < 10000; i++) {
                    // 获取正在执行这一行代码的线程对象的名称
                    System.out.println(Thread.currentThread().getName());
                }
            }
         }
         Thread thread = new Xxx();
         */

        Thread thread = new Thread() {
            @Override
            public void run() {
                for (int i = 0; i < 10000; i++) {
                    // 获取正在执行这一行代码的线程对象的名称
                    System.out.println(Thread.currentThread().getName());
                }
            }
        };
        thread.start();

        for (int i = 0; i < 10000; i++) {
            System.out.println(Thread.currentThread().getName());
        }
    }
}
2.2.4 使用Lambda表达式创建线程
Lambda表达式可以简化匿名内部类,并且只能用于函数式接口,Runnable接口正是一个函数式接口,因此可以使用Lambda表达式来简化匿名内部类;
- 示例代码:
package com.dfbz.demo01_线程的创建;

/**
 * @author lscl
 * @version 1.0
 * @intro:
 */
public class Demo06_使用Lambda表达式创建线程 {
    public static void main(String[] args) {
       /* Runnable runnable= ()->{
            for (int i = 0; i < 10000; i++) {
                System.out.println(Thread.currentThread().getName());
            }
        };*/

        Thread thread = new Thread(()->{
            for (int i = 0; i < 10000; i++) {
                System.out.println(Thread.currentThread().getName());
            }
        });
        thread.start();

        for (int i = 0; i < 10000; i++) {
            System.out.println(Thread.currentThread().getName());
        }
    }
}
2.3 线程的操作
2.3.1 线程的休眠
public static void sleep(long millis):让当前线程睡眠指定的毫秒数
测试代码:
package com.dfbz.demo02_线程的操作;

/**
 * @author lscl
 * @version 1.0
 * @intro:
 */
public class Demo01_线程的休眠 {
    public static void main(String[] args) {
        Thread t1 = new Thread(() -> {
            for (int i = 0; i < 100; i++) {
                // 如果线程休眠了,会把CPU的执行权限让出来
                try {
                    Thread.sleep(100);
                } catch (InterruptedException e) {
                    throw new RuntimeException(e);
                }
                System.out.println("t1...");
            }
        });
        t1.start();

        for (int i = 0; i < 100; i++) {
            try {
                Thread.sleep(100);
            } catch (InterruptedException e) {
                throw new RuntimeException(e);
            }
            System.out.println("main...");
        }
    }
}
在JDK1.5推出了TimeUnit类,该类可以根据时间单位来对线程进行睡眠操作;
示例代码:
public static void main(String[] args) {
    Thread t1 = new Thread(() -> {
        for (int i = 0; i < 100; i++) {
            try {
                // 睡眠1s
                TimeUnit.SECONDS.sleep(1);
            } catch (InterruptedException e) {
                throw new RuntimeException(e);
            }
            System.out.println("t1...");
        }
    });
    t1.start();

    for (int i = 0; i < 100; i++) {
        try {
            // 睡眠1s
            TimeUnit.SECONDS.sleep(1);
        } catch (InterruptedException e) {
            throw new RuntimeException(e);
        }
        System.out.println("main...");
    }
}
2.3.2 线程的加入
多条线程时,当指定线程调用join方法时,线程执行权交给该线程,必须等到调用join方法的线程执行完全部任务后才会释放线程的执行权,其他线程才有可能争抢到线程执行权;
public final void join():让调用join方法的线程在当前线程优先执行,直至调用join方法的线程执行完毕时,再执行本线程;public final void join(long millis):让线程执行millis毫秒,然后将线程执行权抛出,给其他线程争抢
1) join方法示例
【示例代码】:
package com.dfbz.demo02_线程的操作;
/**
* @author lscl
* @version 1.0
* @intro:
*/
public class Demo02_join_使用示例 {
public static void main(String[] args) {
//创建线程1
Thread t1 = new Thread(new Runnable() {
@Override
public void run() {
for (int i = 0; i < 1000; i++) {
System.out.println("线程1:" + i);
try {
Thread.sleep(500);
} catch (InterruptedException e) {
e.printStackTrace();
}
}
}
});
//创建线程2
Thread t2 = new Thread(new Runnable() {
@Override
public void run() {
for (int i = 0; i < 1000; i++) {
System.out.println("线程2:" + i);
try {
Thread.sleep(500);
} catch (InterruptedException e) {
e.printStackTrace();
}
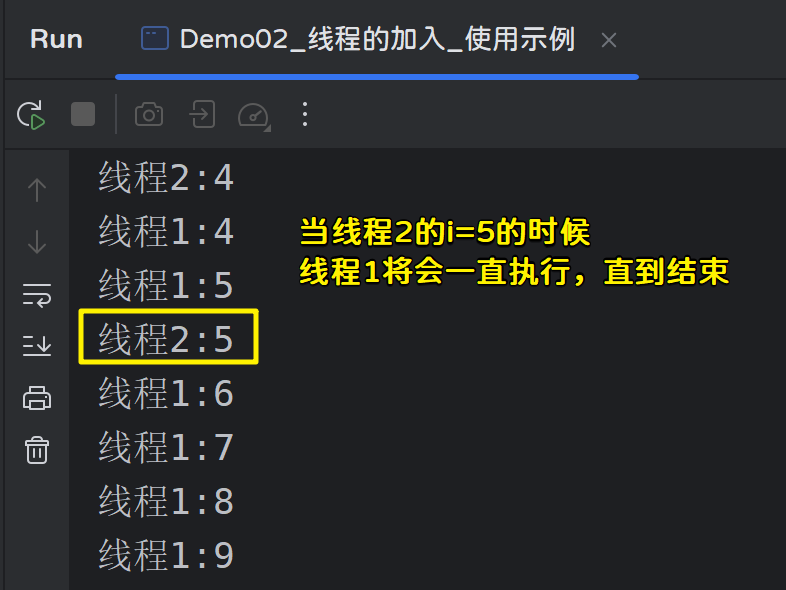
if (i == 5) {
try {
//当i等于5的时候,让t1线程加入执行,直至执行完毕
t1.join();
//当i等于500的时候,让t1线程加入执行,执行10毫秒之后交出执行权
// t1.join(10);
} catch (InterruptedException e) {
e.printStackTrace();
}
}
}
}
});
t1.start();
t2.start();
}
}
执行效果:
2) join方法的应用场景
【join方法小案例】:
static int num = 0;
public static void main(String[] args) {
    Thread t1 = new Thread() {
        @Override
        public void run() {
            try {
                Thread.sleep(10);
            } catch (InterruptedException e) {
                e.printStackTrace();
            }
            num=10;
        }
    };

    t1.start();

    System.out.println(num);            // ?
}
我们在main线程中开启了一个新的线程(t1),t1线程对num进行赋值,然后在main线程中进行打印,很显然num的值为0,因为t1线程的阻塞不会让main线程也阻塞,当t1线程阻塞时,main线程会继续往下执行;
【使用join方法改造】:
package com.dfbz.demo02_线程的操作;

/**
 * @author lscl
 * @version 1.0
 * @intro:
 */
public class Demo03_join_应用场景 {
    static int num = 0;

    // 使用join改造
    public static void main(String[] args) {
        Thread t1 = new Thread() {
            @Override
            public void run() {
                try {
                    Thread.sleep(10);
                } catch (InterruptedException e) {
                    e.printStackTrace();
                }
                num = 10;
            }
        };
        t1.start();

        try {
            // 必须让t1线程执行完毕才能执行下面的代码
            t1.join();
        } catch (InterruptedException e) {
            e.printStackTrace();
        }
        System.out.println(num);            // 10
    }
}
Tips:join方法一般应用于线程2依赖于线程1执行的返回结果时;
3) join方法注意事项
【注意事项1】:当线程执行join方法传递时间参数时,如果join线程任务执行完毕,则不必等待join时间结束;
package com.dfbz.demo02_线程的操作;

/**
 * @author lscl
 * @version 1.0
 * @intro: 当线程执行join方法传递时间参数时,如果join线程任务执行完毕,则不必等待join时间结束;
 */
public class Demo04_join_注意事项_01 {
    static int count = 0;

    public static void main(String[] args) throws InterruptedException {

        Thread t1 = new Thread() {
            @Override
            public void run() {
                try {
                    Thread.sleep(2000);
                } catch (InterruptedException e) {
                    e.printStackTrace();
                }
                count = 10;
            }
        };

        long startTime = System.currentTimeMillis();
        t1.start();

        // 让t1线程执行完毕
//    t1.join();

        // 让t1线程执行1s,然后代码继续往下执行
//        t1.join(1000);

        // 让t1线程执行3s,但如果t1线程执行完毕了,该方法也会结束
        t1.join(3000);
        long endTime = System.currentTimeMillis();

        // count【10】,time【2011】
        System.out.println("count【" + count + "】,time【" + (endTime - startTime) + "】");
    }
}
- 执行效果如下:
t1.join();
count【10】,time【2003】
----------------------------------------

t1.join(1000);
count【0】,time【1005】

----------------------------------------
t1.join(3000);
count【10】,time【2006】
【注意事项2】:当线程执行join方法时,优先执行join线程的任务,等到join线程任务执行完毕时才会执行本线程。但如果还有其他线程与执行join方法的线程同时存在时,则其他线程与join线程交替执行;
package com.dfbz.demo02_线程的操作;

/**
 * @author lscl
 * @version 1.0
 * @intro:
 */
public class Demo05_join_注意事项_02 {
    public static void main(String[] args) {
        Thread t1 = new Thread("t1") {
            @Override
            public void run() {

                while (true) {
                    try {
                        Thread.sleep(500);
                    } catch (InterruptedException e) {
                        e.printStackTrace();
                    }

                    System.out.println(Thread.currentThread().getName());
                }
            }
        };

        Thread t2 = new Thread("t2") {
            @Override
            public void run() {
                while (true) {
                    System.out.println("t2");
                    try {

                        // 让t1优先执行,但是如果还有其他线程和t1线程同时存在,那么其他线程将和t1线程交替执行
                        t1.join();
                    } catch (InterruptedException e) {
                        e.printStackTrace();
                    }
                }
            }
        };

        Thread t3 = new Thread("t3") {
            @Override
            public void run() {
                while (true) {
                    try {
                        Thread.sleep(500);
                    } catch (InterruptedException e) {
                        e.printStackTrace();
                    }
                    System.out.println(Thread.currentThread().getName());
                }
            }
        };

        t1.start();
        t2.start();
        t3.start();
    }
}
执行代码,发现t1和t3线程交替执行;
2.3.3 守护线程
1) 守护线程的使用
public final void setDaemon(boolean on):设置线程是否为守护线程
当用户线程(非守护线程)运行完毕时,守护线程也会停止执行,但由于CPU运行速度太快,当用户线程执行完毕时,将信息传递给守护线程,会有点时间差,而这些时间差会导致还会执行一点守护线程;
守护线程的主要用途是在后台执行一些辅助任务,如清理工作、监控状态等。因为它们没有影响应用程序主要功能的能力,所以它们可以随时被中断和终止。
【示例代码】
package com.dfbz.demo02_线程的操作;

/**
 * @author lscl
 * @version 1.0
 * @intro:
 */
public class Demo06_守护线程的使用 {
    public static void main(String[] args) {
        Thread t1 = new Thread(new Runnable() {
            @Override
            public void run() {
                for (int i = 0; i < 2000000; i++) {
                    System.out.println("守护线程: " + i);
                }
            }
        });

        //将t1设置为守护线程
        t1.setDaemon(true);

        Thread t2 = new Thread(new Runnable() {
            @Override
            public void run() {
                for (int i = 0; i < 10; i++) {
                    System.out.println("用户线程: " + i);
                }
            }
        });

        t1.start();
        t2.start();
    }
}
2) 守护线程的退出
当一个用户线程(也称为非守护线程)结束其运行后,其他用户线程和守护线程仍将继续运行,直到所有用户线程都已结束其运行为止。 ==只有当没有任何用户线程处于活动状态(即所有用户线程都已经结束其运行)时,JVM才会退出,并在此过程中终止任何剩余的守护线==程。 因此,如果有多个用户线程正在运行,即使其中一个用户线程结束了其运行,只要还有至少一个用户线程处于活动状态,那么所有的守护线程都将继续运行。
【示例代码】
package com.dfbz.demo02_线程的操作;

/**
 * @author lscl
 * @version 1.0
 * @intro:
 */
public class Demo07_守护线程的退出 {
    public static void main(String[] args) {
        Thread t1 = new Thread(() -> {
            for (int i = 0; i < 2000000; i++) {
                System.out.println("守护线程: " + i);
            }
        });

        //将t1设置为守护线程
        t1.setDaemon(true);

        Thread t2 = new Thread(()->{
            for (int i = 0; i < 10; i++) {
                System.out.println("用户线程1: " + i);
            }
        });

        Thread t3 = new Thread(()->{
            for (int i = 0; i < 1000000; i++) {
                System.out.println("用户线程2: " + i);
            }
        });

        t1.start();
        t2.start();
        t3.start();
    }
}
执行代码,发现【用户线程1】执行完毕后,守护线程并不会被退出;而是要等到所有的用户线程执行完毕后守护线程才会退出。
2.3.4 线程优先级
默认情况下,所有的线程优先级默认为5,最高为10,最低为1。优先级高的线程更容易让线程在抢到线程执行权;
通过如下方法可以设置指定线程的优先级:
public final void setPriority(int newPriority):设置线程的优先级。
示例代码:
package com.dfbz.demo02_线程的操作;

/**
 * @author lscl
 * @version 1.0
 * @intro:
 */
public class Demo08_线程优先级 {
    public static void main(String[] args) {
        Thread t1 = new Thread(() -> {
            for (int i = 0; i <= 10000; i++) {
                System.out.println("线程2: " + i);
            }
        });

        Thread t2 = new Thread(() -> {
            for (int i = 0; i <= 10000; i++) {
                System.out.println("线程2: " + i);
            }
        });

        // 设置优先级
        t1.setPriority(1);
        t2.setPriority(10);

        t1.start();
        t2.start();
    }
}
2.3.5 线程礼让
在多线程执行时,线程礼让,告知当前线程可以将执行权礼让给其他线程,礼让给优先级相对高一点的线程,==但仅仅是一种告知,并不是强制将执行权转让给其他线程,当前线程将CPU执行权礼让出去后,也有可能下次的执行权还在原线程这里;==如果想让原线程强制让出执行权,可以使用join()方法
public static void yield():将当前线程的CPU执行权礼让出来;
示例代码:
package com.dfbz.demo02_线程的操作;

/**
 * @author lscl
 * @version 1.0
 * @intro:
 */
public class Demo09_线程礼让 {
    public static void main(String[] args) {

        Thread t1 = new Thread(()->{
            for (int i = 0; i < 100; i++) {
                System.out.println("线程1: " + i);
                if (i == 10) {
                    // 当i等于10的时候该线程礼让(礼让之后有可能下次线程执行权还被线程2抢到了)
                    Thread.yield();
                }
            }
        });

        Thread t2 = new Thread(() -> {
            for (int i = 0; i < 100; i++) {
                System.out.println("线程2: " + i);
            }
        });

        t1.start();
        t2.start();
    }
}
2.3.6 线程中断
当一个线程接收到中断请求后,它的中断状态将会被设置为“已中断”,并且如果该线程正在睡眠、等待某个锁、I/O事件或其他同步对象,则它将收到一个InterruptedException异常。
需要注意的是:中断并不是立即停止线程的执行,而是通知线程它已经被中断,并给出一个机会让它自己去处理这个中断请求。具体的响应方式由开发者自行定义。
1) interrupt中断线程
public void interrupt():发送一个中断请求给指定线程。 将线程的中断状态设置为true;如果被中断的线程正在sleep、wait、join等操作,那么将会出现InterruptedException异常,并且重置中断状态(重置为false),相当于中断失败;public boolean isInterrupted():获取当前线程的中断状态;public static boolean interrupted():获取当前线程的中断状态,并清空中断状态(设置为false)
示例代码:
package com.dfbz.demo03_线程的中断;

/**
 * @author lscl
 * @version 1.0
 * @intro:
 */
public class Demo01_线程中断 {
    public static void main(String[] args) throws Exception {
        Thread t1 = new Thread(() -> {
            while (true) {
                // 模拟任务
            }
        }, "t1");
        t1.start();

        System.out.println(t1.isInterrupted());         // false

        t1.interrupt();         // 中断线程,将中断状态设置为true

        System.out.println(t1.isInterrupted());         // true
    }
}
Tips:中断线程并且不是将线程停止,只是将线程的中断状态设置为true;
借助中断状态,我们可以采用如下的方式来停止线程:
package com.dfbz.demo03_线程的中断;

/**
 * @author lscl
 * @version 1.0
 * @intro:
 */
public class Demo02_使用中断来停止线程 {
    public static void main(String[] args) throws Exception {
        Thread t1 = new Thread(() -> {
            while (true) {
                // 获取当前线程的中断状态
                boolean interrupted = Thread.currentThread().isInterrupted();
                if (interrupted) {
                    System.out.println("线程被中断【" + interrupted + "】....");
                    System.out.println("释放资源....");
                    break;
                } else {
                    System.out.println("执行任务【" + interrupted + "】.....");
                }
            }
        }, "t1");
        t1.start();

        Thread.sleep(10);   	// 让t1线程执行10ms
        t1.interrupt();         // 中断线程,将中断状态设置为true
    }
}
2) isInterrupted和interrupted方法
isInterrupted和interrupted方法都可以获取当前线程的中断状态,但不同的是isInterrupted只会返回线程的中断状态,并不会对中断状态发送改变,interrupted方法首先返回线程的中断状态,然后将线程的中断状态设置为false(清除中断状态)
【小案例】
需求:一个生产线程一直生产菜包,生产一定时间后生产一个肉包,然后在继续生产菜包;
package com.dfbz.demo03_线程的中断;

/**
 * @author lscl
 * @version 1.0
 * @intro:
 */
public class Demo03_中断线程小案例 {
    public static void main(String[] args) throws InterruptedException {
        Thread t1 = new Thread(() -> {
            long startTime = System.currentTimeMillis();

            // 让while循环执行5ms
            while (System.currentTimeMillis() - startTime < 5) {

                /*
                1. 一开始中断状态为false,执行生产菜包
                2. 1ms过去之后,main线程对生产线程进行中断,中断状态设置为true
                3. 执行Thread.interrupted()语句返回true,然后把中断状态设置为false,生产线程开始生产肉包
                 */
                if (Thread.currentThread().isInterrupted()) {         // 如果使用isInterrupted方法只是获取线程的中断状态,并不会清除中断状态
//                if (Thread.interrupted()) {
                    System.out.println(System.currentTimeMillis() + ": 生产肉包...");
                } else {
                    System.out.println(System.currentTimeMillis() + ": 生产菜包...");
                }
            }
        });

        t1.start();

        // 生产线程执行3ms后对线程进行中断
        Thread.sleep(3);

        // 对线程进行中断
        t1.interrupt();
    }
}
2.3.7 中断sleep线程
1) 中断sleep线程
需要注意的是,被中断的线程如果正在处于sleep、wait、join等操作中,将会抛出InterruptedException异常,然后重置中断状态(重置为false);
package com.dfbz.demo03_线程的中断;
/**
* @author lscl
* @version 1.0
* @intro:
*/
public class Demo04_中断sleep线程 {
public static void main(String[] args) throws Exception {
Thread t1 = new Thread(() -> {
try {
Thread.sleep(1000);
} catch (InterruptedException e) {
e.printStackTrace();
}
}, "t1");
// 启动线程
t1.start();
Thread.sleep(50); // 确保t1线程首先运行
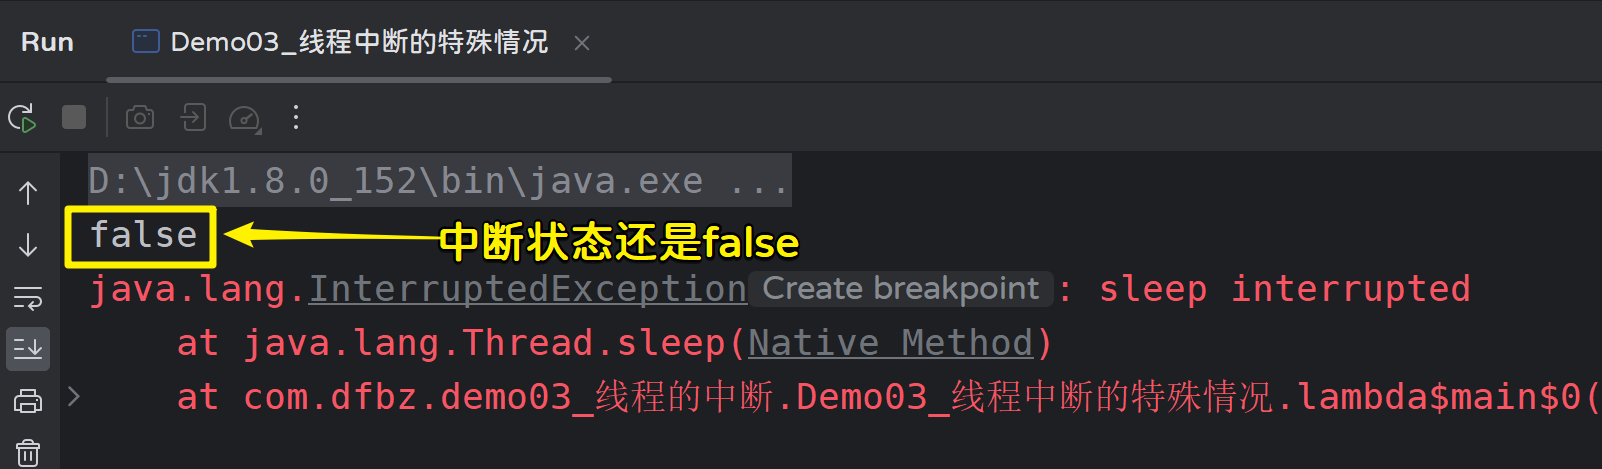
// 中断t1线程,将中断标记设置为true(但此时t1线程正在sleep,因此线程会出现异常,并且中断标记还是false)
t1.interrupt();
// 让main线程睡眠一小会再去查看中断状态,否则有可能出现中断状态还未设置为false就被main线程抢先打印了中断状态
Thread.sleep(10);
System.out.println(t1.isInterrupted()); // false(相当于中断失败)
}
}
2) 中断sleep线程注意事项
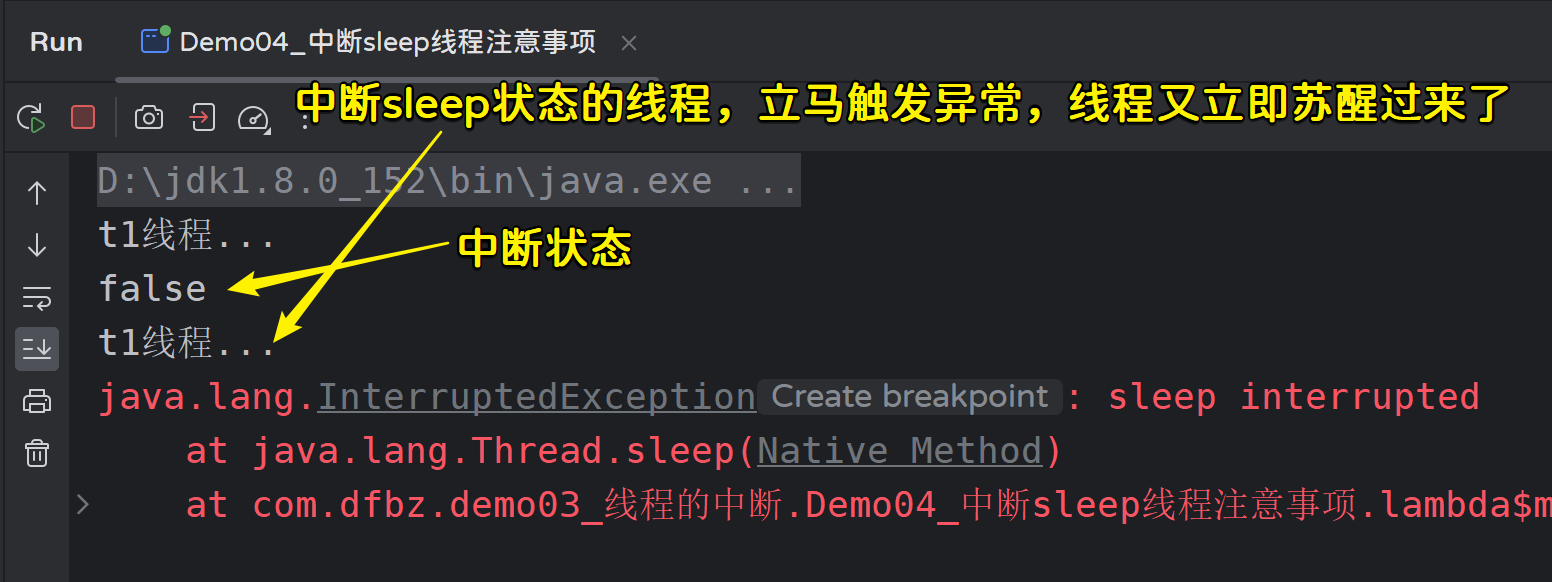
中断sleep、wait、join等状态的线程都将会抛出InterruptedException异常,然后重置中断状态(重置为false),相当于中断失败,同时InterruptedException异常的出现相当于重新唤醒了线程;
package com.dfbz.demo03_线程的中断;

/**
 * @author lscl
 * @version 1.0
 * @intro:
 */
public class Demo05_中断sleep线程注意事项 {

    public static void main(String[] args) throws Exception {
        Thread t1 = new Thread(() -> {
            while (true) {
                try {
                    System.out.println("t1线程...");
                    Thread.sleep(5000);
                } catch (InterruptedException e) {
                    e.printStackTrace();
                }
            }
        }, "t1");

        // 启动线程
        t1.start();

        Thread.sleep(50);       // 确保t1线程首先运行

        // 中断t1线程,将中断标记设置为true(但此时t1线程正在sleep,因此线程会出现异常,并且中断标记还是false)
        t1.interrupt();

        // 让main线程睡眠一小会再去查看中断状态,否则有可能出现中断状态还未设置为false就被main线程抢先打印了中断状态
        Thread.sleep(10);
        System.out.println(t1.isInterrupted());         // false(相当于中断失败)
    }
}
2.3.8 线程的其他方法
1) 线程退出
public final void stop():退出当前线程
stop()方法曾经是用来强制停止一个正在运行的线程的方法,但是这个方法现在已经过时,并且被强烈反对使用。这是因为,强制停止一个线程可能会导致一些不可预料的结果,例如数据损坏、资源泄漏和其他并发问题。
此外,stop()方法还可能会抛出未经检查的安全异常,这可能会破坏程序的健壮性和安全性。
由于以上原因,从Java 1.1开始,stop()方法就被正式废弃,并不再推荐使用。取而代之的是,开发者应该使用更安全和可控的方式来进行线程的中断,例如使用interrupt()方法和适当的同步机制来实现线程间的协作。
示例代码:
package com.dfbz.demo04_线程的其他操作;

/**
 * @author lscl
 * @version 1.0
 * @intro:
 */
public class Demo01_线程的退出 {
    public static void main(String[] args) throws InterruptedException {
        Thread t1 = new Thread(() -> {
            for (int i = 0; i < 1000; i++) {
                System.out.println("hello【" + i + "】");
                try {
                    Thread.sleep(1000);
                } catch (InterruptedException e) {
                    e.printStackTrace();
                }
            }

        }, "t1");

        t1.start();
        Thread.sleep(2000);     // 让t1线程执行2s

        // 退出线程(这个做法是非常不可取的,好端端运行的线程被强制终止了)
        t1.stop();
        System.out.println("end");
    }
}
2) 线程挂起
public final void suspend():暂停当前线程的执行;public final void resume():恢复被暂停的线程;
suspend()和resume()方法曾经是用来暂时挂起和恢复线程运行的方法,但是这两个方法现在也已经过时,并且被强烈反对使用。
这是因为,挂起一个线程可能会导致一些不可预料的结果,例如死锁、数据损坏和其他并发问题。此外,suspend()和resume()方法的操作也不能保证原子性,这可能会导致竞态条件和数据不一致等问题。
由于以上原因,从Java 1.2开始,suspend()和resume()方法就被正式废弃,并不再推荐使用。取而代之的是,开发者应该使用更安全和可控的方式来进行线程的控制和同步,例如使用interrupt()方法和适当的同步机制来实现线程间的协作。
示例代码:
package com.dfbz.demo04_线程的其他操作;

/**
 * @author lscl
 * @version 1.0
 * @intro:
 */
public class Demo02_线程的挂起与恢复 {
    public static void main(String[] args) throws InterruptedException {
        Thread t1 = new Thread(() -> {
            while (true){
                System.out.println("hello");
                try {
                    Thread.sleep(500);
                } catch (InterruptedException e) {
                    throw new RuntimeException(e);
                }
            }
        });

        t1.start();
        Thread.sleep(2000);     // 让t1线程执行2s

        // 挂起线程
        t1.suspend();

        System.out.println("线程挂起...");
        Thread.sleep(2000);             // main线程睡眠2s,t1线程被挂起,此时没有线程在执行

        t1.resume();
        System.out.println("线程恢复....");
    }
}
2.4 Callable实现线程
2.4.1 Callable的使用
我们前面学习过,Thread是Java中的线程类,Runnable接口封装了线程所要执行的任务;当线程开启后(调用start方法)则会执行Runnable中的run方法;Callable适用于执行某个任务后需要有返回值响应的情况。例如发送短信是否成功、订单是否更新成功、发起远程调用响应的结果等…
- Callable接口:
@FunctionalInterface
public interface Callable<V> {
    /**
     * Computes a result, or throws an exception if unable to do so.
     *
     * @return computed result
     * @throws Exception if unable to compute a result
     */
    V call() throws Exception;
}
Callable接口代表一个具有返回值的任务。与Runnable接口不同,Callable接口允许任务在完成后返回一个值,并且还可以抛出一个受检异常。 要使用Callable接口,你需要先创建一个实现了该接口的对象;
- Callable使用示例:
package com.dfbz.demo01_Callable的使用;

import java.util.concurrent.Callable;
import java.util.concurrent.ExecutionException;
import java.util.concurrent.FutureTask;

/**
 * @author lscl
 * @version 1.0
 * @intro:
 */
public class Demo01_Callable实现线程 {
    public static void main(String[] args) throws Exception {

        // 创建一个Callable任务
        MyCallable myCallable = new MyCallable();

        // 封装成task(线程要执行的任务,最终会执行task里面封装的Callable里面的任务)
        FutureTask<String> task1 = new FutureTask<>(myCallable);
        FutureTask<String> task2 = new FutureTask<>(myCallable);

        // 开启线程执行任务
        new Thread(task1).start();
        new Thread(task2).start();

        // 获取任务执行结果(会造成线程阻塞,必须等线程任务完全执行完毕才会有结果返回)
        Object result_1 = task1.get();
        Object result_2 = task2.get();

        System.out.println("执行结果:【" + result_1 + "】");
        System.out.println("执行结果:【" + result_2 + "】");
    }
}

class MyCallable implements Callable<String> {

    @Override
    public String call() throws Exception {
        for (int i = 0; i < 10000; i++) {
            System.out.println(Thread.currentThread().getName() + "【" + i + "】");
        }
        return "执行任务成功!";
    }
}
2.4.2 Callable案例
创建API类,分别提供发送短信方法、文件下载方法;使用异步(使用多线程)和非异步方式(不使用多线程),查看执行效率;
- 定义一个API类:
class Api {

    /**
     * 模拟发送短信
     *
     * @return
     */
    public String sendMsg() {
        try {
            Thread.sleep(500);
        } catch (InterruptedException e) {
            e.printStackTrace();
        }
        return "短信发送成功!";
    }

    /**
     * 模拟下载文件
     *
     * @return
     */
    public String upload() {
        try {
            Thread.sleep(800);
        } catch (InterruptedException e) {
            e.printStackTrace();
        }
        return "文件下载成功!";
    }
}
- 测试类:
package com.dfbz.demo01_Callable的使用;

import java.util.concurrent.Callable;
import java.util.concurrent.ExecutionException;
import java.util.concurrent.FutureTask;

/**
 * @author lscl
 * @version 1.0
 * @intro:
 */

public class Demo02_Callable案例 {
    public static void main(String[] args) throws Exception {
        // 同步调用
        sync();

        // 异步调用
//        async();
    }

    // 异步调用
    public static void async() throws ExecutionException, InterruptedException {
        long startTime = System.currentTimeMillis();

        Api api = new Api();
        // 发送短信的任务
        Callable<String> msgCallable = new Callable<String>() {
            @Override
            public String call() {
                String result = api.sendMsg();

                return result;
            }
        };

        // 下载文件的任务
        Callable<String> uploadCallable = new Callable<String>() {
            @Override
            public String call() {
                String result = api.sendMsg();
                return result;
            }
        };


        // 封装成Task
        FutureTask<String> msgTask = new FutureTask<String>(msgCallable);
        FutureTask<String> uploadTask = new FutureTask<String>(uploadCallable);

        // 执行任务
        new Thread(msgTask).start();
        new Thread(uploadTask).start();

        // 获取线程任务执行的结果集
        String msgResult = msgTask.get();
        String uploadResult = msgTask.get();

        System.out.println("发送短信:【" + msgResult + "】");
        System.out.println("下载文件:【" + uploadResult + "】");

        long endTime = System.currentTimeMillis();

        System.out.println("花费时间:【" + (endTime - startTime) + "】");
    }

    // 同步调用
    public static void sync() {
        long startTime = System.currentTimeMillis();

        Api api = new Api();

        // 发送短信
        String msgResult = api.sendMsg();

        // 下载文件
        String uploadResult = api.upload();

        System.out.println("发送短信:【" + msgResult + "】");
        System.out.println("下载文件:【" + uploadResult + "】");

        long endTime = System.currentTimeMillis();

        System.out.println("花费时间:【" + (endTime - startTime) + "】");
    }
}
三、线程安全
3.1 线程安全问题
我们前面的操作线程与线程间都是互不干扰,各自执行,不会存在线程安全问题。当多条线程操作同一个资源时,发生写的操作时,就会产生线程安全问题;
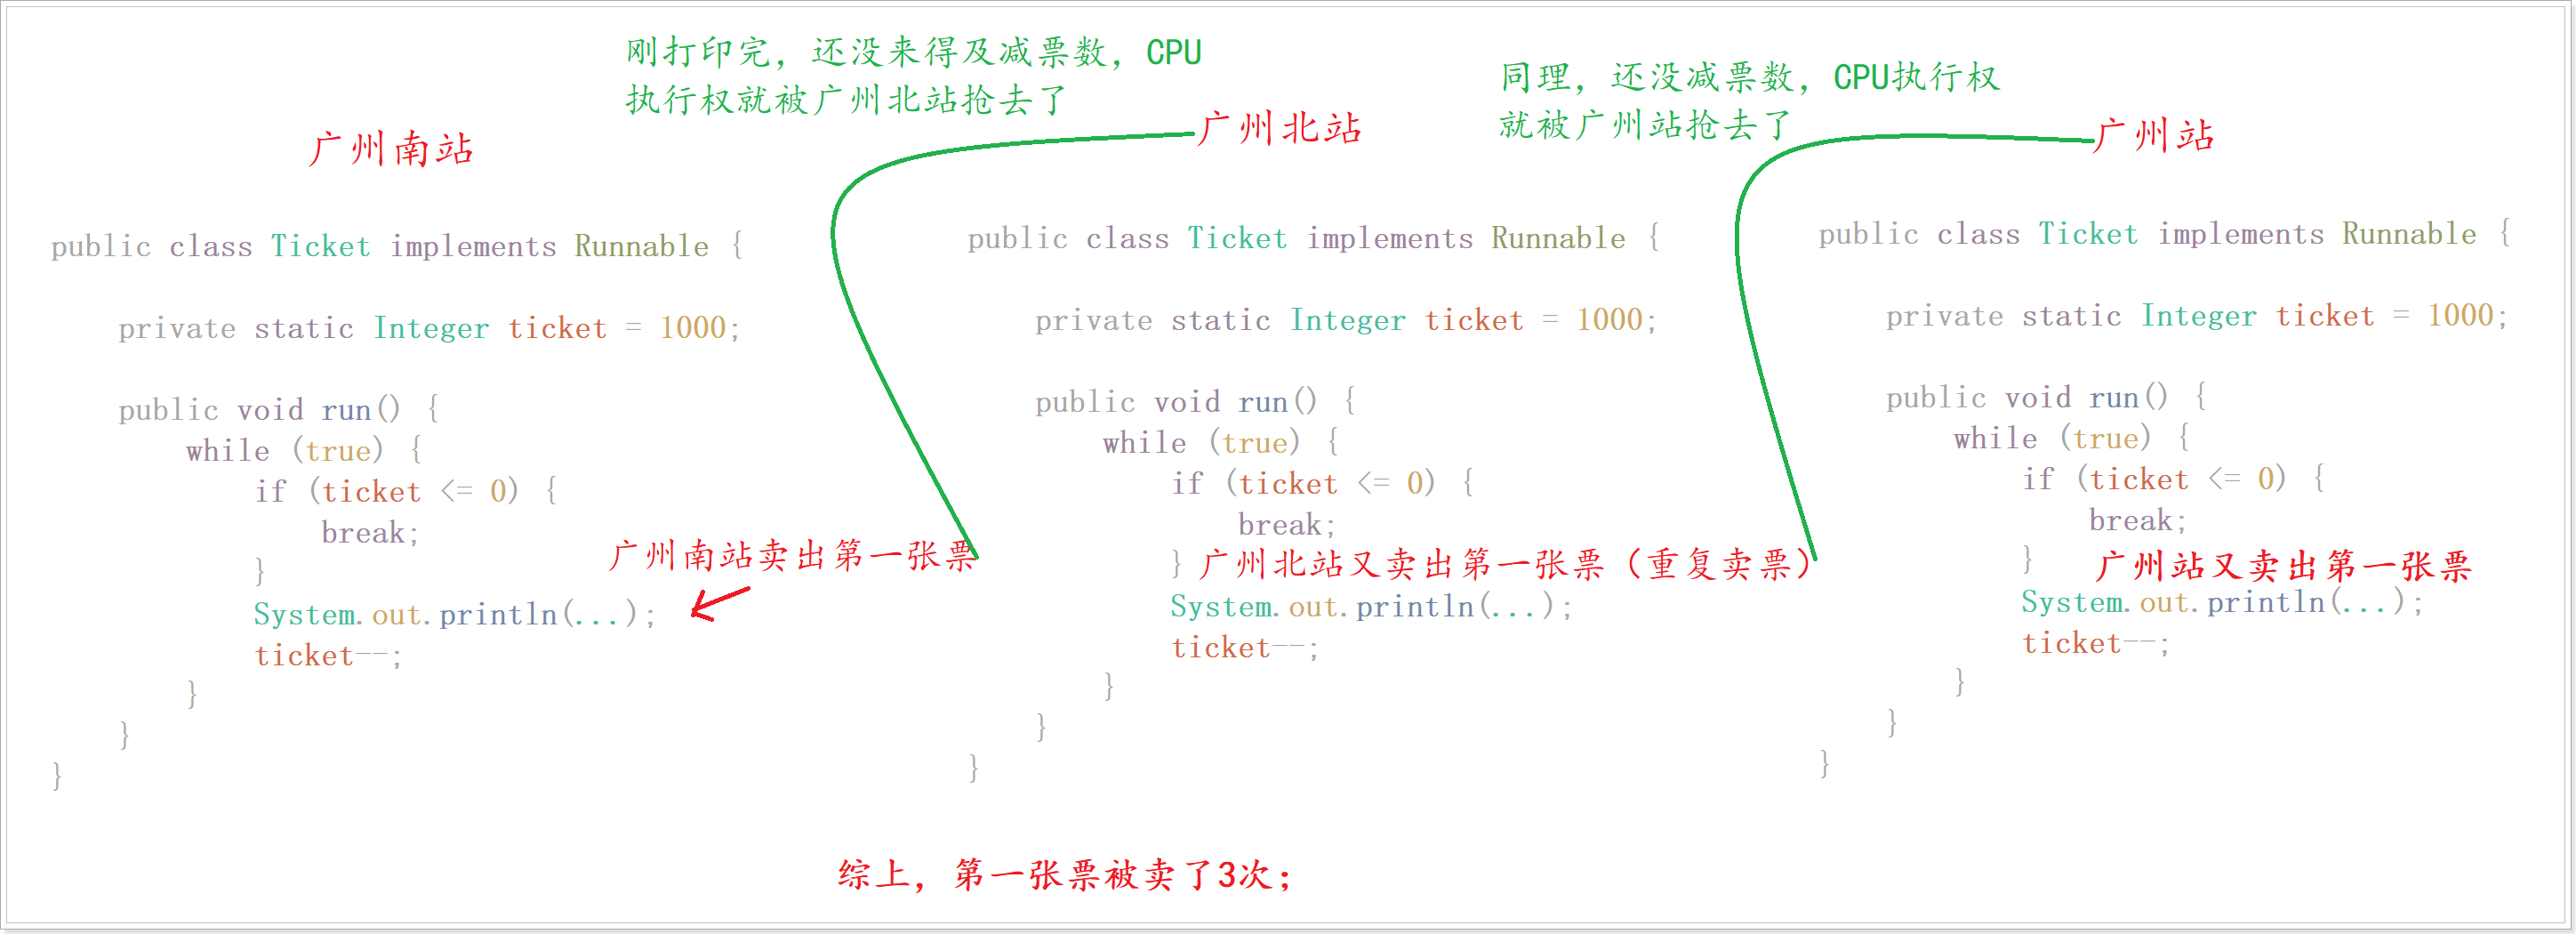
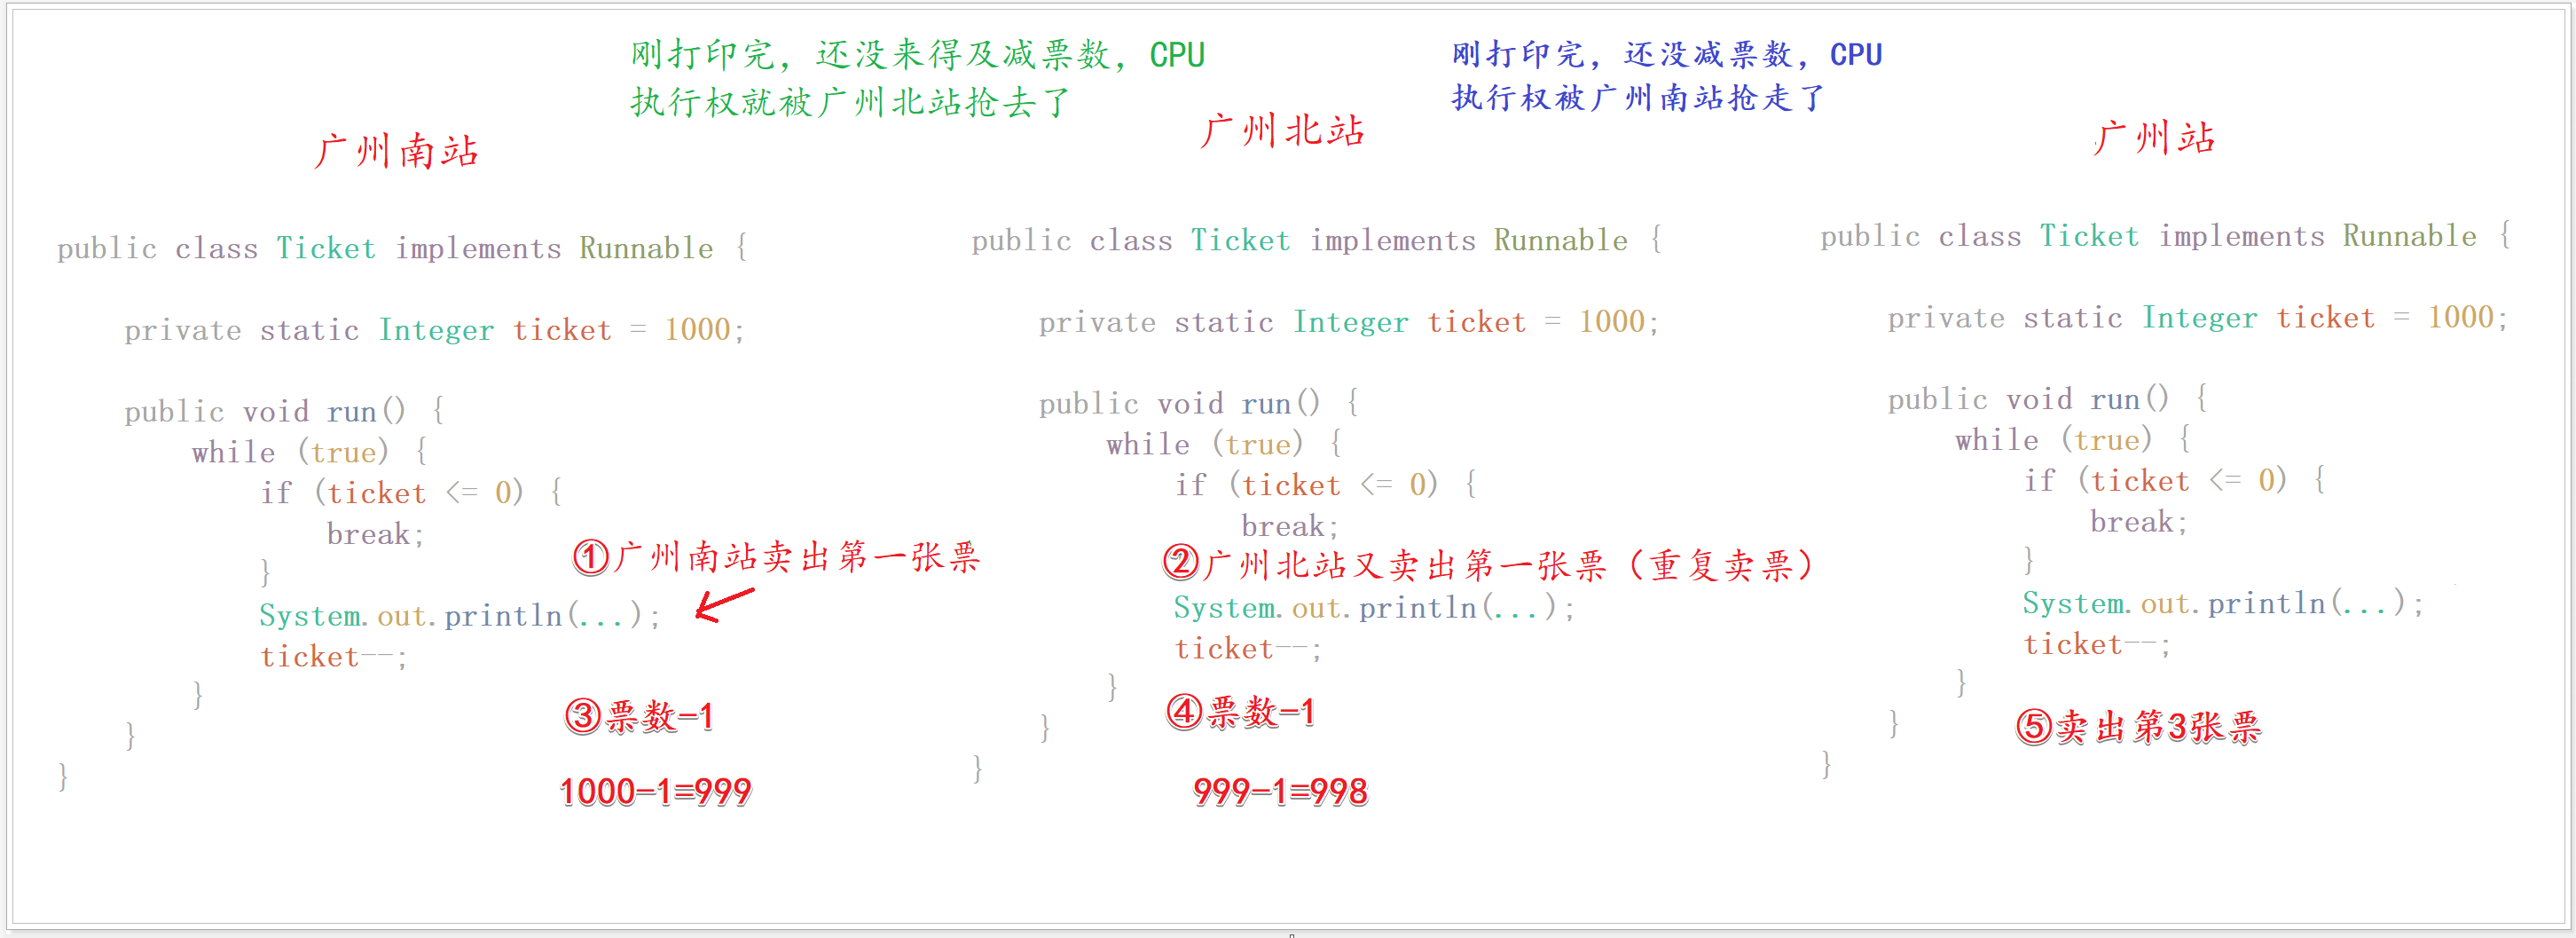
我们来举一个案例,从广州开往南昌的票数共有100张票,售票窗口分别有“广州南站”、“广州北站”、“广州站”等。
- 定义卖票任务:
package com.dfbz.demo01_线程安全问题引入;

/**
 * @author lscl
 * @version 1.0
 * @intro:
 */
public class Ticket implements Runnable {

    //票数
    private Integer ticket = 1000;

    @Override
    public void run() {

        while (true) {

            if (ticket <= 0) {
                break;      //票卖完了
            }
            System.out.println(Thread.currentThread().getName() + "正在卖第: " + (1001 - ticket) + "张票");
            ticket--;
        }
    }
}
- 测试类:
package com.dfbz.demo01_线程安全问题引入;

/**
 * @author lscl
 * @version 1.0
 * @intro:
 */
public class Demo01_卖票案例 {
    public static void main(String[] args) {
        Ticket ticket = new Ticket();
        //开启三个窗口,买票
        Thread t1 = new Thread(ticket, "广州南站");
        Thread t3 = new Thread(ticket, "广州北站");
        Thread t2 = new Thread(ticket, "广州站");

        t1.start();
        t2.start();
        t3.start();
    }
}
查看运行结果:
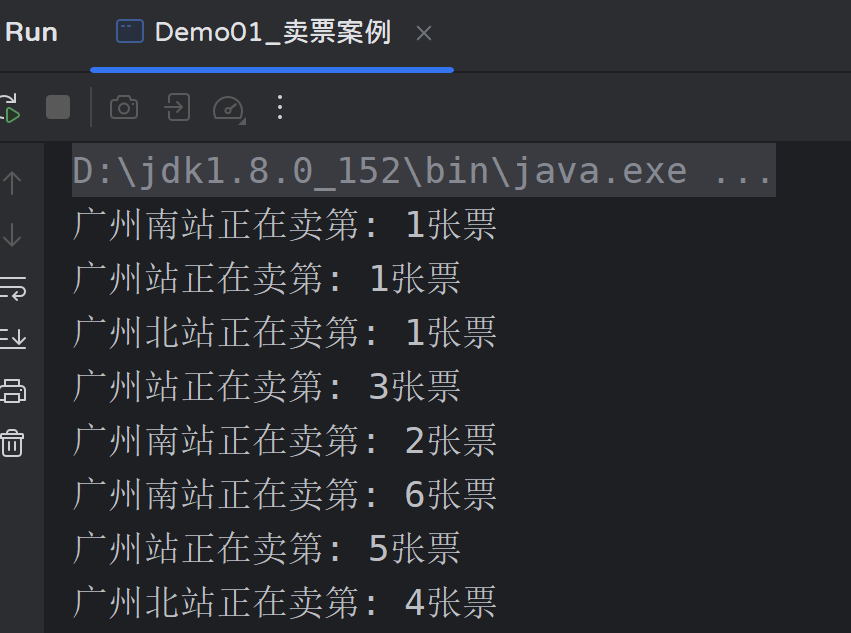
发现程序出现了两个问题:
- 有的票卖了多次
- 卖票顺序不一致
分析卖了多次票:
分析卖票顺序不一致:
3.2 线程同步
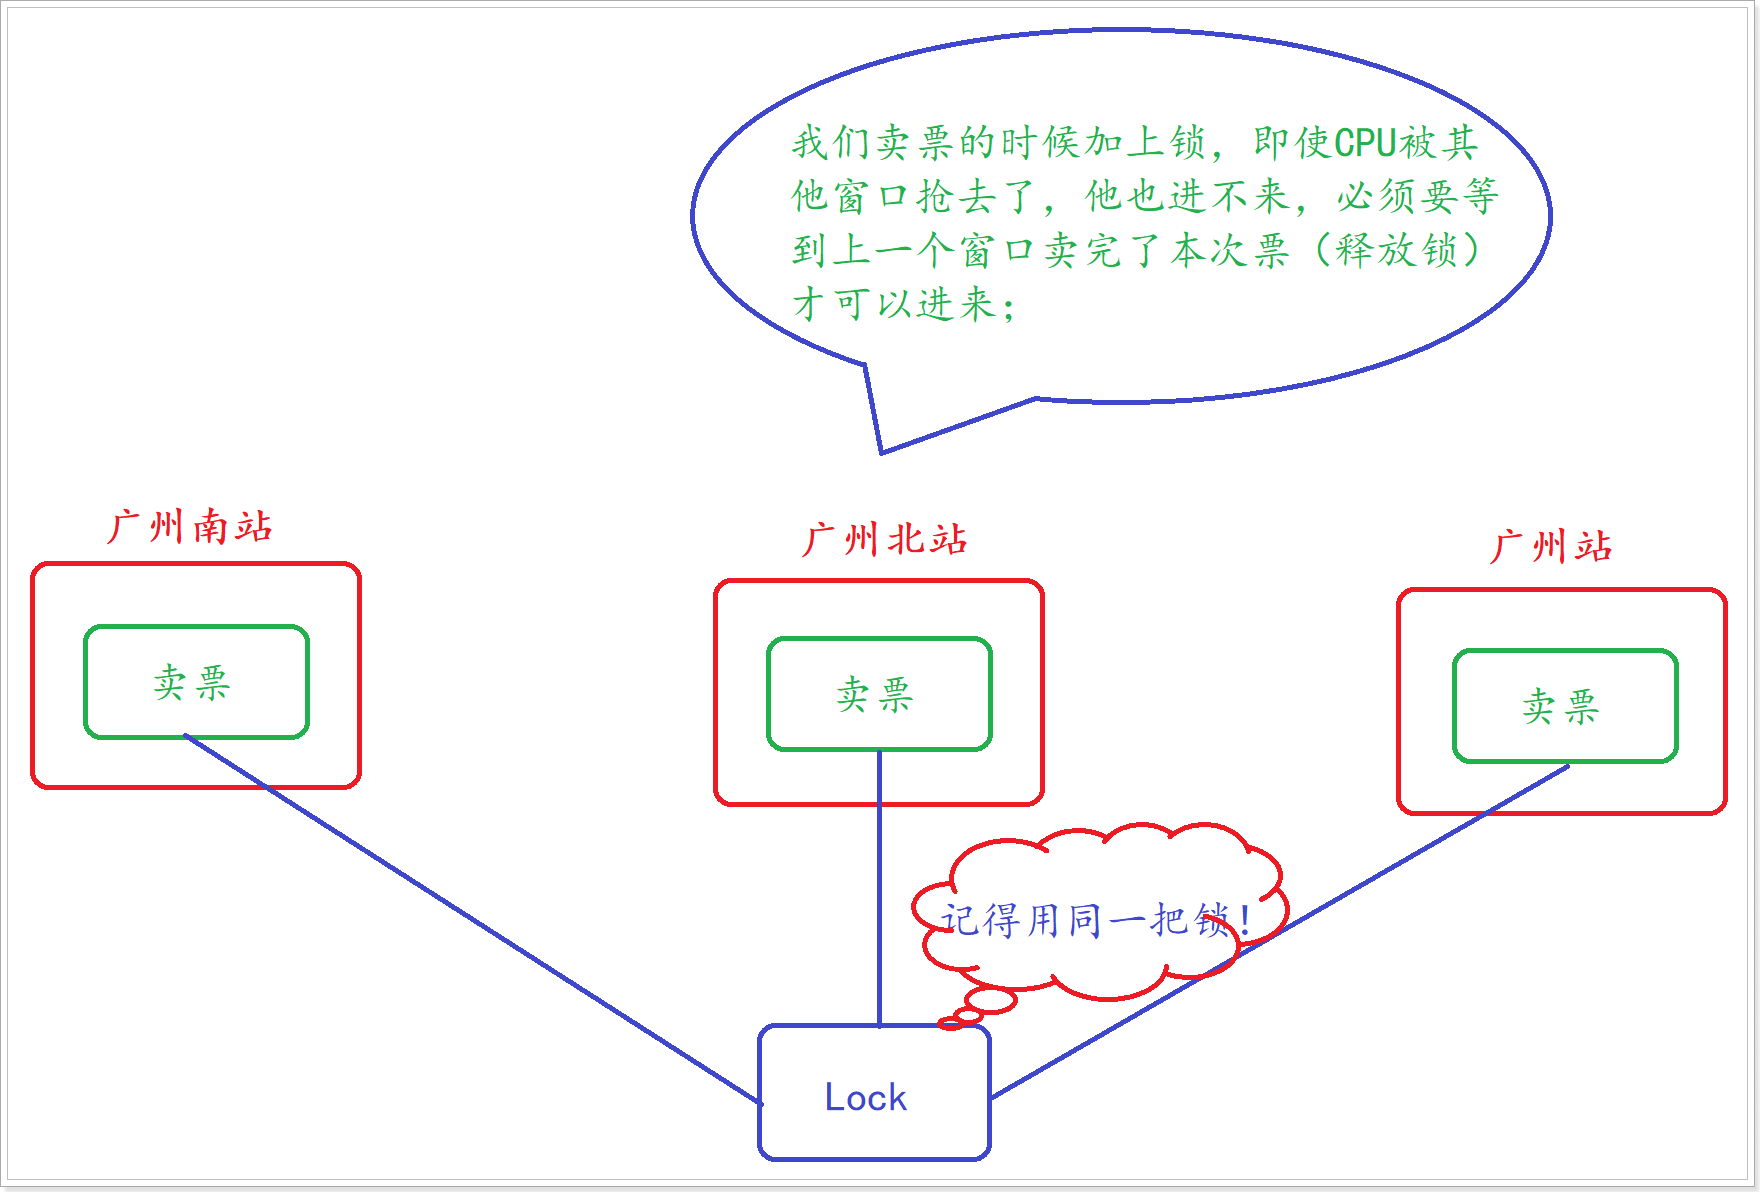
当我们使用多个线程访问同一资源的时候,且多个线程中对资源有写的操作,就容易出现线程安全问题。要解决上述多线程并发访问一个资源的安全性问题:也就是解决重复票与不存在票问题,Java中提供了同步机制(synchronized)来解决。
根据案例简述:窗口1线程操作的时候,窗口2和窗口3线程只能在外等着,窗口1操作结束,窗口1和窗口2和窗口3才有机会进入代码去执行。也就是说在某个线程修改共享资源的时候,其他线程不能修改该资源,等待修改完毕同步之后,才能去抢夺CPU资源,完成对应的操作,保证了数据的同步性,解决了线程不安全的现象。
Java中提供了三种方式完成同步操作:
- 同步代码块。
- 同步方法。
- 锁机制。
3.2.1 同步代码块
1)同步代码块改造买票案例
- 同步代码块:
synchronized关键字可以用于方法中的某个区块中,表示只对这个区块的资源实行互斥访问。
语法:
synchronized(同步锁){
     需要同步操作的代码
}
同步锁:
对象的同步锁只是一个概念,可以想象为在对象上标记了一个锁;
- 锁对象可以是任意类型。
- 多个线程对象 要使用同一把锁。
注意:在任何时候,最多允许一个线程拥有同步锁,谁拿到锁就进入代码块,其他的线程只能在外等着(BLOCKED)。
使用同步代码块改造代码:
package com.dfbz.demo01_线程安全问题引入;

/**
 * @author lscl
 * @version 1.0
 * @intro:
 */
public class Ticket implements Runnable {
    //票数
    private Integer ticket = 1000;

    //锁对象
    private Object obj = new Object();

    @Override
    public void run() {
        while (true) {
            // 加上同步代码块,把需要同步的代码放入代码块中,同步代码块中的锁对象必须保证一致!
            synchronized (obj) {
                if (ticket <= 0) {
                    break;      // 票卖完了
                }
                System.out.println(Thread.currentThread().getName() + "正在卖第: " + (1001 - ticket) + "张票");
                ticket--;
            }
        }
    }
}
2)同步代码块案例
案例:要么输出"犯我中华者",要么输出"虽远必诛"
package com.dfbz.demo02_线程安全;

/**
 * @author lscl
 * @version 1.0
 * @intro:
 */
public class Demo01_同步代码块小案例 {
    public static void main(String[] args) {

        new Thread() {
            @Override
            public void run() {
                for (int i = 0; i < 10000; i++) {
                    synchronized (String.class) {
                        System.out.print("我");
                        System.out.print("是");
                        System.out.print("中");
                        System.out.print("国");
                        System.out.print("人");
                        System.out.println();
                    }
                }
            }
        }.start();

        new Thread() {
            @Override
            public void run() {
                for (int i = 0; i < 10000; i++) {
                    synchronized (String.class) {
                        System.out.print("犯");
                        System.out.print("我");
                        System.out.print("中");
                        System.out.print("华");
                        System.out.print("者");
                        System.out.println();
                    }
                }
            }
        }.start();
    }
}
3)字节码对象
在使用同步代码块时,必须保证锁对象是同一个,才能实现线程的同步,不能使用不同的对象来锁不同的代码块;那么有什么对象只会存在一份的吗?答:任何类的字节码对象;
任何类的字节码对象都只会存在一次,在类加载的时候由JVM创建的;因此字节码锁也称为万能锁;
- 获取一个类的字节码对象有三种方式:
package com.dfbz.demo02_线程安全;


/**
 * @author lscl
 * @version 1.0
 * @intro:
 */
public class Demo02_字节码对象 {
    public static void main(String[] args) throws ClassNotFoundException {

        // 获取字节码对象的1种方式
        Class<String> c1 = String.class;

        // 获取字节码对象的2种方式
        String str = new String();
        Class<? extends String> c2 = str.getClass();

        // 获取字节码对象的3种方式
        Class<?> c3 = Class.forName("java.lang.String");

        System.out.println(c1 == c2);           // true
        System.out.println(c1 == c3);           // true
    }
}
Tips:以上三种方式都是获取JVM创建的字节码对象,而不是创建一个字节码对象,所有类的字节码对象都是在类加载的时候由JVM创建的;
- 使用字节码对象来作为锁对象:
package com.dfbz.demo02_线程安全;

/**
 * @author lscl
 * @version 1.0
 * @intro:
 */
public class Demo03_使用字节码对象作为锁 {
    public static void main(String[] args) {

        new Thread(()->{
            for (int i = 0; i < 100; i++) {
                synchronized (Object.class) {           // 使用字节码对象作为锁对象
                    System.out.print("犯");
                    System.out.print("我");
                    System.out.print("中");
                    System.out.print("华");
                    System.out.print("者");
                    System.out.println();
                }
            }
        }).start();

        new Thread(()->{
            for (int i = 0; i < 100; i++) {
                synchronized (Object.class) {           // 使用字节码对象作为锁对象
                    System.out.print("虽");
                    System.out.print("远");
                    System.out.print("必");
                    System.out.print("诛");
                    System.out.println();
                }
            }
        }).start();
    }
}
3.2.2 同步方法
1)普通同步方法
- 同步方法:使用
synchronized修饰的方法,就叫做同步方法,保证A线程执行该方法的时候,其他线程只能在方法外等着。
注意:同步方法也是有锁对象的,对于静态方法的锁对象的当前类的字节码对象(.class),对于非静态的方法的锁对象是this;
语法:
public synchronized void method(){
   	可能会产生线程安全问题的代码
}
使用同步方法:
package com.dfbz.demo02_线程安全;

/**
 * @author lscl
 * @version 1.0
 * @intro:
 */
public class Demo04_同步方法 {
    public static void main(String[] args) {

        Shower shower = new Shower();
        new Thread() {
            @Override
            public void run() {
                for (int i = 0; i < 1000; i++) {
                    shower.print1();
                }
            }
        }.start();

        new Thread() {
            @Override
            public void run() {
                for (int i = 0; i < 1000; i++) {
                    shower.print2();
                }
            }
        }.start();
    }
}

class Shower {

    // 普通方法的锁对象是this
    public synchronized void print1() {
        System.out.print("犯");
        System.out.print("我");
        System.out.print("中");
        System.out.print("华");
        System.out.print("者");
        System.out.println();
    }

    public void print2() {
        synchronized (this) {
            System.out.print("虽");
            System.out.print("远");
            System.out.print("必");
            System.out.print("诛");
            System.out.println();
        }
    }
}
2)静态同步方法
普通同步方法的锁对象是当前对象的引用(this),静态同步方法的锁对象是当前类的字节码对象;
- 示例代码:
package com.dfbz.demo02_线程安全;

/**
 * @author lscl
 * @version 1.0
 * @intro:
 */
public class Demo05_静态同步方法 {
    public static void main(String[] args) {
        Print print = new Print();
        new Thread() {
            @Override
            public void run() {
                for (int i = 0; i < 1000; i++) {
                    print.print1();
                }
            }
        }.start();

        new Thread() {
            @Override
            public void run() {
                for (int i = 0; i < 1000; i++) {
                    print.print2();
                }
            }
        }.start();
    }
}

class Print{

    // 静态同步方法的锁对象是当前类的字节码对象
    public static synchronized void print1() {
        System.out.print("犯");
        System.out.print("我");
        System.out.print("中");
        System.out.print("华");
        System.out.print("者");
        System.out.println();
    }

    public void print2() {
        synchronized (Print.class) {
            System.out.print("虽");
            System.out.print("远");
            System.out.print("必");
            System.out.print("诛");
            System.out.println();
        }
    }
}
3.2.3 Lock锁
java.util.concurrent.locks.Lock机制提供了比synchronized代码块和synchronized方法更广泛的锁定操作,它是用于管理和控制线程之间共享资源的同步机制之一。 与传统的synchronized关键字相比,Lock接口提供了更细粒度的控制,例如公平性、可重入性等。此外,Lock接口还支持中断锁的获取和超时获取,这是synchronized关键字所不具备的功能。
Lock加锁与释放锁方法化了,如下:
public void lock():加同步锁。public void unlock():释放同步锁。
示例代码:
package com.dfbz.demo02_线程安全;

import java.util.concurrent.locks.ReentrantLock;

/**
 * @author lscl
 * @version 1.0
 * @intro:
 */
public class Demo06_lock锁 {
    public static void main(String[] args) {
        ReentrantLock lock = new ReentrantLock();

        new Thread() {
            @Override
            public void run() {
                for (int i = 0; i < 10000; i++) {
                    lock.lock();
                    System.out.print("我");
                    System.out.print("是");
                    System.out.print("中");
                    System.out.print("国");
                    System.out.print("人");
                    System.out.println();
                    lock.unlock();
                }
            }
        }.start();

        new Thread() {
            @Override
            public void run() {
                for (int i = 0; i < 10000; i++) {
                    lock.lock();
                    System.out.print("犯");
                    System.out.print("我");
                    System.out.print("中");
                    System.out.print("华");
                    System.out.print("者");
                    System.out.println();
                    lock.unlock();
                }
            }
        }.start();
    }
}
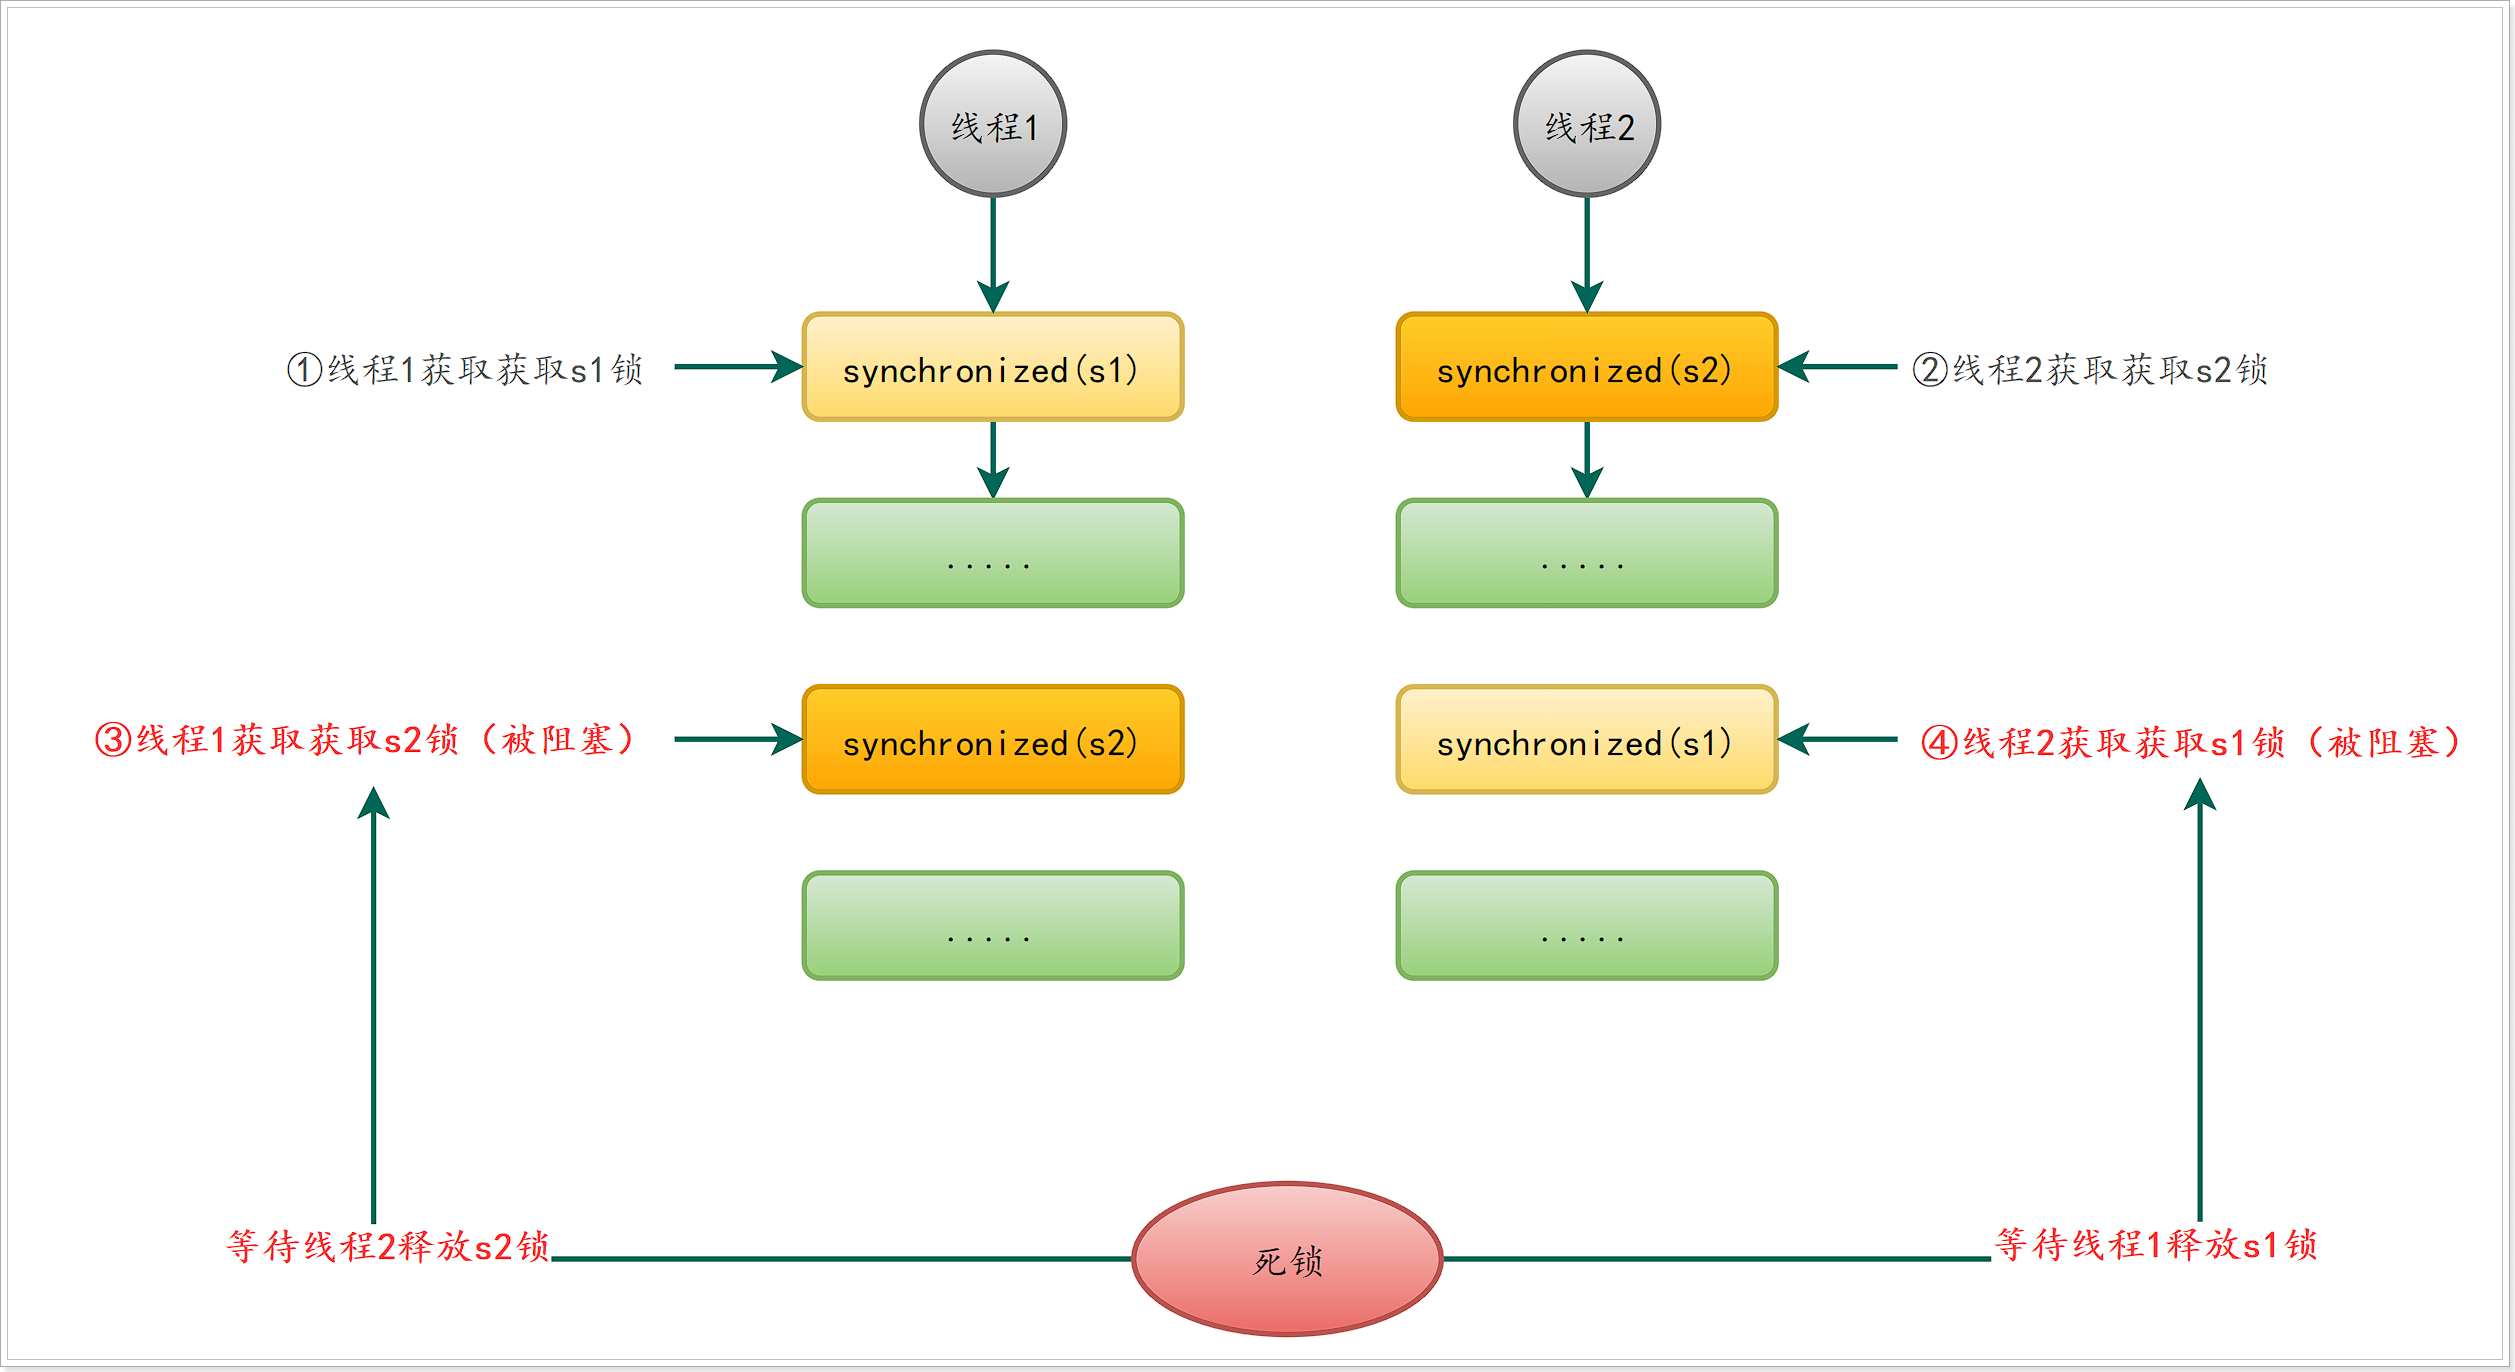
3.2.4 线程死锁
多线程同步的时候,如果同步代码嵌套,使用相同锁,就有可能出现死锁;
- 分析:
- 示例代码:
package com.dfbz.demo02_线程安全;

/**
 * @author lscl
 * @version 1.0
 * @intro:
 */
public class Demo07_线程死锁 {
    public static void main(String[] args) {
        String s1 = "s1";
        String s2 = "s2";
        new Thread() {
            public void run() {
                while (true) {
                    synchronized (s1) {
                        // ①线程1先获取到s1锁
                        System.out.println(this.getName() + "s1");
                        synchronized (s2) {     // ③线程1继续执行,被锁阻塞
                            System.out.println(this.getName() + "s2");
                        }
                    }
                }
            }
        }.start();
        new Thread() {
            public void run() {
                while (true) {
                    synchronized (s2) {
                        // ②线程2获取到s2锁
                        System.out.println(this.getName() + "s2");
                        synchronized (s1) {     // ④线程2继续执行,被锁阻塞(死锁)
                            System.out.println(this.getName() + "s1");
                        }
                    }
                }
            }
        }.start();
    }
}
3.3 集合的线程安全问题
3.3.1 线程安全与不安全集合
我们前面学习集合的时候发现集合存在由线程安全集合和线程不安全集合;线程安全效率低,安全性高;反之,线程不安全效率高,安全性低,线程不安全的集合有:Vector,Stack,Hashtable等;
- 查看Vector和Hashtable等源代码:

线程安全集合中的方法大部分都加上了synchronized关键字来保证线程的同步;
- 线程不安全集合:

3.3.2 线程不安全集合测试
- 数据覆盖问题:
package com.dfbz.demo03_集合与线程安全问题;

import java.util.ArrayList;

/**
 * @author lscl
 * @version 1.0
 * @intro:
 */
public class Demo01_测试ArrayList线程不安全问题 {
    public static void main(String[] args) {
        ArrayList<String> arr = new ArrayList<>();
        for (int j = 0; j < 200; ++j) {
            new Thread(() -> {
                for (int i = 0; i < 100; i++) {
                    arr.add("1");
                    try {
                        // 让线程安全问题更加突出
                        Thread.sleep(10);
                    } catch (InterruptedException e) {
                        e.printStackTrace();
                    }
                }
            }).start();
        }
    }
}
运行代码,发现出现数组下标越界异常:

分析ArrayList源码:
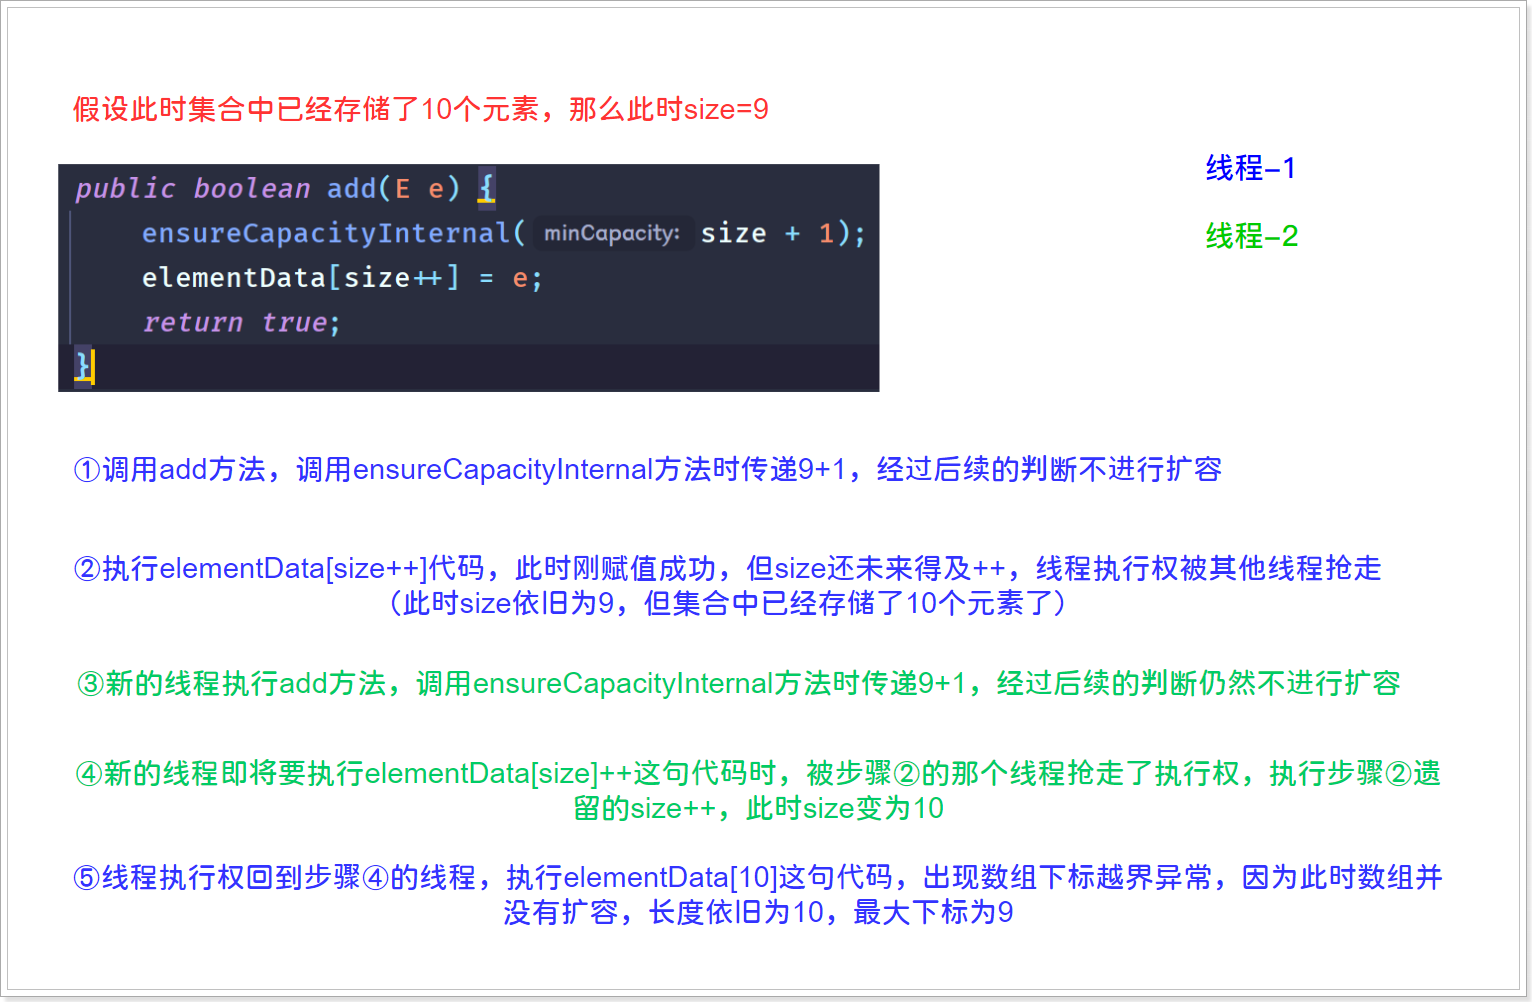
①假设此时size为9(集合已经存储了9个元素,本次是来存储第10个元素),size+1并没有大于数组的默认长度(10),并没有造成数组的扩容
②等待代码将集合的9下标赋值后,size++还没来得及运算,CPU的执行权就被其他的线程抢走了,此时size仍旧为9,但此时集合中已经存储了10个元素了;
③等到其他线程来执行ensureCapacityInternal(9+1)—>ensureCapacityInternal—>ensureExplicitCapacity发现10-10还是小于0,依旧不扩容
④代码执行elementData[size++]=e时(还没执行),线程执行权又回到了第一条线程,size++,变为10
⑤然后线程执行权又变回执行elementData[size++]=e这段代码时的那个线程,出现了elementData[10]=e,出现数组下标越界;
Tips:HashMap同样会出现这个问题,将集合换成Vector或者Stack等线程安全集合可以解决这些问题;或者使用JDK提供的其他线程同步集合也可以解决这些问题;
上一篇:11【双列集合、异常】


 1731
1731


 被折叠的 条评论
为什么被折叠?
被折叠的 条评论
为什么被折叠?
 到【灌水乐园】发言


