


jdk tomcat 解压以及安装
1、目录管理
(1) opt/install 安装源文件
(2) opt/bigdata 安装目录
在opt下创建install/java(文件目录) bigdata/java(解压位置)
2、压缩和解压
(1)压缩格式
1)zip / unzip
2) gzip /gunzip
3) tar
4) tar.gz
5)tar.xz
(2)文件解压
a.Xxx.tar tar -xvf xxx.tar [-C path]
b.Xxx.tar.gz tar-zxvf xxx.tar.gz [-C path]
c.Xxx.tar.xz xz -d xxx.tar.xz =>xxx.tar
(3)文件压缩
①tar - cvf destpath/ xxx.tar srcpath
②tar -zcvf destpath/xxx.tar.gz srcpath
jdk tamcat 解压到指定目录
tar -zxvf jdk-8u111-linux-x64.tar.gz -C /opt/bigdata/java;
tar -zxvf apache-tomcat-8.5.57.tar.gz -C /opt/bigdata/java;
改名: mv apache-tomcat-8.5.57/ tomcat85
mv jdk1.8.0_111/ jdk180
查看全路径 pwd
配置环境变量 vi /etc/profile
快捷键 shift+g,跳转到末尾
另起一个Xshell export JAVAHOME=/opt/bigdata/java/jdk180
export TOMCATHOME=/opt/bigdata/java/tomcat85
export PATH=
J
A
V
A
H
O
M
E
/
b
i
n
:
JAVAHOME/bin:
JAVAHOME/bin:TOMCATHOME/bin:
P
A
T
H
e
x
p
o
r
t
C
L
A
S
S
P
A
T
H
=
.
:
PATH export CLASSPATH=.:
PATHexportCLASSPATH=.:JAVAHOME/lib/dt.jar:$JAVAHOME/lib/tools.jar
:x保存退出
激活环境变量 source /etc/profile
jdk版本检查 echo $JAVAHOME
Java-version
Tomcat 检查
进入tomcat目录 cd /opt/bigdata/java/tomcat85/bin/
启动tomcat ./startup.sh 检查=>网页 192.168.xxx.xx:8080
关闭tomcat ./shutdown
root@localhost ~]# vi /etc/profile
[root@localhost ~]# source /etc/profile
[root@localhost ~]# java -version
java version "1.8.0_111"
Java(TM) SE Runtime Environment (build 1.8.0_111-b14)
Java HotSpot(TM) 64-Bit Server VM (build 25.111-b14, mixed mode)
[root@localhost ~]# cd /opt/bigdata/java/tomcat85/bin/
[root@localhost bin]# ./start.sh
-bash: ./start.sh: No such file or directory
[root@localhost bin]# vi /etc/profile
[root@localhost bin]# source /etc/profile
[root@localhost bin]# echo $JAVAHOME
/opt/bigdata/java/jdk180
[root@localhost bin]# ./startup.sh
Using CATALINA_BASE:   /opt/bigdata/java/tomcat85
Using CATALINA_HOME:   /opt/bigdata/java/tomcat85
Using CATALINA_TMPDIR: /opt/bigdata/java/tomcat85/temp
Using JRE_HOME:        /opt/bigdata/java/jdk180
Using CLASSPATH:       /opt/bigdata/java/tomcat85/bin/bootstrap.jar:/opt/bigdata/java/tomcat85/bin/tomcat-juli.ja
Tomcat started.
[root@localhost bin]#
外网配置:
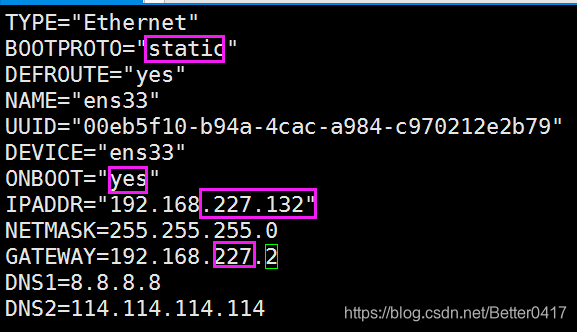
检查 ping www.baidu.com
mysql安装
(1)为lunix设置阿里镜像源
① 备份centos7自带的镜像源文件
② 设置阿里镜像
③更改centos-base.repo
(2)检查旧版本 mariadb
rpm -qa|grep mariadb
(3)删除旧版本
yum -y remove xxxxxxxxx
(4)因为minimal安装所有wget不能用
yum search wget
Yum -y install weet.x86_64
(5)设置rpm镜像源
wget http://repo.mysql.com/mysql-community-release-el7-5.noarch.rpm
(6)rpm安装
rpm -ivh mysql-community-release-el7-5.noarch.rpm
yum -y install mysql-server
(7)启动mysql服务
Systemctl start mysql
(8)首次免密登录:mysql回车进入
修改密码:
① 进入系统存储用户信息的库
指令:use mysql;
② 查看当前mysql的相关信息
指令:select host,user,password from user where user=‘root’;
③ 设置新密码
指令:update user set password=password(‘root’) where user=‘root’;
④ 设置远程连接
指令:grant all on . to root@’%’ identified by ‘kb08’;
⑤ 退出
指令:exit;/quit/Ctrl+c
[root@localhost tomcat85]# systemctl start mysql
[root@localhost tomcat85]# mysql
Welcome to the MySQL monitor.  Commands end with ; or \g.
Your MySQL connection id is 2
Server version: 5.6.49 MySQL Community Server (GPL)

Copyright (c) 2000, 2020, Oracle and/or its affiliates. All rights reserved.

Oracle is a registered trademark of Oracle Corporation and/or its
affiliates. Other names may be trademarks of their respective
owners.

Type 'help;' or '\h' for help. Type '\c' to clear the current input statement.

mysql> use mysql
Reading table information for completion of table and column names
You can turn off this feature to get a quicker startup with -A

Database changed
mysql> update user set password=password('root') where user='root';
Query OK, 4 rows affected (0.00 sec)
Rows matched: 4  Changed: 4  Warnings: 0

mysql> select host,user,password from user where user='root';
+-----------------------+------+-------------------------------------------+
| host                  | user | password                                  |
+-----------------------+------+-------------------------------------------+
| localhost             | root | *81F5E21E35407D884A6CD4A731AEBFB6AF209E1B |
| localhost.localdomain | root | *81F5E21E35407D884A6CD4A731AEBFB6AF209E1B |
| 127.0.0.1             | root | *81F5E21E35407D884A6CD4A731AEBFB6AF209E1B |
| ::1                   | root | *81F5E21E35407D884A6CD4A731AEBFB6AF209E1B |
+-----------------------+------+-------------------------------------------+
4 rows in set (0.00 sec)

mysql> grant all on *.* to root@'%'identified by 'kb08';
Query OK, 0 rows affected (0.00 sec)

mysql> select host,user,password from user where user='root';
+-----------------------+------+-------------------------------------------+
| host                  | user | password                                  |
+-----------------------+------+-------------------------------------------+
| localhost             | root | *81F5E21E35407D884A6CD4A731AEBFB6AF209E1B |
| localhost.localdomain | root | *81F5E21E35407D884A6CD4A731AEBFB6AF209E1B |
| 127.0.0.1             | root | *81F5E21E35407D884A6CD4A731AEBFB6AF209E1B |
| ::1                   | root | *81F5E21E35407D884A6CD4A731AEBFB6AF209E1B |
| %                     | root | *89ADB0CB77504A2E61974730A067BEC8EC3C01EF |
+-----------------------+------+-------------------------------------------+
5 rows in set (0.00 sec)

mysql> Ctrl-C -- exit!
Aborted
[root@localhost tomcat85]# systemctl restart mysql
[root@localhost tomcat85]# mysql -u root -p
Enter password:
Welcome to the MySQL monitor.  Commands end with ; or \g.
Your MySQL connection id is 4
Server version: 5.6.49 MySQL Community Server (GPL)

Copyright (c) 2000, 2020, Oracle and/or its affiliates. All rights reserved.

Oracle is a registered trademark of Oracle Corporation and/or its
affiliates. Other names may be trademarks of their respective
owners.

Type 'help;' or '\h' for help. Type '\c' to clear the current input statement.

mysql>
忘记密码
如果忘记登录密码,需要重启免密登录
① 找到mysql的配置文件
指令:cd /
指令:find -name ‘my.cnf’
② 编辑找到的文件
指令:vi /etc/my.cnf
添加修改:
[mysqld]
skip-grant-tables
③ 保存并退出
指令:Esc+:wq!
④ 重启服务
指令:systemctl restart mysql
免密登录后,设置密码。然后关闭免密登录。
重复13,重启免密登录步骤。删除配置信息
指令:skip-grant-tables


 342
342


 被折叠的 条评论
为什么被折叠?
被折叠的 条评论
为什么被折叠?
 到【灌水乐园】发言


