http://www.cnblogs.com/gnuhpc/archive/2013/01/04/2844303.html
1.基本环境搭建
Java SE6 JDK的安装:下载Java SE6 JDK,双击,安装默认选项进行安装即可。
2.Eclipse的安装与配置:
安装时直接解压。
配置处有两点,Window>Preferences>Java>Installed JREs确保如下设置:
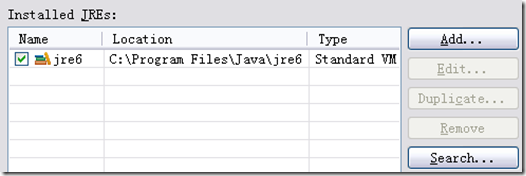
安装路径可能略有不同。
Window>Preferences>Java>Compiler 确保如下设置:
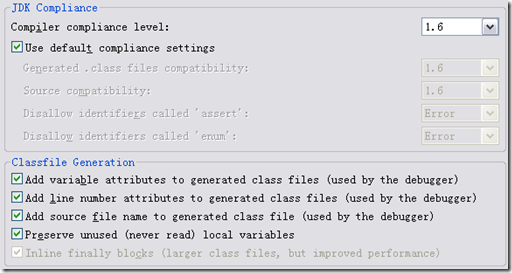
3.建立Server端工程和相关包与类
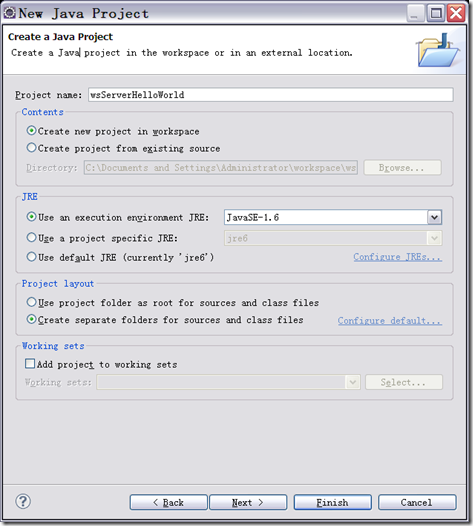
创建一个Java Project,命名为wsServerHelloWorld:
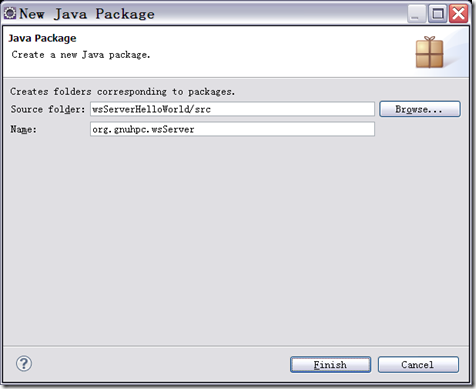
在这个项目下建立包:org.gnuhpc.wsServer
在这个包下边建立类:SayHello
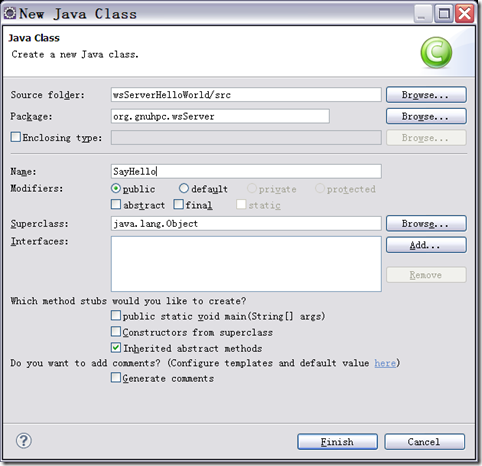
在SayHello.java文件中输入以下代码:
package org.gnuhpc.wsServer;
import javax.jws.WebService;
@WebService
public class SayHello {
private static final String SALUTATION = "Hello";public String getGreeting(String name) {
return SALUTATION + " " + name;
}
}
其中注意到@WebService ,这个称作annotation或者metadata,Java SE 5中的Web Services Metadata Specification引入的。Java SE 6中对于Web Services规范的升级以及JAX-WS(Java API for XML Web Services)2.0规范,这些升级使得我们Web Services的创建和调用变得更加容易。使用这些新功能,我们可以仅仅使用简单的Annotations注释从一个Java类创建Web Services。开发者将其类和方法之前用该annotations指定,类告诉runtime engine以Web Service的方式和操作来使能该类和方法。这个annotations可以产生一个可布署的Web Service,是一个WSDL映射annotations,将Java源代码与代表Web Service的WSDL元素连接在了一起。
4.使用Ant产生Server端代码
首先在项目中新建一个文件:build.xml,然后使用OpenWith>AntEditor打开,输入以下脚本代码:
- <project default="wsgen">
- <target name="wsgen">
- <exec executable="wsgen">
- <arg line="-cp ./bin -keep -s ./src -d ./bin
- org.gnuhpc.wsServer.SayHello"/>
- </exec>
- </target>
- </project>
default指定了默认执行的Target为wsgen,wsgen可以创建一个能够使用WebService的类,它生成所有用于WebService发布的源代码文件和经过编译过的二进制类文件。它还生成WSDL和符合规范的该类的WebService。
Target名称为wsgen,具体执行的命令的参数:
-cp 为类路径
-keep后产生的java文件
-s 产生的源文件放在哪
-d 产生的输出问价放在哪
然后使用Ant Build选项运行:
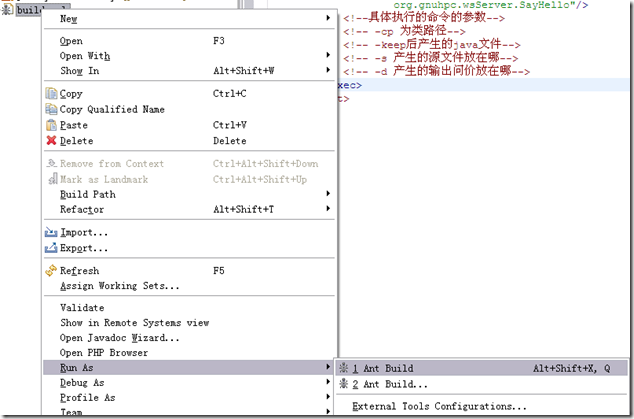
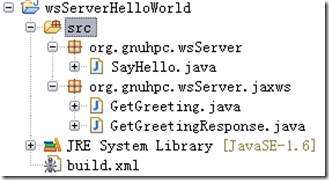
在成功执行的提示后,我们刷新一下Project

我们在Project区域可以看到,结果如下:
5.发布Web Service
org.gnuhpc.wsServer下建立一个类RunService:
package org.gnuhpc.wsServer;
import javax.xml.ws.Endpoint;
public class RunService {
/** *@paramargs */
public static void main(String[] args) {
System.out.println("SayHello Web Service started.");
Endpoint.publish("http://localhost:8080/wsServerExample" ,
new SayHello());
}
}
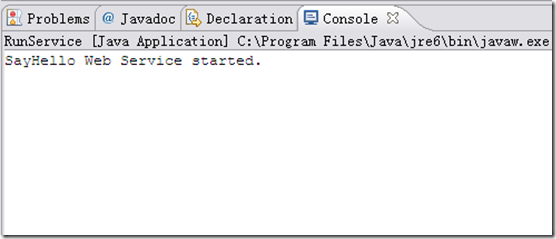
运行Run As>Java Application。我们得到结果,说明这个web service的Server端已经启动。
6.查看WSDL
Window>Show View>Other>General>Internal Web Browser,在其中输入:http://localhost:8080/wsServerExample?wsdl
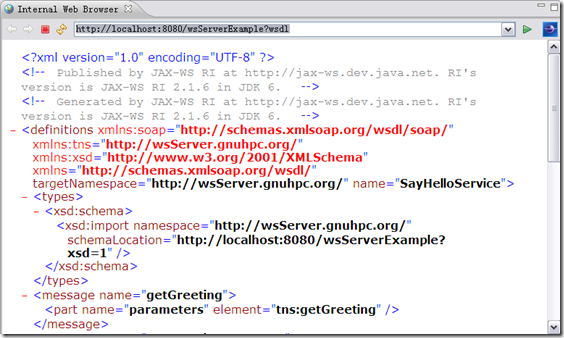
你可以看看到底WSDL都记录了哪些信息。
7.监测Server
我们创建完Server可以用过Eclipse Web Services Explorer监测Server,
Window>Open Perspective>Other >JavaEE
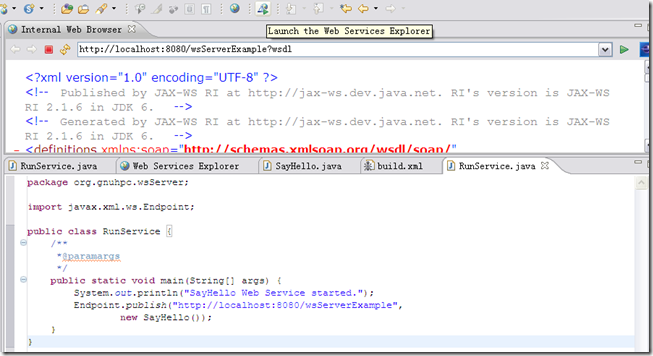
打开Eclipse Web Services Explorer
单击WSDL Main,在URL中输入:http://localhost:8080/wsServerExample?wsdl 按Go按钮后出现一下视图:
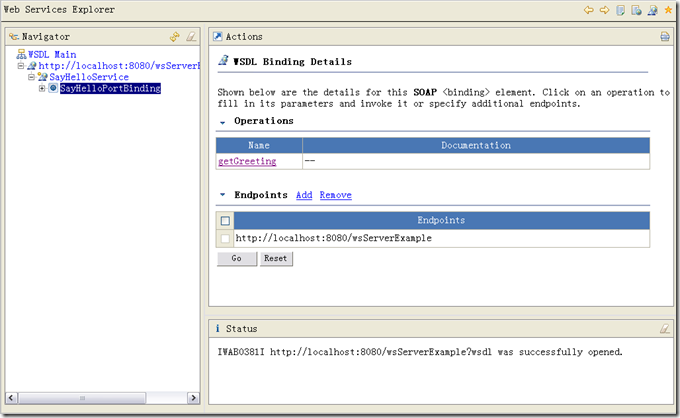
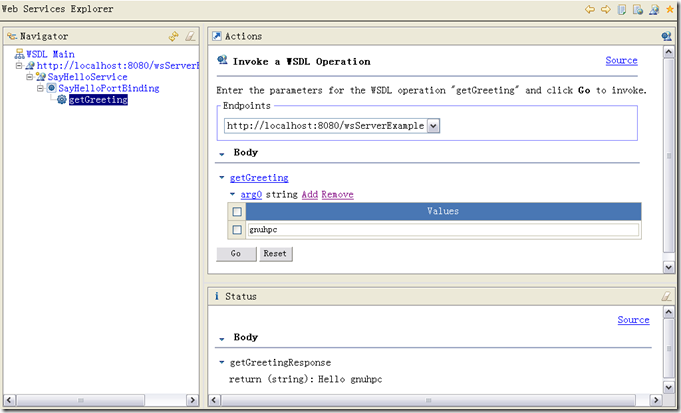
我们可以触发一个Web Service操作:点击getGreetings,添加一个参数,比如gnuhpc,然后点击Go按钮:
8.创建Client端 工程和相关包与类
创建一个Java Project,命名为wsClientHelloWorld,在这个项目下建立包:org.gnuhpc.wsClient
9.使用Ant产生Client代码框架
编写Web service时,可以使用工具来利用WSDL生成进行调用的客户端桩;或者也可以使用底层API来手动编写Web service。前者方便,后者灵活,现在我们通过前者做说明:
新建文件build.xml
New>File>build.xml
- <project default="wsimport">
- <target name="wsimport">
- <exec executable="wsimport">
- <arg line="-keep -s ./src -p org.gnuhpc.wsClient
- -d ./bin http://localhost:8080/wsServerExample?wsdl"/>
- </exec>
- </target>
- </project>
注意:wsgen 支持从 Java class 创建 Web services,wsimport 支持从 WSDL 创建 Web services,分别对应于 JAX-RPC 方式下的 Java2WSDL 和 WSDL2Java。要根据发布的WSDL进行创建,这也就是为什么要先运行RunServer的原因了。
<span style="font-size:14px;color:#000000;">运行Server的RunService : Run As>Java Application></span>运行该Ant脚本,产生Client代码:Run As>Ant Build
运行成功的提示如下:

生成的代码如下:
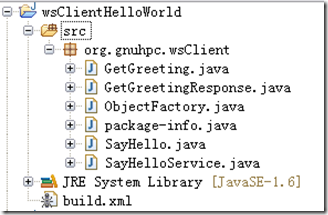
这一步读取WSDL并生成客户端桩。这些桩是将为我们的代码所用的Java类和接口。这些桩给服务器端功能提供了一个客户端接口。例如,如果我们的服务器提供一个Maths服务,该服务带有一个叫做add的方法。我们的客户端代码将调用桩上的一个方法,而桩实现将对该方法使用参数封装,把Java方法调用变为Web service请求。这个请求将基于HTTP发送给服务器,而且将使用SOAP作为RPC协议。监听服务器接收该SOAP消息,然后(十有八九)将其转换为服务器处的一次方法调用。

10.编写Client代码
创建一个类:SayHelloClient
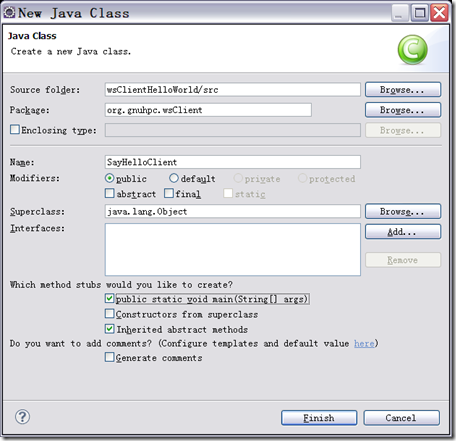
package org.gnuhpc.wsClient;
import java.io.BufferedReader;
import java.io.IOException;
import java.io.InputStreamReader;import javax.xml.ws.BindingProvider;
public class SayHelloClient {
/**
* @param args
*/
public static void main(String[] args) {
SayHelloService shs = new SayHelloService();
SayHello sh = (SayHello) shs.getSayHelloPort();
((BindingProvider) sh).getRequestContext().put(
BindingProvider.ENDPOINT_ADDRESS_PROPERTY,
"http://localhost:8080/wsServerExample");
System.out.println(((BindingProvider) sh).toString());String userName = null;
boolean exit = false;
while (!exit) {
System.out.print("/n Please enter yourname (type 'quit' to exit): ");
BufferedReader br = new BufferedReader(new InputStreamReader(
System.in));
try {
userName = br.readLine();
} catch (IOException e) {
System.out.println("Errorreadingname.");
System.exit(1);
}
if (!(exit = userName.trim().equalsIgnoreCase("quit")
|| userName.trim().equalsIgnoreCase("exit"))) {
System.out.println(sh.getGreeting(userName));
}
}
System.out.println("/nThank you for running the client.");
}
}
当你运行SayHelloClient时,它创建了一个新的Service--SayHelloService,这是通过Ant脚本调用wsimport产生的一个proxy,用来调用目标服务端点的操作。然后Client得到请求上下文,添加端点地址http://localhost:8080/wsServerExample ,在这里处理请求消息。
11.运行Client
右键SayHelloClient.java,选择Run As> Java Application,得到:

可以使用脚本完成对Server和Client的调用:
在Client中建立文件buildall.xml:
- <project default="runClient">
- <!-- =================================
- target: wsimport
- ================================= -->
- <target name="wsimport" description="-->
- Read the WSDL and generate the required artifacts">
- <exec executable="wsimport">
- <arg line="-keep -s ./src -p org.gnuhpc.wsClient -d ./bin
- http://localhost:8080/wsServerExample?wsdl"/>
- </exec>
- </target>
- <!-- =================================
- target: runServer
- ================================= -->
- <target name="runServer" description="-->
- Runs the Web service server from a terminal">
- <echo>
- Running the following command from the terminal to run the server:
- ${java.home}/bin/java -cp "C:/Documents and Settings/Administrator/workspace/wsServerHelloWorld/bin"
- org.gnuhpc.wsServer.RunService
- </echo>
- <exec dir="c:/Progra~1/Java/jdk1.6.0_13/bin" executable="cmd" spawn="true"
- os="Windows XP" description="runs on XP">
- <arg line="start cmd /K start cmd /K" />
- <arg line='"c:/Progra~1/Java/jdk1.6.0_13/bin/java" -cp
- "C:/Documents and Settings/Administrator/workspace/wsServerHelloWorld/bin"
- org.gnuhpc.wsServer.RunService'/>
- </exec>
- </target>
- <!-- =================================
- target: pause
- ================================= -->
- <target name="pause" depends="runServer" description="-->
- Pauses briefly while the server starts">
- <sleep seconds="5"/>
- </target>
- <!-- =================================
- target: runClient
- ================================= -->
- <target name="runClient" depends="pause" description="-->
- Runs a Web service client from a terminal">
- <echo>
- Running the following command from the terminal to run the client:
- ${java.home}/bin/java -cp "c:/DOCUME~1/Administrator/workspace/wsClientHelloWorld/bin"
- org.gnuhpc.wsClient.SayHelloClient
- </echo>
- <exec dir="c:/Progra~1/Java/jdk1.6.0_13/bin/" executable="cmd" spawn="true"
- os="Windows XP" description="Runs on XP">
- <arg line="start cmd /K start cmd /K" />
- <arg line='"c:/Progra~1/Java/jdk1.6.0_13/bin/java -cp" "c:/DOCUME~1/Administrator/workspace/wsClientHelloWorld/bin"
- org.gnuhpc.wsClient.SayHelloClient'/>
- </exec>
- </target>
- </project>
- <project default="runClient"> <!-- ================================= target: wsimport ================================= --> <target name="wsimport" description="--> Read the WSDL and generate the required artifacts"> <exec executable="wsimport"> <arg line="-keep -s ./src -p org.gnuhpc.wsClient -d ./bin http://localhost:8080/wsServerExample?wsdl"/> </exec> </target> <!-- ================================= target: runServer ================================= --> <target name="runServer" description="--> Runs the Web service server from a terminal"> <echo> Running the following command from the terminal to run the server: ${java.home}/bin/java -cp "C:/Documents and Settings/Administrator/workspace/wsServerHelloWorld/bin" org.gnuhpc.wsServer.RunService </echo> <exec dir="c:/Progra~1/Java/jdk1.6.0_13/bin" executable="cmd" spawn="true" os="Windows XP" description="runs on XP"> <arg line="start cmd /K start cmd /K" /> <arg line='"c:/Progra~1/Java/jdk1.6.0_13/bin/java" -cp "C:/Documents and Settings/Administrator/workspace/wsServerHelloWorld/bin" org.gnuhpc.wsServer.RunService' /> </exec> </target> <!-- ================================= target: pause ================================= --> <target name="pause" depends="runServer" description="--> Pauses briefly while the server starts"> <sleep seconds="5"/> </target> <!-- ================================= target: runClient ================================= --> <target name="runClient" depends="pause" description="--> Runs a Web service client from a terminal"> <echo> Running the following command from the terminal to run the client: ${java.home}/bin/java -cp "c:/DOCUME~1/Administrator/workspace/wsClientHelloWorld/bin" org.gnuhpc.wsClient.SayHelloClient </echo> <exec dir="c:/Progra~1/Java/jdk1.6.0_13/bin/" executable="cmd" spawn="true" os="Windows XP" description="Runs on XP"> <arg line="start cmd /K start cmd /K" /> <arg line='"c:/Progra~1/Java/jdk1.6.0_13/bin/java -cp" "c:/DOCUME~1/Administrator/workspace/wsClientHelloWorld/bin" org.gnuhpc.wsClient.SayHelloClient' /> </exec> </target> </project>
注意其中的路径名称,选择与你自己系统的路径名即可。
在这个脚本中,默认target为runClient,但是在运行runClient之前还有一个依赖:pause,意味着runClient之前一定要运行pause,而pause的依赖是runServer,那么运行顺序就是
runServer先运行,pause再运行,最后runClient运行。
另一个需要注意的是os值:只有当前系统与指定的OS匹配时才会被执行。
为显示命令。
用Ant Build运行得到一个Server,5秒钟后出现一个Client。
12.使用SOAP监视器监视C-S的通信:
到这一步,我们已经建立了一个Server 一个Client端,我们现在想使用Eclipse的TCP/IP Monitor监视SOAP通信。

打开:Window>Show View>Other>Debug>TCP/IP Monitor
配置:Windows>Preferences >Run/Debug > TCP/IPMonitor
添加一个TCP/IP Monitor:
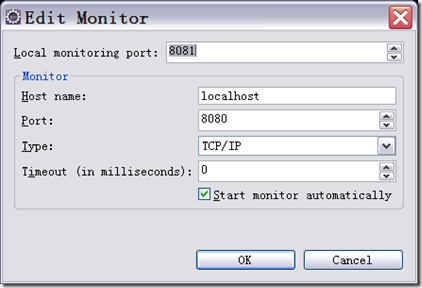
Port为远端服务器端口,Local Monitoring Port为本地监听端口
现在我们需要更新一下Client代码(将端口8080,设置为8081),将Web Service通过Monitor重定向。然后运行脚本:
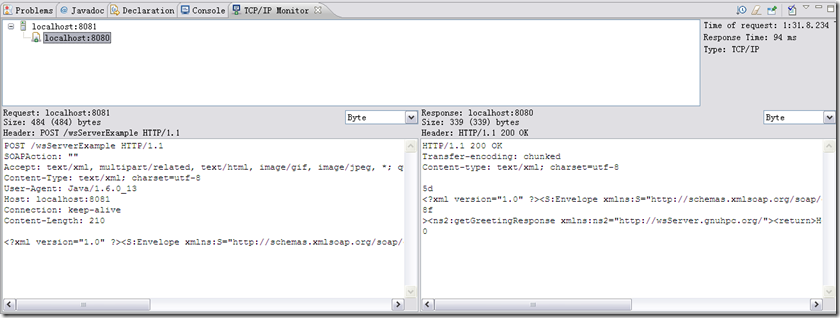
左右分别的文本全文为:
POST /wsServerExample HTTP/1.1
SOAPAction: ""
Accept: text/xml, multipart/related, text/html, image/gif, image/jpeg, *; q=.2, */*; q=.2
Content-Type: text/xml; charset=utf-8
User-Agent: Java/1.6.0_13
Host: localhost:8081
Connection: keep-alive
Content-Length: 210http://schemas.xmlsoap.org/soap/envelope/">http://wsServer.gnuhpc.org/">gnuhpc
HTTP/1.1 200 OK
Transfer-encoding: chunked
Content-type: text/xml; charset=utf-85d
http://schemas.xmlsoap.org/soap/envelope/">
8f
>http://wsServer.gnuhpc.org/">Hello gnuhpc
0
其中的含义不言自明。
所有代码下载:
http://cid-a0a0b50959052db4.skydrive.live.com/self.aspx/.Public/WebService.rar
2010.1.5 补充:
1.网友Alexander Ananiev在其Blog 上表示在他看来还是手工写WSDL和schemas比较靠谱,更加有重用性和扩展性,并不推荐使用annotations自动生成WSDL。
2.JAX-WS 包括了 Java Architecture for XML Binding (JAXB) 和 SOAP with Attachments API for Java (SAAJ).
前者为从XML Schema到Java代码表示提供了一个方便的映射方法,屏蔽了从SOAP消息中的XML Schema到Java代码之间转换的具体细节。而SAAJ则为处理在SOAP消息中附带的XML提供了一个标准的方法。另外,JAX-WS还定义了从WSDL上定义的服务到实现这些服务的Java类之间的映射,任何定义在WSDL中的复杂类型都将根据JAXB定义的标准转换到Java类中。
3.开发JAX-WS有两种思路:
- Contract first:先写好WSDL,然后从中生成Java 代码来实现。
- Code first:先写好一些plain old Java object (POJO) classes,然后使用annotations产生WSDL和Java类。
前者需要很好的WSDL和XSD知识,初学者一般建议后者,另外要是将一个已经实现的类以Web Service的方式呈现也建议用后者。前者的一个例子是:http://myarch.com/create-jax-ws-service-in-5-minutes


 1万+
1万+

 被折叠的 条评论
为什么被折叠?


