


目前CSDN上有一些文章做了yolov5目标检测api这个工作,但是博主拿来直接应用的时候发现已经不适配最新版本的yolov5了,并且博主发现原来博文中代码还可以更加精简和高效。
本文贡献:
1.依据最新版本的yolov5源代码重写了全新的目标检测api
2.依据最新版本的yolov5源代码重写了全新的图像分类api
1. 最终实现效果
1.1 示例代码
# 目标检测和目标分类pth权重路径
yolo_path = './my_ddddocr/models/yolo_model/best0.pt'
yolo_classify_path = './my_ddddocr/models/yolo_model/best1.pt'

# 可以直接调用的模型初始化代码
def model_init(char_path, yolo_path, yolo_classify_path):
    a = detectapi(weights=yolo_path)
    b = Classify_api(weights=yolo_classify_path)
    return a, b

# 示例使用代码
def test(img_cv2, a ,b)
	img = img_cv2.copy()
	# 调用模型a,即目标检测模型
    result,names =a.detect([img])
    img=result[0][0] #第一张图片的处理结果图片
    # 调用模型b,即图像分类模型
    res = b.detect(img)
可以看到整体代码非常简洁优雅,适合于各种部署项目。
1.2 效果展示
博主做的一个汉字点选验证码识别小项目使用了这两个api,下面是结果:
目标检测api使用结果展示:
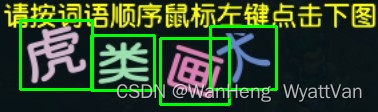
可以看到成功的将需要的四个成语汉字位置都识别出来了。
图像分类api使用结果展示:
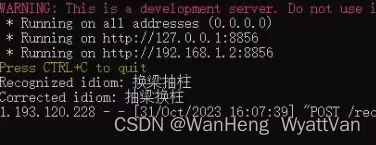
这是另外一张图片的识别结果,可以看出来对每个汉字的识别还是很准确的,根据训练和验证集测试,top1准确率超过了0.99.
2. 目标检测api完整代码
import argparse
import csv
import os
import platform
import sys
from pathlib import Path
import random
import torch

FILE = Path(__file__).resolve()
ROOT = FILE.parents[0]  # YOLOv5 root directory
if str(ROOT) not in sys.path:
    sys.path.append(str(ROOT))  # add ROOT to PATH
ROOT = Path(os.path.relpath(ROOT, Path.cwd()))  # relative

from ultralytics.yolo.utils.plotting import Annotator, colors, save_one_box

from models.common import DetectMultiBackend
from utils.dataloaders import IMG_FORMATS, VID_FORMATS, MyLoadImages
from utils.general import (LOGGER, Profile, check_file, check_img_size, check_imshow, check_requirements, colorstr, cv2,
                           increment_path, non_max_suppression, print_args, scale_boxes, strip_optimizer, xyxy2xywh)
from utils.torch_utils import select_device, smart_inference_mode

class simulation_opt:# 参数对象。
    def __init__(self,weights,img_size=640,conf_thres=0.25,iou_thres=0.45,device='',view_img=False,
        classes=None,agnostic_nms=False,augment=False,update=False,exist_ok=False,dnn=False,data=ROOT / 'data/my_data.yaml',half=False):
        self.weights=weights
        self.source=None
        self.img_size=img_size
        self.conf_thres=conf_thres
        self.iou_thres=iou_thres
        self.device=device
        self.view_img=view_img
        self.classes=classes
        self.agnostic_nms=agnostic_nms
        self.augment=augment
        self.update=update
        self.exist_ok=exist_ok
        self.dnn=dnn
        self.data=data
        self.half=half
        self.max_det=1000

class detectapi:
    def __init__(self,weights,img_size=640):
        self.opt=simulation_opt(weights=weights,img_size=img_size)
        weights, imgsz=self.opt.weights, self.opt.img_size

    # Initialize
        self.device = select_device(self.opt.device)

    # Load model
        self.model = DetectMultiBackend(weights, device=self.device, dnn=self.opt.dnn, data=self.opt.data, fp16=self.opt.half)
        self.stride = self.model.stride
        self.imgsz = check_img_size(imgsz, s=self.stride)

    # read names and colors
        self.names = self.model.module.names if hasattr(self.model, 'module') else self.model.names
        self.colors = [[random.randint(0, 255) for _ in range(3)] for _ in self.names]


    def detect(self,source): # 使用时,调用这个函数
        if type(source)!=list:
                raise TypeError('source must be a list which contain  pictures read by cv2')

        # Set Dataloader
        dataset = MyLoadImages(source, img_size=self.imgsz, stride=self.stride)

        result=[]

        for img, im0s in dataset:
            img = torch.from_numpy(img).to(self.model.device)
            img = img.half() if self.model.fp16 else img.float()  # uint8 to fp16/32
            img /= 255.0  # 0 - 255 to 0.0 - 1.0
            if len(img.shape) == 3:
                img = img[None]  # expand for batch dim

            # Inference
            pred = self.model(img, augment=self.opt.augment)

            # Apply NMS
            pred = non_max_suppression(pred, self.opt.conf_thres, self.opt.iou_thres, classes=self.opt.classes, agnostic=self.opt.agnostic_nms, max_det=self.opt.max_det)

            # Process detections
            det=pred[0]
            # pred是个列表。元素个数为batch_size。由于对于我这个api,每次只处理一个图片,
            # 所以pred中只有一个元素,直接取出来就行,不用for循环。
            im0 = im0s.copy()
            # 这是原图片,与被传进来的图片是同地址的,需要copy一个副本,否则,原来的图片会受到影响
            result_txt = []
            # 对于一张图片,可能有多个可被检测的目标。所以结果标签也可能有多个。
            # 每被检测出一个物体,result_txt的长度就加一。result_txt中的每个元素是个列表,记录着
            # 被检测物的类别引索,在图片上的位置,以及置信度
            if len(det):
                # Rescale boxes from img_size to im0 size
                det[:, :4] = scale_boxes(img.shape[2:], det[:, :4], im0.shape).round()

                for *xyxy, conf, cls in reversed(det):
                    line = (int(cls.item()), [int(_.item()) for _ in xyxy], conf.item())  # label format
                    result_txt.append(line)
                    label = f'{self.names[int(cls)]} {conf:.2f}'
            result.append((im0,result_txt)) # 对于每张图片,返回画完框的图片,以及该图片的标签列表。
        return result, self.names
重写的dataloader函数,把下面这一段加入到原本的dataloaders.py里面:
class MyLoadImages:  # for inference
    def __init__(self, path, img_size=640, stride=32):
        # print(len(path))
        for img in path:
            if type(img)!=np.ndarray: # or len(img.shape)!=3
                raise TypeError('there is a object which is not a picture read by cv2 in source')

        self.img_size = img_size
        self.stride = stride
        self.files = path
        self.nf = len(path)
        #self.video_flag = [False] * ni + [True] * nv
        self.mode = 'image'
        #if any(videos):
            #self.new_video(videos[0])  # new video
        #else:
            #self.cap = None
        #assert self.nf > 0, f'No images or videos found in {p}. ' \
                            #f'Supported formats are:\nimages: {img_formats}\nvideos: {vid_formats}'

    def __iter__(self):
        self.count = 0
        return self

    def __next__(self):
        if self.count == self.nf:
            raise StopIteration
        path = self.files[self.count]

        # Read image
        self.count += 1
        #img0 = cv2.imread(path)  # BGR
        #assert img0 is not None, 'Image Not Found ' + path
        #print(f'image {self.count}/{self.nf} {path}: ', end='')

        # Padded resize
        img = letterbox(path, self.img_size, stride=self.stride, auto=True)[0]

        # Convert
        img = img.transpose(2, 0, 1)[::-1]  # BGR to RGB, to 3x416x416
        img = np.ascontiguousarray(img)

        return img, path
3. 图像分类api完整代码实现
大家需要的请关注点赞收藏博主并在评论区评论噢!


 被折叠的 条评论
为什么被折叠?
被折叠的 条评论
为什么被折叠?
 到【灌水乐园】发言


