


K8S 学习笔记三 核心技术
- 2.13 Helm
- 2.14 持久化之nfs网络储存 pv
- 2.15 PV 和 PVC
- 2.16 k8s 集群资源监控
- 2.17 搭建高可用集群
- 2.18 HA集群中的容器交付流程
笔记记录尚硅谷老师的视频课
地址:https://www.bilibili.com/video/BV1GT4y1A756?p=3
上文地址:https://blog.csdn.net/BogerPeng/article/details/125138816
2.13 Helm
2.13.1 Helm 引入
- 1). 之前部署应用的过程
  编写yaml文件
    如创建 create deployment
	暴露端口给外界(expose) Service
	使用Ingress 弥补NodePort的缺点
- 2). 之前部署应用的手段的优缺点
如果使用之前方式部署单一应用,少数服务的应用比较合适。

如果部署微服务项目,可能有几十个服务,每个服务都有一套yaml文件
需要维护大量的yaml文件,版本管理特别不方便。
而Helm正是为了解决这个问题
2.13.2 使用 Helm 可以解决哪些问题
使用 helm 可以把这些yaml作为一个整体管理

实现yaml的高效复用

使用helm进行应用级别的版本管理
2.13.3 Helm 概述
Helm 介绍:
Helm 是一个 Kubernetes 的包管理工具,就像 Linux 下的包管理器,
如 yum/apt 等,可以很方便的将之前打包好的 yaml 文件部署到 kubernetes 上。
2.13.4 Helm 的 3 个重要概念:
(1)helm:一个命令行客户端工具,主要用于 Kubernetes 应用 chart 的创建、
	打包、发布和管理。

(2)Chart:应用描述,一系列用于描述 k8s 资源相关文件的集合。yaml的集合

(3)Release:基于 Chart 的部署实体,应用级别的版本管理。
	一个 chart 被 Helm 运行后将会生成对应的一个release;将在 k8s 中创建出真实运行的资源对象。
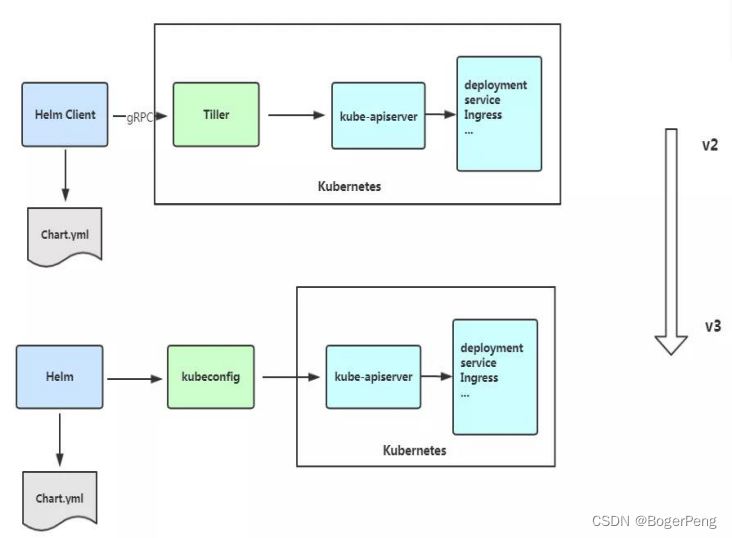
2.13.5 Helm v3 变化
2019 年 11 月 13 日, Helm 团队发布 Helm v3 的第一个稳定版本。
该版本主要变化如下:
架构变化:
1、最明显的变化是 Tiller 的删除
2、Release 名称可以在不同命名空间重用
3、支持将 Chart 推送至 Docker 镜像仓库中
4、使用 JSONSchema 验证 chart values
5、其他
2.13.6 Helm的安装和配置仓库
Helm 官网:https://helm.sh/
2.13.6.1 安装部署:
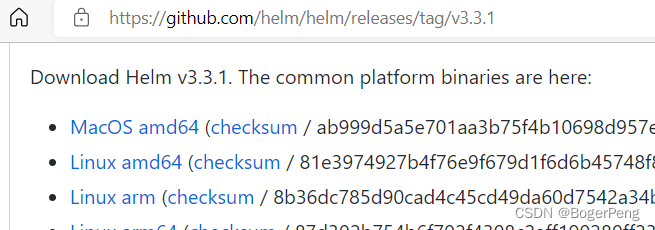
Helm 客户端下载地址:https://github.com/helm/helm/releases
解压移动到/usr/bin/目录即可。

## 这里选择如下图 V3.3.1 版本为例,右键复制下载项网址
wget https://get.helm.sh/helm-v3.3.1-linux-amd64.tar.gz
tar zxvf helm-v3.3.1-linux-amd64.tar.gz
mv linux-amd64/helm /usr/bin
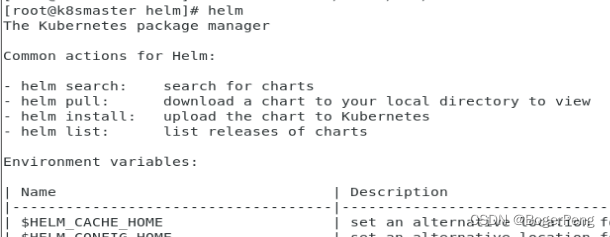
安装结果:
2.13.6.2 配置helm仓库
配置国内 chart 仓库:
	微软仓库(http://mirror.azure.cn/kubernetes/charts/)这个仓库推荐,基本
上官网有的 chart 这里都有。
	阿里云仓库(https://kubernetes.oss-cn-hangzhou.aliyuncs.com/charts )
	官方仓库(https://hub.kubeapps.com/charts/incubator)官方 chart 仓库,国
内有点不好使。
添加存储库
helm repo add stable http://mirror.azure.cn/kubernetes/charts
helm repo add aliyun https://kubernetes.oss-cn-hangzhou.aliyuncs.com/charts
helm repo update
查看配置的存储库
helm repo list
helm search repo stable
删除存储库:
helm repo remove aliyun
具体例子:
# 添加微软云仓库
[root@k8smaster ~]# helm repo add stable http://mirror.azure.cn/kubernetes/charts
"stable" has been added to your repositories
# 再添加阿里云仓库
[root@k8smaster ~]# helm repo add aliyun https://kubernetes.oss-cn-hangzhou.aliyuncs.com/charts
"aliyun" has been added to your repositories
# 更新现有仓库
[root@k8smaster ~]# helm repo update
Hang tight while we grab the latest from your chart repositories...
...Successfully got an update from the "aliyun" chart repository
...Successfully got an update from the "stable" chart repository
Update Complete. ⎈Happy Helming!⎈
# 列出仓库
[root@k8smaster ~]# helm repo list
NAME URL
stable http://mirror.azure.cn/kubernetes/charts
aliyun https://kubernetes.oss-cn-hangzhou.aliyuncs.com/charts
# 删除阿里云仓库
[root@k8smaster ~]# helm repo remove aliyun
"aliyun" has been removed from your repositories
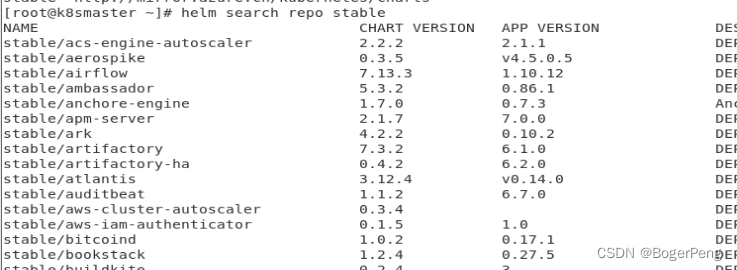
#查询名为stable的仓库
[root@k8smaster ~]# helm search repo stable
2.13.7 使用Helm快速部署应用
2.13.7.1 使用命令搜索应用
[root@k8smaster admin]# helm search repo weave
NAME              	CHART VERSION	APP VERSION	DESCRIPTION
aliyun/weave-cloud	0.1.2        	           	Weave Cloud is a add-on to Kubernetes which pro...
aliyun/weave-scope	0.9.2        	1.6.5      	A Helm chart for the Weave Scope cluster visual...
stable/weave-cloud	0.3.9        	1.4.0      	DEPRECATED - Weave Cloud is a add-on to Kuberne...
stable/weave-scope	1.1.12       	1.12.0     	DEPRECATED - A Helm chart for the Weave Scope c...
2.13.7.2 根据搜索结果选择安装
命令:helm install 安装之后的名称 搜索之后的应用名称
如: helm install ui stable/weave-scope
[root@k8smaster admin]# helm install ui stable/weave-scope
WARNING: This chart is deprecated
NAME: ui
LAST DEPLOYED: Tue Jun 21 23:40:48 2022
NAMESPACE: default
STATUS: deployed
REVISION: 1
NOTES:
You should now be able to access the Scope frontend in your web browser, by
using kubectl port-forward:

kubectl -n default port-forward $(kubectl -n default get endpoints \
ui-weave-scope -o jsonpath='{.subsets[0].addresses[0].targetRef.name}') 8080:4040

then browsing to http://localhost:8080/.
For more details on using Weave Scope, see the Weave Scope documentation:

https://www.weave.works/docs/scope/latest/introducing/
2.13.7.3 查看安装之后的状态
命令:helm list
[root@k8smaster admin]# helm list
NAME	NAMESPACE	REVISION	UPDATED                                	STATUS  	CHART             	APP VERSION
ui  	default  	1       	2022-06-21 23:40:48.699971552 +0800 CST	deployed	weave-scope-1.1.12	1.12.0
命令:helm status 安装之后的名称
[root@k8smaster admin]# helm status ui
NAME: ui
LAST DEPLOYED: Tue Jun 21 23:45:01 2022
NAMESPACE: default
STATUS: deployed
REVISION: 1
NOTES:
You should now be able to access the Scope frontend in your web browser, by
using kubectl port-forward:

kubectl -n default port-forward $(kubectl -n default get endpoints \
ui-weave-scope -o jsonpath='{.subsets[0].addresses[0].targetRef.name}') 8080:4040

then browsing to http://localhost:8080/.
For more details on using Weave Scope, see the Weave Scope documentation:
2.13.7.4 修改svc的yaml文件,type=NodePort
## 查询 svc
[root@k8smaster admin]# kubectl get svc
NAME             TYPE        CLUSTER-IP      EXTERNAL-IP   PORT(S)        AGE
kubernetes       ClusterIP   10.96.0.1       <none>        443/TCP        27d
ui-weave-scope   ClusterIP   10.99.249.173   <none>        80/TCP         2m25s
web              NodePort    10.103.17.3     <none>        80:31468/TCP   2d23h
## 修改 svc ui-weave-scope ,type: NodePort
[root@k8smaster admin]# kubectl edit svc ui-weave-scope
service/ui-weave-scope edited
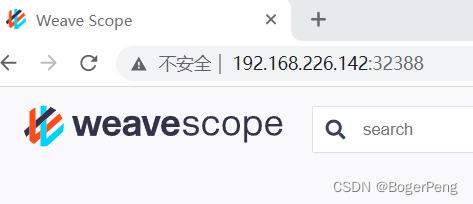
修改之后,该svc的端口对外暴露,
可以通过workernode(142或143)的ip加端口访问

2.13.8 自定义chart部署
2.13.8.1 如何做?
命令: helm create chart名称
[root@k8smaster ~]# helm create mychart
Creating mychart
[root@k8smaster ~]# ls
configmap.yaml   ds.yaml              mychart
[root@k8smaster ~]# cd mychart/

## chart的一些默认文件
[root@k8smaster mychart]# ls
charts  Chart.yaml  templates  values.yaml
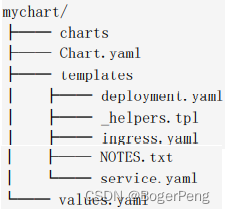
Chart.yaml:用于描述这个 Chart 的基本信息,包括名字、描述信息以及版本等。
values.yaml :用于存储 templates 目录中模板文件中用到变量的值。
Templates: 目录里面存放所有 yaml 模板文件。
charts:目录里存放这个 chart 依赖的所有子 chart。
NOTES.txt :用于介绍 Chart 帮助信息, helm install 部署后展示给用户。例如:
如何使用这个 Chart、列出缺省的设置等。
_helpers.tpl:放置模板助手的地方,可以在整个 chart 中重复使用
2.13.8.2 在 templates 中创建两个文件
## 先清空 templates 中的文件
[root@k8smaster mychart]# cd templates/
[root@k8smaster templates]# ls
deployment.yaml  _helpers.tpl  hpa.yaml  ingress.yaml  NOTES.txt  serviceaccount.yaml  service.yaml  tests
[root@k8smaster templates]# rm -rf *
[root@k8smaster templates]# ls
[root@k8smaster templates]# pwd
/root/mychart/templates
deployment.yaml
[root@k8smaster templates]# kubectl create deployment web5 --image=nginx --dry-run -o yaml > deployment.yaml
W0622 00:14:39.722355   25924 helpers.go:535] --dry-run is deprecated and can be replaced with --dry-run=client.
[root@k8smaster templates]# ls
deployment.yaml

## 启动应用
[root@k8smaster templates]# kubectl apply -f deployment.yaml
deployment.apps/web5 created
service.yaml
[root@k8smaster templates]# kubectl expose deployment web5 --port=80 --target-port=80 --type=NodePort --dry-run -o yaml > service.yaml
W0622 00:24:39.976665   28046 helpers.go:535] --dry-run is deprecated and can be replaced with --dry-run=client.
[root@k8smaster templates]# kubectl apply -f service.yaml
service/web5 created
[root@k8smaster templates]# kubectl get svc
NAME             TYPE        CLUSTER-IP      EXTERNAL-IP   PORT(S)        AGE
web5             NodePort    10.108.163.99   <none>        80:31446/TCP   8s
2.13.8.3 安装 mychart
把上面的两个 yaml文件启动的内容删除
[root@k8smaster templates]#  kubectl delete -f service.yaml
service "web5" deleted
[root@k8smaster templates]#  kubectl delete -f deployment.yaml
deployment.apps "web5" deleted
回到 mychart的上级目录
[root@k8smaster ~]# ls
mychart  rbac-role.yaml
[root@k8smaster ~]# pwd
/root
执行安装命令:
会与 2.13.8.2 执行的结果相同
[root@k8smaster ~]# helm install web11 mychart/
NAME: web11
LAST DEPLOYED: Wed Jun 22 00:31:53 2022
NAMESPACE: default
STATUS: deployed
REVISION: 1
TEST SUITE: None
2.13.8.4 chart中的应用升级
命令:helm upgrade chart名称
[root@k8smaster ~]# helm upgrade web11 mychart/
Release "web11" has been upgraded. Happy Helming!
NAME: web11
LAST DEPLOYED: Wed Jun 22 00:36:14 2022
NAMESPACE: default
STATUS: deployed
REVISION: 2
TEST SUITE: None
2.13.9 chart 模板
2.13.9.1 概述
Helm 最核心的就是模板,即模板化的 K8S manifests 文件。
它本质上就是一个 Go 的 template 模板。Helm 在 Go template 模板的基础上,还会增加很多东西。如一些自定义的元数据信息、扩展的库以及一些类似于编程形式的工作流,例如条件语句、管道等等。这些东西都会使得我们的模板变得更加丰富。
有了模板,我们怎么把我们的配置融入进去呢?用的就是这个 values 文件。这两部分内容其实就是 chart 的核心功能。
2.13.9.2 作用:实现yaml的高效复用
通过传递参数,动态渲染模板,yaml内容动态传入参数生成
- 1). 在value.yaml 定义变量的值
- 2). 在templates目录下具体的yaml中获取变量的值
yaml文件大体有几个地方不同:
image
tag
label
port
replicas
2.13.9.3 案例
- 1). 去到mychart目录下,修改value.yaml
[root@k8smaster mychart]# ls
charts  Chart.yaml  templates  values.yaml
[root@k8smaster mychart]# pwd
/root/mychart

## 修改value.yaml
replicaCount: 2
image: nginx
tag: 1.16
label: nginx
port: 80
- 2). 去templates目录中的yaml文件中使用value.yaml中的变量
表达式:  {{ .Values.变量名称}}
当前版本名称: {{ .Release.Names}}
# service.yaml
apiVersion: v1
kind: Service
metadata:
creationTimestamp: null
labels:
app: web5
name: {{ .Release.Name}}-svc
spec:
ports:
- port: {{ .Values.port}}
protocol: TCP
targetPort: {{ .Values.port}}
selector:
app: {{ .Values.label}}
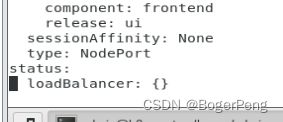
type: NodePort
status:
loadBalancer: {}
- 3). dry-run 执行结果:
[root@k8smaster ~]# helm install --dry-run web12 mychart
NAME: web12
LAST DEPLOYED: Wed Jun 22 01:11:45 2022
NAMESPACE: default
STATUS: pending-install
REVISION: 1
TEST SUITE: None
HOOKS:
MANIFEST:
---
# Source: mychart/templates/service.yaml
apiVersion: v1
kind: Service
metadata:
  creationTimestamp: null
  labels:
    app: web5
  name: web12-svc
spec:
  ports:
  - port: 80
    protocol: TCP
    targetPort: 80
  selector:
    app: nginx
  type: NodePort
status:
  loadBalancer: {}
---
# Source: mychart/templates/deployment.yaml
apiVersion: apps/v1
kind: Deployment
metadata:
  creationTimestamp: null
  labels:
    app: web5
  name: web12-deploy
spec:
  replicas: 1
  selector:
    matchLabels:
      app: nginx
  strategy: {}
  template:
    metadata:
      creationTimestamp: null
      labels:
        app: nginx
    spec:
      containers:
      - image: nginx
        name: nginx
        resources: {}
status: {}
具体执行结果
[root@k8smaster ~]# helm install  web12 mychart/
NAME: web12
LAST DEPLOYED: Wed Jun 22 01:16:22 2022
NAMESPACE: default
STATUS: deployed
REVISION: 1
TEST SUITE: None

2.14 持久化之nfs网络储存 pv
数据卷只是本地存储。
2.14.1 安装nfs server - 130机器
关闭防火墙
[root@vm001 nfs]# systemctl stop firewalld
选择一台机器作为储存机器,这里选择130的机器
指令:
yum install -y nfs-utils
2.14.2 设置挂载路径 130机器
vi /etc/exports

/data/nfs *{rw,no_root_squash}

# 左边是挂载的路径,右边是读写权限,可以自定义
# 且自定义的挂载路径 /data/nfs 必须存在
[root@k8sworker1 admin]# vi /etc/exports
## 左列:主机共享目录 ;右列:从机IP限制(共享选项)
[root@k8sworker1 admin]# cat /etc/exports
/data/nfs *(rw,no_root_squash)

[root@k8sworker1 admin]# mkdir /data
[root@k8sworker1 admin]# cd /data/
[root@k8sworker1 data]# mkdir nfs
[root@k8sworker1 data]# cd nfs/
[root@k8sworker1 nfs]# pwd
/data/nfs
2.14.3 安装nfs 两台node机器并启动
yum install -y nfs-utils

## 启动并保持启动
[root@k8sworker2 admin]# systemctl start nfs
[root@k8sworker2 admin]# systemctl enable nfs
Created symlink from /etc/systemd/system/multi-user.target.wants/nfs-server.service to /usr/lib/systemd/system/nfs-server.service.
2.14.4 nfs server启动服务
130机器:
systemctl start nfs
systemctl enable nfs
测试客户端连服务端的nfs,
如果前面没有关闭防火墙,会出现异常。
[root@k8sworker2 admin]# showmount -e 192.168.226.130
clnt_create: RPC: Port mapper failure - Unable to receive: errno 113 (No route to host)

## 关闭服务端防火墙后,可解决
[root@k8sworker2 admin]# showmount -e 192.168.226.130
Export list for 192.168.226.130:
/data/nfs *(rw,no_root_squash)

参考文章: https://blog.csdn.net/HelloWorld_4396/article/details/111614806
谢谢!
2.14.5 在k8s集群中使用nfs持久网络存储
新建nfs-nginx.yaml,仔细体会yaml文件的操作目的
apiVersion: apps/v1
kind: Deployment
metadata:
  name: nginx-dep1
spec:
  replicas: 1
  selector:
    matchLabels:
      app: nginx
  template:
    metadata:
      labels:
        app: nginx
    spec:
      containers:
      - name: nginx
        image: nginx
        volumeMounts:
        - name: wwwroot
          mountPath: /usr/share/nginx/html
        ports:
        - containerPort: 80
      volumes:
        - name: wwwroot
          nfs:
            server: 192.168.226.130
            path: /data/nfs
2.14.6 测试
## k8s server中,进入 pod
[root@k8smaster pv]# kubectl exec -it nginx-dep1-589d979776-l8j6n bash
kubectl exec [POD] [COMMAND] is DEPRECATED and will be removed in a future version. Use kubectl kubectl exec [POD] -- [COMMAND] instead.
## 查询 /usr/share/nginx/html 目录,目前为空
root@nginx-dep1-589d979776-l8j6n:/# ls /usr/share/nginx/html
## 进入nfs server,在挂载目录新建 index.html
[root@vm001 nfs]# pwd
/data/nfs
[root@vm001 nfs]# vi index.html
[root@vm001 nfs]# cat index.html
hello nfs
此时 k8s server的pod中,出现了index.html文件

再把deployment expose 成svc
[root@k8smaster pv]# kubectl expose deployment nginx-dep1 --port=80 --target-port=80 --type=NodePort
service/nginx-dep1 exposed

[root@k8smaster pv]# kubectl get svc
NAME         TYPE        CLUSTER-IP      EXTERNAL-IP   PORT(S)        AGE
kubernetes   ClusterIP   10.96.0.1       <none>        443/TCP        28d
nginx-dep1   NodePort    10.96.214.237   <none>        80:31072/TCP   4s
查看该端口,变成修改后的index.html

2.15 PV 和 PVC
PVC 和 PV
2.15.1 基本概念
管理存储是管理计算的一个明显问题。该 PersistentVolume 子系统为用户和管理员提供了一个 API,用于抽象如何根据消费方式提供存储的详细信息。为此,我们引入了两个新的API 资源:
PersistentVolume 和 PersistentVolumeClaim
PersistentVolume(PV)是集群中由管理员配置的一段网络存储。 它是集群中的资源,就像节点是集群资源一样。 PV 是容量插件,如 Volumes,但其生命周期独立于使用 PV 的任何单个 pod。 此 API 对象捕获存储实现的详细信息,包括 NFS,iSCSI 或特定于云提供程序的存储系统。
PersistentVolumeClaim(PVC)是由用户进行存储的请求。 它类似于 pod。 Pod 消耗节点资源,PVC 消耗 PV 资源。Pod 可以请求特定级别的资源(CPU 和内存)。声明可以请求特定的大小和访问模式(例如,可以一次读/写或多次只读)。
虽然 PersistentVolumeClaims 允许用户使用抽象存储资源,但是PersistentVolumes 对于不同的问题,用户通常需要具有不同属性(例如性能)。群集管理员需要能够提供各种PersistentVolumes 不同的方式,而不仅仅是大小和访问模式,而不会让用户了解这些卷的实现方式。对于这些需求,有 StorageClass 资源。
StorageClass 为管理员提供了一种描述他们提供的存储的“类”的方法。 不同的类可能映射到服务质量级别,或备份策略,或者由群集管理员确定的任意策略。 Kubernetes 本身对于什么类别代表是不言而喻的。 这个概念有时在其他存储系统中称为“配置文件”。
PVC 和 PV 是一一对应的。
PV: 生产者,持久化储存,对储存资源进行抽象,对外提供可以调用的地方
PVC: 消费者, 用于调用,不关心内部细节
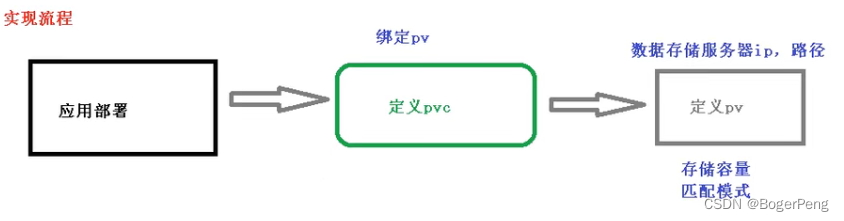
2.15.2 实现流程
2.15.2.1 在master 141新建 pvc.yaml 并执行
## pvc.yaml
apiVersion: apps/v1
kind: Deployment
metadata:
  name: nginx-dep1
spec:
  replicas: 3
  selector:
    matchLabels:
      app: nginx
  template:
    metadata:
      labels:
        app: nginx
    spec:
      containers:
      - name: nginx
        image: nginx
        volumeMounts:
        - name: wwwroot
          mountPath: /usr/share/nginx/html
        ports:
        - containerPort: 80
      volumes:
      - name: wwwroot
        persistentVolumeClaim:
          claimName: my-pvc

---

apiVersion: v1
kind: PersistentVolumeClaim
metadata:
  name: my-pvc
spec:
  accessModes:
    - ReadWriteMany
  resources:
    requests:
      storage: 5Gi
此时pod一直显示pending
[root@k8smaster pv]# kubectl apply -f pvc.yaml
deployment.apps/nginx-dep1 created
persistentvolumeclaim/my-pvc created

[root@k8smaster pv]# kubectl get pods
NAME                                            READY   STATUS    RESTARTS   AGE
nginx-dep1-58b7bf955f-tpskg                     0/1     Pending   0          82s
nginx-dep1-58b7bf955f-tz6c8                     0/1     Pending   0          82s
nginx-dep1-58b7bf955f-vpjwf                     0/1     Pending   0          82s
2.15.2.2 在master 141新建 pv.yaml 并执行
## pv.yaml
apiVersion: v1
kind: PersistentVolume
metadata:
  name: my-pv
spec:
  capacity:
    storage: 5Gi
  accessModes:
    - ReadWriteMany
  nfs:
    path: /data/nfs
    server: 192.168.226.130
把pv绑定到pvc,k8s会根据pvc中配置的存储容量和匹配模式筛选出最适合的pv,进行绑定。
假如 pv.yaml中配置了5个 pv(目前只配了一个),各自有不同的容量和访问模式,pvc.yaml启动的时候,就会在这5个pv中选择最能匹配的一个进行绑定

[root@k8smaster pv]# kubectl apply -f pv.yaml
persistentvolume/my-pv created

[root@k8smaster pv]# kubectl get pods
NAME                                            READY   STATUS    RESTARTS   AGE
nginx-dep1-58b7bf955f-6hqbh                     1/1     Running   0          6m27s
nginx-dep1-58b7bf955f-qsmnk                     1/1     Running   0          6m27s
nginx-dep1-58b7bf955f-vqdp6                     1/1     Running   0          6m27s
注意,此处记得检查nfs server (130机器)的防火墙是否关闭。
systemctl status firewalld
systemctl stop firewalld
systemctl disable firewalld    # 永久关闭
2.15.2.3 测试
[root@k8smaster pv]# kubectl exec -it nginx-dep1-58b7bf955f-6hqbh  bash
kubectl exec [POD] [COMMAND] is DEPRECATED and will be removed in a future version. Use kubectl kubectl exec [POD] -- [COMMAND] instead.
## 即是到达
root@nginx-dep1-58b7bf955f-6hqbh:/# cd /usr/share/nginx/html
root@nginx-dep1-58b7bf955f-6hqbh:/usr/share/nginx/html# ls
index.html
底部存储类型杂,挂载方式也不一样,你不知道用的是什么,所以就把存储资源抽象成pv,不操心你底部什么存储。
2.16 k8s 集群资源监控
2.16.1 监控指标
集群监控指标
	节点资源利用率
	节点数
	运行的pods数量

Pod监控指标
	容器指标
	应用程序
2.16.2 监控平台 prometheus + grafana 介绍
prometheus:
	开源的
	监控、报警、数据库
	以http协议周期性抓取被监控组件的状态,
	不需要复杂的基础过程,使用http接口接入即可


grafana:
	开源的数据分析和可视化工具
	支持多种数据源
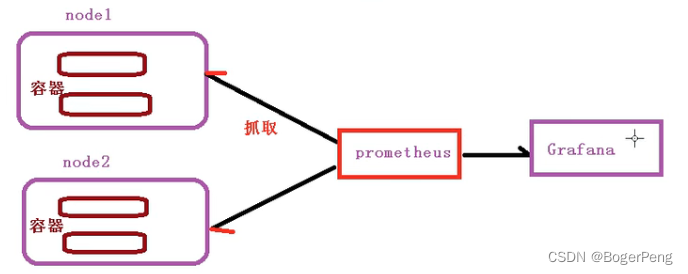
2.16.3 搭建细节
2.16.3.0 部署守护进程以及其对外暴露端口

node-exporter.yaml: 部署守护进程以及其对外暴露的端口
[root@k8smaster pgmonitor]# kubectl create -f node-exporter.yaml
daemonset.apps/node-exporter created
service/node-exporter created
2.16.3.1 部署 prometheus
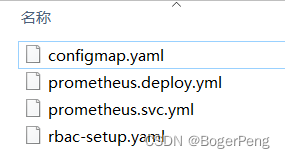
rbac-setup.yaml: 设置集群内部的访问角色和权限
configmap.yaml: 设置集群的相关配置文件,有的通过正则表达式匹配
prometheus.deploy.yaml: peometheus和其相应的端口号、资源及限制、数据卷挂载等
prometheus.svc.yaml:  peometheus对外暴露端口

注:几个yaml使用相同的命名空间 kube-system
2.16.3.1.1 rbac-setup.yaml
## rbac-setup.yaml
apiVersion: rbac.authorization.k8s.io/v1
kind: ClusterRole
metadata:
  name: prometheus
rules:
- apiGroups: [""]
  resources:
  - nodes
  - nodes/proxy
  - services
  - endpoints
  - pods
  verbs: ["get", "list", "watch"]
- apiGroups:
  - extensions
  resources:
  - ingresses
  verbs: ["get", "list", "watch"]
- nonResourceURLs: ["/metrics"]
  verbs: ["get"]
---
apiVersion: v1
kind: ServiceAccount
metadata:
  name: prometheus
  namespace: kube-system
---
apiVersion: rbac.authorization.k8s.io/v1
kind: ClusterRoleBinding
metadata:
  name: prometheus
roleRef:
  apiGroup: rbac.authorization.k8s.io
  kind: ClusterRole
  name: prometheus
subjects:
- kind: ServiceAccount
  name: prometheus
  namespace: kube-system
[root@k8smaster prometheus]# kubectl create -f rbac-setup.yaml
clusterrole.rbac.authorization.k8s.io/prometheus created
serviceaccount/prometheus created
clusterrolebinding.rbac.authorization.k8s.io/prometheus created
2.16.3.1.2 configmap.yaml
## configmap.yaml
apiVersion: v1
kind: ConfigMap
metadata:
  name: prometheus-config
  namespace: kube-system
data:
  prometheus.yml: |
    global:
      scrape_interval:     15s
      evaluation_interval: 15s
    scrape_configs:

    - job_name: 'kubernetes-apiservers'
      kubernetes_sd_configs:
      - role: endpoints
      scheme: https
      tls_config:
        ca_file: /var/run/secrets/kubernetes.io/serviceaccount/ca.crt
      bearer_token_file: /var/run/secrets/kubernetes.io/serviceaccount/token
      relabel_configs:
      - source_labels: [__meta_kubernetes_namespace, __meta_kubernetes_service_name, __meta_kubernetes_endpoint_port_name]
        action: keep
        regex: default;kubernetes;https

    - job_name: 'kubernetes-nodes'
      kubernetes_sd_configs:
      - role: node
      scheme: https
      tls_config:
        ca_file: /var/run/secrets/kubernetes.io/serviceaccount/ca.crt
      bearer_token_file: /var/run/secrets/kubernetes.io/serviceaccount/token
      relabel_configs:
      - action: labelmap
        regex: __meta_kubernetes_node_label_(.+)
      - target_label: __address__
        replacement: kubernetes.default.svc:443
      - source_labels: [__meta_kubernetes_node_name]
        regex: (.+)
        target_label: __metrics_path__
        replacement: /api/v1/nodes/${1}/proxy/metrics

    - job_name: 'kubernetes-cadvisor'
      kubernetes_sd_configs:
      - role: node
      scheme: https
      tls_config:
        ca_file: /var/run/secrets/kubernetes.io/serviceaccount/ca.crt
      bearer_token_file: /var/run/secrets/kubernetes.io/serviceaccount/token
      relabel_configs:
      - action: labelmap
        regex: __meta_kubernetes_node_label_(.+)
      - target_label: __address__
        replacement: kubernetes.default.svc:443
      - source_labels: [__meta_kubernetes_node_name]
        regex: (.+)
        target_label: __metrics_path__
        replacement: /api/v1/nodes/${1}/proxy/metrics/cadvisor

    - job_name: 'kubernetes-service-endpoints'
      kubernetes_sd_configs:
      - role: endpoints
      relabel_configs:
      - source_labels: [__meta_kubernetes_service_annotation_prometheus_io_scrape]
        action: keep
        regex: true
      - source_labels: [__meta_kubernetes_service_annotation_prometheus_io_scheme]
        action: replace
        target_label: __scheme__
        regex: (https?)
      - source_labels: [__meta_kubernetes_service_annotation_prometheus_io_path]
        action: replace
        target_label: __metrics_path__
        regex: (.+)
      - source_labels: [__address__, __meta_kubernetes_service_annotation_prometheus_io_port]
        action: replace
        target_label: __address__
        regex: ([^:]+)(?::\d+)?;(\d+)
        replacement: $1:$2
      - action: labelmap
        regex: __meta_kubernetes_service_label_(.+)
      - source_labels: [__meta_kubernetes_namespace]
        action: replace
        target_label: kubernetes_namespace
      - source_labels: [__meta_kubernetes_service_name]
        action: replace
        target_label: kubernetes_name

    - job_name: 'kubernetes-services'
      kubernetes_sd_configs:
      - role: service
      metrics_path: /probe
      params:
        module: [http_2xx]
      relabel_configs:
      - source_labels: [__meta_kubernetes_service_annotation_prometheus_io_probe]
        action: keep
        regex: true
      - source_labels: [__address__]
        target_label: __param_target
      - target_label: __address__
        replacement: blackbox-exporter.example.com:9115
      - source_labels: [__param_target]
        target_label: instance
      - action: labelmap
        regex: __meta_kubernetes_service_label_(.+)
      - source_labels: [__meta_kubernetes_namespace]
        target_label: kubernetes_namespace
      - source_labels: [__meta_kubernetes_service_name]
        target_label: kubernetes_name

    - job_name: 'kubernetes-ingresses'
      kubernetes_sd_configs:
      - role: ingress
      relabel_configs:
      - source_labels: [__meta_kubernetes_ingress_annotation_prometheus_io_probe]
        action: keep
        regex: true
      - source_labels: [__meta_kubernetes_ingress_scheme,__address__,__meta_kubernetes_ingress_path]
        regex: (.+);(.+);(.+)
        replacement: ${1}://${2}${3}
        target_label: __param_target
      - target_label: __address__
        replacement: blackbox-exporter.example.com:9115
      - source_labels: [__param_target]
        target_label: instance
      - action: labelmap
        regex: __meta_kubernetes_ingress_label_(.+)
      - source_labels: [__meta_kubernetes_namespace]
        target_label: kubernetes_namespace
      - source_labels: [__meta_kubernetes_ingress_name]
        target_label: kubernetes_name

    - job_name: 'kubernetes-pods'
      kubernetes_sd_configs:
      - role: pod
      relabel_configs:
      - source_labels: [__meta_kubernetes_pod_annotation_prometheus_io_scrape]
        action: keep
        regex: true
      - source_labels: [__meta_kubernetes_pod_annotation_prometheus_io_path]
        action: replace
        target_label: __metrics_path__
        regex: (.+)
      - source_labels: [__address__, __meta_kubernetes_pod_annotation_prometheus_io_port]
        action: replace
        regex: ([^:]+)(?::\d+)?;(\d+)
        replacement: $1:$2
        target_label: __address__
      - action: labelmap
        regex: __meta_kubernetes_pod_label_(.+)
      - source_labels: [__meta_kubernetes_namespace]
        action: replace
        target_label: kubernetes_namespace
      - source_labels: [__meta_kubernetes_pod_name]
        action: replace
        target_label: kubernetes_pod_name
[root@k8smaster prometheus]# kubectl create -f configmap.yaml
configmap/prometheus-config created
2.16.3.1.3 prometheus.deploy.yml
## prometheus.deploy.yml
---
apiVersion: apps/v1
kind: Deployment
metadata:
  labels:
    name: prometheus-deployment
  name: prometheus
  namespace: kube-system
spec:
  replicas: 1
  selector:
    matchLabels:
      app: prometheus
  template:
    metadata:
      labels:
        app: prometheus
    spec:
      containers:
      - image: prom/prometheus:v2.0.0
        name: prometheus
        command:
        - "/bin/prometheus"
        args:
        - "--config.file=/etc/prometheus/prometheus.yml"
        - "--storage.tsdb.path=/prometheus"
        - "--storage.tsdb.retention=24h"
        ports:
        - containerPort: 9090
          protocol: TCP
        volumeMounts:
        - mountPath: "/prometheus"
          name: data
        - mountPath: "/etc/prometheus"
          name: config-volume
        resources:
          requests:
            cpu: 100m
            memory: 100Mi
          limits:
            cpu: 500m
            memory: 2500Mi
      serviceAccountName: prometheus
      volumes:
      - name: data
        emptyDir: {}
      - name: config-volume
        configMap:
          name: prometheus-config
[root@k8smaster prometheus]# kubectl create -f prometheus.deploy.yml
deployment.apps/prometheus created
2.16.3.1.4 prometheus.svc.yml
## prometheus.svc.yml
---
kind: Service
apiVersion: v1
metadata:
  labels:
    app: prometheus
  name: prometheus
  namespace: kube-system
spec:
  type: NodePort
  ports:
  - port: 9090
    targetPort: 9090
    nodePort: 30003
  selector:
    app: prometheus
[root@k8smaster prometheus]# kubectl create -f prometheus.svc.yml
service/prometheus created
2.16.3.1.4 检查
[root@k8smaster prometheus]# kubectl get pods -n kube-system
NAME                                READY   STATUS    RESTARTS   AGE
coredns-7ff77c879f-dqqtz            1/1     Running   29         31d
coredns-7ff77c879f-gzn6z            1/1     Running   29         31d
etcd-k8smaster                      1/1     Running   30         31d
kube-apiserver-k8smaster            1/1     Running   30         31d
kube-controller-manager-k8smaster   1/1     Running   35         31d
kube-flannel-ds-ldt25               1/1     Running   31         31d
kube-flannel-ds-mnh5s               1/1     Running   24         31d
kube-flannel-ds-tqpzp               1/1     Running   22         31d
kube-proxy-55frw                    1/1     Running   20         31d
kube-proxy-l4bll                    1/1     Running   21         31d
kube-proxy-rshj2                    1/1     Running   30         31d
kube-scheduler-k8smaster            1/1     Running   35         31d
node-exporter-dqtvn                 1/1     Running   0          18m
node-exporter-mlw92                 1/1     Running   0          18m
prometheus-7486bf7f4b-x5kkt         1/1     Running   0          5m31s
2.16.3.2 部署 grafana
因为grafana是显示组件,不是数据收集处理组件,所以不用守护,听哪里去了
gtafana不需要每个node部署 node_exporter 用daemonset 确保在每个node节点运行,即使新增node也会运行
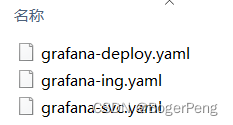
2.16.3.2.1 grafana-deploy.yaml
## grafana-deploy.yaml
apiVersion: apps/v1
kind: Deployment
metadata:
  name: grafana-core
  namespace: kube-system
  labels:
    app: grafana
    component: core
spec:
  replicas: 1
  selector:
    matchLabels:
      app: grafana
      component: core
  template:
    metadata:
      labels:
        app: grafana
        component: core
    spec:
      containers:
      - image: grafana/grafana:4.2.0
        name: grafana-core
        imagePullPolicy: IfNotPresent
        # env:
        resources:
          # keep request = limit to keep this container in guaranteed class
          limits:
            cpu: 100m
            memory: 100Mi
          requests:
            cpu: 100m
            memory: 100Mi
        env:
          # The following env variables set up basic auth twith the default admin user and admin password.
          - name: GF_AUTH_BASIC_ENABLED
            value: "true"
          - name: GF_AUTH_ANONYMOUS_ENABLED
            value: "false"
          # - name: GF_AUTH_ANONYMOUS_ORG_ROLE
          #   value: Admin
          # does not really work, because of template variables in exported dashboards:
          # - name: GF_DASHBOARDS_JSON_ENABLED
          #   value: "true"
        readinessProbe:
          httpGet:
            path: /login
            port: 3000
          # initialDelaySeconds: 30
          # timeoutSeconds: 1
        volumeMounts:
        - name: grafana-persistent-storage
          mountPath: /var
      volumes:
      - name: grafana-persistent-storage
        emptyDir: {}
[root@k8smaster grafana]# kubectl create -f grafana-deploy.yaml
deployment.apps/grafana-core created
2.16.3.2.2 grafana-svc.yaml
## grafana-svc.yaml
apiVersion: v1
kind: Service
metadata:
  name: grafana
  namespace: kube-system
  labels:
    app: grafana
    component: core
spec:
  type: NodePort
  ports:
    - port: 3000
  selector:
    app: grafana
    component: core
[root@k8smaster grafana]# kubectl create -f grafana-svc.yaml
service/grafana created
2.16.3.2.3 grafana-ing.yaml
apiVersion: extensions/v1beta1
kind: Ingress
metadata:
   name: grafana
   namespace: kube-system
spec:
   rules:
   - host: k8s.grafana
     http:
       paths:
       - path: /
         backend:
          serviceName: grafana
          servicePort: 3000
[root@k8smaster grafana]# kubectl create -f grafana-ing.yaml
ingress.extensions/grafana created
2.16.3.2.4 检查
[root@k8smaster grafana]# kubectl get pods -n kube-system
NAME                                READY   STATUS    RESTARTS   AGE
coredns-7ff77c879f-dqqtz            1/1     Running   29         31d
coredns-7ff77c879f-gzn6z            1/1     Running   29         31d
etcd-k8smaster                      1/1     Running   30         31d
grafana-core-768b6bf79c-vr9rz       0/1     Running   0          43s
kube-apiserver-k8smaster            1/1     Running   30         31d
kube-controller-manager-k8smaster   1/1     Running   35         31d
kube-flannel-ds-ldt25               1/1     Running   31         31d
kube-flannel-ds-mnh5s               1/1     Running   24         31d
kube-flannel-ds-tqpzp               1/1     Running   22         31d
kube-proxy-55frw                    1/1     Running   20         31d
kube-proxy-l4bll                    1/1     Running   21         31d
kube-proxy-rshj2                    1/1     Running   30         31d
kube-scheduler-k8smaster            1/1     Running   35         31d
node-exporter-dqtvn                 1/1     Running   0          35m
node-exporter-mlw92                 1/1     Running   0          35m
prometheus-7486bf7f4b-x5kkt         1/1     Running   0          22m
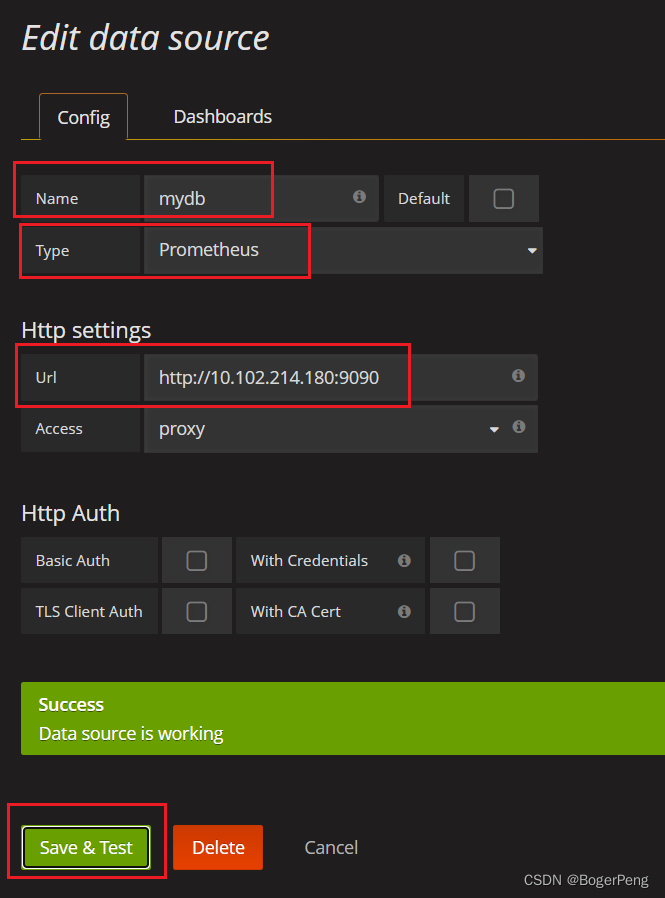
2.16.3.2.5 grafana配置数据源
进入grafana,配置数据源,导入显示模板
[root@k8smaster grafana]# kubectl get svc -n kube-system -o wide
NAME            TYPE        CLUSTER-IP       EXTERNAL-IP   PORT(S)                  AGE     SELECTOR
grafana         NodePort    10.96.95.211     <none>        3000:31951/TCP           8m50s   app=grafana,component=core
kube-dns        ClusterIP   10.96.0.10       <none>        53/UDP,53/TCP,9153/TCP   31d     k8s-app=kube-dns
node-exporter   NodePort    10.101.69.154    <none>        9100:31672/TCP           43m     k8s-app=node-exporter
prometheus      NodePort    10.102.214.180   <none>        9090:30003/TCP           27m     app=prometheus
URL: http://192.168.226.141:31951/login
默认用户名和密码: admin/admin
配置数据源,使用 prometheus
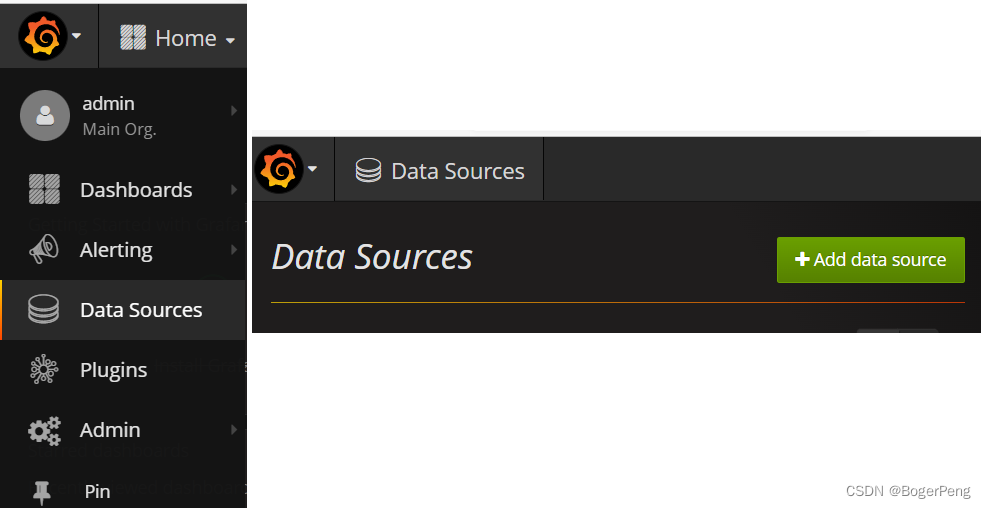
url是上面get svc的的prometheus的ip
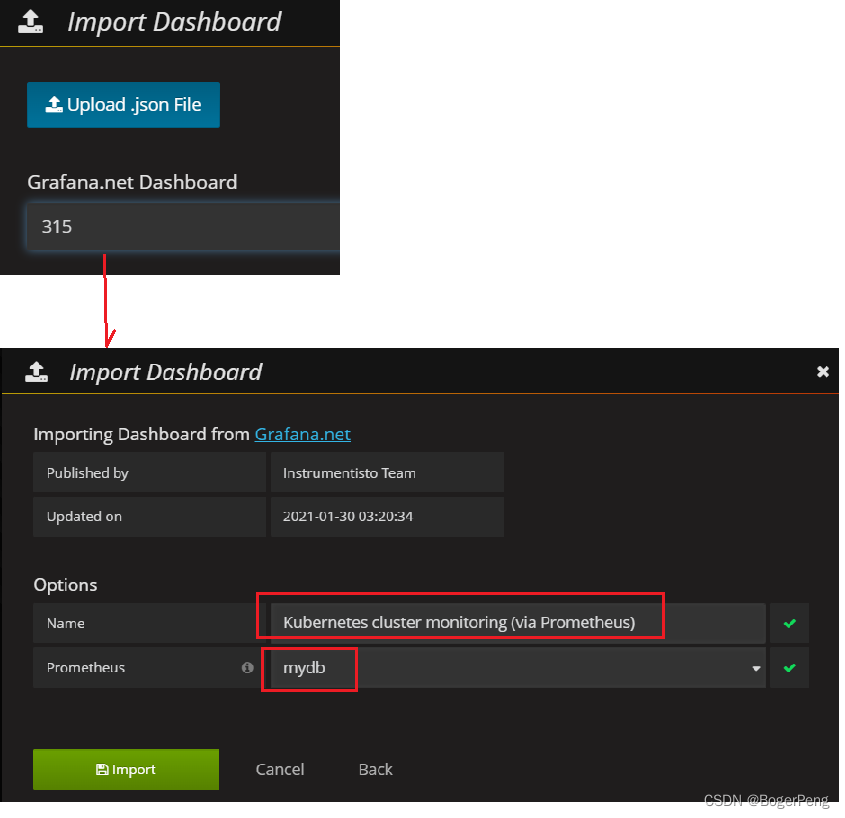
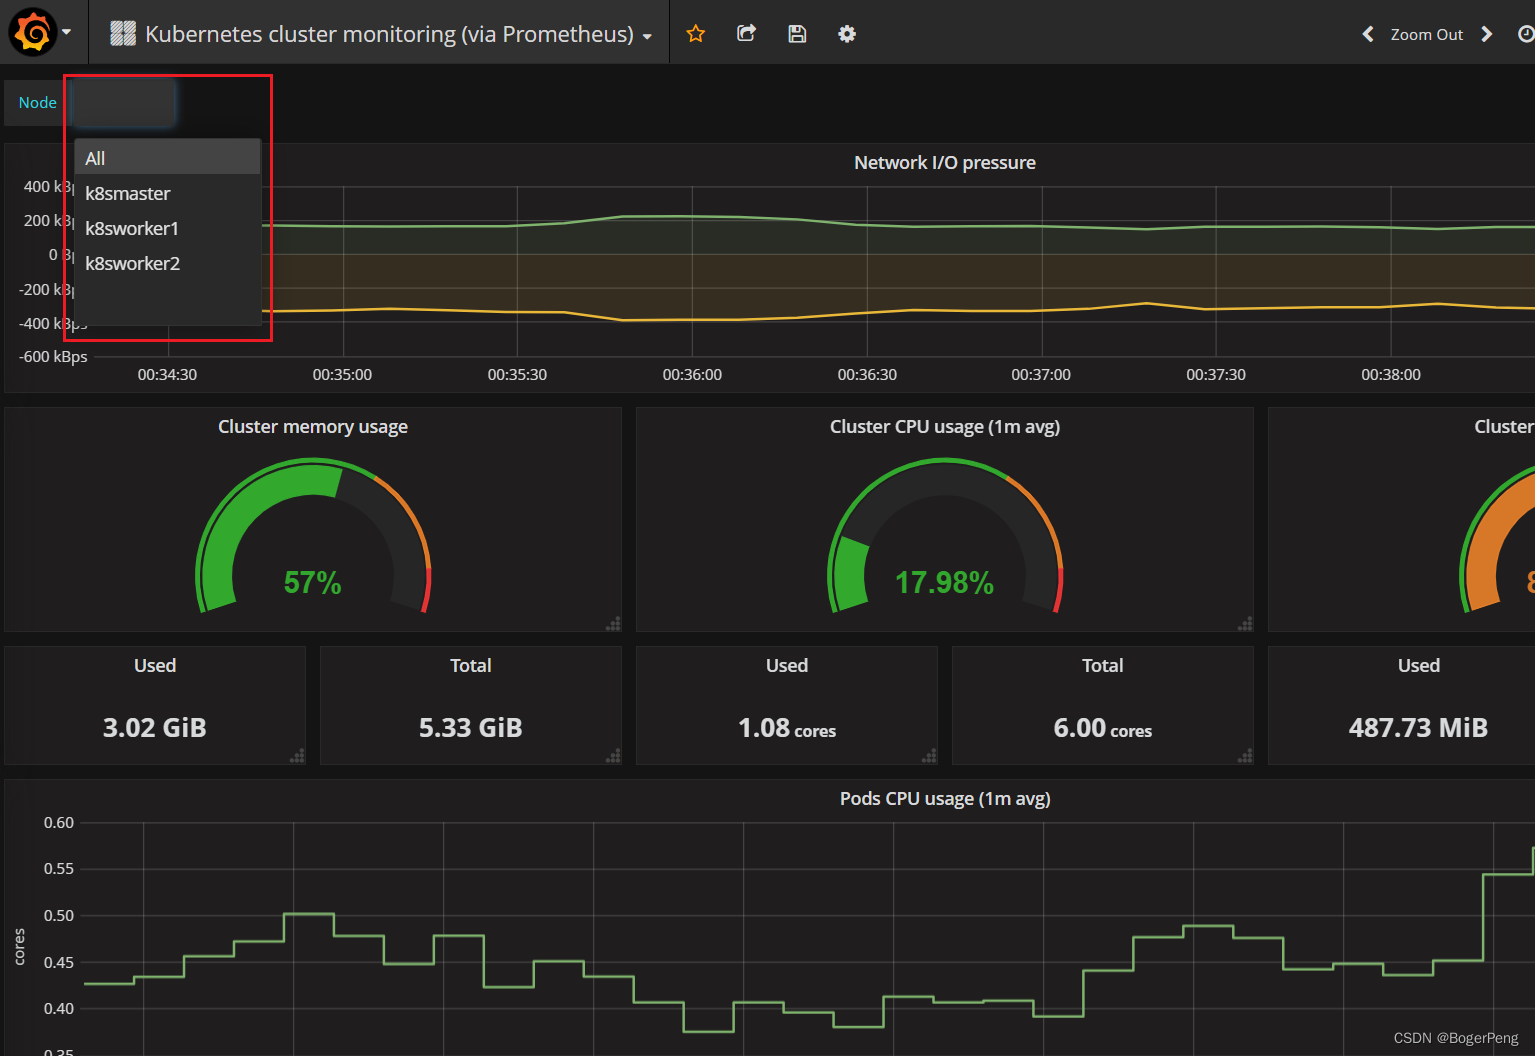
2.16.3.2.6 grafana设置显示数据模板
选择import
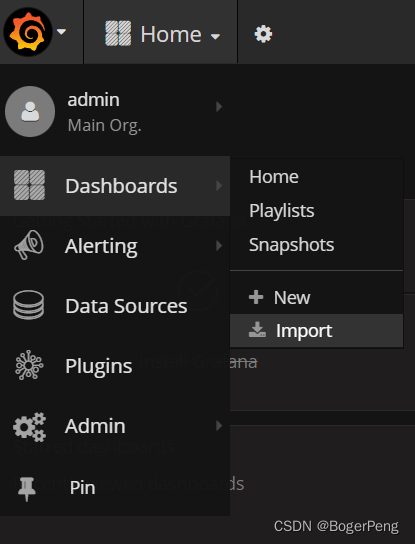
填入315的模板
数据库是刚刚新建的mydb,数据库名称可自己填
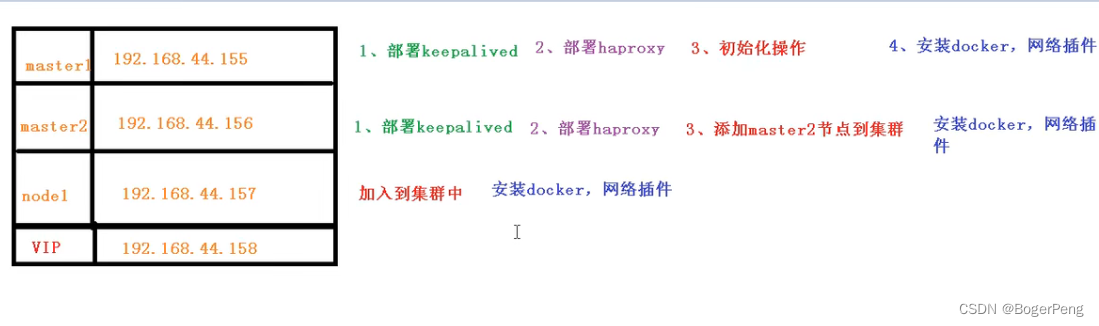
2.17 搭建高可用集群
2.17.1 单master与多master
2.17.1.1 单master
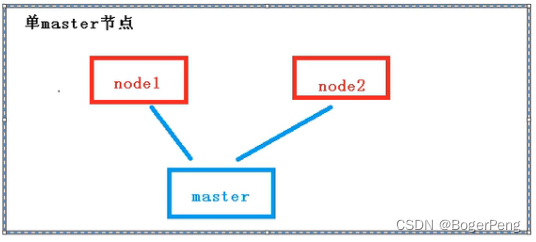
2.17.1.2 多master
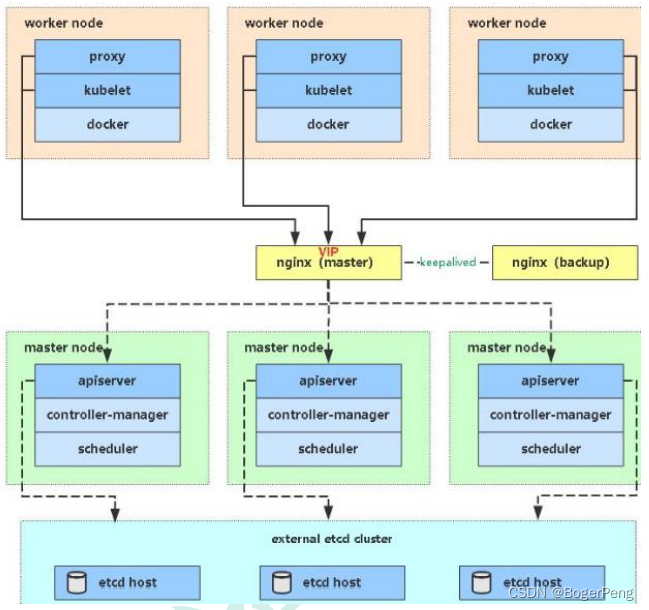
简化版
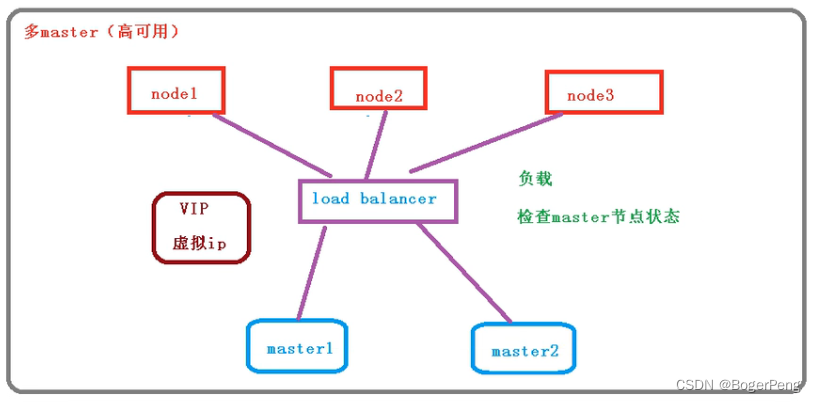
2.17.1.3 高可用集群的技术要求:
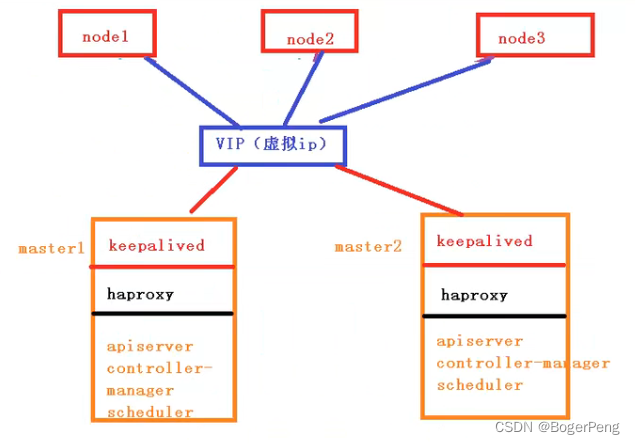
keepalive: 配置虚拟ip,检查当前节点状态
HAproxy: high availability proxy, 做到负载均衡的效果
2.17.2 初始化和部署keeplived
2.17.2.1 初始化
案例使用2台master和1台worker
系统初始化参考:https://blog.csdn.net/BogerPeng/article/details/124892243
中的2.4.3
- 1). 关闭防火墙:
systemctl stop firewalld
systemctl disable firewalld
为什么关闭防火墙,请参考:https://www.q578.com/s-5-2615546-0/

- 2). 关闭 selinux:
sed -i 's/enforcing/disabled/' /etc/selinux/config # 永久
setenforce 0 # 临时

- 3). 关闭 swap - K8S的要求
	#(1)临时关闭swap分区, 重启失效;
	swapoff -a
	#(2)永久关闭swap分区
	sed -ri 's/.*swap.*/#&/' /etc/fstab
	#(3)输入命令 free -mh 查看一下分区的状态:
	[root@k8shost admin]# sed -ri 's/.*swap.*/#&/' /etc/fstab
	[root@k8shost admin]# free -mh
	              total        used        free      shared  buff/cache   available
	Mem:           1.8G        777M        331M         35M        710M        859M
	Swap:            0B          0B          0B

- 4). 主机名:
$ hostnamectl set-hostname <hostname>
	## 155 机器
	hostnamectl set-hostname master1
	## 156 机器
	hostnamectl set-hostname master2
	## 157 机器
	hostnamectl set-hostname node1
	## 158 机器
	hostnamectl set-hostname k8s-vip

- 5). 在 master 添加 hosts:
需要在master1(155) 、master2(156)和node1(157) 中各自执行
cat >> /etc/hosts << EOF
192.168.226.158  master.k8s.io  k8s-vip
192.168.226.155  master01.k8s.io  master1
192.168.226.156  master02.k8s.io  master2
192.168.226.157  node01.k8s.io  node1
EOF

- 6). 将桥接的 IPv4 流量传递到 iptables 的链:
三台服务器都设置
	cat > /etc/sysctl.d/k8s.conf << EOF
	net.bridge.bridge-nf-call-ip6tables = 1
	net.bridge.bridge-nf-call-iptables = 1
	EOF

	# 生效
	sysctl --system

- 7). 时间同步:
	yum install ntpdate -y
	ntpdate time.windows.com
2.17.2.2 安装相关包和部署keepalived(两台master)
## 两台master(155/156)上执行
yum install -y conntrack-tools libseccomp libtool-ltdl
yum install -y keepalived
2.17.2.3 配置master节点
master1(155机器)节点配置:
注:vip就是我们设计时的ip地址
cat > /etc/keepalived/keepalived.conf <<EOF
! Configuration File for keepalived

global_defs {
   router_id k8s
}

vrrp_script check_haproxy {
    script "killall -0 haproxy"
    interval 3
    weight -2
    fall 10
    rise 2
}

vrrp_instance VI_1 {
    state MASTER
    interface ens33
    virtual_router_id 51
    priority 250
    advert_int 1
    authentication {
        auth_type PASS
        auth_pass ceb1b3ec013d66163d6ab
    }
    virtual_ipaddress {
        192.168.226.158
    }
    track_script {
        check_haproxy
    }

}
EOF
master2(156机器)节点配置
cat > /etc/keepalived/keepalived.conf <<EOF
! Configuration File for keepalived

global_defs {
   router_id k8s
}

vrrp_script check_haproxy {
    script "killall -0 haproxy"
    interval 3
    weight -2
    fall 10
    rise 2
}

vrrp_instance VI_1 {
    state BACKUP
    interface ens33
    virtual_router_id 51
    priority 200
    advert_int 1
    authentication {
        auth_type PASS
        auth_pass ceb1b3ec013d66163d6ab
    }
    virtual_ipaddress {
        192.168.226.158
    }
    track_script {
        check_haproxy
    }

}
EOF
2.17.2.4 启动和检查
在两台master节点都执行
# 启动keepalived
$ systemctl start keepalived.service
设置开机启动
$ systemctl enable keepalived.service
# 查看启动状态
$ systemctl status keepalived.service
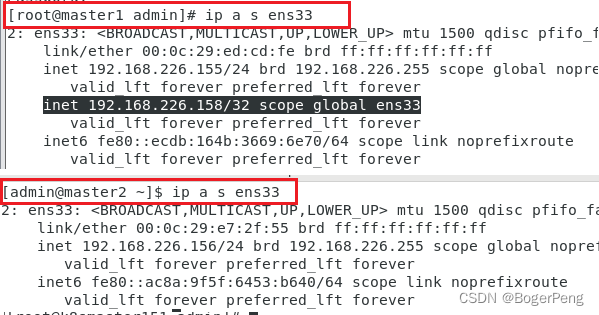
目前VIP在155机器上,如果155挂了,那么它会飘到156机器上
## 查询ens33的ip
ip a s ens33
2.17.3 部署haproxy
haproxy需要在两台master上面部署
2.17.3.1 安装
yum install -y haproxy
2.17.3.2 配置
两台master节点的配置均相同,配置中声明了后端代理的两个master节点服务器,指定了haproxy运行的端口为16443等,因此16443端口为集群的入口
cat > /etc/haproxy/haproxy.cfg << EOF
#---------------------------------------------------------------------
# Global settings
#---------------------------------------------------------------------
global
    # to have these messages end up in /var/log/haproxy.log you will
    # need to:
    # 1) configure syslog to accept network log events.  This is done
    #    by adding the '-r' option to the SYSLOGD_OPTIONS in
    #    /etc/sysconfig/syslog
    # 2) configure local2 events to go to the /var/log/haproxy.log
    #   file. A line like the following can be added to
    #   /etc/sysconfig/syslog
    #
    #    local2.*                       /var/log/haproxy.log
    #
    log         127.0.0.1 local2

    chroot      /var/lib/haproxy
    pidfile     /var/run/haproxy.pid
    maxconn     4000
    user        haproxy
    group       haproxy
    daemon

    # turn on stats unix socket
    stats socket /var/lib/haproxy/stats
#---------------------------------------------------------------------
# common defaults that all the 'listen' and 'backend' sections will
# use if not designated in their block
#---------------------------------------------------------------------
defaults
    mode                    http
    log                     global
    option                  httplog
    option                  dontlognull
    option http-server-close
    option forwardfor       except 127.0.0.0/8
    option                  redispatch
    retries                 3
    timeout http-request    10s
    timeout queue           1m
    timeout connect         10s
    timeout client          1m
    timeout server          1m
    timeout http-keep-alive 10s
    timeout check           10s
    maxconn                 3000
#---------------------------------------------------------------------
# kubernetes apiserver frontend which proxys to the backends
#---------------------------------------------------------------------
frontend kubernetes-apiserver
    mode                 tcp
    bind                 *:16443
    option               tcplog
    default_backend      kubernetes-apiserver
#---------------------------------------------------------------------
# round robin balancing between the various backends
#---------------------------------------------------------------------
backend kubernetes-apiserver
    mode        tcp
    balance     roundrobin
    server      master01.k8s.io   192.168.44.155:6443 check
    server      master02.k8s.io   192.168.44.156:6443 check
#---------------------------------------------------------------------
# collection haproxy statistics message
#---------------------------------------------------------------------
listen stats
    bind                 *:1080
    stats auth           admin:awesomePassword
    stats refresh        5s
    stats realm          HAProxy\ Statistics
    stats uri            /admin?stats
EOF
2.17.4 启动和检查
两台master都启动
# 设置开机启动
systemctl enable haproxy
# 开启haproxy
systemctl start haproxy
# 查看启动状态
systemctl status haproxy
检查端口
netstat -lntup | grep haproxy
2.17.5 所有节点安装docker/kubeadm/kubelet
Kubernetes默认CRI(容器运行时)为Docker,因此先安装Docker
2.17.5.1 安装Docker
$ wget https://mirrors.aliyun.com/docker-ce/linux/centos/docker-ce.repo -O /etc/yum.repos.d/docker-ce.repo
$ yum -y install docker-ce-18.06.1.ce-3.el7
$ systemctl enable docker && systemctl start docker
$ docker --version
Docker version 18.06.1-ce, build e68fc7a
修改镜像地址为阿里云
cat > /etc/docker/daemon.json << EOF
{
  "registry-mirrors": ["https://n76ky23k.mirror.aliyuncs.com"]
  ,"exec-opts": ["native.cgroupdriver=systemd"]
}
EOF
添加阿里云YUM软件源
cat > /etc/yum.repos.d/kubernetes.repo << EOF
[kubernetes]
name=Kubernetes
baseurl=https://mirrors.aliyun.com/kubernetes/yum/repos/kubernetes-el7-x86_64
enabled=1
gpgcheck=0
repo_gpgcheck=0
gpgkey=https://mirrors.aliyun.com/kubernetes/yum/doc/yum-key.gpg https://mirrors.aliyun.com/kubernetes/yum/doc/rpm-package-key.gpg
EOF
2.17.5.2 安装kubeadm,kubelet和kubectl
由于版本更新频繁,这里指定版本号部署:
## yum install -y kubelet-1.16.3 kubeadm-1.16.3 kubectl-1.16.3
yum install -y kubelet-1.18.0 kubeadm-1.18.0 kubectl-1.18.0
systemctl enable kubelet
2.17.6 部署Kubernetes Master
2.17.6.1 创建kubeadm配置文件
在具有vip的master上操作,这里为master1
## 查询本机是否有vip
ip a s ens33
mkdir /usr/local/kubernetes/manifests -p

cd /usr/local/kubernetes/manifests/

vi kubeadm-config.yaml

apiServer:
  certSANs:
    - master1
    - master2
    - master.k8s.io
    - 192.168.226.158
    - 192.168.226.155
    - 192.168.226.156
    - 127.0.0.1
  extraArgs:
    authorization-mode: Node,RBAC
  timeoutForControlPlane: 4m0s
apiVersion: kubeadm.k8s.io/v1beta2
certificatesDir: /etc/kubernetes/pki
clusterName: kubernetes
controlPlaneEndpoint: "master.k8s.io:6443"
controllerManager: {}
dns:
  type: CoreDNS
etcd:
  local:
    dataDir: /var/lib/etcd
imageRepository: registry.aliyuncs.com/google_containers
kind: ClusterConfiguration
kubernetesVersion: v1.18.0
networking:
  dnsDomain: cluster.local
  podSubnet: 10.244.0.0/16
  serviceSubnet: 10.1.0.0/16
scheduler: {}
2.17.6.2 在master1节点执行
cd /usr/local/kubernetes/manifests/
kubeadm init --config kubeadm-config.yaml

## 查看日志:
journalctl -u kubelet -f
部署参考:
URL1: https://www.jianshu.com/p/b9d43465a09c
URL2: https://blog.csdn.net/BogerPeng/article/details/124892243
中的 2.4.4.4 部署 Kubernetes Master
[kubelet-finalize] Updating "/etc/kubernetes/kubelet.conf" to point to a rotatable kubelet client certificate and key
[addons] Applied essential addon: CoreDNS
[addons] Applied essential addon: kube-proxy

Your Kubernetes control-plane has initialized successfully!

To start using your cluster, you need to run the following as a regular user:

  mkdir -p $HOME/.kube
  sudo cp -i /etc/kubernetes/admin.conf $HOME/.kube/config
  sudo chown $(id -u):$(id -g) $HOME/.kube/config

You should now deploy a pod network to the cluster.
Run "kubectl apply -f [podnetwork].yaml" with one of the options listed at:
URL: https://kubernetes.io/docs/concepts/cluster-administration/addons/

You can now join any number of control-plane nodes by copying certificate authorities
and service account keys on each node and then running the following as root:

  kubeadm join master.k8s.io:6443 --token kiieqa.w6rv3dh0p9hmfk32 \
    --discovery-token-ca-cert-hash sha256:9d550938ca4774c4b76bb05eccb1318a737b657837cd0d05f83d232a919f57fa \
    --control-plane

Then you can join any number of worker nodes by running the following on each as root:

kubeadm join master.k8s.io:6443 --token kiieqa.w6rv3dh0p9hmfk32 \
    --discovery-token-ca-cert-hash sha256:9d550938ca4774c4b76bb05eccb1318a737b657837cd0d05f83d232a919f57fa
按照上面启动成功的日志提示,再执行三行脚本
 mkdir -p $HOME/.kube
 sudo cp -i /etc/kubernetes/admin.conf $HOME/.kube/config
 sudo chown $(id -u):$(id -g) $HOME/.kube/config
按照提示保存以下内容,一会要使用:
  kubeadm join master.k8s.io:6443 --token kiieqa.w6rv3dh0p9hmfk32 \
    --discovery-token-ca-cert-hash sha256:9d550938ca4774c4b76bb05eccb1318a737b657837cd0d05f83d232a919f57fa \
    --control-plane
查看集群状态
kubectl get cs

kubectl get pods -n kube-system
2.17.6.3 安装集群网络
从官方地址获取到flannel的yaml,在master1上执行
mkdir /root/flannel
cd /root/flannel

## github 的kube-flannel 文件有时候下载失败,多试几次。
wget -c https://raw.githubusercontent.com/coreos/flannel/master/Documentation/kube-flannel.yml
安装flannel网络
kubectl apply -f kube-flannel.yml
检查
kubectl get pods -n kube-system
## 注意,如果出现not ready或者
[root@master1 flannel]# kubectl get pods -n kube-system
NAME                              READY   STATUS    RESTARTS   AGE
coredns-7ff77c879f-2g8dr          1/1     Running   0          22h
coredns-7ff77c879f-bgnrg          1/1     Running   0          22h
etcd-master1                      1/1     Running   1          22h
kube-apiserver-master1            1/1     Running   1          22h
kube-controller-manager-master1   1/1     Running   1          22h
kube-flannel-ds-lcnbs             1/1     Running   0          10m
kube-proxy-lh4hj                  1/1     Running   1          22h
kube-scheduler-master1            1/1     Running   1          22h
问题及处理:
我遇见过coredns时pending的状态,而且一直没有变成running,导致flannel一直没有成功启动。猜测可能是下载flannel耗时太长,影响了coredns的运行
解决办法:删了flannel.yml, 然后重新apply
kubectl delete -f kube-flannel.yml

2.17.6.4 master2 节点加入集群
2.17.6.4.1 复制密钥及相关文件
从master1复制密钥及相关文件到master2
ssh root@192.168.226.156 mkdir -p /etc/kubernetes/pki/etcd

scp /etc/kubernetes/admin.conf root@192.168.226.156:/etc/kubernetes

scp /etc/kubernetes/pki/{ca.*,sa.*,front-proxy-ca.*} root@192.168.226.156:/etc/kubernetes/pki

scp /etc/kubernetes/pki/etcd/ca.* root@192.168.226.156:/etc/kubernetes/pki/etcd
2.17.6.4.2 master2加入集群
执行在master1上init后输出的join命令,需要带上参数--control-plane表示把master控制节点加入集群
# 在master2 中执行
# 该命令会pull相关的image(与master1中的一样)
  kubeadm join master.k8s.io:6443 --token kiieqa.w6rv3dh0p9hmfk32 \
    --discovery-token-ca-cert-hash sha256:9d550938ca4774c4b76bb05eccb1318a737b657837cd0d05f83d232a919f57fa \
    --control-plane

同样,按照上面图片要求执行三行命令
[root@master2 ~]# mkdir -p $HOME/.kube
[root@master2 ~]# sudo cp -i /etc/kubernetes/admin.conf $HOME/.kube/config
[root@master2 ~]# sudo chown $(id -u):$(id -g) $HOME/.kube/config
检查状态
kubectl get node

kubectl get pods --all-namespaces
[root@master2 ~]# kubectl get nodes
NAME      STATUS     ROLES    AGE     VERSION
master1   Ready      master   23h     v1.18.0
master2   NotReady   master   8m43s   v1.18.0

[root@master2 ~]# kubectl get pods --all-namespaces
NAMESPACE     NAME                              READY   STATUS    RESTARTS   AGE
kube-system   coredns-7ff77c879f-2g8dr          1/1     Running   0          23h
kube-system   coredns-7ff77c879f-bgnrg          1/1     Running   0          23h
kube-system   etcd-master1                      1/1     Running   1          23h
kube-system   etcd-master2                      1/1     Running   0          9m2s
kube-system   kube-apiserver-master1            1/1     Running   1          23h
kube-system   kube-apiserver-master2            1/1     Running   0          9m11s
kube-system   kube-controller-manager-master1   1/1     Running   2          23h
kube-system   kube-controller-manager-master2   1/1     Running   0          9m10s
kube-system   kube-flannel-ds-h8z2m             1/1     Running   0          9m12s
kube-system   kube-flannel-ds-lcnbs             1/1     Running   0          32m
kube-system   kube-proxy-2j8hz                  1/1     Running   0          9m12s
kube-system   kube-proxy-lh4hj                  1/1     Running   1          23h
kube-system   kube-scheduler-master1            1/1     Running   2          23h
kube-system   kube-scheduler-master2            1/1     Running   0          9m11s
2.17.6.5 加入Kubernetes Node
在node1上执行
向集群添加新节点,执行在kubeadm init输出的kubeadm join命令:
kubeadm join master.k8s.io:6443 --token kiieqa.w6rv3dh0p9hmfk32 \
    --discovery-token-ca-cert-hash sha256:9d550938ca4774c4b76bb05eccb1318a737b657837cd0d05f83d232a919f57fa
这里遇见一个问题:
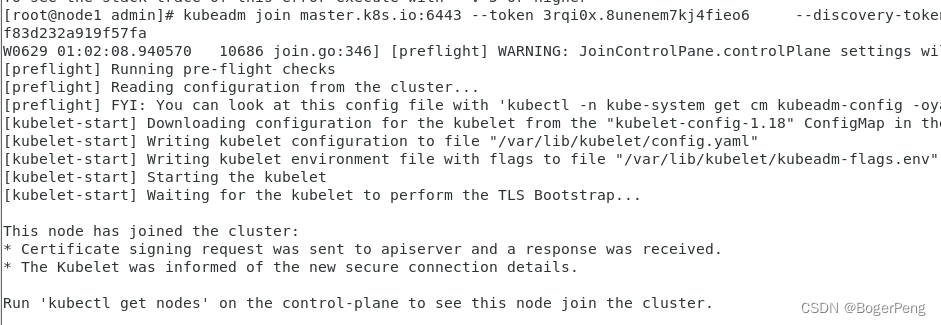
[root@node1 admin]# kubeadm join master.k8s.io:6443 --token kiieqa.w6rv3dh0p9hmfk32 \
>     --discovery-token-ca-cert-hash sha256:9d550938ca4774c4b76bb05eccb1318a737b657837cd0d05f83d232a919f57fa
W0629 00:53:04.150811   10097 join.go:346] [preflight] WARNING: JoinControlPane.controlPlane settings will be ignored when control-plane flag is not set.
[preflight] Running pre-flight checks
error execution phase preflight: couldn't validate the identity of the API Server: could not find a JWS signature in the cluster-info ConfigMap for token ID "kiieqa"
To see the stack trace of this error execute with --v=5 or higher
查资料得到是之前的token超过24小时过期了,需要重新生成
去到master1机器,执行下面命令:
## 生成token
[root@master1 flannel]# kubeadm token generate
3rqi0x.8unenem7kj4fieo6
## 生成join命令
[root@master1 flannel]# kubeadm token create 3rqi0x.8unenem7kj4fieo6 --print-join-command --ttl=0
W0629 01:01:37.531840   28266 configset.go:202] WARNING: kubeadm cannot validate component configs for API groups [kubelet.config.k8s.io kubeproxy.config.k8s.io]
kubeadm join master.k8s.io:6443 --token 3rqi0x.8unenem7kj4fieo6     --discovery-token-ca-cert-hash sha256:9d550938ca4774c4b76bb05eccb1318a737b657837cd0d05f83d232a919f57fa
因为该node节点以及加入过一次集群了,需要在node节点上重新清除配置,再加入
## workernode 节点执行
kubeadm reset
kubeadm join master.k8s.io:6443 --token 3rqi0x.8unenem7kj4fieo6     --discovery-token-ca-cert-hash sha256:9d550938ca4774c4b76bb05eccb1318a737b657837cd0d05f83d232a919f57fa
去到node1节点执行上面获得的命令行,即可成功加入:
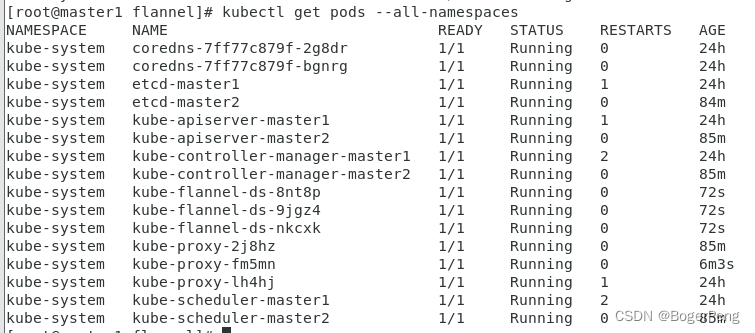
此时需要在master1机器重新apply flannel,否则node1会查询不到
## 先delete
[root@master1 flannel]# kubectl delete -f kube-flannel.yml
podsecuritypolicy.policy "psp.flannel.unprivileged" deleted
clusterrole.rbac.authorization.k8s.io "flannel" deleted
clusterrolebinding.rbac.authorization.k8s.io "flannel" deleted
serviceaccount "flannel" deleted
configmap "kube-flannel-cfg" deleted
daemonset.apps "kube-flannel-ds" deleted
## 再apply
[root@master1 flannel]# kubectl apply -f kube-flannel.yml
podsecuritypolicy.policy/psp.flannel.unprivileged created
clusterrole.rbac.authorization.k8s.io/flannel created
clusterrolebinding.rbac.authorization.k8s.io/flannel created
serviceaccount/flannel created
configmap/kube-flannel-cfg created
daemonset.apps/kube-flannel-ds created

[root@master1 flannel]# kubectl get nodes
NAME      STATUS   ROLES    AGE    VERSION
master1   Ready    master   24h    v1.18.0
master2   Ready    master   86m    v1.18.0
node1     Ready    <none>   7m1s   v1.18.0
2.17.6.6 测试kubernetes集群
在Kubernetes集群中创建一个pod,验证是否正常运行:
kubectl create deployment nginx --image=nginx
kubectl expose deployment nginx --port=80 --target-port=80 --type=NodePort
kubectl get pod,svc
2.18 HA集群中的容器交付流程
高可用集群中部署项目(Java项目)
2.18.1 容器交付流程
代码开发阶段:
	编码
	测试
	编写dockerfile

持续交付/集成阶段:
	代码编译打包
	制作镜像
	上传镜像仓库

应用部署阶段:
	环境准备:Pod、Service、Ingress等等

运维阶段:
	监控
	故障排查
	升级优化
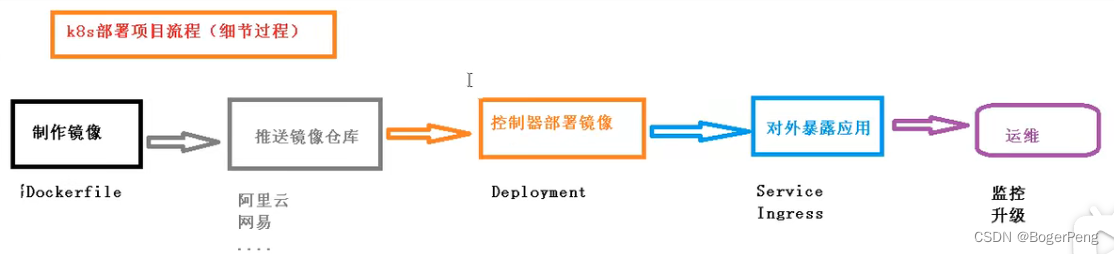
2.18.2 k8s 部署项目流程(细节过程)
制作镜像:
	Dockerfile
推送镜像到仓库:
	--这里以阿里云为例子
控制器部署镜像:
	Deployment
对外暴露应用:
	Service
	Ingress
运维:
	监控、升级等
2.18.3 案例,k8s集群部署java项目
2.18.3.1 java项目,自己新建一个maven项目
pom.xml文件:
<?xml version="1.0" encoding="UTF-8"?>
<project xmlns="http://maven.apache.org/POM/4.0.0" xmlns:xsi="http://www.w3.org/2001/XMLSchema-instance"
         xsi:schemaLocation="http://maven.apache.org/POM/4.0.0 https://maven.apache.org/xsd/maven-4.0.0.xsd">
    <modelVersion>4.0.0</modelVersion>
    <parent>
        <groupId>org.springframework.boot</groupId>
        <artifactId>spring-boot-starter-parent</artifactId>
        <version>2.2.1.RELEASE</version>
        <relativePath/> <!-- lookup parent from repository -->
    </parent>
    <groupId>com.atguigu</groupId>
    <artifactId>demojenkins</artifactId>
    <packaging>jar</packaging>
    <version>0.0.1-SNAPSHOT</version>
    <name>demojenkins</name>
    <description>Demo project for Spring Boot</description>

    <properties>
        <java.version>1.8</java.version>
    </properties>

    <dependencies>
        <dependency>
            <groupId>org.springframework.boot</groupId>
            <artifactId>spring-boot-starter-web</artifactId>
        </dependency>

        <dependency>
            <groupId>org.springframework.boot</groupId>
            <artifactId>spring-boot-starter-test</artifactId>
            <scope>test</scope>
        </dependency>
    </dependencies>

    <build>
        <finalName>demojenkins</finalName>
        <plugins>
            <plugin>
                <groupId>org.springframework.boot</groupId>
                <artifactId>spring-boot-maven-plugin</artifactId>
                <configuration>
                    <executable>true</executable>
                </configuration>
                <executions>
                    <execution>
                        <goals>
                            <!--可以把依赖的包都打包到生成的Jar包中-->
                            <goal>repackage</goal>
                        </goals>
                    </execution>
                </executions>
            </plugin>
            <plugin>
                <groupId>org.apache.maven.plugins</groupId>
                <artifactId>maven-resources-plugin</artifactId>
                <version>3.1.0</version>
            </plugin>
        </plugins>
    </build>

</project>
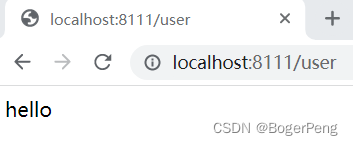
application.properties文件:
server.port=8111
主启动程序:DemojenkinsApplication.java
package com.atguigu.demojenkins;

import org.springframework.boot.SpringApplication;
import org.springframework.boot.autoconfigure.SpringBootApplication;

@SpringBootApplication
public class DemojenkinsApplication {

    public static void main(String[] args) {
        SpringApplication.run(DemojenkinsApplication.class, args);
    }

}
controller
package com.atguigu.demojenkins.controller;

import org.springframework.web.bind.annotation.GetMapping;
import org.springframework.web.bind.annotation.RequestBody;
import org.springframework.web.bind.annotation.RequestMapping;
import org.springframework.web.bind.annotation.RestController;

@RestController
@RequestMapping("/user")
public class UserController {

    @GetMapping
    public String findAll() {
        return "hello";
    }
}
在ideal上启动,并测试
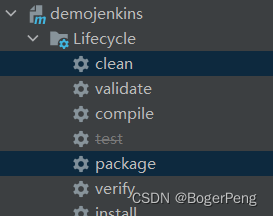
ideal中使用maven打包:
启动包:
java -jar demojenkins.jar
测试:跟上面一样的结果
2.18.3.2 Dockerfile文件
Dockerfile:
FROM openjdk:8-jdk-alpine
VOLUME /tmp
ADD demojenkins.jar demojenkins.jar
ENTRYPOINT ["java","-jar","/demojenkins.jar", "&"]
ADD demojenkins.jar demojenkins.jar
# 第一个demojenkins.jar 是指当前目录下的 demojenkins.jar
# 第二个demojenkins.jar 是指被打包成的包的名称
2.18.3.3 制作镜像
把Dockerfile和demojenkins.jar 复制到 /root/javaproject 目录下
[root@master1 javaproject]# pwd
/root/javaproject
[root@master1 javaproject]# ls
demojenkins.jar  Dockerfile
执行命令制作镜像:
命令格式:docker build -f 来源(默认读Dockerfile) -t 目标镜像名 .

docker build -t java-demo-01:v1 .
# 这个.表示在当前目录寻找Dockfile文件
[root@master1 javaproject]# docker build -t java-demo-01:v1 .
Sending build context to Docker daemon  17.58MB
Step 1/4 : FROM openjdk:8-jdk-alpine
 ---> a3562aa0b991
Step 2/4 : VOLUME /tmp
 ---> Using cache
 ---> e58dd7be714b
Step 3/4 : ADD demojenkins.jar demojenkins.jar
 ---> 4b25c05e0cdc
Step 4/4 : ENTRYPOINT ["java","-jar","/demojenkins.jar", "&"]
 ---> Running in 8cb1c15b7f45
Removing intermediate container 8cb1c15b7f45
 ---> b764f7456bf3
Successfully built b764f7456bf3
Successfully tagged java-demo-01:v1
检查镜像:
[root@master1 javaproject]# docker images
REPOSITORY                                                        TAG                 IMAGE ID            CREATED             SIZE
java-demo-01                                                      v1                  b764f7456bf3        2 minutes ago       122MB
启动镜像:
[root@master1 javaproject]# docker run -d -p 8111:8111 java-demo-01:v1 -t
33d007bc5336ad46d8e5df55a236006bf1f3f41853d1479accdced6366af3e35
检查运行结果:

2.18.3.4 推送镜像
可以自己在本地自建一个镜像服务器。
这里我用的阿里云的容器镜像服务
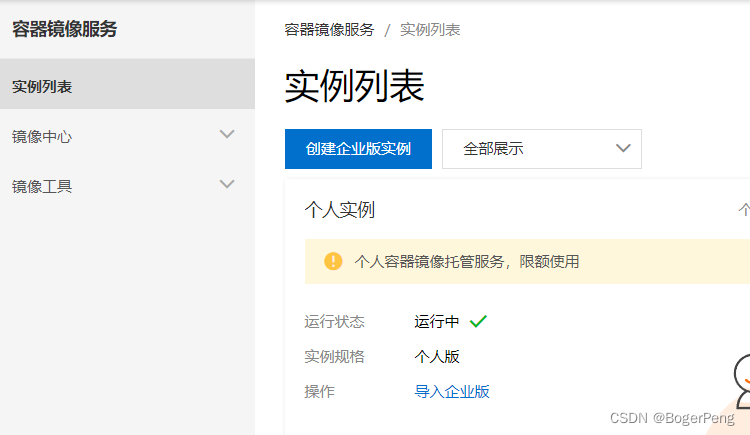
新建一个镜像仓库,然后根据页面提示把镜像推送到该镜像仓库
登录阿里云
对镜像打tag
把镜像推送到阿里云镜像仓库

镜像拉取
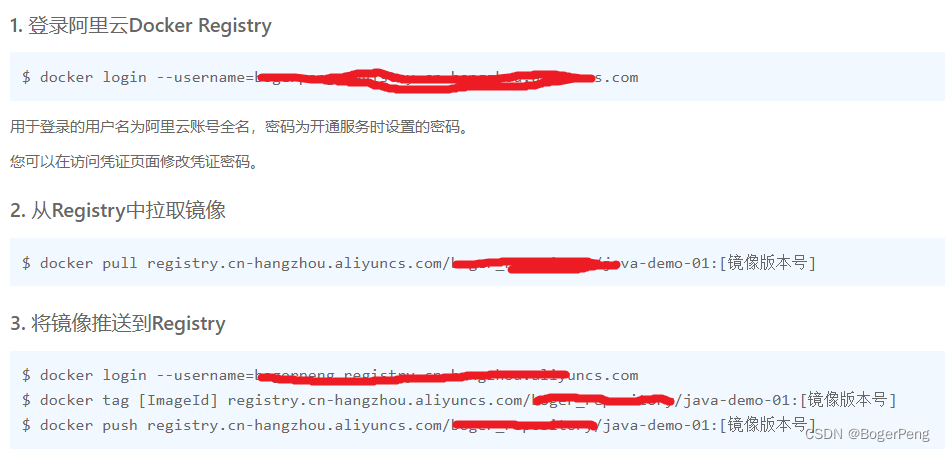
2.18.3.5 部署java镜像暴露应用
创建java镜像的deployment
[root@master1 ~]# kubectl create deployment javademo1 --image=registry.cn-hangzhou.aliyuncs.com/boger_repository/java-demo-01:v1 --dry-run -o yaml > javademo1.yaml
W0702 23:36:27.026813   59783 helpers.go:535] --dry-run is deprecated and can be replaced with --dry-run=client.
[root@master1 ~]# ls
anaconda-ks.cfg  flannel  initial-setup-ks.cfg  javademo1.yaml  javaproject
## javademo1.yaml
apiVersion: apps/v1
kind: Deployment
metadata:
  creationTimestamp: null
  labels:
    app: javademo1
  name: javademo1
spec:
  replicas: 1
  selector:
    matchLabels:
      app: javademo1
  strategy: {}
  template:
    metadata:
      creationTimestamp: null
      labels:
        app: javademo1
    spec:
      containers:
      - image: registry.cn-hangzhou.aliyuncs.com/boger_repository/java-demo-01:v1
        name: java-demo-01
        resources: {}
status: {}
## 查询
[root@master1 ~]# kubectl get pods -o wide
NAME                         READY   STATUS    RESTARTS   AGE   IP           NODE    NOMINATED NODE   READINESS GATES
javademo1-569b6c5994-jpnb7   1/1     Running   0          97s   10.244.1.2   node1   <none>           <none>
2.18.3.6 对外暴露端口
扩容:
[root@master1 ~]# kubectl scale deployment javademo1 --replicas=3
deployment.apps/javademo1 scaled
[root@master1 ~]# kubectl get pods -o wide
NAME                         READY   STATUS    RESTARTS   AGE     IP           NODE    NOMINATED NODE   READINESS GATES
javademo1-569b6c5994-jpnb7   1/1     Running   0          3m14s   10.244.1.2   node1   <none>           <none>
javademo1-569b6c5994-pfmhx   1/1     Running   0          5s      10.244.1.3   node1   <none>           <none>
javademo1-569b6c5994-xr9jn   1/1     Running   0          5s      10.244.1.4   node1   <none>           <none>
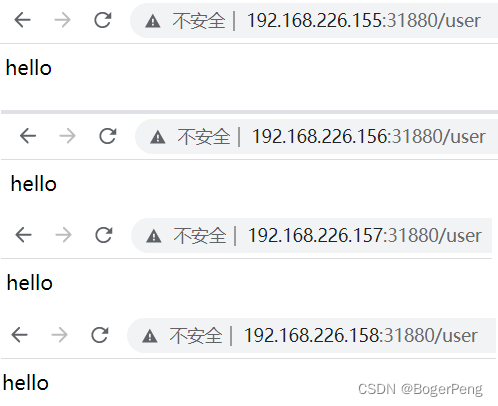
有两种暴露端口的方式:service或者ingress。这里为了方便使用service的方式
## 暴露端口
[root@master1 ~]# kubectl expose deployment javademo1 --port=8111 --target-port=8111 --type=NodePort
service/javademo1 exposed
## 查询svc
[root@master1 ~]# kubectl get svc
NAME         TYPE        CLUSTER-IP     EXTERNAL-IP   PORT(S)          AGE
javademo1    NodePort    10.1.230.223   <none>        8111:31880/TCP   33s
kubernetes   ClusterIP   10.1.0.1       <none>        443/TCP          33m
完结撒花。。。


 566
566


 被折叠的 条评论
为什么被折叠?
被折叠的 条评论
为什么被折叠?
 到【灌水乐园】发言


