


SpringBoot_4
一、@PropertySource
@PropertySource:加载指定的配置文件【properties】
先前我们通过@ConfifigurationProperties加载全局配置文件中的值到javabean中,但是我们在具体使用的时候不会把所用的配置都保存在全局配置文件中的,可能会将不同的配置保存在不同的配置文件中,那么这时我们就需要@PropertySource注解为指定的javabean类加载指定的配置文件
例如:
package com.wangxing.springboot.bean;
import org.springframework.boot.context.properties.ConfigurationProperties;
import org.springframework.context.annotation.PropertySource;
import org.springframework.stereotype.Component;
@Component
@ConfigurationProperties(prefix = "person")
@PropertySource(value = {"classpath:person.properties"})
public class PersonBean {
    private  int  perid;
    private  String pername;
    private  int perage;
    private  String  peraddress;

    public int getPerid() {
        return perid;
    }

    public void setPerid(int perid) {
        this.perid = perid;
    }

    public String getPername() {
        return pername;
    }

    public void setPername(String pername) {
        this.pername = pername;
    }

    public int getPerage() {
        return perage;
    }

    public void setPerage(int perage) {
        this.perage = perage;
    }

    public String getPeraddress() {
        return peraddress;
    }

    public void setPeraddress(String peraddress) {
        this.peraddress = peraddress;
    }
}
person.properties文件
person.perid=1002
person.pername=lisi
person.perage=24
person.peraddress=北京
控制器
package com.wangxing.springboot.controller;
import com.wangxing.springboot.bean.PersonBean;
import org.springframework.beans.factory.annotation.Autowired;
import org.springframework.stereotype.Controller;
import org.springframework.web.bind.annotation.RequestMapping;
import org.springframework.web.bind.annotation.ResponseBody;
@Controller
public class PersonController {
    @Autowired
    private PersonBean personBean;
    @RequestMapping(value = "/person")
    @ResponseBody
    public String testContorller(){
        System.out.println("perid=="+personBean.getPerid());
        System.out.println("pername=="+personBean.getPername());
        System.out.println("perage=="+personBean.getPerage());
        System.out.println("peraddress=="+personBean.getPeraddress());
        return "测试";
    }
}
运行结果:

二、@ImportResource
@ImportResource:导入基于XML的Spring的配置文件,让配置文件里面的内容生效。
Spring Boot里面没有Spring的配置文件,我们自己编写的配置文件,也不能自动识别;
想让Spring的配置文件生效,加载进来;@ImportResource标注在一个主类上。
例如:
package com.wangxing.springboot.bean;
public class UserBean {
    private  int  userid;
    private  String username;
    private  int userage;
    private  String  useraddress;
    public int getUserid() {
        return userid;
    }

    public void setUserid(int userid) {
        this.userid = userid;
    }

    public String getUsername() {
        return username;
    }

    public void setUsername(String username) {
        this.username = username;
    }

    public int getUserage() {
        return userage;
    }

    public void setUserage(int userage) {
        this.userage = userage;
    }

    public String getUseraddress() {
        return useraddress;
    }

    public void setUseraddress(String useraddress) {
        this.useraddress = useraddress;
    }
}
控制器
package com.wangxing.springboot.controller;
import com.wangxing.springboot.bean.UserBean;
import org.springframework.web.servlet.ModelAndView;
import org.springframework.web.servlet.mvc.Controller;
import javax.servlet.http.HttpServletRequest;
import javax.servlet.http.HttpServletResponse;
public class UserController implements Controller {
private UserBean userBean;
public void setUserBean(UserBean userBean) {
this.userBean = userBean;
}
@Override
public ModelAndView handleRequest(HttpServletRequest request, HttpServletResponse response) throws Exception {
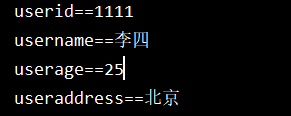
System.out.println("userid=="+userBean.getUserid());
System.out.println("username=="+userBean.getUsername());
System.out.println("userage=="+userBean.getUserage());
System.out.println("useraddress=="+userBean.getUseraddress());
return null;
}
}
user.xml
<?xml version="1.0" encoding="UTF-8"?>
<beans xmlns="http://www.springframework.org/schema/beans"
       xmlns:xsi="http://www.w3.org/2001/XMLSchema-instance"
       xsi:schemaLocation="http://www.springframework.org/schema/beans http://www.springframework.org/schema/beans/spring-beans.xsd">
      <bean id="userBean" class="com.wangxing.springboot.bean.UserBean">
          <property name="userid" value="1111"></property>
          <property name="username" value="李四"></property>
          <property name="userage" value="25"></property>
          <property name="useraddress" value="北京"></property>
      </bean>
    <bean name="/user" class="com.wangxing.springboot.controller.UserController">
        <property name="userBean" ref="userBean"></property>
    </bean>
</beans>
主类
package com.wangxing.springboot.springbootdemo4;

import org.springframework.boot.SpringApplication;
import org.springframework.boot.autoconfigure.SpringBootApplication;
import org.springframework.context.annotation.ImportResource;
@SpringBootApplication
@ImportResource(value ={"classpath:user.xml"})
public class Springbootdemo4Application {
    public static void main(String[] args) {
        SpringApplication.run(Springbootdemo4Application.class, args);
    }

}
运行结果
三、@Bean
@Bean添加在方法上,告诉springIOC容器创建javabean类对象
方法的返回值就是所要创建javabean类对象
法的名称就是javabean类对象的名称
< bean id=“对象的名称” class=“所要创建javabean类对象”>< /bean>
注意:@Bean必须出现在配置类中【@Configuration标注的java类】
例如:
package com.wangxing.springboot.bean
public class HelloService {
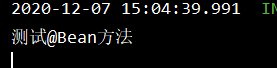
public void serviceInfo(){
System.out.println("测试@Bean方法");
}
}
package com.wangxing.springboot.bean;
import org.springframework.context.annotation.Bean;
import org.springframework.context.annotation.Configuration;
//@Configuration注解标注某一个类为配置类
//代替基于XML的Spring配置文件
@Configuration
public class MyAppConfig {
    //@Bean添加在方法上,告诉springIOC容器创建javabean类对象
    //方法的返回值就是所要创建javabean类对象
    //方法的名称就是javabean类对象的名称
    //<bean id="对象的名称"  class="所要创建javabean类对象"></bean>
    @Bean
    public HelloService getHelloService(){
        return new HelloService();
    }
}
package com.wangxing.springboot.Controller;
import com.wangxing.springboot.bean.HelloService;
import org.springframework.beans.factory.annotation.Autowired;
import org.springframework.stereotype.Controller;
import org.springframework.web.bind.annotation.RequestMapping;
import org.springframework.web.bind.annotation.ResponseBody;
@Controller
public class HelloController {
    @Autowired
    private HelloService helloService;
    @RequestMapping(value = "/hello")
    @ResponseBody
    public String testController(){
        helloService.serviceInfo();
        return "测试Bean";
    }
}
package com.wangxing.springboot.springbootdemo5;
import com.wangxing.springboot.bean.MyAppConfig;
import org.springframework.boot.SpringApplication;
import org.springframework.boot.autoconfigure.SpringBootApplication;
import org.springframework.context.annotation.ComponentScan;
import org.springframework.context.annotation.Import;
@SpringBootApplication
@ComponentScan(value = "com.wangxing.springboot")
@Import(MyAppConfig.class)
public class Springbootdemo5Application {
    public static void main(String[] args) {
       SpringApplication.run(Springbootdemo5Application.class, args);
    }

}
运行结果
四、配置文件【application.properties】中的占位符
1、随机数
$ {random.value}、$ {random.int}、${random.long}
$ {random.int(10)}、 $ {random.int[1024,65536]}
例如:
package com.wangxing.springboot.bean;
import org.springframework.boot.context.properties.ConfigurationProperties;
import org.springframework.context.annotation.PropertySource;
import org.springframework.stereotype.Component;
@Component
@ConfigurationProperties(prefix = "student")
public class StudentBean {
    private  int  stuid;
    private  String stuname;
    private  int stuage;
    private  String  stuaddress;
    public int getStuid() {
        return stuid;
    }
    public void setStuid(int stuid) {
        this.stuid = stuid;
    }
    public String getStuname() {
        return stuname;
    }
    public void setStuname(String stuname) {
        this.stuname = stuname;
    }
    public int getStuage() {
        return stuage;
    }
    public void setStuage(int stuage) {
        this.stuage = stuage;
    }
    public String getStuaddress() {
        return stuaddress;
    }
    public void setStuaddress(String stuaddress) {
        this.stuaddress = stuaddress;
    }
}
application.properties
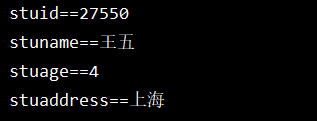
student.stuid=${random.int[1024,65536]}
student.stuname=王五
student.stuage=${random.int(10)}
student.stuaddress=上海
package com.wangxing.springboot.controller;

import com.wangxing.springboot.bean.StudentBean;
import org.springframework.beans.factory.annotation.Autowired;
import org.springframework.stereotype.Controller;
import org.springframework.web.bind.annotation.RequestMapping;
import org.springframework.web.bind.annotation.ResponseBody;

@Controller
public class StudentController {
    @Autowired
    private StudentBean studentBean;
    @RequestMapping(value = "/student")
    @ResponseBody
    public void testController(){
        System.out.println("stuid=="+studentBean.getStuid());
        System.out.println("stuname=="+studentBean.getStuname());
        System.out.println("stuage=="+studentBean.getStuage());
        System.out.println("stuaddress=="+studentBean.getStuaddress());
    }
}
运行结果
五、Profiles
1.Profifile文件就是用来配置在不同环境下的配置数据。
2.因为在不同的环境下配置文件中配置的运行环境的数据是不同的,所以我们就需要灵活的在不同的运行环境下切换成对应的运行环境的数据,此时我们将不同的运行环境数据,配置到不同的配置文件中,通过在主配置文件application.properties中的spring.profiles.active属性完成切换。
测试.properties配置
application-dev.properties【开发环境配置】
server.port=8585
application-prod.properties【生产环境配置】
server.port=9090
application.properties 【主配置】
spring.profiles.active=prod 【指定使用生产环境配置】
http://localhost:9090/

或者
spring.profiles.active=dev 【指定使用开发环境配置】
http://localhost:8080/

测试.yml配置
application-devyml.yml【开发环境配置】
server:
     port: 8585
application-prodyml.yml【生产环境配置】
server:
    port: 9090
application.yml 【主配置】
spring:
    profiles:
       active: prodyml 【指定使用生产环境配置】
http://localhost:9090/
或者
spring:
   profiles:
     active: devyml 【指定使用开发环境配置】
http://localhost:8080/
上面是通过在1.主配置文件中切换运行环境配置
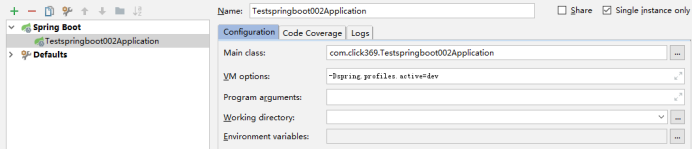
还可以通过配置2.运行环境参数配置视图窗口来指定具体使用哪一个运行环境
“–spring.profiles.active=dev“

还可以通过3.命令行运行jar的时候指定具体使用哪一个运行环境
java -jar testspringboot002-0.0.1-SNAPSHOT.jar --spring.profiles.active=dev;
还可以通过4.配置虚拟机参数指定具体使用哪一个运行环境;
“-Dspring.profiles.active=dev”
注意:运行环境配置文件的名称 application-{profiles}.properties/yml
主配置文件加载位置
spring boot 启动会扫描以下位置的application.properties或者 application.yml文件作为Spring boot的默认配置文件
– 项目根目录/config/
– 项目根目录/
– resource/config/
– resource:/
以上是按照优先级从高到低的顺序,所有位置的文件都会被加载,高优先级配置内容会覆盖低优先级配置内容。
SpringBoot会从这四个位置全部加载主配置文件;互补配置
我们也可以通过配置spring.config.location来改变默认配置
项目打包好以后,我们可以使用命令行参数的形式,启动项目的时候来指定配置文件的新位置;指定配置文件和默认加载的这些配置文件共同起作用形成互补配置;
java -jar testspringboot02-0.0.1-SNAPSHOT.jar --spring.confifig.location=F:/application.properties
六、Spring Boot 支持多种外部配置方式
1.命令行参数
2. 来自java:comp/env的JNDI属性
3. Java系统属性(System.getProperties())
4. 操作系统环境变量
5. RandomValuePropertySource配置的random.*属性值
6. jar包外部的application-{profile}.properties或application.yml(带spring.profile)配置文件
7. jar包内部的application-{profile}.properties或application.yml(带spring.profile)配置文件
8. jar包外部的application.properties或application.yml(不带spring.profile)配置文件
9. jar包内部的application.properties或application.yml(不带spring.profile)配置文件
优先加载带profifile,再来加载不带profifile,由jar包外向jar包内进行寻找
10. @Configuration注解类上的@PropertySource
11. 通过SpringApplication.setDefaultProperties指定的默认属性


 1万+
1万+


 被折叠的 条评论
为什么被折叠?
被折叠的 条评论
为什么被折叠?
 到【灌水乐园】发言


