


GoogleMaps踏坑之旅(一)
GoogleMaps踏坑之旅(二)
GoogleMaps踏坑之旅(三)
第一步:AppDelegate
上回说到,我们终于配置完所有的东西了,然后现在就要开始真刀真枪的gan了,首先,打开万年不变的AppDelegate,
导入头文件:#import <GoogleMaps/GoogleMaps.h>
在 - (BOOL)application:(UIApplication )application didFinishLaunchingWithOptions:(NSDictionary ) 方法里面添加上上一步注册好的 API 密钥
- (BOOL)application:(UIApplication *)application didFinishLaunchingWithOptions:(NSDictionary *)launchOptions {
    // Override point for customization after application launch.

    [GMSServices provideAPIKey:@"你申请的 API 密钥"];

    return YES;
}
第二步,在需要地图的页面添加地图
导入头文件:#import <GoogleMaps/GoogleMaps.h>
#import "MapSelfView.h"
#import <GoogleMaps/GoogleMaps.h>
@interface MapSelfView ()<GMSMapViewDelegate>
{
GMSMapView *_mapView;
GMSMarker *_marker;
}
@end
@implementation MapSelfView
- (void)viewDidLoad {
[super viewDidLoad];
// Do any additional setup after loading the view.
//这是镜头
GMSCameraPosition *camera = [GMSCameraPosition cameraWithLatitude:23.11897 longitude:113.3546 zoom:12];
//这是地图
_mapView = [GMSMapView mapWithFrame:CGRectMake(0, 0, [UIScreen mainScreen].bounds.size.width, [UIScreen mainScreen].bounds.size.height) camera:camera];
//myLocationEnabled 该属性为显示我的位置(蓝色的小圆圈)
_mapView.myLocationEnabled = YES;
//myLocationButton 该属性为显示定位按钮,就是左下角的小圆圈
_mapView.settings.myLocationButton = YES;
[self.view addSubview:_mapView];
//大头针
GMSMarker *marker = [[GMSMarker alloc] init];
marker.position = CLLocationCoordinate2DMake(23.111503, 113.324417);
marker.title = @"海心沙";
marker.snippet = @"Guangzhou";
marker.map = _mapView;
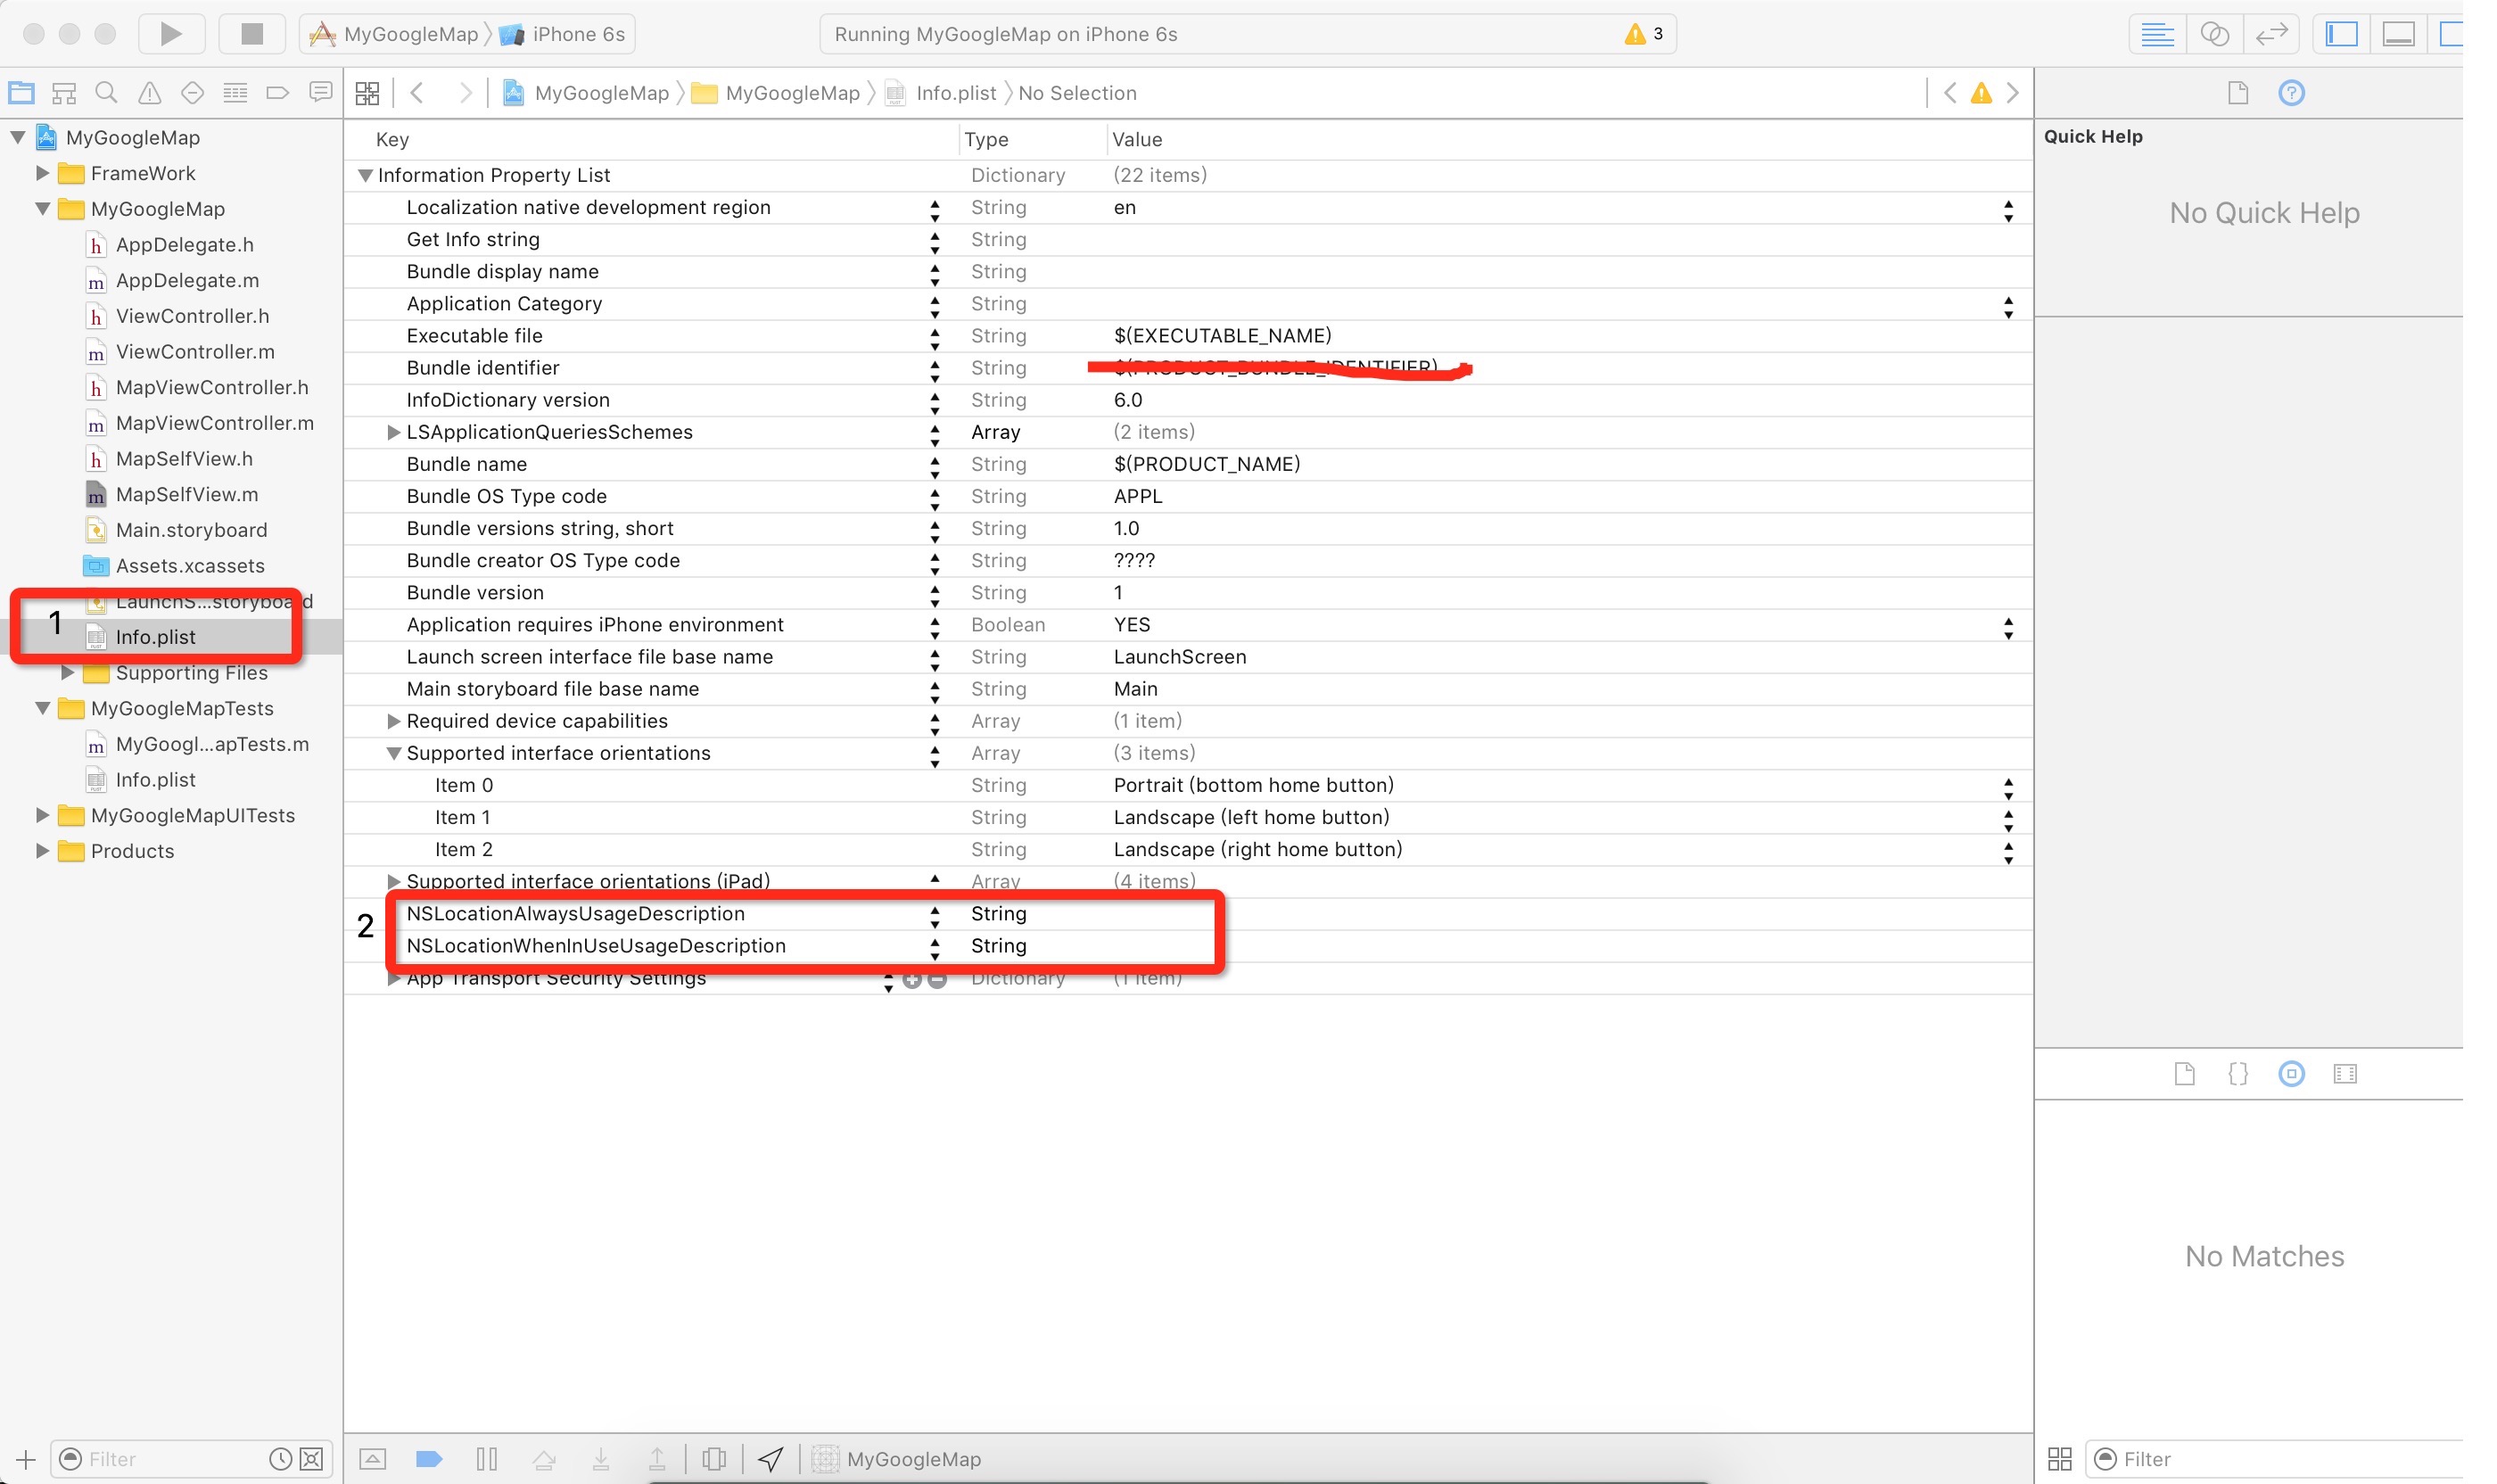
}这个时候,得说一句,由于升级了iOS9了,所以定位什么的,我们都得经过用户的允许了,当然了,定位也不例外了,可以选择在plist文件中,增加两个变量
当然,这个时候呢,我们也可以将网络请求的那部分也给加入到plist文件中

将该段代码加入其中
<key>NSAppTransportSecurity</key>
<dict>
    <!--彻底倒退回不安全的HTTP网络请求,能任意进行HTTP请求-->
    <key>NSAllowsArbitraryLoads</key>
    <true/>
</dict>
这个时候呢,我们就可以开始运行demo,看看效果吧。
三、深入一点
//获取当前位置
GMSPlacesClient *placesClient = [[GMSPlacesClient alloc] init];
[placesClient currentPlaceWithCallback:^(GMSPlaceLikelihoodList *placeLikelihoodList, NSError *error){

    if (error != nil) {
        NSLog(@"Pick Place error %@", [error localizedDescription]);
        return;
    }

    if (placeLikelihoodList != nil) {

        GMSPlace *place = [[[placeLikelihoodList likelihoods] lastObject] place];

        if (place != nil) {

            NSLog(@"place === %@",place);

            NSLog(@"坐标:经度:%f,纬度:%f",place.coordinate.latitude,place.coordinate.longitude);
        }
    }
}];
这里还要注意的就是,由于是在国内,所以我们的定位会有些个偏差,这个时候呢,我们就需要纠偏了。纠偏之后,我们的定位还是会偏差一点的。
//纠偏
-(void)transform:(CGFloat)wgLat wgLon:(CGFloat)wgLon latlng:(NSMutableArray *)latlng{
    if ([self outOfChina:wgLat lon:wgLon]) {
        latlng[0] = @(wgLat);
        latlng[1] = @(wgLon);
        return;
    }

    CGFloat dLat = [self transformLat:(wgLon - 105.0) y:(wgLat - 35.0)];
    CGFloat dLon = [self transformLon:(wgLon - 105.0) y:(wgLat - 35.0)];
    CGFloat radLat = wgLat / 180.0 * pi;
    CGFloat magic = sin(radLat);
    magic = 1 - ee * magic * magic;
    CGFloat sqrtMagic = sqrt(magic);
    dLat = (dLat * 180.0) / ((a * (1 - ee)) / (magic * sqrtMagic) * pi);
    dLon = (dLon * 180.0) / (a / sqrtMagic * cos(radLat) * pi);
    latlng[0] = @(wgLat + dLat);
    latlng[1] = @(wgLon + dLon);
}

- (BOOL)outOfChina:(CGFloat)lat lon:(CGFloat)lon{
    if (lon < 72.004 || lon > 137.8347)
        return true;
    if (lat < 0.8293 || lat > 55.8271)
        return true;
    return false;
}

- (CGFloat)transformLat:(CGFloat)x y:(CGFloat)y{
    //    CGFloat ret = -100.0 + 2.0 * x + 3.0 * y + 0.2 * y * y + 0.1 * x * y + 0.2 * Math.sqrt(Math.abs(x));
    CGFloat ret = -100.0 + 2.0 * x + 3.0 * y + 0.2 * y * y + 0.1 * x * y + 0.2 * sqrt(fabs(x));
    ret += (20.0 * sin(6.0 * x * pi) + 20.0 * sin(2.0 * x * pi)) * 2.0 / 3.0;
    ret += (20.0 * sin(y * pi) + 40.0 * sin(y / 3.0 * pi)) * 2.0 / 3.0;
    ret += (160.0 * sin(y / 12.0 * pi) + 320 * sin(y * pi / 30.0)) * 2.0 / 3.0;
    return ret;
}

- (CGFloat)transformLon:(CGFloat)x y:(CGFloat)y{
    CGFloat ret = 300.0 + x + 2.0 * y + 0.1 * x * x + 0.1 * x * y + 0.1 * sqrt(fabs(x));
    ret += (20.0 * sin(6.0 * x * pi) + 20.0 * sin(2.0 * x * pi)) * 2.0 / 3.0;
    ret += (20.0 * sin(x * pi) + 40.0 * sin(x / 3.0 * pi)) * 2.0 / 3.0;
    ret += (150.0 * sin(x / 12.0 * pi) + 300.0 * sin(x / 30.0 * pi)) * 2.0 / 3.0;
    return ret;
}
这个时候,我们的定位代码就可以改成:
- (void)viewDidLoad {
    [super viewDidLoad];
    // Do any additional setup after loading the view.


    //获取当前位置
GMSPlacesClient *placesClient = [[GMSPlacesClient alloc] init];
[placesClient currentPlaceWithCallback:^(GMSPlaceLikelihoodList *placeLikelihoodList, NSError *error){

    if (error != nil) {
        NSLog(@"Pick Place error %@", [error localizedDescription]);
        return;
    }

    if (placeLikelihoodList != nil) {

        GMSPlace *place = [[[placeLikelihoodList likelihoods] lastObject] place];

        if (place != nil) {

            NSLog(@"place === %@",place);

            NSLog(@"坐标:经度:%f,纬度:%f",place.coordinate.latitude,place.coordinate.longitude);

            //这是镜头
            GMSCameraPosition *camera = [GMSCameraPosition cameraWithLatitude:place.coordinate.latitude longitude:place.coordinate.longitude zoom:12];

            //这是地图
            _mapView = [GMSMapView mapWithFrame:CGRectMake(0, 0, [UIScreen mainScreen].bounds.size.width, [UIScreen mainScreen].bounds.size.height) camera:camera];
            //myLocationEnabled 该属性为显示我的位置(蓝色的小圆圈)
            _mapView.myLocationEnabled = YES;
            //myLocationButton 该属性为显示定位按钮,就是左下角的小圆圈
            _mapView.settings.myLocationButton = YES;
            [self.view addSubview:_mapView];
        }
    }
}];
}
到了这里,基本上我们的demo就可以满足我们展示以及定位等的简单需求了。坑,我还在继续的踏,第三版将在不久之后踏出来,尽请期待。


 1299
1299

 被折叠的 条评论
为什么被折叠?
被折叠的 条评论
为什么被折叠?
 到【灌水乐园】发言


