


往期知识点整理
- 【鸿蒙实战开发】基于自定义注解和代码生成实现路由框架
- 【鸿蒙实战开发】基于ohpm的.ohpmrc仓库访问配制
- 【鸿蒙实战开发】基于C++能力的资源访问
- 【鸿蒙实战开发】基于Drawing的图形/文字绘制及双缓冲模拟实现刷新
- 【鸿蒙实战开发】基于napi_load_module_with_info实现的napi调用arkts的接口
- 【鸿蒙实战开发】基于AudioRenderer音频播放
- 【鸿蒙实战开发】基于AVCodecKit的音视频解码及二次处理播放
- 持续更新中……
1:场景描述
场景:基于VideoCoder的音视频解码及二次处理播放。
首先导入选择器picker模块,使用PhotoViewPicker方法拉起图库选择视频文件,将视频文件传递到native侧使用Demuxer解封装器进行解封装,再使用OH_VideoDecoder进行解码(surface模式)送显播放
使用的核心API:
- picker :提供拉起图库选择视频的功能接口。
- AVDemuxer :音视频解封装,用于获取视频等媒体帧数据。
- VideoDecoder:视频解码,将视频数据解码后送显播放。
2:方案描述
Step1:导入picker模块(仅代表选择一个视频路径,还有其它获取媒体文件的方式), 拉起图库选择视频文件保存到自定义路径。
Step2:将文件传递到native侧进行交互。
Step3:使用AVDemuxer接口对文件进行解封装获取视频流数据。
Step4:使用VideoDecoder接口将视频数据解码,结合Xcomponent送显播放。
效果图如下:

具体步骤如下:
步骤一:导入picker模块, 拉起图库选择视频文件自定义保存。
import { picker } from '@kit.CoreFileKit';
let photoSelectOptions = new picker.PhotoSelectOptions();
photoSelectOptions.MIMEType = picker.PhotoViewMIMETypes.VIDEO_TYPE;
photoSelectOptions.maxSelectNumber = 1;
let photoPicker = new picker.PhotoViewPicker();
photoPicker.select(photoSelectOptions).then((PhotoSelectResult: picker.PhotoSelectResult) => {
  hilog.info(0x0000, TAG, 'PhotoViewPicker.select successfully, PhotoSelectResult uri: ' + JSON.stringify(PhotoSelectResult));
  this.selectFilePath = PhotoSelectResult.photoUris[0];
  hilog.info(0x0000, TAG, 'Get selectFilePath successfully: ' + JSON.stringify(this.selectFilePath));
}).catch((err: BusinessError) => {
  hilog.error(0x0000, TAG, 'PhotoViewPicker.select failed with err: ' + JSON.stringify(err));
})
}
步骤二:将文件传递到native侧进行交互。
import player from 'libplayer.so';
export const playNative: (
  inputFileFd: number,
  inputFileOffset: number,
  inputFileSize: number,
  cbFn: () => void
) => void;
static napi_value Init(napi_env env, napi_value exports) {
  napi_property_descriptor classProp[] = {
    {"playNative", nullptr, Play, nullptr, nullptr, nullptr, napi_default, nullptr},
};
napi_value PlayerNative = nullptr;
const char *classBindName = "playerNative";
napi_define_class(env, classBindName, strlen(classBindName), nullptr, nullptr, 1, classProp, &PlayerNative);
PluginManager::GetInstance()->Export(env, exports);
napi_define_properties(env, exports, sizeof(classProp) / sizeof(classProp[0]), classProp);
return exports;
}
步骤三:使用Demuxer接口对文件进行解封装获取视频流数据。
Step1:创建解封装器,传入媒体文件格式信息。
int32_t Demuxer::CreateDemuxer(SampleInfo &info) {
  source = OH_AVSource_CreateWithFD(info.inputFd, info.inputFileOffset, info.inputFileSize);
  demuxer = OH_AVDemuxer_CreateWithSource(source);
  auto sourceFormat = std::shared_ptr<OH_AVFormat>(OH_AVSource_GetSourceFormat(source), OH_AVFormat_Destroy);
  int32_t ret = GetTrackInfo(sourceFormat, info);
  return AV_ERR_OK;
}
Step2:添加解封装轨道,获取文件轨道信息。
int32_t Demuxer::GetTrackInfo(std::shared_ptr<OH_AVFormat> sourceFormat, SampleInfo &info) {
  int32_t trackCount = 0;
  OH_AVFormat_GetIntValue(sourceFormat.get(), OH_MD_KEY_TRACK_COUNT, &trackCount);
  for (int32_t index = 0; index < trackCount; index++) {
    int trackType = -1;
    auto trackFormat = std::shared_ptr<OH_AVFormat>(OH_AVSource_GetTrackFormat(source, index), OH_AVFormat_Destroy);
    OH_AVFormat_GetIntValue(trackFormat.get(), OH_MD_KEY_TRACK_TYPE, &trackType);
    if (trackType == MEDIA_TYPE_VID) {
      OH_AVDemuxer_SelectTrackByID(demuxer, index);
      OH_AVFormat_GetIntValue(trackFormat.get(), OH_MD_KEY_WIDTH, &info.videoWidth);
      OH_AVFormat_GetIntValue(trackFormat.get(), OH_MD_KEY_HEIGHT, &info.videoHeight);
      OH_AVFormat_GetDoubleValue(trackFormat.get(), OH_MD_KEY_FRAME_RATE, &info.frameRate);
      OH_AVFormat_GetLongValue(trackFormat.get(), OH_MD_KEY_BITRATE, &info.bitrate);
      OH_AVFormat_GetIntValue(trackFormat.get(), "video_is_hdr_vivid", &info.isHDRVivid);
      OH_AVFormat_GetIntValue(trackFormat.get(), OH_MD_KEY_ROTATION, &info.rotation);
      char *codecMime;
      OH_AVFormat_GetStringValue(trackFormat.get(), OH_MD_KEY_CODEC_MIME, const_cast<char const **>(&codecMime));
      info.codecMime = codecMime;
      OH_AVFormat_GetIntValue(trackFormat.get(), OH_MD_KEY_PROFILE, &info.hevcProfile);
      videoTrackId_ = index;
      OH_LOG_ERROR(LOG_APP, "Demuxer config: %{public}d*%{public}d, %{public}.1ffps, %{public}ld" "kbps",
      info.videoWidth, info.videoHeight, info.frameRate, info.bitrate / 1024);
    }
  }
  return AV_ERR_OK;
}
Step3:开始解封装,循环获取视频帧数据。
int32_t Demuxer::ReadSample(OH_AVBuffer *buffer, OH_AVCodecBufferAttr &attr) {
  int32_t ret = OH_AVDemuxer_ReadSampleBuffer(demuxer, videoTrackId_, buffer);
  ret = OH_AVBuffer_GetBufferAttr(buffer, &attr);
  return AV_ERR_OK;
}
解封装支持的文件格式:

步骤四:使用VideoDecoder接口将视频数据解码,结合Xcomponent送显播放。
Step1:将解封装后的数据送去解码器进行解码
void Player::DecInputThread() {
  while (true) {
        std::unique_lock<std::mutex> lock(signal->inputMutex_);
        bool condRet = signal->inputCond_.wait_for(
            lock, 5s, [this]() { return !isStarted_ || !signal->inputBufferInfoQueue_.empty(); });
  if (!isStarted_) {
    OH_LOG_ERROR(LOG_APP, "Work done, thread out");
    break;
  }
  if (signal->inputBufferInfoQueue_.empty()) {
    OH_LOG_ERROR(LOG_APP, "Buffer queue is empty, continue, cond ret: %{public}d", condRet);
  }
  CodecBufferInfo bufferInfo = signal->inputBufferInfoQueue_.front();
  signal->inputBufferInfoQueue_.pop();
  signal->inputFrameCount_++;
  lock.unlock();
  demuxer_->ReadSample(reinterpret_cast<OH_AVBuffer *>(bufferInfo.buffer), bufferInfo.attr);
  int32_t ret = videoDecoder_->PushInputData(bufferInfo);
}
StartRelease();
}
Step2:获取解码后的数据
void Player::DecOutputThread() {
  sampleInfo_.frameInterval = MICROSECOND / sampleInfo_.frameRate;
  while (true) {
        thread_local auto lastPushTime = std::chrono::system_clock::now();
        if (!isStarted_) {
            OH_LOG_ERROR(LOG_APP, "Decoder output thread out");
            break;
        }
        std::unique_lock<std::mutex> lock(signal->outputMutex_);
        bool condRet = signal->outputCond_.wait_for(
            lock, 5s, [this]() { return !isStarted_ || !signal->outputBufferInfoQueue_.empty(); });
  if (!isStarted_) {
    OH_LOG_ERROR(LOG_APP, "Decoder output thread out");
    break;
  }
  if (signal->outputBufferInfoQueue_.empty()) {
    OH_LOG_ERROR(LOG_APP, "Buffer queue is empty, continue, cond ret: %{public}d", condRet);
  }
  CodecBufferInfo bufferInfo = signal->outputBufferInfoQueue_.front();
  signal->outputBufferInfoQueue_.pop();
  if (bufferInfo.attr.flags & AVCODEC_BUFFER_FLAGS_EOS) {
    OH_LOG_ERROR(LOG_APP, "Catch EOS, thread out");
    break;
  }
  signal->outputFrameCount_++;
  OH_LOG_ERROR(LOG_APP, "Out buffer count: %{public}u, size: %{public}d, flag: %{public}u, pts: %{public}ld",
    signal->outputFrameCount_, bufferInfo.attr.size, bufferInfo.attr.flags, bufferInfo.attr.pts);
  lock.unlock();
  int32_t ret = videoDecoder_->FreeOutputData(bufferInfo.bufferIndex, true);
  if (ret != AV_ERR_OK) {
    OH_LOG_ERROR(LOG_APP, "Decoder output thread out");
    break;
  }
  std::this_thread::sleep_until(lastPushTime + std::chrono::microseconds(sampleInfo_.frameInterval));
  lastPushTime = std::chrono::system_clock::now();
}
OH_LOG_ERROR(LOG_APP, "Exit, frame count: %{public}u", signal->outputFrameCount_);
StartRelease();
}
Step3:使用OH_VideoDecoder_SetSurface设置surface数据和window绑定
int32_t VideoDecoder::Config(const SampleInfo &sampleInfo, VDecSignal *signal) {
  // Configure video decoder
  int32_t ret = ConfigureVideoDecoder(sampleInfo);
  // SetSurface from video decoder
  if (sampleInfo.window != nullptr) {
    int ret = OH_VideoDecoder_SetSurface(decoder, sampleInfo.window);
    if (ret != AV_ERR_OK || sampleInfo.window == nullptr) {
      OH_LOG_ERROR(LOG_APP, "Set surface failed, ret: %{public}d", ret);
      return AV_ERR_UNKNOWN;
    }
  }
  // SetCallback for video decoder
  ret = SetCallback(signal);
  if (ret != AV_ERR_OK) {
    OH_LOG_ERROR(LOG_APP, "Set callback failed, ret: %{public}d", ret);
    return AV_ERR_UNKNOWN;
  }
  // Prepare video decoder
  {
    int ret = OH_VideoDecoder_Prepare(decoder);
    if (ret != AV_ERR_OK) {
      OH_LOG_ERROR(LOG_APP, "Prepare failed, ret: %{public}d", ret);
      return AV_ERR_UNKNOWN;
    }
  }
  return AV_ERR_OK;
}
Step4: native层获取 NativeXComponent
void PluginManager::Export(napi_env env, napi_value exports) {
  napi_value exportInstance = nullptr;
  if (napi_get_named_property(env, exports, OH_NATIVE_XCOMPONENT_OBJ, &exportInstance) != napi_ok) {
    OH_LOG_Print(LOG_APP, LOG_ERROR, LOG_DOMAIN, "PluginManager", "Export: napi_get_named_property fail");
    return;
  }
  OH_NativeXComponent *nativeXComponent = nullptr;
  if (napi_unwrap(env, exportInstance, reinterpret_cast<void **>(&nativeXComponent)) != napi_ok) {
    OH_LOG_Print(LOG_APP, LOG_ERROR, LOG_DOMAIN, "PluginManager", "Export: napi_unwrap fail");
    return;
  }
  char idStr[OH_XCOMPONENT_ID_LEN_MAX + 1] = {'\0'};
  uint64_t idSize = OH_XCOMPONENT_ID_LEN_MAX + 1;
  if (OH_NativeXComponent_GetXComponentId(nativeXComponent, idStr, &idSize) != OH_NATIVEXCOMPONENT_RESULT_SUCCESS) {
    OH_LOG_Print(LOG_APP, LOG_ERROR, LOG_DOMAIN, "PluginManager", "Export: OH_NativeXComponent_GetXComponentId fail");
    return;
  }
  std::string id(idStr);
  auto context = PluginManager::GetInstance();
  if ((context != nullptr) && (nativeXComponent != nullptr)) {
    context->SetNativeXComponent(id, nativeXComponent);
    auto render = context->GetRender(id);
    OH_NativeXComponent_RegisterCallback(nativeXComponent, &PluginRender::m_callback);
  }
}
step5:通过回调将window渲染播放
void OnSurfaceCreatedCB(OH_NativeXComponent *component, void *window) {
  OH_LOG_Print(LOG_APP, LOG_INFO, LOG_DOMAIN, "Callback", "OnSurfaceCreatedCB");
  auto context = PluginManager::GetInstance();
  context->m_window = (OHNativeWindow *)window;
}
总是有很多小伙伴反馈说:鸿蒙开发不知道学习哪些技术?不知道需要重点掌握哪些鸿蒙开发知识点? 为了解决大家这些学习烦恼。在这准备了一份很实用的鸿蒙全栈开发学习路线与学习文档给大家用来跟着学习。
针对一些列因素,整理了一套纯血版鸿蒙(HarmonyOS Next)全栈开发技术的学习路线,包含了鸿蒙开发必掌握的核心知识要点,内容有(OpenHarmony多媒体技术、Napi组件、OpenHarmony内核、OpenHarmony驱动开发、系统定制移植……等)技术知识点。

《鸿蒙 (Harmony OS)开发学习手册》(共计892页):https://gitcode.com/HarmonyOS_MN/733GH/overview
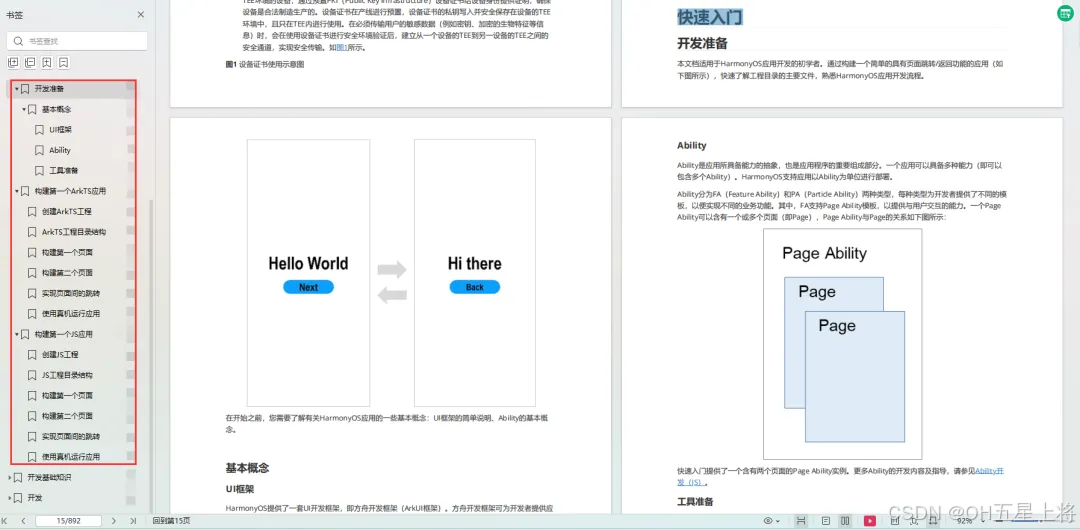
如何快速入门?
1.基本概念
2.构建第一个ArkTS应用
3.……
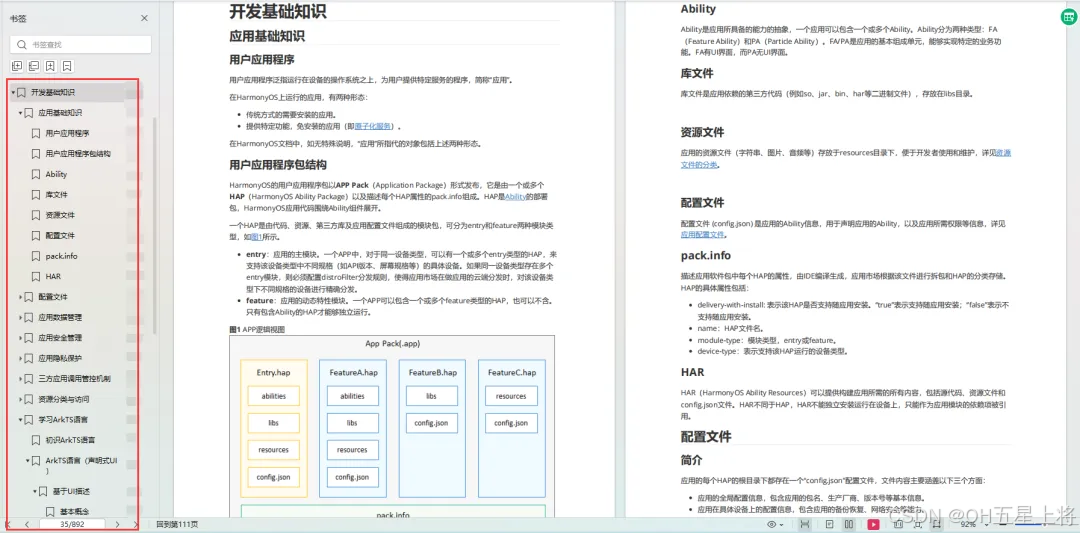
开发基础知识:
1.应用基础知识
2.配置文件
3.应用数据管理
4.应用安全管理
5.应用隐私保护
6.三方应用调用管控机制
7.资源分类与访问
8.学习ArkTS语言
9.……
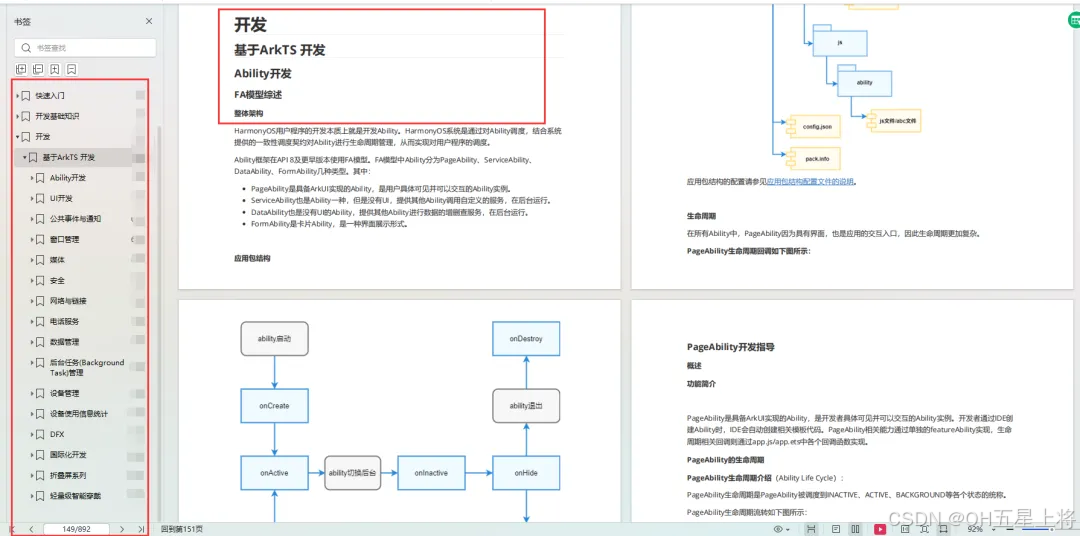
基于ArkTS 开发
1.Ability开发
2.UI开发
3.公共事件与通知
4.窗口管理
5.媒体
6.安全
7.网络与链接
8.电话服务
9.数据管理
10.后台任务(Background Task)管理
11.设备管理
12.设备使用信息统计
13.DFX
14.国际化开发
15.折叠屏系列
16.……
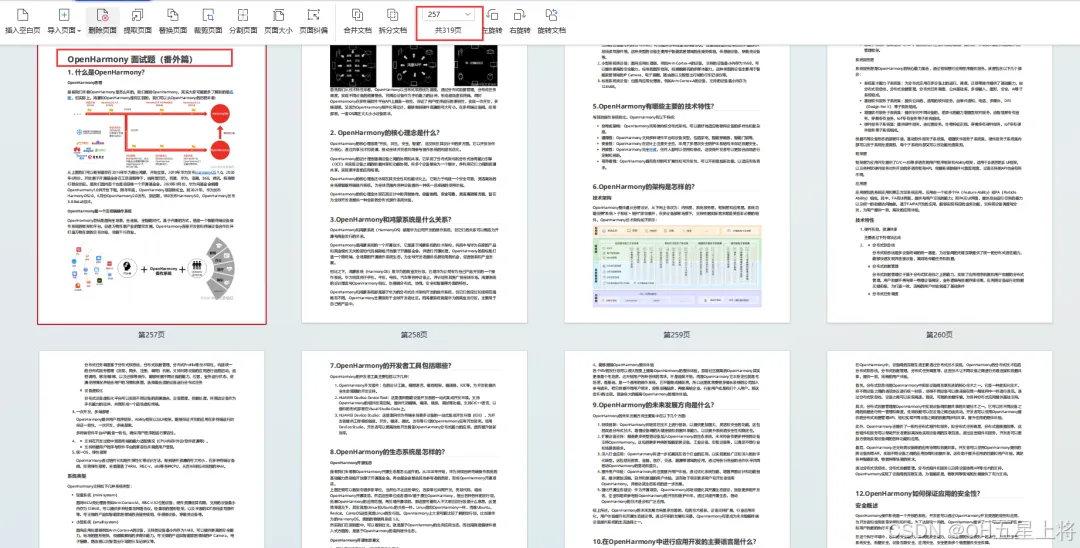
鸿蒙开发面试真题(含参考答案):https://gitcode.com/HarmonyOS_MN/733GH/overview
OpenHarmony 开发环境搭建
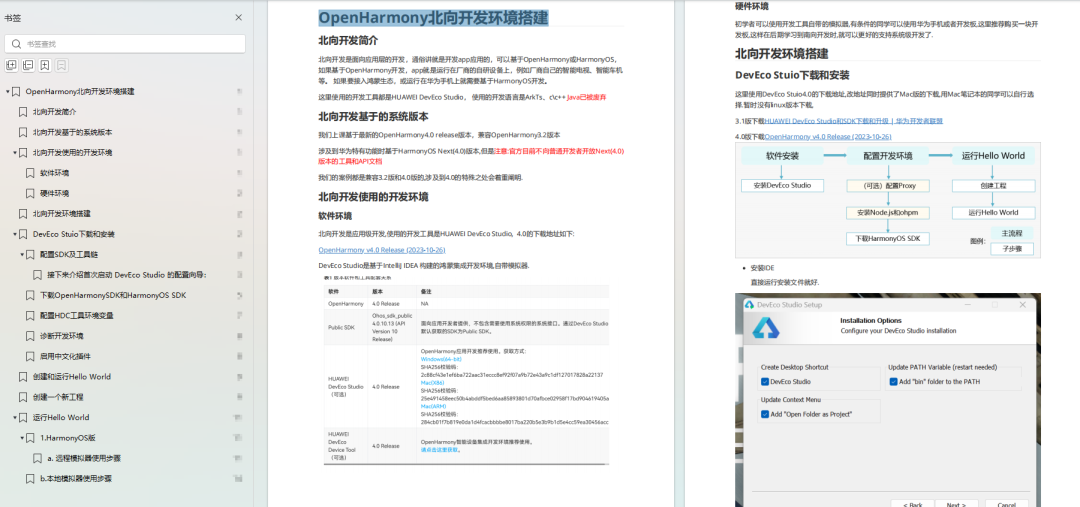
《OpenHarmony源码解析》:https://gitcode.com/HarmonyOS_MN/733GH/overview
- 搭建开发环境
- Windows 开发环境的搭建
- Ubuntu 开发环境搭建
- Linux 与 Windows 之间的文件共享
- ……
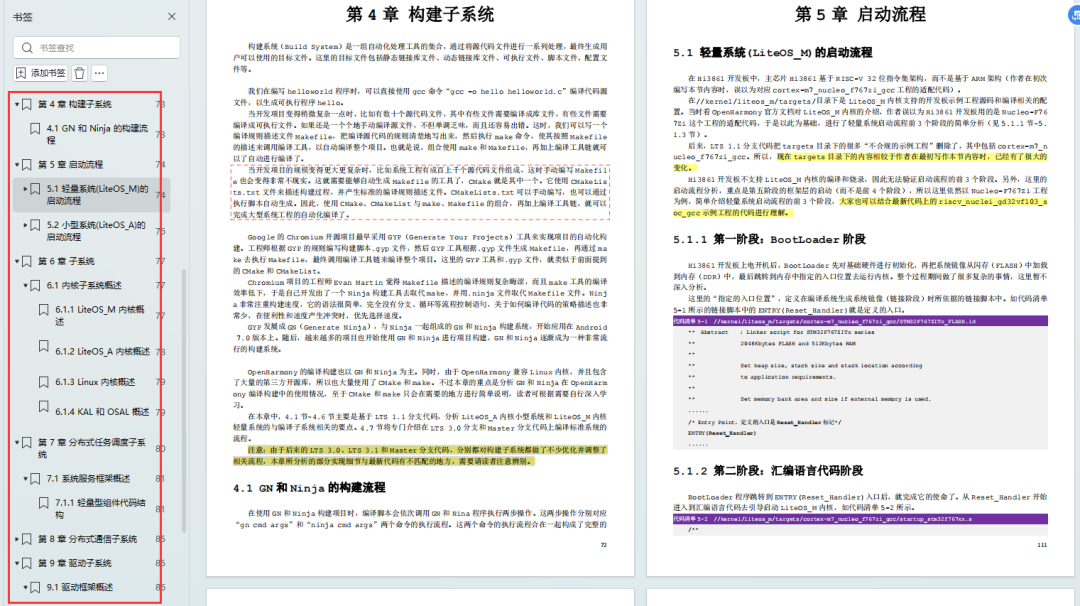
- 系统架构分析
- 构建子系统
- 启动流程
- 子系统
- 分布式任务调度子系统
- 分布式通信子系统
- 驱动子系统
- ……
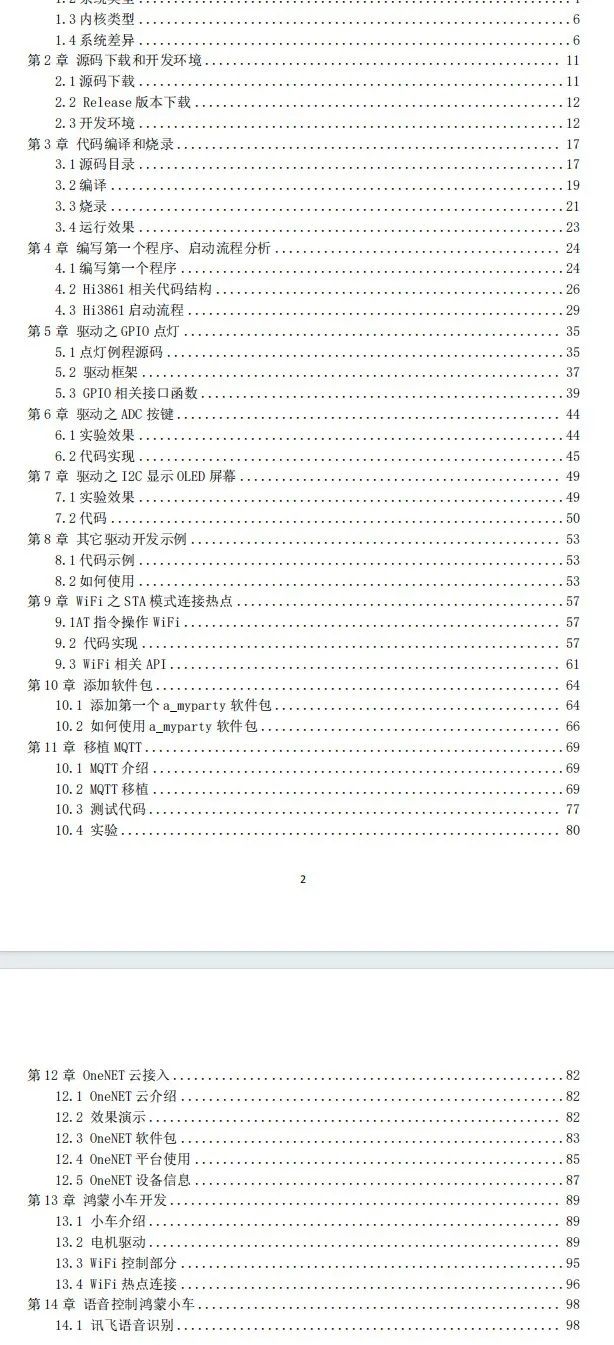
OpenHarmony 设备开发学习手册:https://gitcode.com/HarmonyOS_MN/733GH/overview


 被折叠的 条评论
为什么被折叠?
被折叠的 条评论
为什么被折叠?
 到【灌水乐园】发言


