


往期知识点整理
介绍
金融类应用在密码输入时,一般会使用自定义安全键盘。本示例介绍如何使用TextInput组件实现自定义安全键盘场景,主要包括TextInput.customKeyboard绑定自定义键盘、自定义键盘布局和状态更新等知识点。
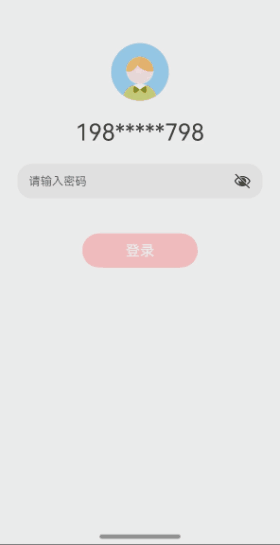
效果图预览
实现思路
1. 使用TextInput的customKeyboard 的属性方法来设置自定义键盘
当设置自定义键盘时,输入框激活后不会打开系统输入法,而是加载应用指定的自定义组件,针对系统键盘的enterKeyType属性设置将无效。自定义键盘采用覆盖原始界面的方式呈现,不会对应用原始界面产生压缩或者上提。默认在输入控件失去焦点时,关闭自定义键盘,开发者也可以通过TextInputController.stopEditing方法控制键盘关闭。
2. 自定义键盘布局
键盘枚举类型:
- 键盘类型分为数字键盘,大写、小写键盘,特殊字符键盘
- 键盘按键类型分为输入操作INPUT、删除操作DELETE、切换数字键盘操作NUMERIC、切换大小写键盘CAPSLOCK、切换数字键盘SPECIAL共五种类型
/**
 * 键盘类型枚举
 */
export enum EKeyboardType {
  NUMERIC,    //数字键盘
  UPPERCASE,  // 大写字母键盘
  LOWERCASE,  // 小写字母键盘
  SPECIAL,    // 特殊字符键盘
}

/**
 * 键盘按键类型枚举
 */
export enum EKeyType {
  INPUT,   // 输入类型,输入具体的值
  DELETE,  // 删除一个输入字符
  NUMERIC, // 切换数字键盘
  CAPSLOCK, // 切换大小写键盘
  SPECIAL, //  切换特殊字符键盘
}
在真实业务场景下,自定义安全键盘数据包括值、UI属性、位置等都通过数据请求来下发,键盘按键数据接口定义如下:
/**
 * 键盘按键数据接口
 */
export interface IKeyAttribute {
  label: string | Resource;
  value?: string;
  type?: EKeyType;
  fontSize?: number;
  fontColor?: string | Color;
  backgroundColor?: string | Color;
  position?: [number, number, number, number];
}
自定义键盘布局:分为标题栏和键盘两部分,键盘使用Grid布局,每个按键GridItem的值、UI属性和位置都通过数据请求下发,不需要额外计算。
数字键盘为4*3的网格布局,但是大小写键盘和特殊字符键盘的布局为不规则布局,如果设置为4 * 10的网格,有的按键占用1 * 1.5,但是GridItem属性不支持占用非整数列。本文将该场景下将网格拆分为更小的单元,为4 * 20网格布局,每个字母按键占1 * 2,删除按键则占1 * 3,空格则占1 * 10,这样就保证每个按键都要占用整数单元。
Column() {
  this.titleBar();

  Grid() {
    ForEach(this.items, (item: IKeyAttribute) => {
      GridItem() {
        this.myGridItem(item)
      }
      .width('100%')
      .height(this.itemHeight)
      .rowStart(item?.position?.[0])
      .columnEnd(item?.position?.[1])
      .columnStart(item?.position?.[2])
      .columnEnd(item?.position?.[3])
      .backgroundColor(item.backgroundColor)
      .borderRadius($r("app.integer.key_border_radius"))
      .onClick(() => {
            ....
      })
    }, (item: IKeyAttribute, index: number) => JSON.stringify(item) + index)
  }
  .margin({ bottom: $r("app.integer.key_board_marin_bottom") })
  .columnsTemplate(this.curKeyboardType === EKeyboardType.NUMERIC ? "1fr 1fr 1fr" :
    "1fr 1fr 1fr 1fr 1fr 1fr 1fr 1fr 1fr 1fr 1fr 1fr 1fr 1fr 1fr 1fr 1fr 1fr 1fr 1fr")
  .rowsTemplate("1fr 1fr 1fr 1fr") // Grid高度均分成4份
  .rowsGap(this.rowSpace) // 设置行间距
  .columnsGap(this.columnSpace) // 设置列间距
  .width('100%')
  .height(this.itemHeight * this.rowCount + this.rowSpace * (this.rowCount - 1))
}
.width('100%')
.padding({ left: this.columnSpace, right: this.columnSpace })
.backgroundColor(Color.Black)
}
3. 状态更新
主要是子组件自定义键盘的按键事件如何传递到父组件,可以在父组件定义好键盘按键事件响应函数onKeyboardEvent,传递给子组件,然后子组件按键时调用父组件传递过来的onKeyboardEvent即可。需要注意的是,在子组件中,必须定义inputValue且使用@Link装饰器,这样能保证子组件调用时onKeyboardEvent时inputValue不为空,父子组件数据双向更新。
@Component
export struct CustomSafeKeyboardView {
  @State inputValue: string = '';
  @State items: IKeyAttribute[] = numericKeyData;
  @State curKeyboardType: EKeyboardType = EKeyboardType.NUMERIC;
  controller: TextInputController = new TextInputController();

  /**
   * 键盘按键事件响应函数
   * @param item
   */
  onKeyboardEvent(item: IKeyAttribute) {
    switch (item.type) {
      // 输入类型,更新输入内容
      case EKeyType.INPUT:
        this.inputValue += item.value;
        break;
      // 删除一个已输入的末尾字符
      case EKeyType.DELETE:
        this.inputValue = this.inputValue.slice(0, -1);
        break;
      // 切换数字字符键盘
      case EKeyType.NUMERIC:
        if (this.curKeyboardType !== EKeyboardType.NUMERIC) {
          this.curKeyboardType = EKeyboardType.NUMERIC;
          this.items = numericKeyData;
        }
        break;
      // 切换大小写
      case EKeyType.CAPSLOCK:
        if (this.curKeyboardType === EKeyboardType.LOWERCASE) {
          // 切换大写字母键盘
          this.curKeyboardType = EKeyboardType.UPPERCASE;
          this.items = upperCaseKeyData;
        } else {
          // 切换小写字母键盘
          this.curKeyboardType = EKeyboardType.LOWERCASE;
          this.items = lowerCaseKeyData;
        }
        break;
      // 切换特殊字符键盘
      case EKeyType.SPECIAL:
        if (this.curKeyboardType !== EKeyboardType.SPECIAL) {
          this.curKeyboardType = EKeyboardType.SPECIAL;
          this.items = specialKeyData;
        }
        break;
      default:
        console.info(`Sorry, we are out of input type.`);
    }
  }

  /**
   * 自定义键盘组件Builder
   */
  @Builder
  customKeyboardBuilder() {
    CustomKeyboard({
      items: this.items,
      inputValue: this.inputValue,
      curKeyboardType: this.curKeyboardType,
      onKeyboardEvent: this.onKeyboardEvent,
      controller: this.controller
    })
  }

  build() {
    Column() {
      Row()
        .height($r("app.integer.row_height"))

      Image($r("app.media.avatar"))
        .width($r("app.integer.avatar_weight"))
        .height($r("app.integer.avatar_height"))
        .objectFit(ImageFit.Fill)

      Text($r("app.string.account_name"))
        .fontSize($r("app.integer.text_font_size"))
        .margin({ top: $r("app.integer.common_margin_padding") })

      TextInput({
        text: this.inputValue,
        placeholder: $r("app.string.placeholder"),
        controller: this.controller
      })// 绑定自定义键盘
        .type(InputType.Password)
        .customKeyboard(this.customKeyboardBuilder())// 绑定自定义安全键盘
        .height($r("app.integer.text_input_height"))
        .border(null)
        .margin({ top: $r("app.integer.common_margin_padding") })

      Button($r("app.string.login_button_label"))
        .type(ButtonType.Capsule)
        .fontSize($r("app.integer.login_button_font_size"))
        .width($r("app.integer.login_button_width"))
        .height($r("app.integer.login_button_height"))
        .margin({ top: $r("app.integer.login_button_margin") })
        .backgroundColor(Color.Pink)
        .onClick(() => {
          this.controller.stopEditing();
        })

    }
    .width($r("app.string.one_hundred_percent"))
    .height($r("app.string.one_hundred_percent"))
    .padding($r("app.integer.common_margin_padding"))
  }
}
高性能知识点
不涉及
工程结构&模块类型
customsafekeyboard              // har类型
|---components                  // 自定义组件
|   ---CustomKeyboard.ets
|---model                       // 模型层
|   ---Constants                // 定义常量数据
|---CustomSafeKeyboardView.ets  // 主页面
最后
总是有很多小伙伴反馈说:鸿蒙开发不知道学习哪些技术?不知道需要重点掌握哪些鸿蒙开发知识点? 为了解决大家这些学习烦恼。在这准备了一份很实用的鸿蒙全栈开发学习路线与学习文档给大家用来跟着学习。
针对一些列因素,整理了一套纯血版鸿蒙(HarmonyOS Next)全栈开发技术的学习路线,包含了鸿蒙开发必掌握的核心知识要点,内容有(OpenHarmony多媒体技术、Napi组件、OpenHarmony内核、OpenHarmony驱动开发、系统定制移植……等)技术知识点。

《鸿蒙 (Harmony OS)开发学习手册》(共计892页):https://gitcode.com/HarmonyOS_MN/733GH/overview
如何快速入门?
1.基本概念
2.构建第一个ArkTS应用
3.……
鸿蒙开发面试真题(含参考答案):
《OpenHarmony源码解析》:
- 搭建开发环境
- Windows 开发环境的搭建
- Ubuntu 开发环境搭建
- Linux 与 Windows 之间的文件共享
- ……
- 系统架构分析
- 构建子系统
- 启动流程
- 子系统
- 分布式任务调度子系统
- 分布式通信子系统
- 驱动子系统
- ……
OpenHarmony 设备开发学习手册:https://gitcode.com/HarmonyOS_MN/733GH/overview


 1899
1899

 被折叠的 条评论
为什么被折叠?
被折叠的 条评论
为什么被折叠?
 到【灌水乐园】发言


