


前言
最近在使用gd32单片机,bootloader是产品不能少的一部分,所以准备基于RT-Thread实现一个Bootloader以及Iap升级。
众所周知GD32F103RCT6是可以平替STM32F103TCT6,但是作为强迫症的我不想用st的固件库或者HAL库,但是RT-Thread对GD32没有做板级支持包的设计,只能自己写,所以这里准备使用 RT-Thread4.1内核+env进行制作bsp,bsp就不说了教程有很多直接讲开发过程。
内核剪裁
由于GD32F103RCT6的Flash为256k,资源有限所以Bootloader尽量短小精悍。
只保留信号量、互斥量
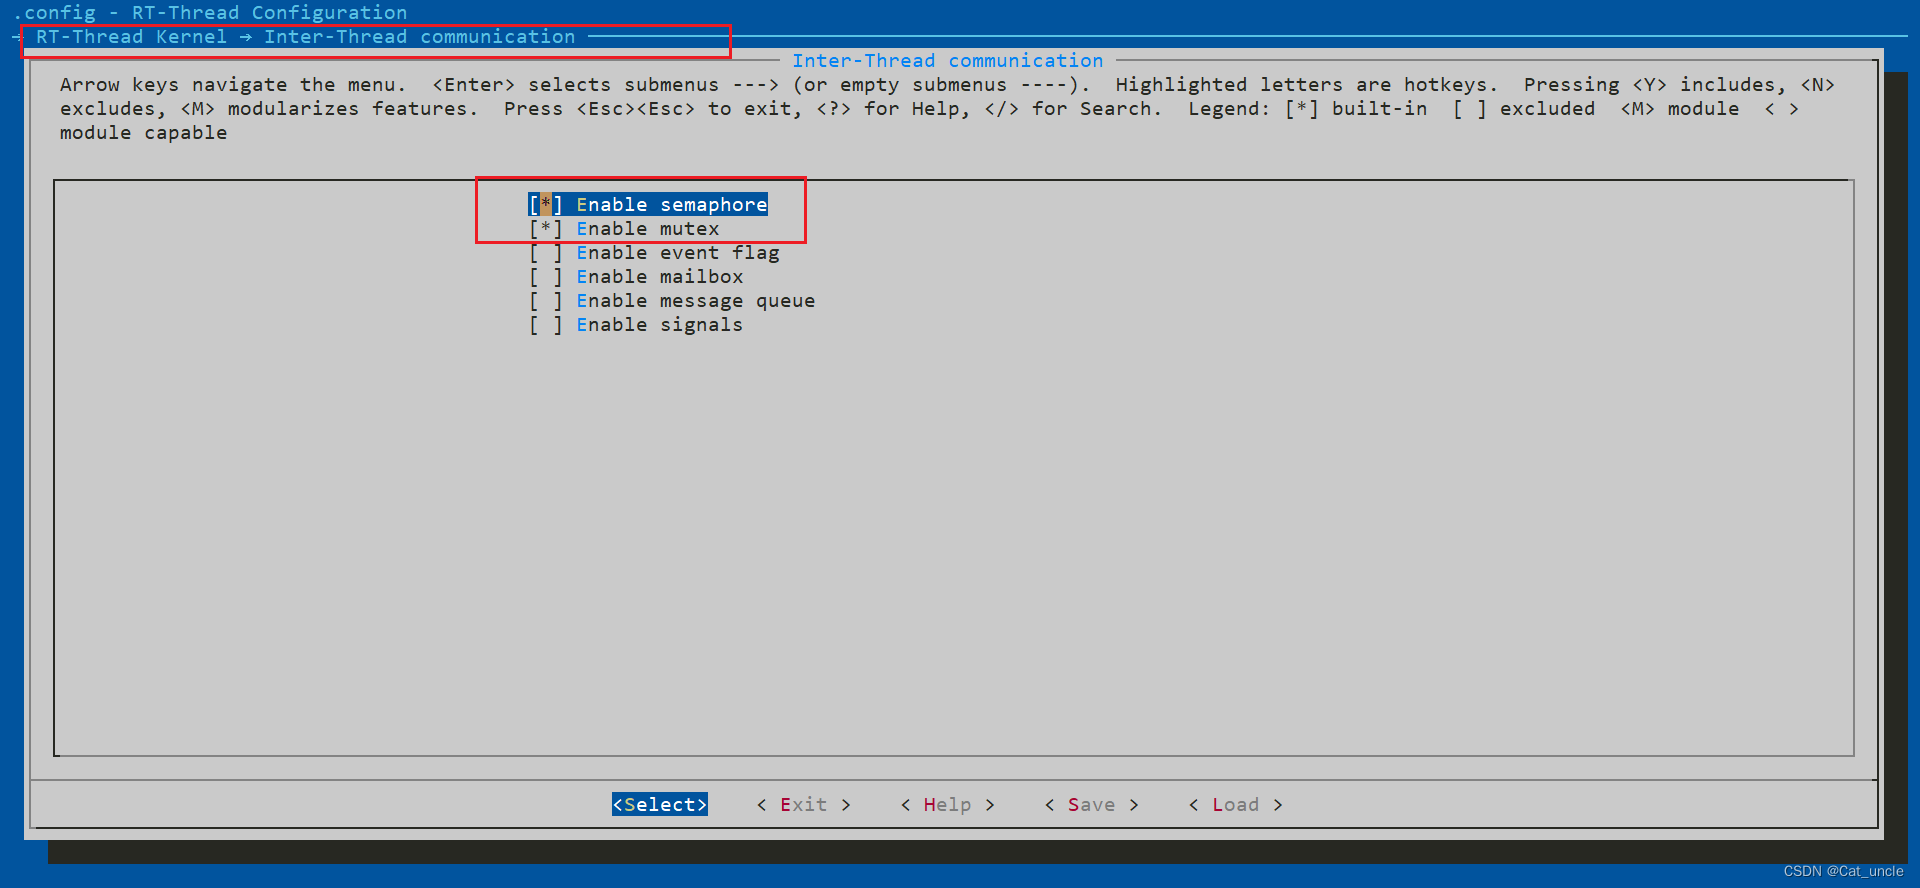
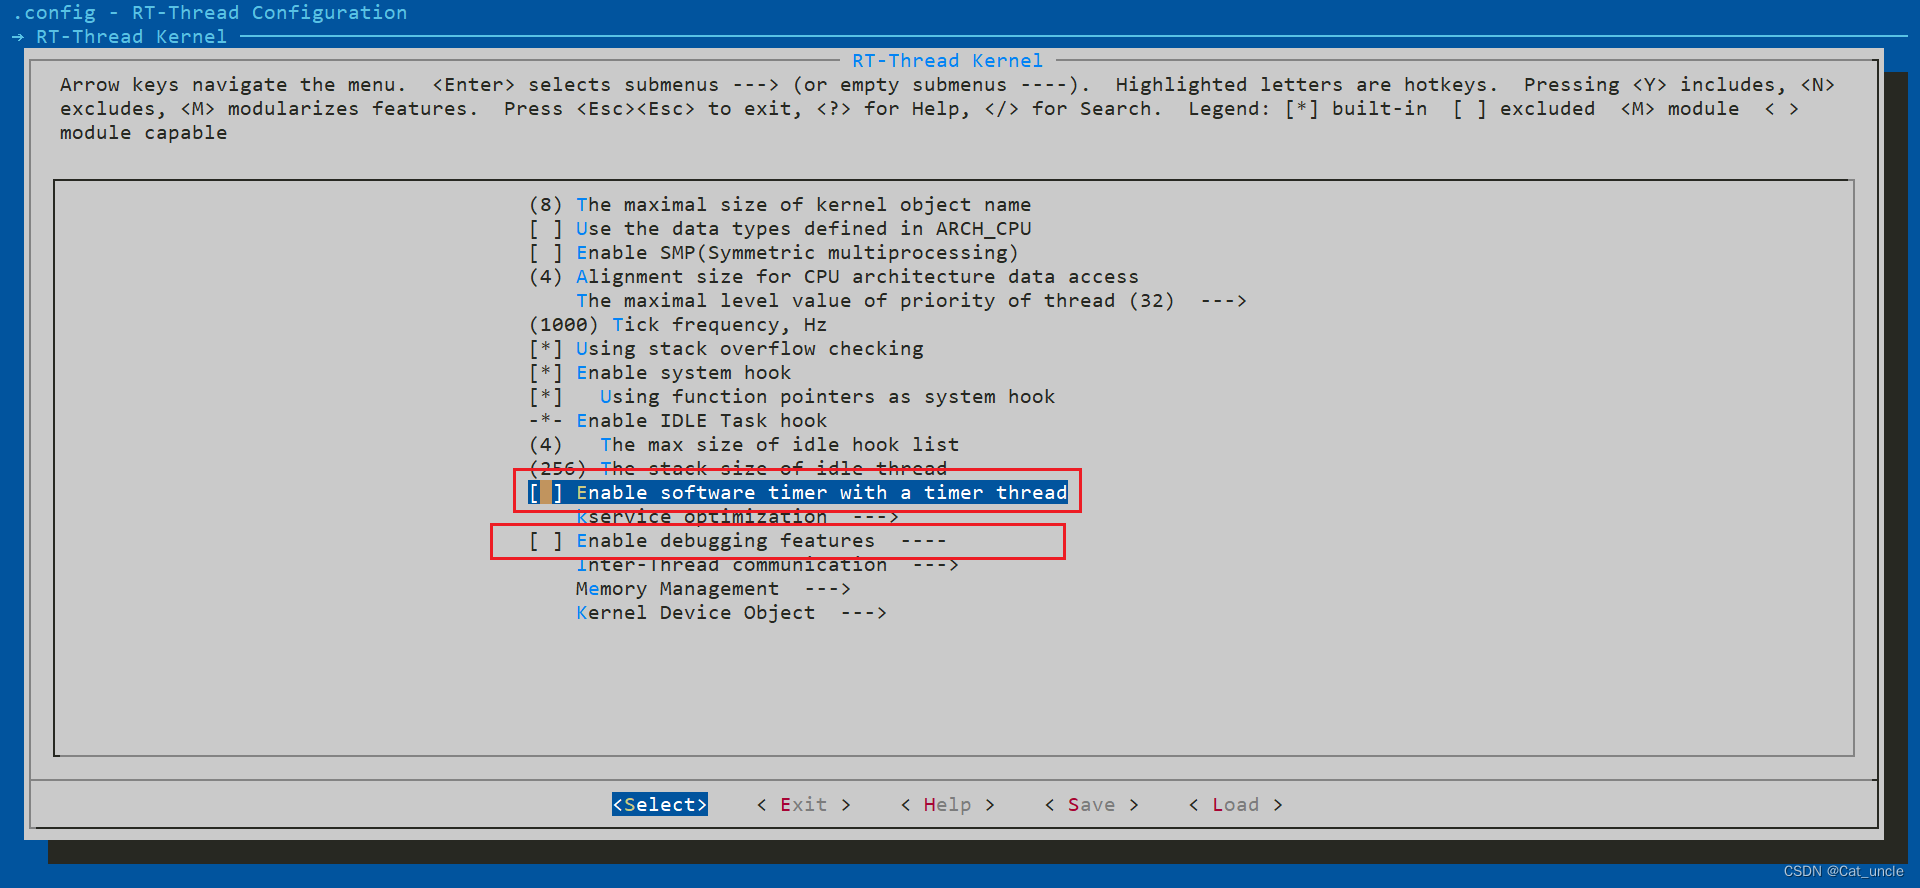
关闭内核调试功能及软件定时器
其他的功能自己调整,我剪裁完后50
k左右,实际上最小能达到30k以下。

熟悉基于rtt构建bootloader的都知道第一步先配置fal组件,但是fal调用的是flash驱动,在gd系列里是需要自己实现对接接口的,这里就不多赘述一下是代码。
#include "rtthread.h"
#ifdef BSP_USING_FMC

#include "gd32f10x_fmc.h"

#if defined(RT_USING_FAL)
#include "fal.h"
#endif


/* FLASH����256K */
#define GD32FLASH_SIZE  0x40000UL

/* FLASH��ʼ��ַ */
#define GD32FLASH_BASE  FLASH_BASE

/* FLASH������ַ */
#define GD32FLASH_END   (GD32FLASH_BASE | GD32FLASH_SIZE)

/* FLASHҳ��С��2K */
#define GD32FLASH_PAGE_SIZE (2048U)

/* FLASH��ҳ�� */
#define GD32FLASH_PAGE_NUM  (GD32FLASH_SIZE / GD32FLASH_PAGE_SIZE)


int flash_write( rt_uint32_t addr, const rt_uint8_t *buf, size_t size)
{
  size_t i;
    rt_uint16_t buf16;

    if ((addr + size) > GD32FLASH_END)
    {
        log_e("ERROR: erase outrange flash size! addr is (0x%p)\n", (void*)(addr + size));
        return -1;
    }
    /* unlock the flash program/erase controller */
    fmc_unlock();

    fmc_flag_clear(FMC_FLAG_BANK0_END);
    fmc_flag_clear(FMC_FLAG_BANK0_WPERR);
    fmc_flag_clear(FMC_FLAG_BANK0_PGERR);
    i = (size_t)addr;
    if(i % 2 == 1)  //��ôд�˵��ֽڻ��ǻ�治��ȥ��ֻ�ܱ�֤û���
    {
        buf16 = *((rt_uint16_t*)buf)<<8 | 0xff;

        fmc_halfword_program(addr-1, buf16);
        buf++;
        addr++;
        size--;
    }
    for(i=0;i<size;i+=2)
    {
        buf16 = *((rt_uint16_t*)buf);
        if(size-1 == i)
        {
            buf16 |= 0xff00;
        }
        rt_kprintf("buf16 %x",buf16);

        fmc_halfword_program(addr + i, buf16);
        buf += 2;
    }

    /* lock the main FMC after the erase operation */
    fmc_lock();
    return size;
}
static int flash_erase(rt_uint32_t addr, size_t size)
{
  size_t i;


    if ((addr + size) > GD32FLASH_END)
    {
        //LOG_E("ERROR: erase outrange flash size! addr is (0x%p)\n", (void*)(addr + size));
        return -1;
    }
    /* unlock the flash program/erase controller */
    fmc_unlock();
//    fmc_flag_clear(FMC_FLAG_BANK0_END | FMC_FLAG_BANK0_WPERR | FMC_FLAG_BANK0_PGERR | FMC_FLAG_BANK1_WPERR | FMC_FLAG_BANK1_PGERR );
    fmc_flag_clear(FMC_FLAG_BANK0_END);
    fmc_flag_clear(FMC_FLAG_BANK0_WPERR);
    fmc_flag_clear(FMC_FLAG_BANK0_PGERR);
    for(i = 0;i < size;i += GD32FLASH_PAGE_SIZE)
    {
        fmc_page_erase(addr);
        addr += GD32FLASH_PAGE_SIZE;
//            fmc_flag_clear(FMC_FLAG_BANK0_END | FMC_FLAG_BANK0_WPERR | FMC_FLAG_BANK0_PGERR | FMC_FLAG_BANK1_WPERR | FMC_FLAG_BANK1_PGERR );
        fmc_flag_clear(FMC_FLAG_BANK0_END);
        fmc_flag_clear(FMC_FLAG_BANK0_WPERR);
        fmc_flag_clear(FMC_FLAG_BANK0_PGERR);
    }

    /* lock the main FMC after the erase operation */
    fmc_lock();
    return size;
}
static int flash_read(rt_uint32_t addr, rt_uint8_t *buf, size_t size)
{
    size_t i;

    if ((addr + size) > GD32FLASH_END)
    {
            //LOG_E("read outrange flash size! addr is (0x%p)", (void*)(addr + size));
            return -1;
    }
    for (i = 0; i < size; i++, buf++, addr++)
    {
        *buf = (*(__IO uint8_t*) addr);
    }
    return size;
}

#if defined(RT_USING_FAL)

static int fal_flash_read(long offset, rt_uint8_t *buf, size_t size);
static int fal_flash_write(long offset, const rt_uint8_t *buf, size_t size);
static int fal_flash_erase(long offset, size_t size);

const struct fal_flash_dev gd32_onchip_flash =
{
    .name       = "onchip_flash",
    .addr       = GD32FLASH_BASE,
    .len        = GD32FLASH_SIZE,
    .blk_size   = GD32FLASH_PAGE_SIZE,
    .ops        = {NULL, fal_flash_read, fal_flash_write, fal_flash_erase},

};

static int fal_flash_read(long offset, rt_uint8_t *buf, size_t size)
{
      return flash_read(gd32_onchip_flash.addr + offset, (int8_t*)buf, size);
}

static int fal_flash_write(long offset, const rt_uint8_t *buf, size_t size)
{
      return flash_write(gd32_onchip_flash.addr + offset, (int8_t*)buf, size);
}

static int fal_flash_erase(long offset, size_t size)
{
    return flash_erase(gd32_onchip_flash.addr + offset, size);
}
#endif /* RT_USING_FAL */

#endif /* BSP_USING_FMC */

/************************ (C) COPYRIGHT  *****END OF FILE****/
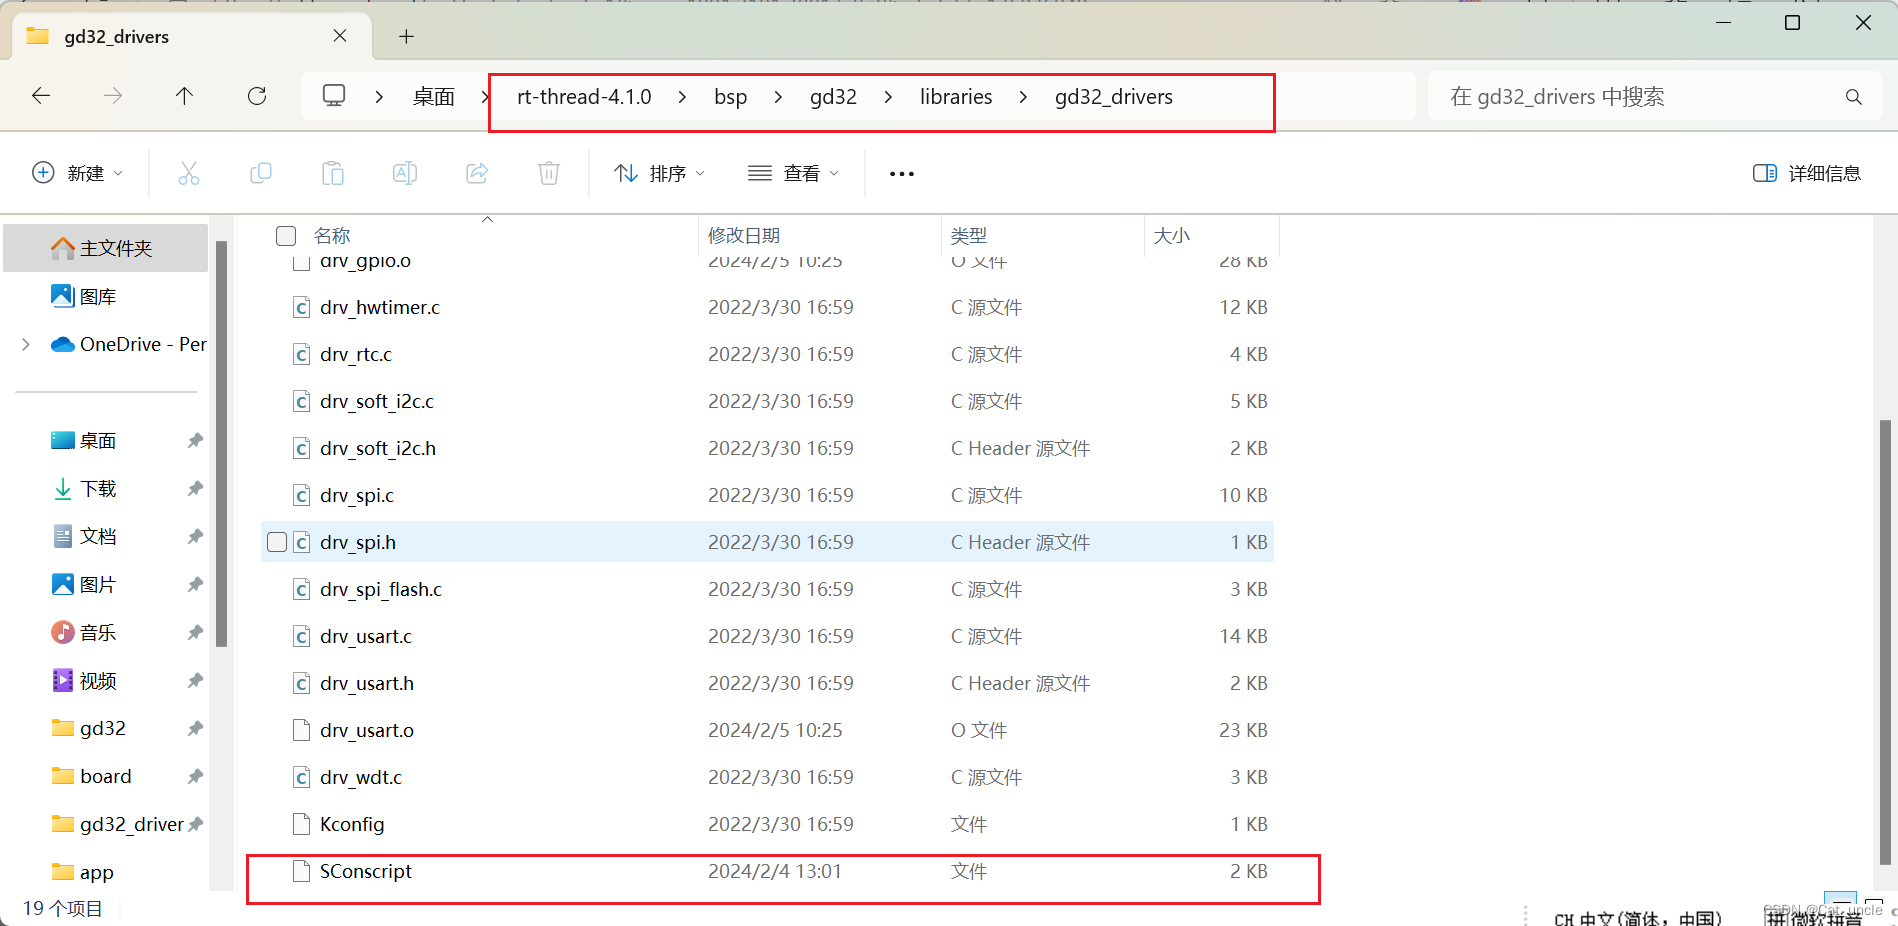
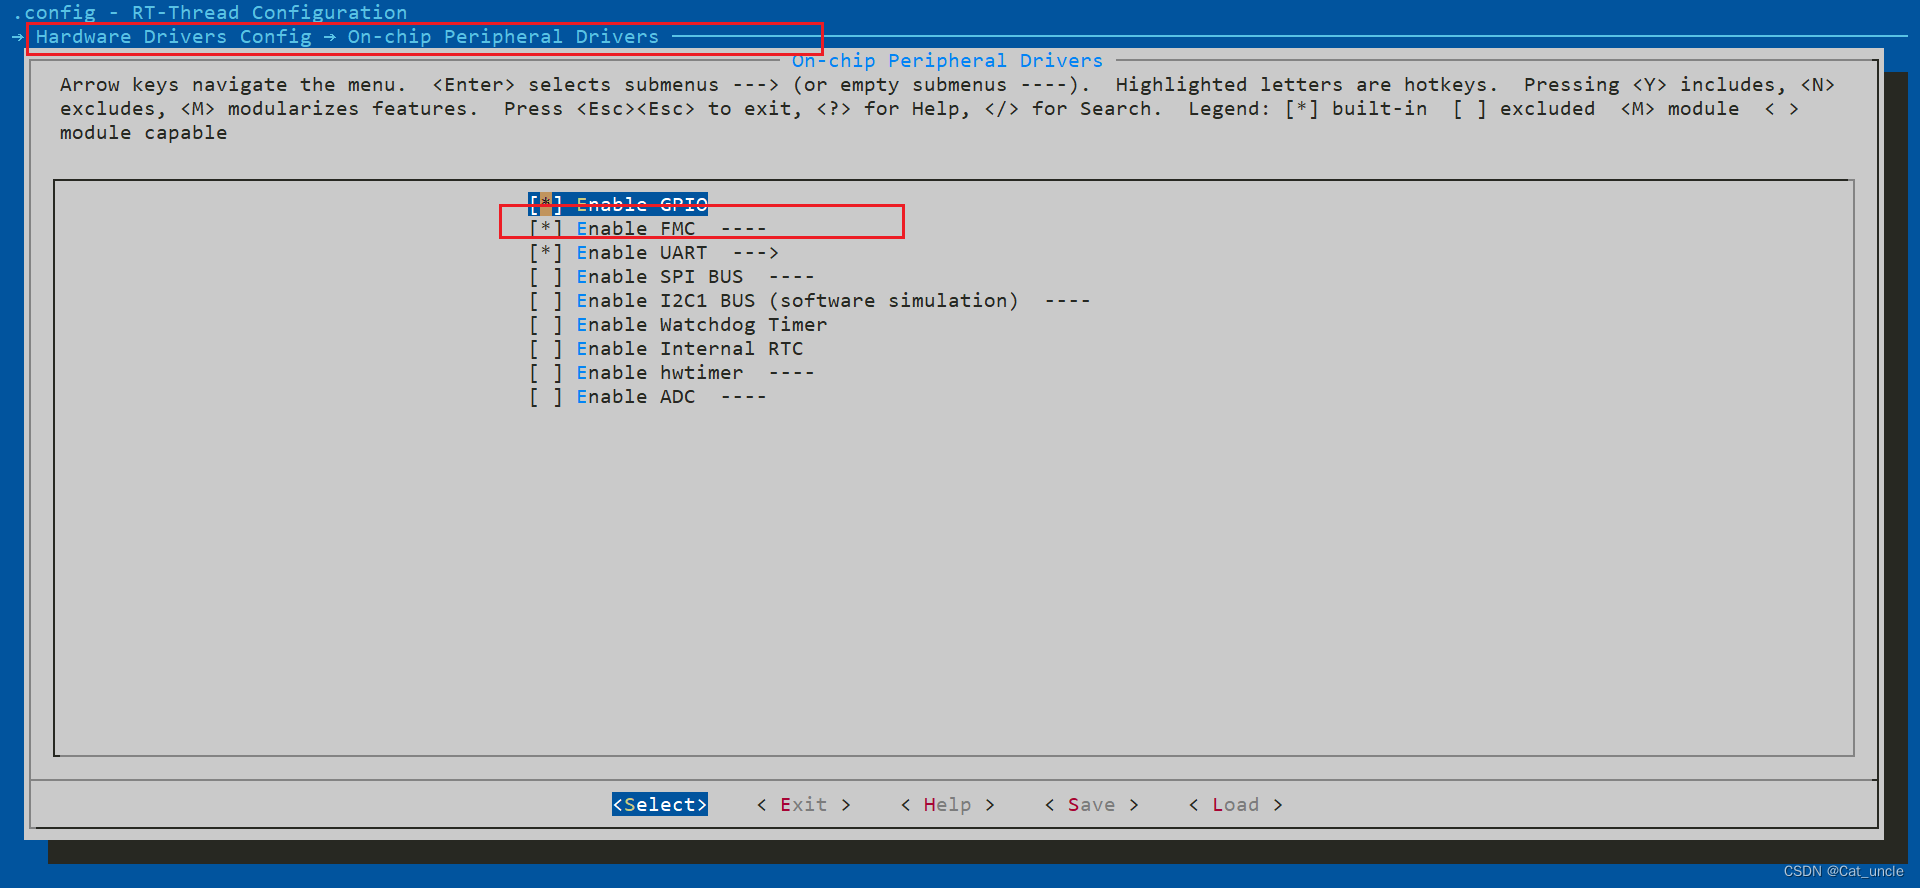
RT_USING_FAL和BSP_USING_FMC是检测编译代码区域的,如果你使用了fal组件会自动添加RT_USING_FAL定义但是有可能定义名称不一样,这里要确认,BSP_USING_FMC这个是要自己添加的以下是添加步骤。
-
每个型号的bsp都有一个固件库以及驱动库,把flash.c的文件代码添加到gd32_drivers中后打开SConscript
-
添加
if GetDepend('BSP_USING_FMC'): src += ['drv_flash.c']这个是如果定义了BSP_USING_FMC关键字添加drv_flash.c驱动文件。 -
同级目下打开GD32F10x_Firmware_Library中的SConscript,添加
if GetDepend('BSP_USING_FMC'): src += ['GD32F10x_standard_peripheral/Source/gd32f10x_fmc.c']这个是添加固件库文件的。 -
到board文件夹下打开Kconfig文件添加BSP_USING_FMC定义
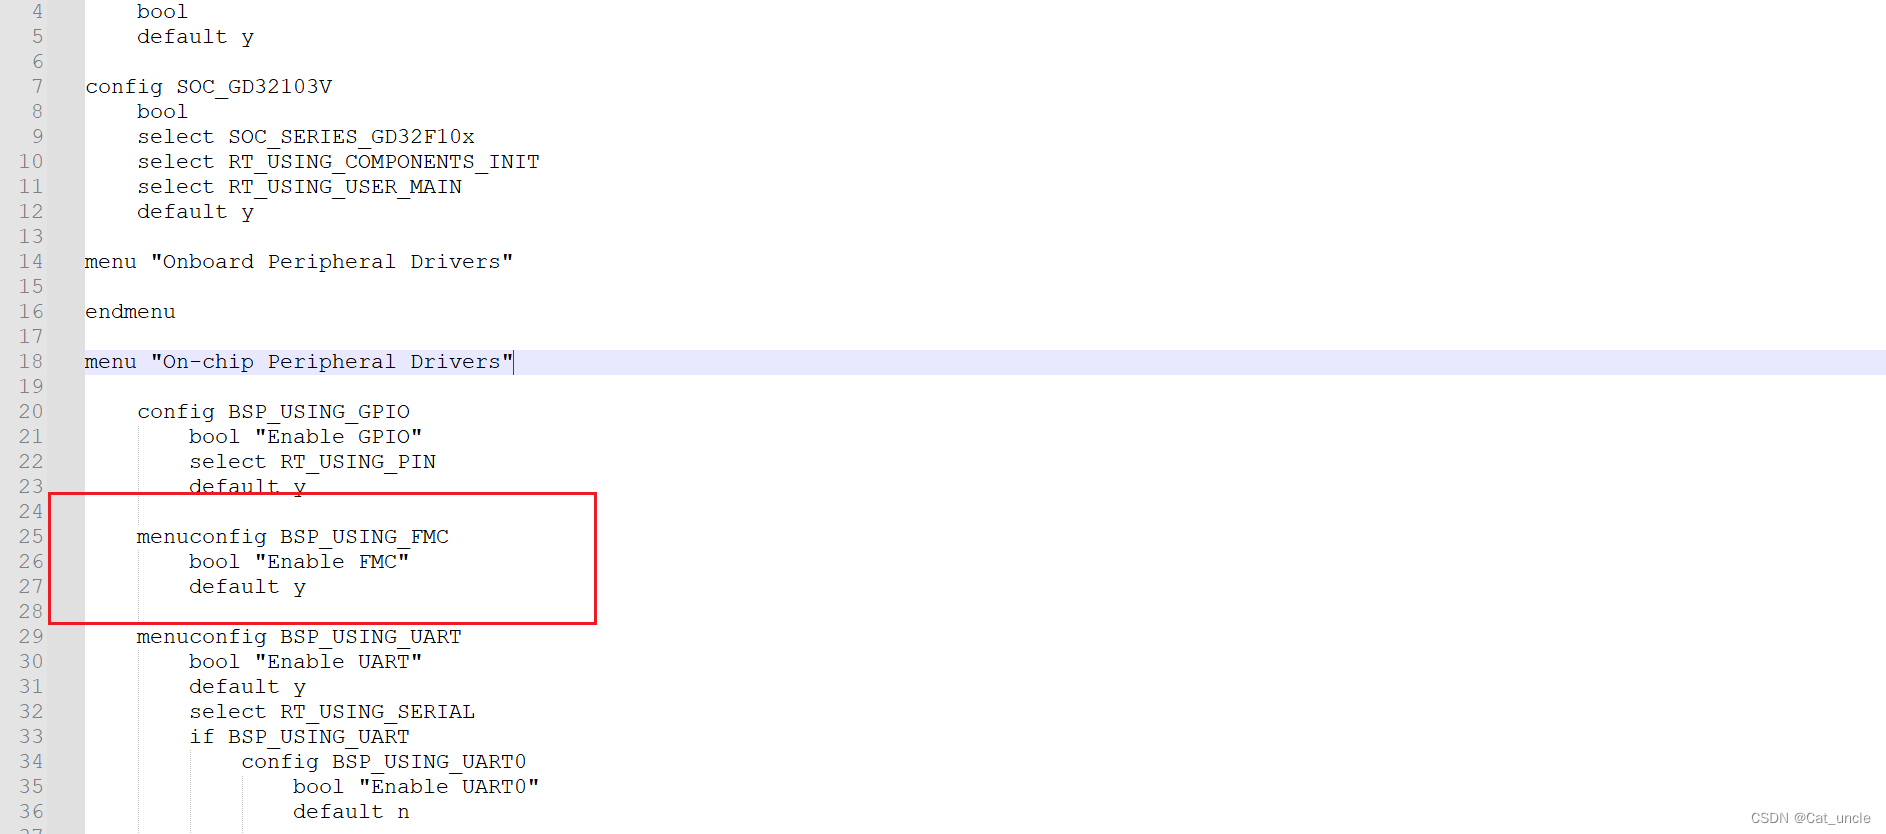
这样整个就跟emv关联起来了。
Fal配置
打开ENV工具,添加fal组件已经使能FMC功能
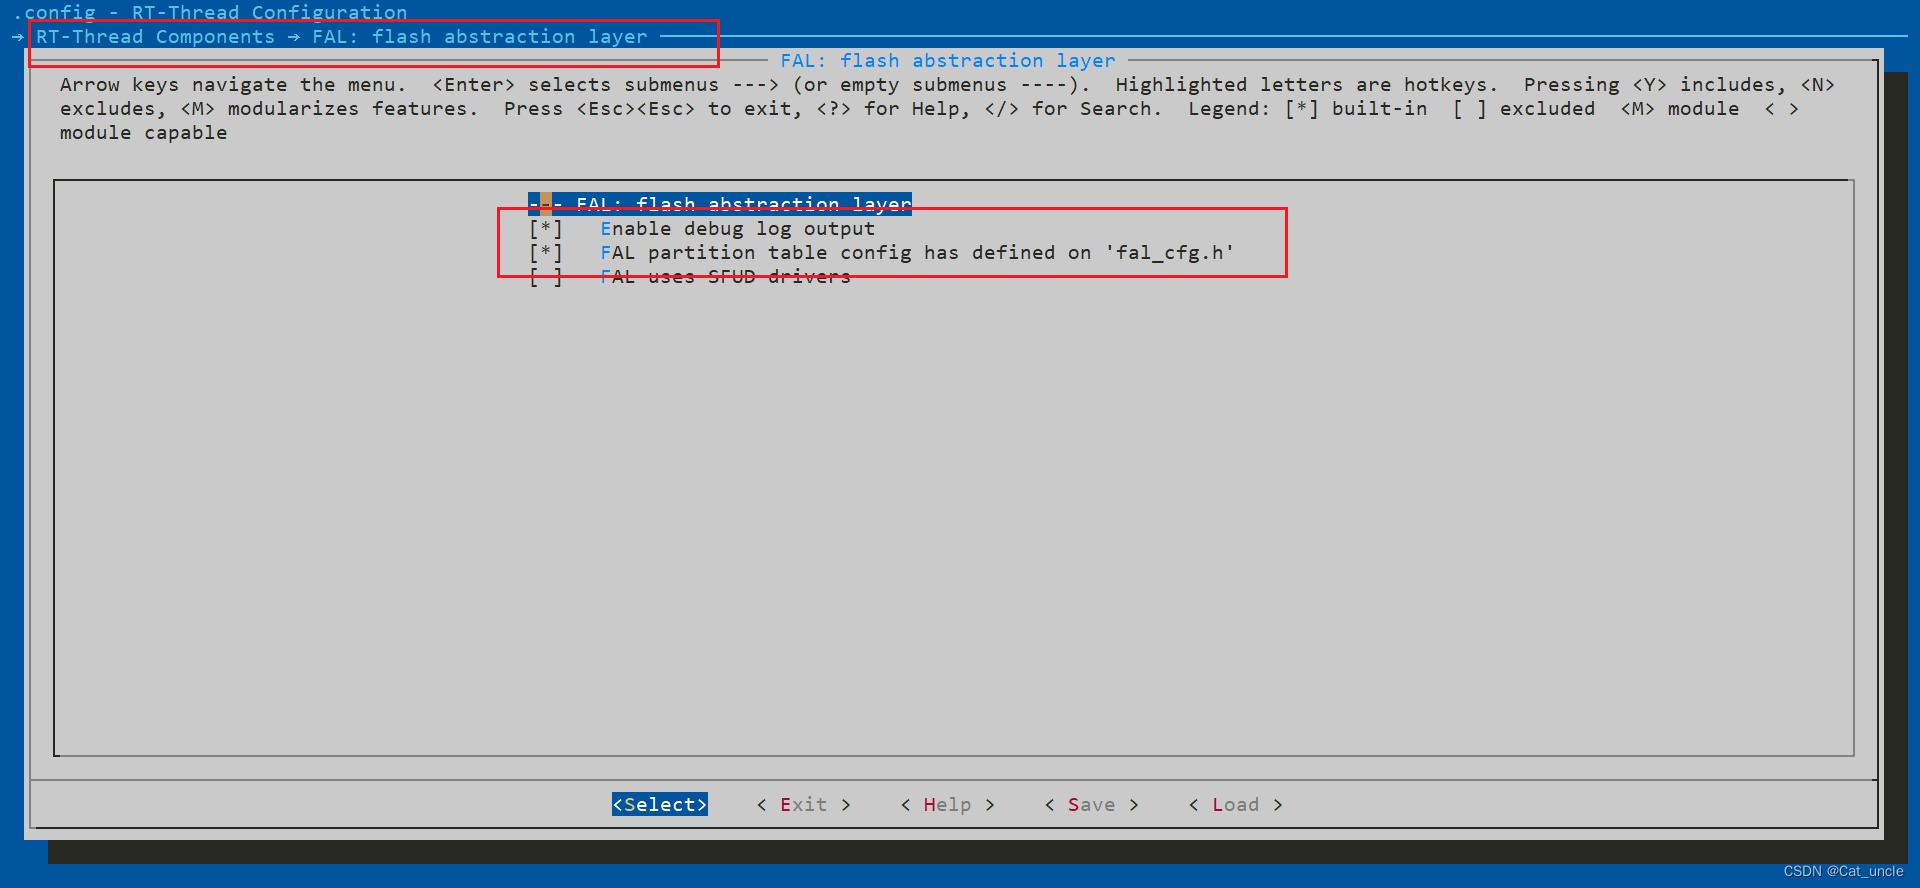
保存退出后,输入scons 会报错fal_cfg.h的文件。所以新建fal_cfg.h文件内容如下。
/*
 * Copyright (c) 2006-2018, RT-Thread Development Team
 *
 * SPDX-License-Identifier: Apache-2.0
 *
 * Change Logs:
 * Date           Author       Notes
 * 2018-05-17     armink       the first version
 */

#ifndef _FAL_CFG_H_
#define _FAL_CFG_H_


#include <board.h>

#define RT_APP_PART_ADDR 0x8014000

/* ===================== Flash device Configuration ========================= */
extern const struct fal_flash_dev gd32_onchip_flash;


/* flash device table */
#define FAL_FLASH_DEV_TABLE                                          \
{                                                                    \
    &gd32_onchip_flash,                                           \
}
/* ====================== Partition Configuration ========================== */
#ifdef FAL_PART_HAS_TABLE_CFG
/* partition table */
#define FAL_PART_TABLE                                                               \
{                                                                                    \
    {FAL_PART_MAGIC_WORD,        "bl",     "onchip_flash",         0,   80*1024, 0}, \
    {FAL_PART_MAGIC_WORD,       "app",     "onchip_flash",   80*1024,  160*1024, 0}, \
    {FAL_PART_MAGIC_WORD,  "download", "onchip_flash", 160*1024, 240*1024, 0}, \
}
#endif /* FAL_PART_HAS_TABLE_CFG */

#endif /* _FAL_CFG_H_ */
这里说明几点注意事项:
RT_APP_PART_ADDR一定要定义已经修改成自己的app起始地址,如果不定义就按默认地址0x08020000extern const struct fal_flash_dev gd32_onchip_flash引入的是drv_flash的定义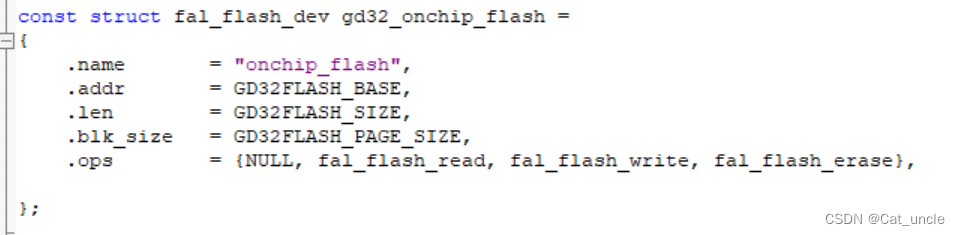
所以名称要统一。- 在
FAL_PART_TABLE定义分区表中它的flash名称要与定义的名称对应上onchip_flash
Qboot移植
fal组件添加完成之后添加qboot组件,只保留压缩算法以及ota功能。
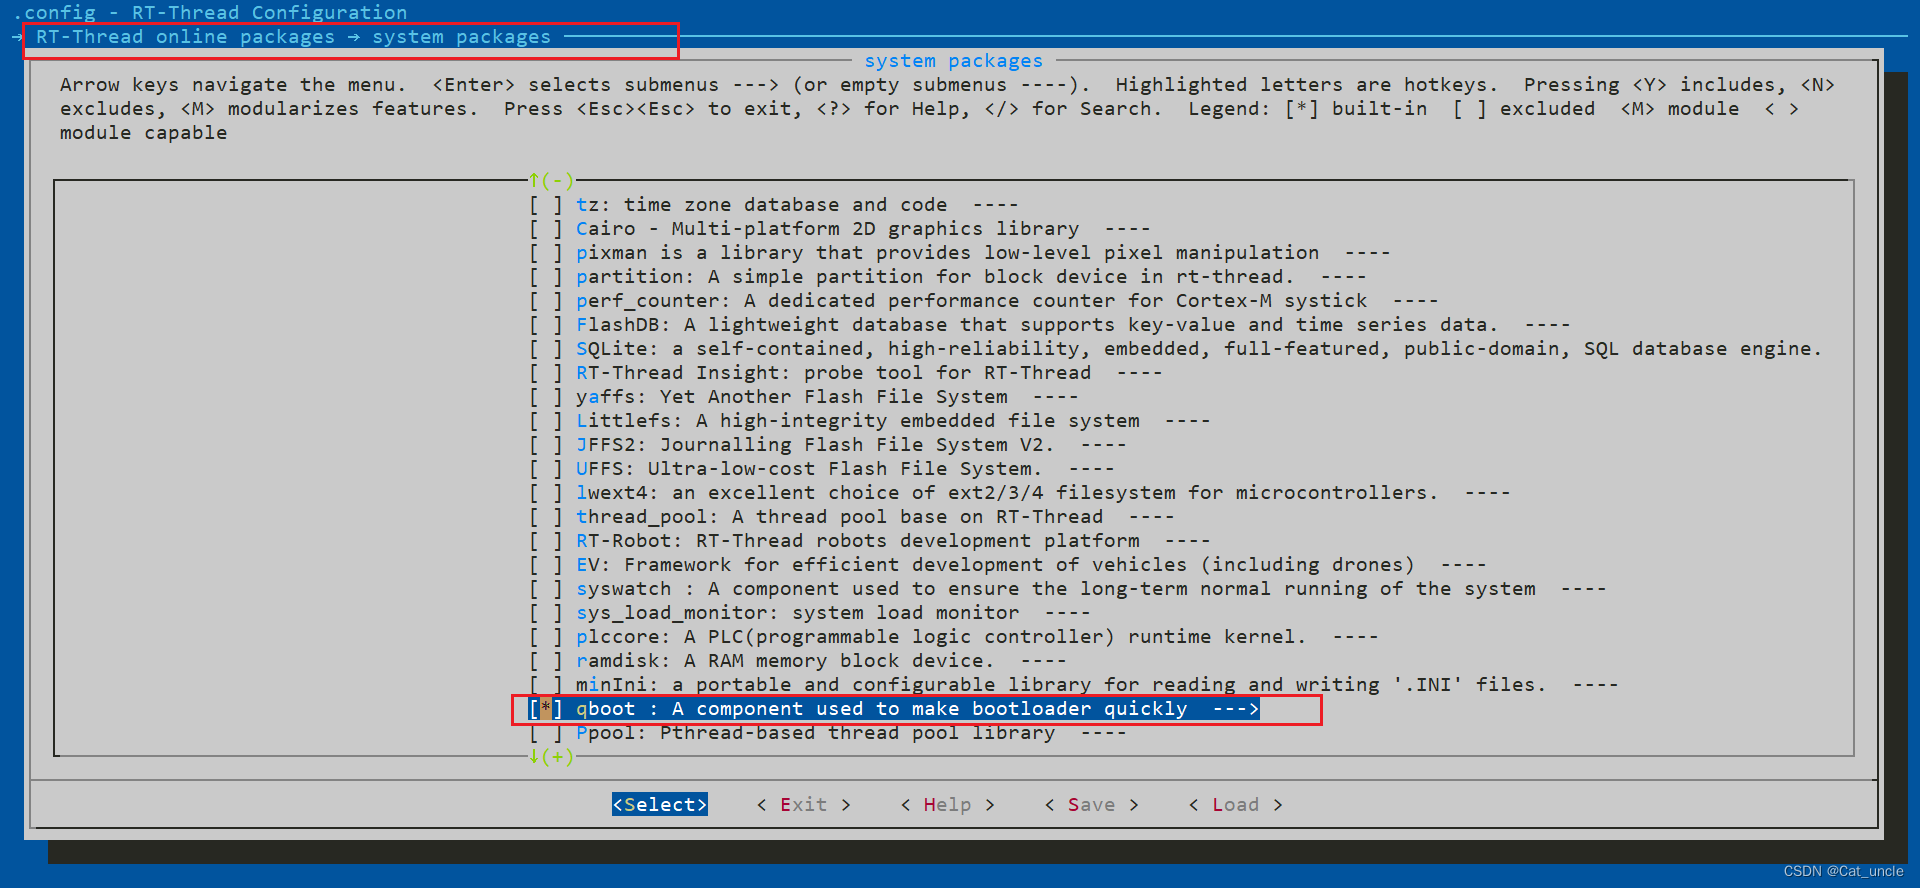
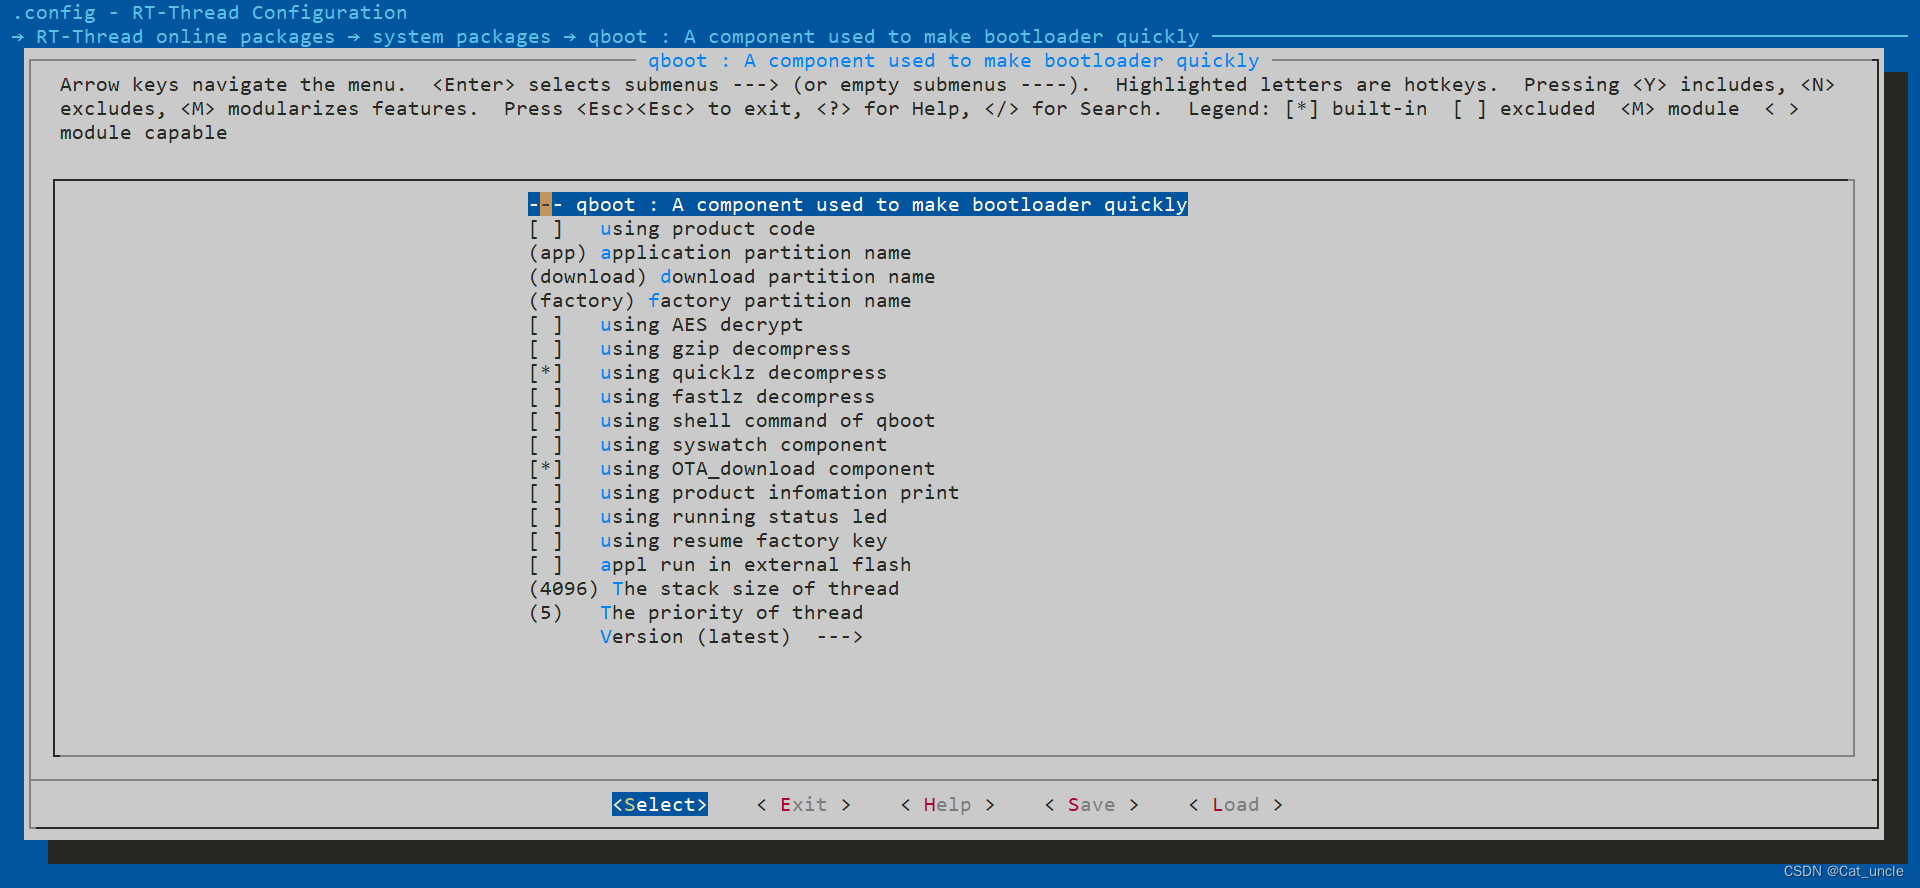
保存退出 输入pkgs --update 下载并更新组件,然后scons -- target=mdk5更新到keil中。
修补报错内容
将qboot.c中的void qbt_jump_to_app(void)函数注释掉,在qboot_gd32.c中添加宏定义#define SOC_FAMILY_GD32修改void hal_DeInit(void)以及void qbt_jump_to_app(void)内容如下。
void hal_DeInit(void)
{
    //AHB1 peripherals
    rcu_periph_reset_enable(RCU_GPIOARST);
    rcu_periph_reset_enable(RCU_GPIOBRST);
    rcu_periph_reset_enable(RCU_GPIOCRST);
    rcu_periph_reset_enable(RCU_GPIODRST);
    rcu_periph_reset_enable(RCU_GPIOERST);
    rcu_periph_reset_enable(RCU_GPIOFRST);
    rcu_periph_reset_enable(RCU_GPIOGRST);
//    rcu_periph_reset_enable(RCU_GPIOHRST);
//    rcu_periph_reset_enable(RCU_GPIOIRST);
//    rcu_periph_reset_enable(RCU_CRCRST);
//    rcu_periph_reset_enable(RCU_DMA0RST);
//    rcu_periph_reset_enable(RCU_DMA1RST);
//    rcu_periph_reset_enable(RCU_IPARST);
//    rcu_periph_reset_enable(RCU_ENETRST);
//    rcu_periph_reset_enable(RCU_USBHSRST);
    //AHB2 peripheral
//    rcu_periph_reset_enable(RCU_DCIRST);
//    rcu_periph_reset_enable(RCU_TRNGRST);
//    rcu_periph_reset_enable(RCU_USBFSRST);
//    //AHB3 peripheral
//    rcu_periph_reset_enable(RCU_EXMCRST);
//    // APB1 peripheral
    rcu_periph_reset_enable(RCU_TIMER1RST);
    rcu_periph_reset_enable(RCU_TIMER2RST);
    rcu_periph_reset_enable(RCU_TIMER3RST);
    rcu_periph_reset_enable(RCU_TIMER4RST);
    rcu_periph_reset_enable(RCU_TIMER5RST);
    rcu_periph_reset_enable(RCU_TIMER6RST);
//    rcu_periph_reset_enable(RCU_TIMER11RST);
//    rcu_periph_reset_enable(RCU_TIMER12RST);
//    rcu_periph_reset_enable(RCU_TIMER13RST);
    rcu_periph_reset_enable(RCU_WWDGTRST);
    rcu_periph_reset_enable(RCU_SPI1RST);
    rcu_periph_reset_enable(RCU_SPI2RST);
    rcu_periph_reset_enable(RCU_USART1RST);
    rcu_periph_reset_enable(RCU_USART2RST);
    rcu_periph_reset_enable(RCU_UART3RST);
    rcu_periph_reset_enable(RCU_UART4RST);
    rcu_periph_reset_enable(RCU_I2C0RST);
    rcu_periph_reset_enable(RCU_I2C1RST);
//    rcu_periph_reset_enable(RCU_I2C2RST);
    rcu_periph_reset_enable(RCU_CAN0RST);
//    rcu_periph_reset_enable(RCU_CAN1RST);
    rcu_periph_reset_enable(RCU_PMURST);
    rcu_periph_reset_enable(RCU_DACRST);
//    rcu_periph_reset_enable(RCU_UART6RST);
//    rcu_periph_reset_enable(RCU_UART7RST);
    //APB2 peripheral
    rcu_periph_reset_enable(RCU_TIMER0RST);
    rcu_periph_reset_enable(RCU_TIMER7RST);
    rcu_periph_reset_enable(RCU_USART0RST);
//    rcu_periph_reset_enable(RCU_USART5RST);
//    rcu_periph_reset_enable(RCU_ADCRST);
//    rcu_periph_reset_enable(RCU_SDIORST);
    rcu_periph_reset_enable(RCU_SPI0RST);
//    rcu_periph_reset_enable(RCU_SPI3RST);
//    rcu_periph_reset_enable(RCU_SYSCFGRST);
//    rcu_periph_reset_enable(RCU_TIMER8RST);
//    rcu_periph_reset_enable(RCU_TIMER9RST);
//    rcu_periph_reset_enable(RCU_TIMER10RST);
//    rcu_periph_reset_enable(RCU_SPI4RST);
//    rcu_periph_reset_enable(RCU_SPI5RST);
//    rcu_periph_reset_enable(RCU_TLIRST);
//    //APB1 additional
//    rcu_periph_reset_enable(RCU_CTCRST);
//    rcu_periph_reset_enable(RCU_IREFRST);

//AHB1 peripherals
    rcu_periph_reset_disable(RCU_GPIOARST);
    rcu_periph_reset_disable(RCU_GPIOBRST);
    rcu_periph_reset_disable(RCU_GPIOCRST);
    rcu_periph_reset_disable(RCU_GPIODRST);
    rcu_periph_reset_disable(RCU_GPIOERST);
    rcu_periph_reset_disable(RCU_GPIOFRST);
    rcu_periph_reset_disable(RCU_GPIOGRST);
//    rcu_periph_reset_disable(RCU_GPIOHRST);
//    rcu_periph_reset_disable(RCU_GPIOIRST);
//    rcu_periph_reset_disable(RCU_CRCRST);
//    rcu_periph_reset_disable(RCU_DMA0RST);
//    rcu_periph_reset_disable(RCU_DMA1RST);
//    rcu_periph_reset_disable(RCU_IPARST);
//    rcu_periph_reset_disable(RCU_ENETRST);
//    rcu_periph_reset_disable(RCU_USBHSRST);
    //AHB2 peripheral
//    rcu_periph_reset_disable(RCU_DCIRST);
//    rcu_periph_reset_disable(RCU_TRNGRST);
//    rcu_periph_reset_disable(RCU_USBFSRST);
//    //AHB3 peripheral
//    rcu_periph_reset_disable(RCU_EXMCRST);
    // APB1 peripheral
    rcu_periph_reset_disable(RCU_TIMER1RST);
    rcu_periph_reset_disable(RCU_TIMER2RST);
    rcu_periph_reset_disable(RCU_TIMER3RST);
    rcu_periph_reset_disable(RCU_TIMER4RST);
    rcu_periph_reset_disable(RCU_TIMER5RST);
    rcu_periph_reset_disable(RCU_TIMER6RST);
//    rcu_periph_reset_disable(RCU_TIMER11RST);
//    rcu_periph_reset_disable(RCU_TIMER12RST);
//    rcu_periph_reset_disable(RCU_TIMER13RST);
    rcu_periph_reset_disable(RCU_WWDGTRST);
    rcu_periph_reset_disable(RCU_SPI1RST);
    rcu_periph_reset_disable(RCU_SPI2RST);
    rcu_periph_reset_disable(RCU_USART1RST);
    rcu_periph_reset_disable(RCU_USART2RST);
    rcu_periph_reset_disable(RCU_UART3RST);
    rcu_periph_reset_disable(RCU_UART4RST);
    rcu_periph_reset_disable(RCU_I2C0RST);
    rcu_periph_reset_disable(RCU_I2C1RST);
//    rcu_periph_reset_disable(RCU_I2C2RST);
    rcu_periph_reset_disable(RCU_CAN0RST);
//    rcu_periph_reset_disable(RCU_CAN1RST);
    rcu_periph_reset_disable(RCU_PMURST);
    rcu_periph_reset_disable(RCU_DACRST);
//    rcu_periph_reset_disable(RCU_UART6RST);
//    rcu_periph_reset_disable(RCU_UART7RST);
    //APB2 peripheral
    rcu_periph_reset_disable(RCU_TIMER0RST);
    rcu_periph_reset_disable(RCU_TIMER7RST);
    rcu_periph_reset_disable(RCU_USART0RST);
//    rcu_periph_reset_disable(RCU_USART5RST);
//    rcu_periph_reset_disable(RCU_ADCRST);
//    rcu_periph_reset_disable(RCU_SDIORST);
    rcu_periph_reset_disable(RCU_SPI0RST);
//    rcu_periph_reset_disable(RCU_SPI3RST);
//    rcu_periph_reset_disable(RCU_SYSCFGRST);
//    rcu_periph_reset_disable(RCU_TIMER8RST);
//    rcu_periph_reset_disable(RCU_TIMER9RST);
//    rcu_periph_reset_disable(RCU_TIMER10RST);
//    rcu_periph_reset_disable(RCU_SPI4RST);
//    rcu_periph_reset_disable(RCU_SPI5RST);
//    rcu_periph_reset_disable(RCU_TLIRST);
//    //APB1 additional
//    rcu_periph_reset_disable(RCU_CTCRST);
//    rcu_periph_reset_disable(RCU_IREFRST);
}

void qbt_jump_to_app(void)
{
   typedef void (*app_func_t)(void);

    unsigned long app_addr = QBOOT_APP_ADDR;
    unsigned long stk_addr = *((__IO uint32_t *)app_addr);
    app_func_t app_func = (app_func_t)(*((__IO uint32_t *)(app_addr + 4)));

    if ((((unsigned long)app_func & 0xff000000) != 0x08000000) || ((stk_addr & 0x2ff00000) != 0x20000000))
    {
        rt_kprintf("No legitimate application.");
        return;
    }

    rt_kprintf("Jump to application running ... \n");
    rt_thread_mdelay(200);

		__set_PRIMASK(1);

		SysTick->CTRL = 0;
    SysTick->LOAD = 0;
    SysTick->VAL = 0;

		for(int i = 0; i< 8; i++)
    {
			NVIC->ICER[i] = 0xFFFFFFFF;
			NVIC->ICPR[i] = 0xFFFFFFFF;

			__DSB();
			__ISB();
    }

    __disable_irq();
    hal_DeInit();

		SysTick->CTRL = 0;
    SysTick->LOAD = 0;
    SysTick->VAL = 0;

    //Resets the RCC clock configuration to the default reset state.
    rcu_deinit();


    __set_CONTROL(0);
    __set_MSP(stk_addr);

    app_func();//Jump to application running

    rt_kprintf("Qboot jump to application fail.");
}
修改main.c
int main(void)
{
	fal_init();
    return RT_EOK;
}
keil设置
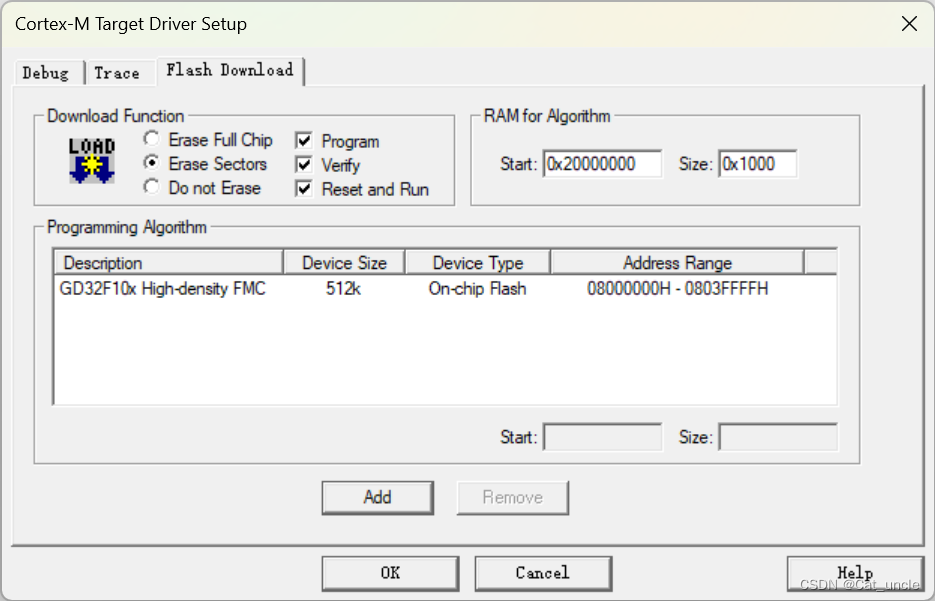
下载起始地址为flash首地址,下载方式为全片擦除。

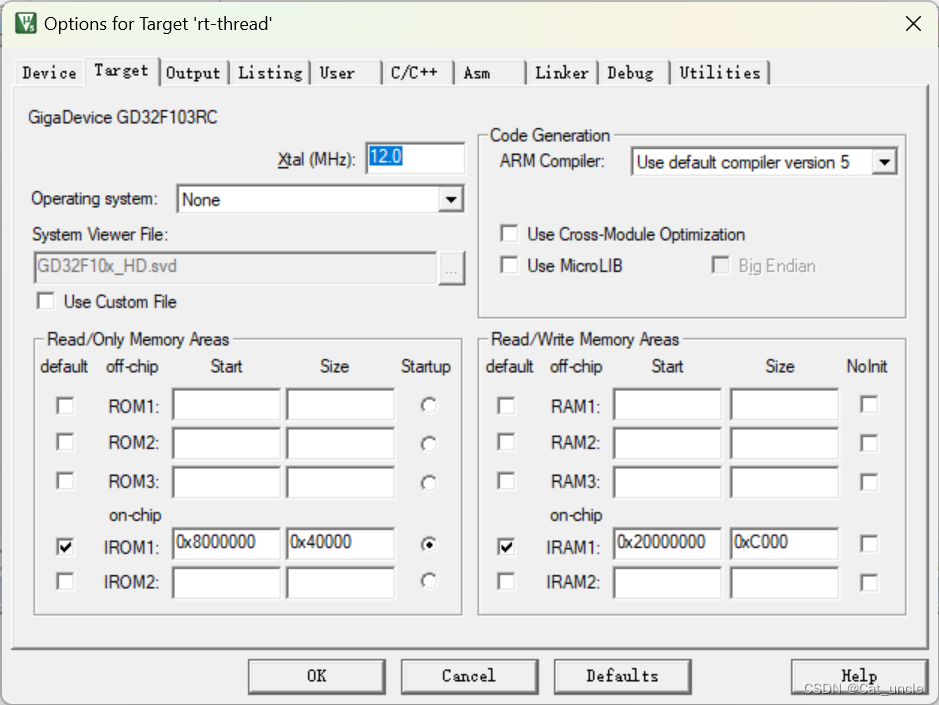
ok到这里bootloader就结束了。
APP制作
复制bootloader文件,进入env,组件只保留fal以及ota,其他删除。
这里就不截图了,删除路径就是添加路径。
App main.c
/*
 * Copyright (c) 2006-2021, RT-Thread Development Team
 *
 * SPDX-License-Identifier: Apache-2.0
 *
 * Change Logs:
 * Date           Author       Notes
 * 2021-12-18     BruceOu      first implementation
 */

#include <stdio.h>
#include <rtthread.h>
#include <rtdevice.h>
#include <board.h>
#include "fal.h"

int main(void)
{
	fal_init();


	while(1)
	{

		//rt_kprintf("app v2.0\n");
		rt_thread_mdelay(1000);

	}
    return RT_EOK;
}
void run(void)
{
	nvic_vector_table_set(0x08000000, 0x00014000);
}

INIT_BOARD_EXPORT(run);
中断向量表一定要在main函数执行的前面,所以要使用INIT_BOARD_EXPORT
keil设置
在魔法棒中修改下载地址以及,下载方式按扇区擦除,生成bin文件位置
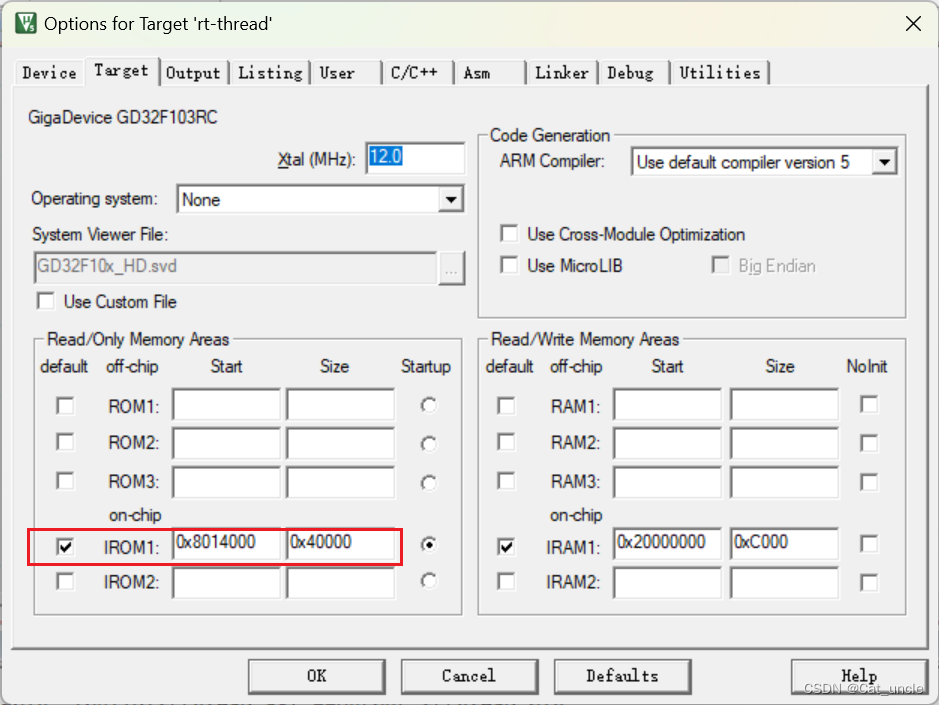
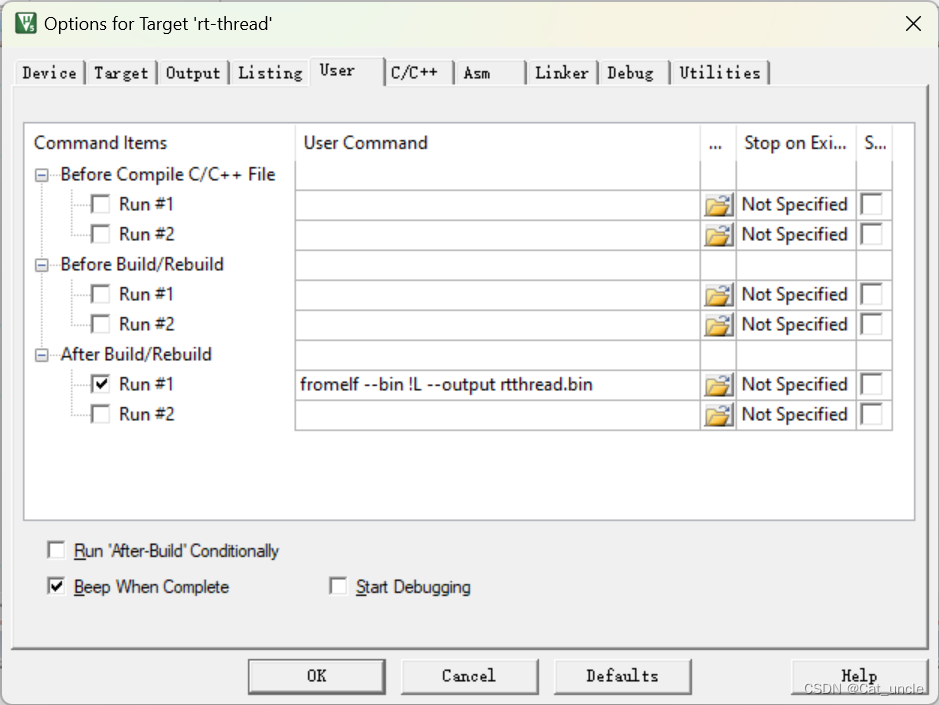
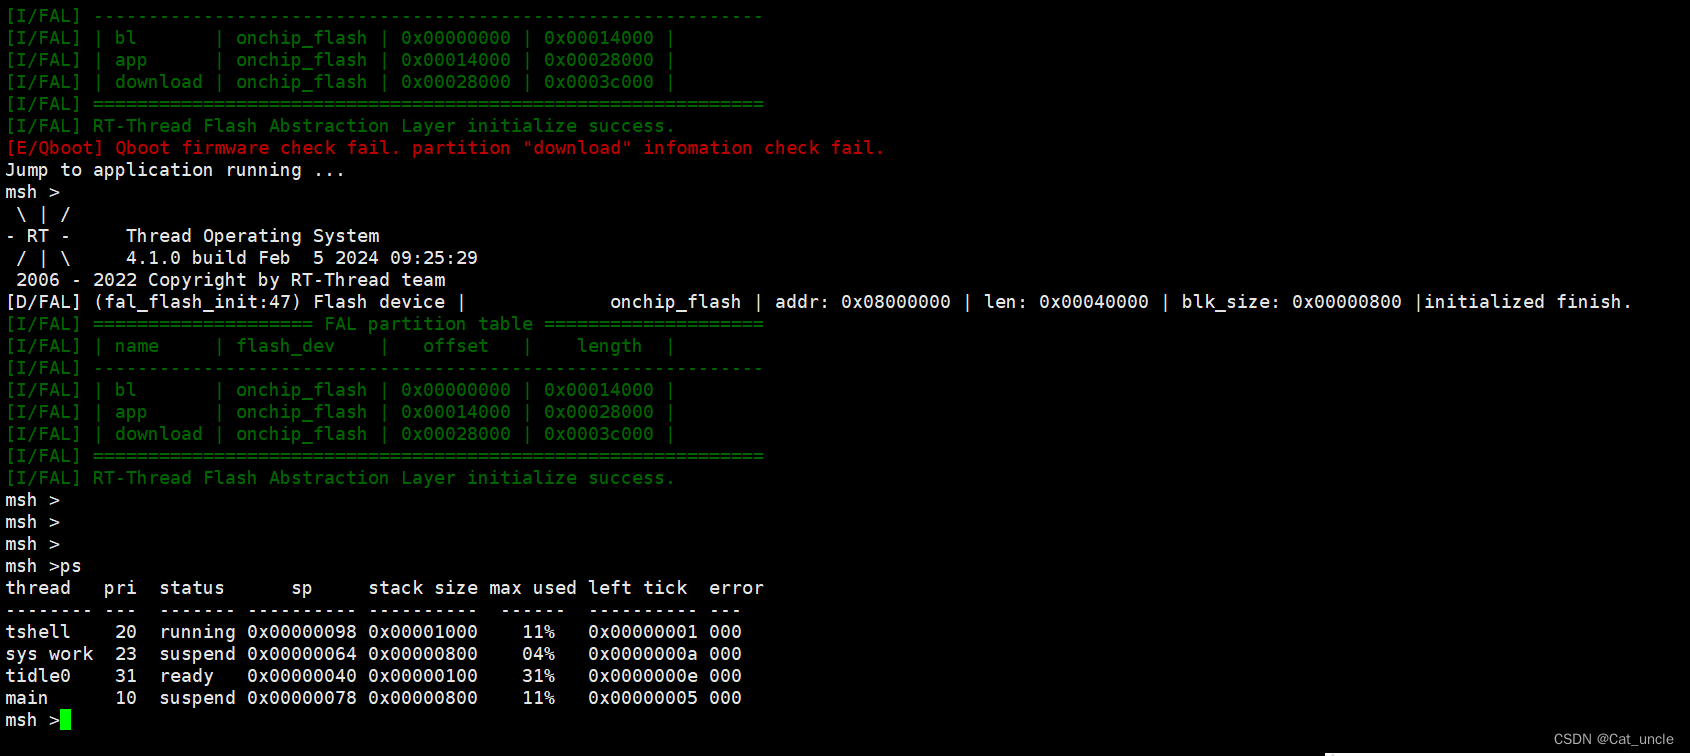
烧入程序后已经可以正常跳转了
IAP OTA验证
修改main函数
int main(void)
{
	fal_init();


	while(1)
	{

		rt_kprintf("app v2.0\n");
		rt_thread_mdelay(1000);

	}
    return RT_EOK;
}
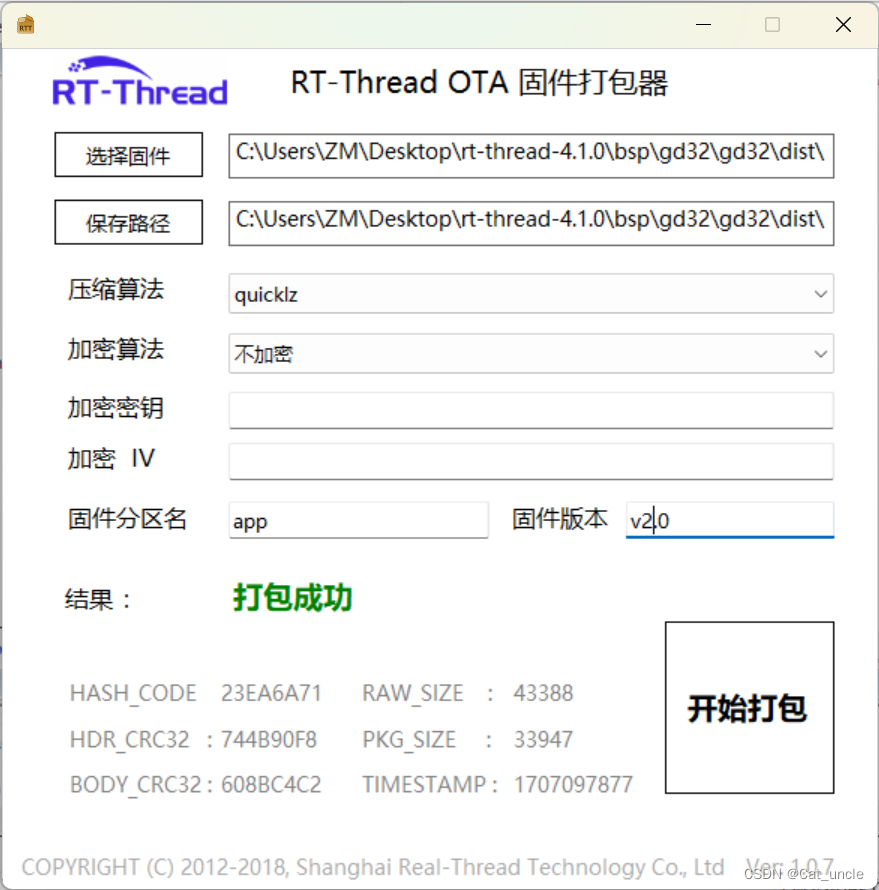
编译后把bin文件通过rtthread ota固件打包器生成.rbl格式文件
在xshell中输入ymodem_ota,然后右键传输使用ymodem发送生成的.rbl文件
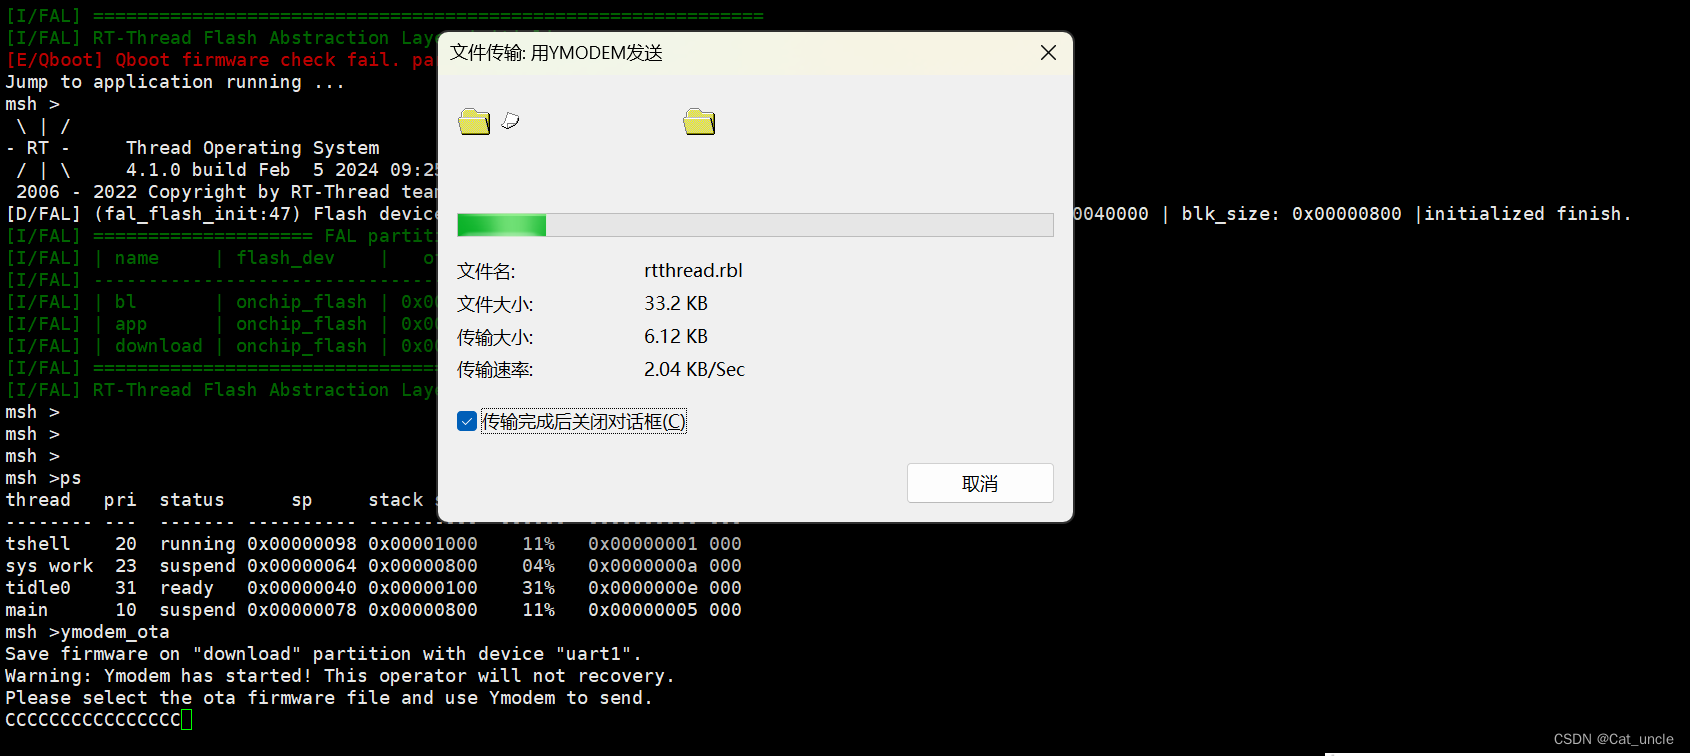
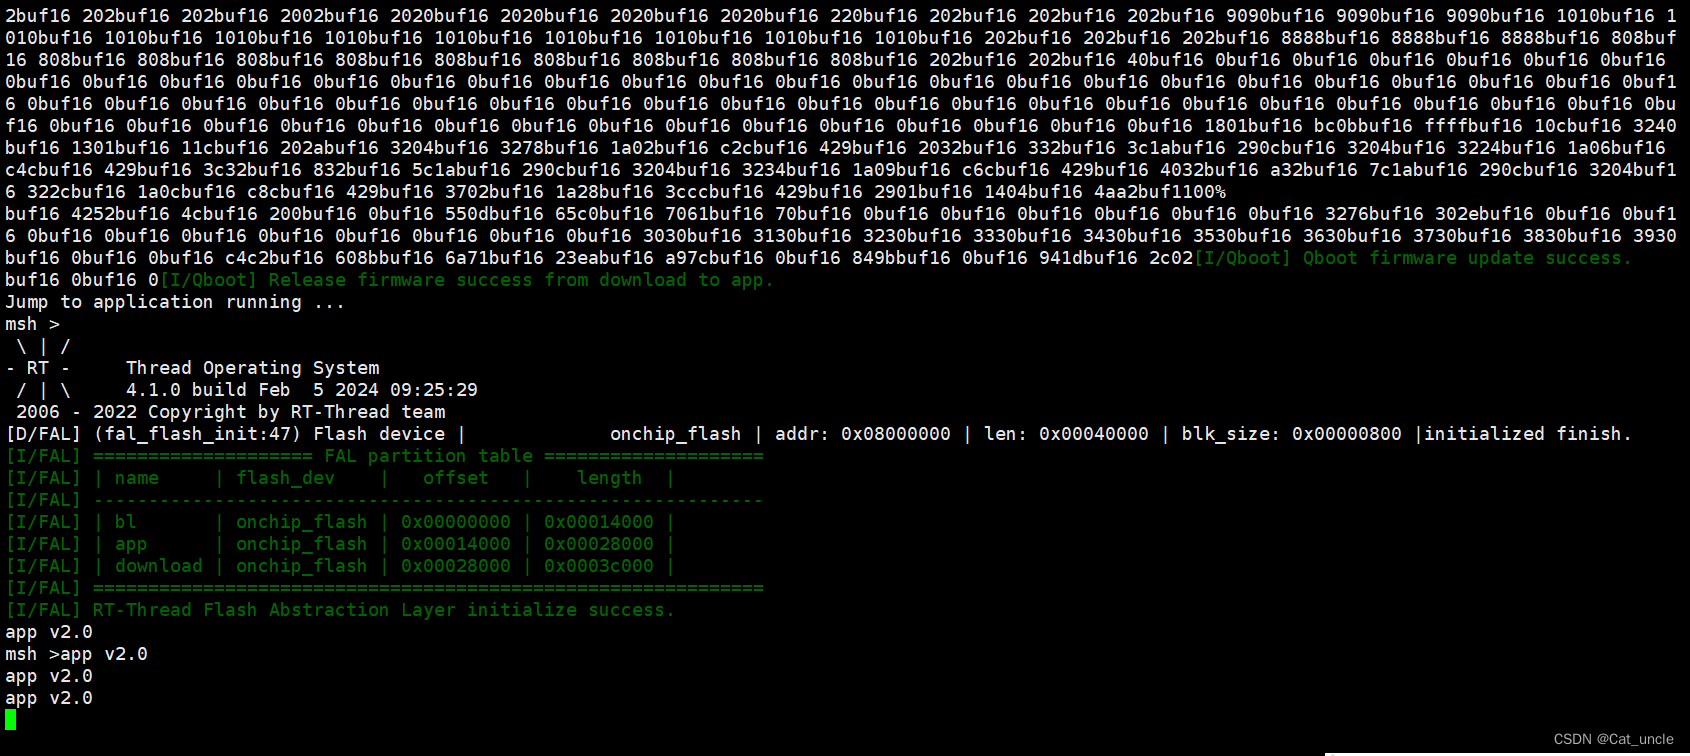
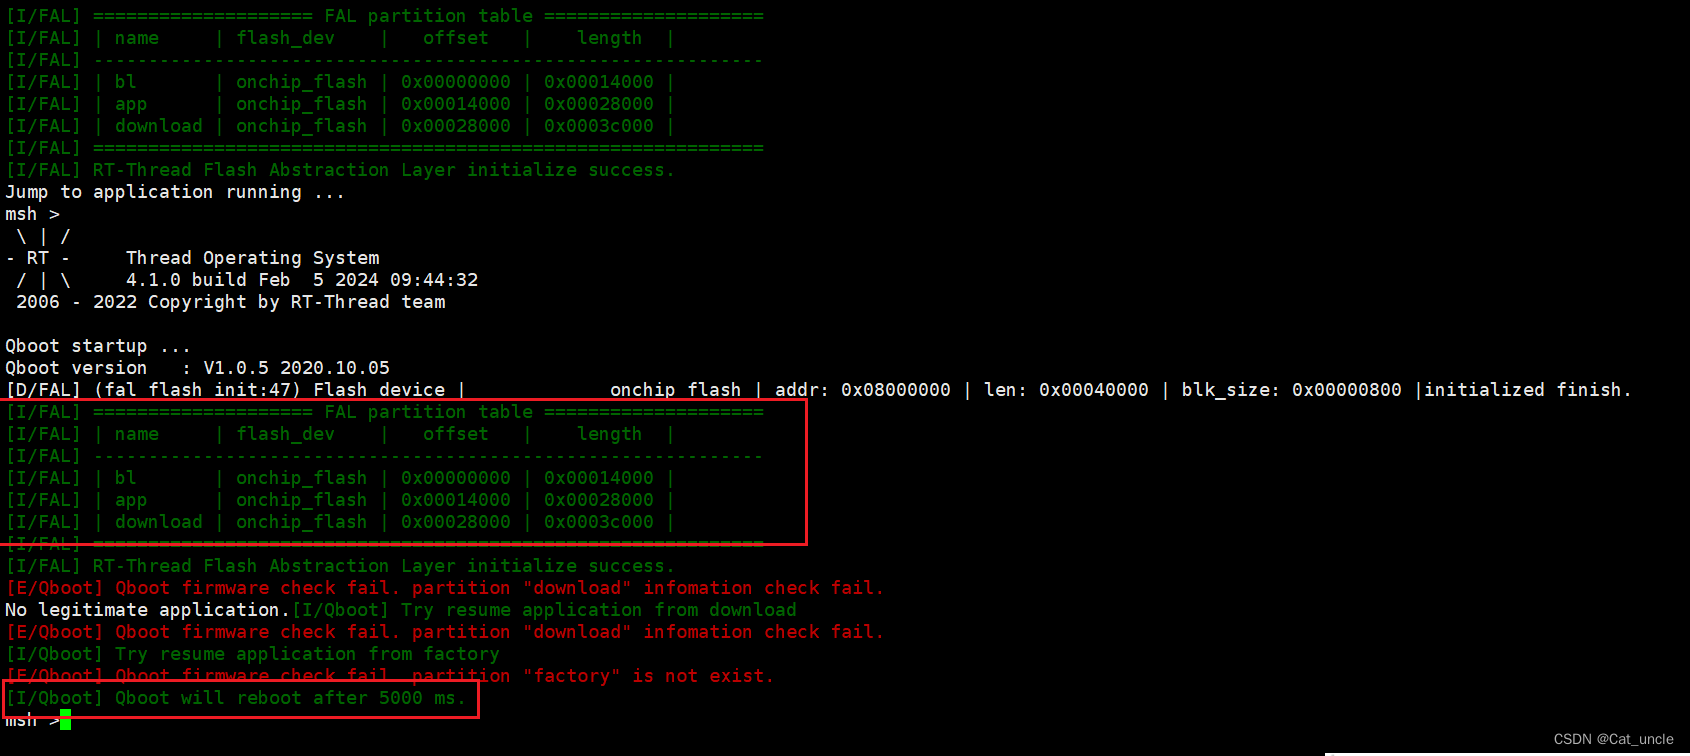
已经ota成功了。


 8953
8953


 被折叠的 条评论
为什么被折叠?
被折叠的 条评论
为什么被折叠?
 到【灌水乐园】发言


